NUK 10.251.010 User manual

Art.-Nr. 10.251.010
NUKVaporisator
NUK Steam Steriliser
Bedienungsanleitung
Operating Instructions
Vaporisator 04/10 Seite 1 Freitag, 30. Juli 2010 11:07 11
zur Verfügung gestellt von Gebrauchs.info
Aktualisierungsstand Gebrauchs.info November 2013

Deutsch
Bitte Ausklappseite beachten . . . . . . . . . . . . . . . . . . . . . . . . . . . . . . . . . . . . . . . . . . . . . . . 3
English
Please see inside cover fold-out page . . . . . . . . . . . . . . . . . . . . . . . . . . . . . . . . . . . . . . . . 8
Français
Veuillez tenir compte des informations fournies sur les rabats . . . . . . . . . . . . . . . . . . . 13
Español
Observar la portada plegable. . . . . . . . . . . . . . . . . . . . . . . . . . . . . . . . . . . . . . . . . . . . . . 18
Português
É favor observar a folha desdobrável. . . . . . . . . . . . . . . . . . . . . . . . . . . . . . . . . . . . . . . . 23
Italiano
Leggere attentamente la pagina pieghevole . . . . . . . . . . . . . . . . . . . . . . . . . . . . . . . . . . . 29
Ελληνικά
Παρακαλούμε προσέξτε την ξεδιπλούμενη σελίδα . . . . . . . . . . . . . . . . . . . . . . . . . 35
Türkçe
Lütfen açılan resimli sayfayı dikkate alınız. . . . . . . . . . . . . . . . . . . . . . . . . . . . . . . . . 41
. . . . . . . . . . . . . . . . . . . . . . . . . . . . . . . . . . . . . . . . . . . . . . 47
Polski
Przy czytaniu proszę korzystać z rozkładanej strony. . . . . . . . . . . . . . . . . . . . . . . . . 53
Vaporisator 04/10 Seite 1 Freitag, 30. Juli 2010 11:07 11
zur Verfügung gestellt von Gebrauchs.info
Aktualisierungsstand Gebrauchs.info November 2013

K
L
M
N
O
P
Vaporisator 04/10 Seite 1 Freitag, 30. Juli 2010 11:07 11
zur Verfügung gestellt von Gebrauchs.info
Aktualisierungsstand Gebrauchs.info November 2013

4
5
6
9
10
11 12 13 14
1
2
3
7
8
Vaporisator 04/10 Seite 1 Freitag, 30. Juli 2010 11:07 11
zur Verfügung gestellt von Gebrauchs.info
Aktualisierungsstand Gebrauchs.info November 2013

AB
C
D
E
G
H
I
F
Vaporisator 04/10 Seite 2 Freitag, 30. Juli 2010 11:07 11
zur Verfügung gestellt von Gebrauchs.info
Aktualisierungsstand Gebrauchs.info November 2013

Vaporisator 04/10 Seite 2 Freitag, 30. Juli 2010 11:07 11
zur Verfügung gestellt von Gebrauchs.info
Aktualisierungsstand Gebrauchs.info November 2013

3
Liebe Eltern,
Sie haben sich für unserenVaporisator entschie-
den. Und damit für Qualität und Sicherheit. Jetzt
desinfizieren Sie Babyflaschen und Flaschenzu-
behör ganz leicht und zuverlässig. Krankheitser-
regende Keime, gegen die sich ein
Neugeborenes noch nicht ausreichend wehren
kann, werden so vollständig abgetötet. Die des-
infizierten Teile sind sofort wieder einsetzbar.
Unser Vaporisator kann aber noch mehr: er
wächst mit Ihrem Baby und wird zum Dampf-
gargerät für die schonende Zubereitung von
Babykost.
Lesen Sie diese Bedienungsanleitung vor dem
ersten Gebrauch des Gerätes sorgfältig durch.
Wir wünschen Ihrem Baby eine gesunde
Entwicklung.
1. Bestandteile des Vaporisators
1
Dampfauslass
2
Deckel
3
Griff
4
Oberer Korb
5
Flaschenhalterung
6
Flaschenzange
7
Unterer Korb
8
Tropfschalen-Verriegelung
9
Tropfschale
10
Verdampferschale/Heizplatte
11
Kontrolllampe
12
Ein-Schalter (mit Markierung)
13
Aus-Schalter
14
Netzkabel mit Stecker
Ohne Abbildung: Unter dem Gerät befindet sich
eine Kabelaufwicklung.
2. Sicherheitshinweise
• Vaporisator nur zur Desinfektion von Baby-
flaschen und deren Zubehör sowie zum
Zubereiten von Babymahlzeiten verwenden.
Bei nicht bestimmungsgemäßem Gebrauch
können erhebliche Gefahrenquellen für den
Benutzer entstehen.
• Die Netzspannung muss mit den auf der
Geräteunterseite angegebenen Spannungs-
werten übereinstimmen.
• Wenn das Netzkabel
14
beschädigt ist, muss
es durch den Hersteller, seinen Kunden-
dienst oder eine ähnlich qualifizierte Person
ersetzt werden, um Gefährdungen zu ver-
meiden.
• Dieses Gerät ist nicht dafür bestimmt,
durch Personen (einschließlich Kinder) mit
eingeschränkten physischen, sensorischen
oder geistigen Fähigkeiten oder mit mangel-
hafter Erfahrung und/oder mit mangelhaf-
tem Wissen benutzt zu werden, es sei denn,
sie werden durch eine für ihre Sicherheit
zuständige Person beaufsichtigt oder erhiel-
ten von ihr Anweisungen, wie das Gerät zu
benutzen ist.
• Vaporisator außerhalb der Reichweite von
Kleinkindern betreiben. Die Zuleitung
sicher verlegen, das Gerät könnte sonst am
Netzkabel heruntergezogen werden.
• Kinder erkennen nicht die Gefahren, die
beim Umgang mit Elektrogeräten entstehen
können. Deshalb Kinder niemals unbeauf-
sichtigt lassen, damit sie nicht mit dem
Gerät spielen.
• Die Standfläche für das Gerät muß trocken
und eben sein.
• Füllen Sie das Gerät nie ganz mit Wasser.
Tauchen Sie das Gerät nie in Wasser ein.
Vaporisator 04/10 Seite 3 Freitag, 30. Juli 2010 11:07 11
zur Verfügung gestellt von Gebrauchs.info
Aktualisierungsstand Gebrauchs.info November 2013

4
• Setzen Sie das Gerät nie ohne Wasser in
Betrieb.
• Den Vaporisator während des Betriebes
nicht transportieren.
• Die Geräteoberflächen werden während
des Betriebes sehr heiß. Daher nur am dafür
vorgesehenen Griff oder den Schaltern
berühren.
• Die Flaschen sind direkt nach der Desinfek-
tion sehr heiß und sollten nur mit der beilie-
genden Flaschenzange entnommen werden.
• Verwenden Sie die imVaporisator zubereite-
ten Lebensmittel sofort weiter, halten Sie
diese nicht über einen längeren Zeitraum
warm.
• Prüfen Sie unbedingt vor der Babymahlzeit
die Temperatur des zubereiteten Breis
durch Abschmecken.Verbrühungsgefahr!
• Trennen Sie nach dem Gebrauch das Gerät
vom Netz, damit es nicht unbeabsichtigt
eingeschaltet werden kann.
• Benutzen Sie den Vaporisator nur, wenn
Gerät und Netzkabel intakt sind.
• Das Gerät darf nur von einer Fachwerkstatt
geöffnet werden. Andernfalls erlischt die
Garantie.
• Reparaturen dürfen nur von Fachkräften
durchgeführt werden. Durch unsachgemäße
Reparaturen können erhebliche Gefahren-
quellen für den Benutzer entstehen.
3. Desinfektion von Babyflaschen, Saugern und Zubehör
3.1 Allgemeines zur Desinfektion
Neugeborene haben anfangs noch nicht genü-
gend Abwehrstoffe, um sich selbst ausreichend
gegen Krankheitserreger (pathogene Keime) zu
schützen.
Bei der Zubereitung der Säuglingsnahrung sind
keimfreie Sauger und Babyflaschen daher eine
wichtigeVoraussetzung.
Schon kleinste Nahrungsmittelreste an den Saugern
und Babyflaschen können leicht zu einer gesund-
heitsgefährdenden Bakterienbildung führen.
Der Vaporisator arbeitet mit der Heiß-Desin-
fektions-Methode. Dabei wird Wasser auf 95 -
97 °C erhitzt. Der so entstehende Wasser-
dampf desinfiziert die eingelegten Teile schnell
und zuverlässig, indem er sie gleichmäßig
umgibt.
Die Sauger und Babyflaschen kommen also nur
mit Wasserdampf in Berührung. Durch die
geringe Menge Wasser, die der Vaporisator zur
Desinfektion verbraucht, wird auch nur wenig
Strom benötigt.
3.2 Desinfektion
Achtung:
Alle zu desinfizierenden Teile müssen
gründlich gespült und von sämtlichen Nahrungs-
resten befreit werden.
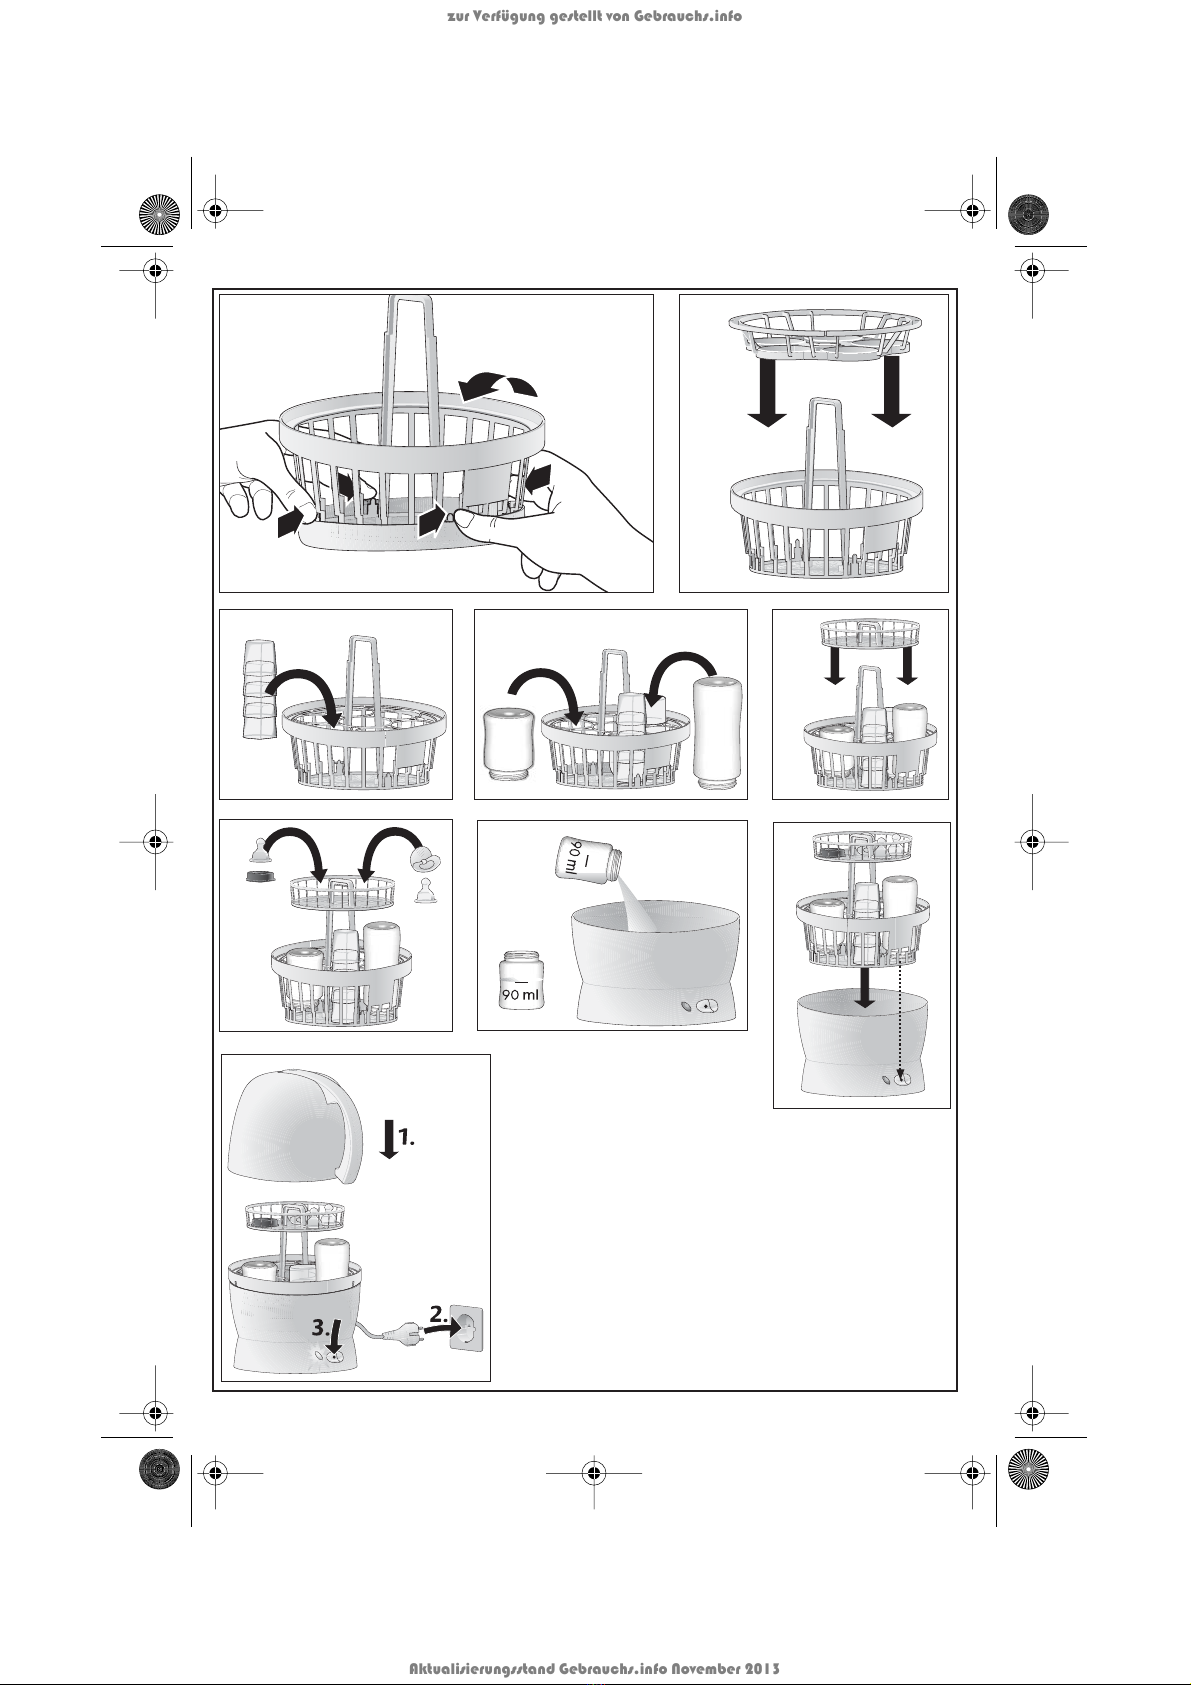
Die Abbildungen
A
bis
I
zur Desinfektion finden
Sie auf der Ausklappseite.
1. Drücken Sie drei der vier Verriegelungen
8
am Fuß des unteren Korbes
7
nach innen.
Die Tropfschale
9
läßt sich nun nach unten
wegklappen (Abb.
A
).
2. Setzen Sie die Flaschenhalterung
5
in den
unteren Korb
7
ein (Abb.
B
).
3. Stellen Sie die übereinander gesteckten Ver-
schlusskappen mit der Öffnung nach unten in
einen Ring der Flaschenhalterung hinein
(Abb.
C
).
4. Stellen Sie die Babyflaschen über Kopf in den
unteren Korb in die freien Ringe (Abb.
D
).
5. Stecken Sie den oberen Korb
4
auf den Griff
des unteren Korbes (Abb.
E
).
6. Legen Sie Sauger und Babyflaschenzubehör
in den oberen Korb. Diese dürfen auch lok-
ker geschüttet sein (Abb.
F
).
Vaporisator 04/10 Seite 4 Freitag, 30. Juli 2010 11:07 11
zur Verfügung gestellt von Gebrauchs.info
Aktualisierungsstand Gebrauchs.info November 2013

5
7. Geben Sie 90 ml Leitungswasser in die Ver-
dampferschale
10
(Abb.
G
).
8. Stellen Sie den befüllten Korb so in das
Gerät, dass die Gravur nach vorne zum
Schalter zeigt (Abb.
H
).
Achtung:
In allen anderen Stellungen
schließt der Deckel nicht vollständig, so dass
Wasserdampf austreten kann undWasser am
Gerät herabfließt.
9. Setzen Sie den Deckel
2
auf das Gerät, stek-
ken Sie den Stecker
14
in die Steckdose und
schalten Sie das Gerät mit dem Ein-Schalter
12
(mit Markierung) ein. Die Kontrolllampe
11
leuchtet (Abb.
I
).
10.Der Vaporisator schaltet sich nach der Des-
infektion automatisch ab.
3.3 Beachten Sie bitte:
• Eine Desinfektion dauert ca. 15 Minuten.
• Eine Desinfektion ist nur garantiert, wenn
der Desinfektionsvorgang nicht unterbro-
chen und nicht verkürzt wird.
• Verwenden Sie bitte ausschließlich normales
Leitungswasser ohne weitere Zusätze.
• Sorgen Sie für eine regelmäßige Entkalkung,
gemäß Abschnitt „Entkalken” auf Seite 7,
damit die Funktionsfähigkeit erhalten bleibt.
4. Garen von Lebensmitteln
4.1 Allgemeines zum Garen
Das schonende Verfahren des Dampfgarens
ermöglicht einen hohen Erhalt an Vitaminen in
den Nahrungsmitteln. Mit geringem Arbeitsauf-
wand kann so schnell eine frische Portion Baby-
kost zubereitet werden. Die Garzeiten leiten
sich direkt von der jeweils eingesetzten Wasser-
menge ab. Ist das Wasser verdampft, schaltet
sich das Gerät automatisch ab.
In der folgenden Tabelle finden Sie die erforder-
lichen Wassermengen und zugehörigen Garzei-
ten für einige Grundnahrungsmittel.
Hinweis:
Diese getesteten Wassermengen und
Garzeiten können je nach Lebensmittelqualität
leicht variieren.
Die erforderlichenWassermengen für die Zube-
reitung anderer Lebensmittel lassen sich anhand
der Garzeiten-Tabelle leicht ermitteln.
4.2 Garzeiten-Tabelle:
Bitte berücksichtigen Sie, dass pro Garvorgang
nicht mehr als insgesamt 500 g Lebensmittel
gegart werden sollten.
Lebensmittel Wasser Ca.-Garzeit
Äpfel 100 ml 20 min
Birnen 100 ml 20 min
Blumenkohl 150 ml 30 min
Brokkoli 100 ml 20 min
Erbsen 100 ml 20 min
Fenchel 100 ml 20 min
Fisch 50 ml 10 min
Geflügelfleisch 150 ml 30 min
grüne Bohnen 100 ml 20 min
Karotten 200 ml 40 min
Kartoffeln 100 ml 20 min
Kohlrabi 150 ml 30 min
Pfirsich 100 ml 20 min
Rind-/Schweine-
fleisch
150 ml 30 min
Tomaten 100 ml 20 min
Zucchini 100 ml 20 min
Ca.-Garzeit Wassermenge
10 min. 50 ml
20 min. 100 ml
30 min. 150 ml
40 min. 200 ml
50 min. 250 ml
Lebensmittel Wasser Ca.-Garzeit
Vaporisator 04/10 Seite 5 Freitag, 30. Juli 2010 11:07 11
zur Verfügung gestellt von Gebrauchs.info
Aktualisierungsstand Gebrauchs.info November 2013

6
4.3 Garen
Die Abbildungen
K
bis
P
zum Garen von
Lebensmitteln finden Sie auf der Ausklappseite.
1. Stecken Sie die Tropfschale
9
von unten auf
den Korb
7
. Achten Sie darauf, dass alle vier
Verriegelungen
8
komplett einrasten
(Abb.
K
).
Achtung:
Zum Garen müssen Sie unbedingt
die Tropfschale
9
anbringen, da sonst austre-
tender Gemüse- oder Obstsud auf die Heiz-
platte tropfen und dort anbrennen würde.
2. Schneiden Sie die gewaschenen und geschäl-
ten Lebensmittel in ca. 1 cm große Würfel
(Abb.
L
).
3. Geben Sie die Lebensmittelwürfel in den
unteren Korb
7
(Abb.
M
).
4. Geben Sie die erforderliche Wassermenge in
die Verdampferschale
10
. Die erforderliche
Wassermenge entnehmen Sie bitte den
Tabellen weiter oben.
Achtung:
Das Wasser muss unten in die
Verdampferschale mit der Heizplatte und
nicht in den Korb mit der Tropfschale gege-
ben werden, da sonst das Gerät nicht funk-
tioniert (Abb.
N
).
5. Setzen Sie den Korb mit den Lebensmitteln
in das Gerät ein (Abb.
O
).
6. Setzen Sie den Deckel
2
auf das Gerät, stek-
ken Sie den Stecker
14
in die Steckdose und
schalten Sie das Gerät mit dem Ein-Schalter
12
(mit Markierung) ein. Die Kontrolllampe
11
leuchtet (Abb.
P
).
Das Gerät schaltet sich nach dem Garen auto-
matisch ab.
Achtung:
Da der Vaporisator sowie der Korb-
einsatz nach dem Garen noch heiss sein können,
bitte Nahrungsmittel vorsichtig entnehmen.
Es ist möglich, den Garvorgang mit dem Aus-
Schalter
13
zu stoppen.
Sind die Lebensmittel noch nicht gar, sollten 50
ml Wasser nachgeschüttet und der Garvorgang
fortgesetzt werden. Beachten Sie bitte, dass das
Gerät sich nach der automatischen Abschaltung
erst nach einer Pause von einer Minute wieder
anschalten lässt.
4.4 Gleichzeitiges Garen mehrerer
Lebensmittel
Sie können auch Lebensmittel mit unterschiedli-
chen Garzeiten zur gleichen Zeit garen. Gehen
Sie wie im folgenden Beispiel (je 100 g Rind-
fleisch + Erbsen) vor:
1. Rindfleisch muss 10 min. länger als Erbsen
garen. Geben Sie daher zuerst das Fleisch
mit 50 ml Wasser für 10 min. Garzeit (siehe
Garzeiten-Tabelle) in das Gerät. Nach 10
min. schaltet sich das Gerät ab.
2. Geben Sie nun die Erbsen und 100 ml Was-
ser für die restlichen 20 min. Garzeit in das
Gerät. Setzen Sie den Garvorgang fort.
Nach weiteren 20 min. Garen sind beide
Lebensmittel gleichzeitig fertig und das Gerät
schaltet sich automatisch ab.
5. Reinigung und Pflege des Gerätes
5.1 Reinigung
Ziehen Sie immer den Netzstecker, bevor Sie
das Gerät reinigen.
Reinigen Sie das Gerät nur im abgekühlten
Zustand. Verwenden Sie keine scharfen Reini-
gungs- oder Scheuermittel, da diese die Ober-
flächen angreifen können.
Wischen Sie die Verdampferschale
10
und den
Deckel 2nach jeder Benutzung mit einem
feuchten Tuch aus.
Zum Reinigen kann die Tropfschale 9vom unte-
ren Korb 7entfernt werden:
• Drücken Sie wie in Abbildung Adrei der
vier Verriegelungen 8am Fuß des Korbein-
Vaporisator 04/10 Seite 6 Freitag, 30. Juli 2010 11:07 11
zur Verfügung gestellt von Gebrauchs.info
Aktualisierungsstand Gebrauchs.info November 2013

7
satzes nach innen. Die Tropfschale 9läßt
sich nun nach unten wegklappen.
Um die Tropfschale 9wieder an den Korb zu
montieren, drücken Sie den Korb in die
Tropfschale, bis die Verriegelungen 8einra-
sten.
Obere und untere Körbe 4+ 7, Flaschenhalte-
rung 5, Tropfschale 9und Flaschenzange 6sind
spülmaschinenfest.
Hinweis: Die natürlichen Farbstoffe aus
Lebensmitteln können an den Kunststoffteilen
bleibende Verfärbungen hinterlassen. Dennoch
läßt sich weiterhin mit diesem Gerät zuverlässig
desinfizieren.
5.2 Entkalken
Nach einiger Zeit wird sich durch den Kochvor-
gang Kalk in der Verdampferschale desVaporisa-
tors absetzen (je nach Härtebereich des
verwendeten Leitungswassers). Diesen sollten
Sie in regelmäßigen Abständen entfernen, um
die Funktionsfähigkeit des Gerätes sicherzustel-
len. Verkalkungen können die Leistung beim
Garen und beim Desinfizieren erheblich ver-
schlechtern.
Hinweis: Bei leichten Verkalkungen benutzen
Sie am besten das unten beschriebeneVerfahren
mit Haushaltsessig. Bei starken Verkalkungen
sollten Sie einen handelsüblichen Entkalker ver-
wenden. Beachten Sie dabei die Anwendungs-
hinweise für den Entkalker.
• Zum Entkalken 100 ml heißes Wasser mit
100 ml Haushaltsessig mischen und in die
Verdampferschale einfüllen. Die Lösung 30
Minuten einwirken lassen und weggießen.
Das Gerät anschließend mit einem feuchten
Tuch auswischen.
6.Technische Daten
Spannung: 230V~/50 Hz
Leistungsaufnahme: 380 Watt
7. Garantie
Bei sorgfältiger Behandlung und Beachtung der
Bedienungsanleitung gewährleistet der Herstel-
ler 2 Jahre Garantie ab Kaufdatum.
Wir verpflichten uns, das Gerät kostenlos
instandzusetzen, soweit es sich um Material-
oder Konstruktionsfehler handelt. Weitere
Ansprüche sind ausgeschlossen.
Schäden, die sich aus der unsachgemäßen
Benutzung des Gerätes ergeben, werden nicht
ersetzt. Zuleitung und Stecker sind von der
Garantie ausgeschlossen, soweit es sich um Ver-
schleiß handelt. Innerhalb der ersten 2 Jahre ab
Kaufdatum beseitigen wir die als berechtigt
anerkannten Mängel ohne Abrechnung der ent-
standenen Nebenkosten. Die Kostenübernahme
ist vorher zu klären. Dazu wenden Sie sich bitte
an den NUK Eltern-Service, Telefonnummer
01801/62 72 46 (0,04 EUR/min).
Die Einsendung des Gerätes muss in jedem Fall
unter Beifügung des Garantiescheines oder des
Kaufbeleges erfolgen.
Ohne Nachweis des Kaufdatums erfolgt eine
Kostenanrechnung ohne Rückfrage. Die Rück-
sendung erfolgt dann per Nachnahme.
Garantieschein bitte sofort beim Kauf ausfüllen
lassen und sorgfältig aufbewahren. Verloren
gegangene Garantiescheine werden nicht
ersetzt.
Den Garantieschein finden Sie am Ende dieses
Heftes.
Vaporisator 04/10 Seite 7 Freitag, 30. Juli 2010 11:07 11
zur Verfügung gestellt von Gebrauchs.info
Aktualisierungsstand Gebrauchs.info November 2013

8
Dear Parent,
Thank you for buying a NUK Steam Steriliser.
Please read carefully the following operating
instructions before attempting to use your
steam steriliser for the first time.
You have chosen a high quality product which is
safe, reliable and easy to use. By sterilising your
baby’s feeding equipment in a NUK steam steri-
liser you are destroying the pathogenic germs to
which new born babies do not have adequate
resistance to. Once your baby’s feeding equip-
ment has been sterilised it can be used again.
The NUK Steam Steriliser can also be used to
steam your baby’s food when they begin wean-
ing.This is a great and healthy way to cook your
baby’s food because steaming helps retain the
high levels of vitamins within the food.
We hope that you and your baby enjoy the bene-
fits of your new NUK Steam Steriliser.
1. Steam Steriliser Parts
1Steam outlet
2Lid
3Handle
4Top basket
5Bottle holder
6Bottle tongs
7Bottom basket
8Drip tray lock
9Drip tray
10 Evaporation tray/hotplate
11 Indicator lamp
12 On switch (with marking)
13 Off switch
14 Mains cable and plug
Not shown: underneath the unit is a device for
storing the power supply cable.
2. Safety Instructions
• Only use the steam steriliser for sterilising
baby’s feeding bottles and accessories, and
for steaming your baby’s food. Do not use it
for any other purpose, as it could present a
safety hazard.
• The mains voltage must be the same as that
shown on the base of the unit.
• If the supply cord 14 is damaged, it must be
replaced by the manufacturer, its service
agent or similarly qualified persons in order
to avoid a hazard.
• This appliance is not intended for use by
persons (including children) with reduced
physical, sensory or mental capabilities or
with lack of experience and/or lack of
knowledge, unless supervised by a person
responsible for their safety or given
instructions on the use of the appliance by
such a person.
• Only operate the steam steriliser when it is
safely out of reach of small children,
ensuring that the power supply cable is
safely positioned, so that the unit cannot be
pulled over.
• Children do not recognise the dangers that
can arise when using electrical appliances.
Please ensure children are not left
unsupervised to play with the appliance.
• Make sure the surface the steam steriliser is
on is dry and level.
• Never fill the steriliser full of water or
immerse it in water.
• Never operate the unit without water – see
point 7. on page 9.
• Do not move/transport the unit whilst it’s in
use.
Vaporisator 04/10 Seite 8 Freitag, 30. Juli 2010 11:07 11
zur Verfügung gestellt von Gebrauchs.info
Aktualisierungsstand Gebrauchs.info November 2013

9
• When the steriliser is in operation the
surface can become very hot, so only touch
the unit on the handle or the switches.
• After sterilisation, carefully remove the
feeding bottles with the bottle tongs
provided, as the bottles will be very hot.
• Food prepared in the steam steriliser should
be used immediately, and should not be kept
warm for a prolonged period. The food
should also not be reheated.
• To avoid the risk of scalding, please carefully
check the temperature of the food first
before feeding it to your baby.
• After use, disconnect from the power
supply immediately, to avoid the steam
steriliser being turned on accidentally.
• Before each use, carefully check the power
supply cable for damage. Do not use the
steam steriliser if the power supply cable is
damaged in any way.
• The steam steriliser should only be
dismantled by an approved agent otherwise
the guarantee becomes invalid.
• Repairs should only be carried out by an
approved agent. Repairs carried out by a
non approved agent cannot be guaranteed
and could cause a safety hazard.
3. Sterilising baby feeding bottles, teats and accessories
3.1 General sterilising information
Newborn babies initially do not have an ade-
quate resistance to protect them against patho-
genic germs which may cause illness.
This means that when you prepare infant feeds
it is vital that the bottles, teats, etc. are properly
sterilised so they are germ free.
Even tiny feed residues left on teats and bottles
can easily lead to bacteria forming.
The steam steriliser works by the heat-sterilisa-
tion method where water is heated to 95 -
97 °C and the steam generated then rapidly
sterilises the items.
The small quantity of water the steam steriliser
uses for sterilising means that very little energy
is required.
3.2 Sterilisation
Please note: all parts which are to be sterilised
must first be thoroughly washed and rinsed to
remove all visible feed residues.
Figures Ato Irelating to sterilising can be found
on the inside cover of the fold-out page.
1. Press in three of the four locks 8on the base
of the basket 7.The drip tray 9can now be
put away as this is only used when steaming
food (Fig. A).
2. Place the bottle holder 5in the bottom of
the basket 7(Fig. B).
3. Place the caps which have been stacked
together with the opening facing down in a
ring in the bottle holder (Fig. C).
4. Insert the baby feeding bottles upside down into
the vacant rings in the bottom basket (Fig.
D
).
5. Fit the top basket 4onto the handle of the
bottom basket (Fig. E).
6. Place the teats and the baby feeding bottle
accessories in the top basket (Fig.
F
).
7. Add 90 ml of tapwater to the evaporation
tray 10 (Fig. G).
8. Place the filled basket in the unit so that the
engraving is pointing towards the switch at
the front (Fig. H).
Please note: if the basket is not correctly
positioned the lid may not fit correctly and
steam and water may escape from the unit.
9. Place the lid 2on the unit, insert the plug 14
into the socket and switch on the unit using
the On switch 12 (marked). The indicator
lamp 11 will light up (Fig. I).
Vaporisator 04/10 Seite 9 Freitag, 30. Juli 2010 11:07 11
zur Verfügung gestellt von Gebrauchs.info
Aktualisierungsstand Gebrauchs.info November 2013

10
10.The steam steriliser switches off automati-
cally once sterilisation is complete.
3.3 Please note:
• Sterilising takes approx. 15 minutes.
• Sterilisation is guaranteed only if the
sterilising process is not interrupted or cut
short.
• Use only normal tapwater without additives
of any kind.
• Make sure you carry out regular descaling
according to the section "Descaling" on
page 11 to ensure that your NUK Steam
Steriliser is kept in optimal condition.
4. Steaming/Cooking Food
4.1 General information about
steaming/cooking food
The gentle steaming method used to cook food
helps to retain a high level of vitamins within the
food. Steaming allows you to quickly and easily
prepare a fresh and healthy portion of baby
food. Cooking times are derived directly from
the amount of water used in each case. Once
the water has evaporated, the unit switches off
automatically.
In the table below, you will find the quantities of
water required and the associated cooking
times for some basic foods.
Note: these tested quantities of water and
cooking times may vary slightly depending on
the food quality.
The quantities of water required for preparing
other foods can easily be determined using the
cooking times table.
4.2 Steaming/Cooking times table:
Please note: no more than 500g of food should
be cooked in any one batch.
4.3 Cooking
Figures Kto Pfor cooking food can be found
on the fold-out page.
1. Fit the drip tray 9onto the bottom of the bas-
ket 7from below.When doing so, make sure
that all four locks 8snap into place (Fig. K).
Attention: When cooking food you must
always make sure that you attach the drip
tray 9. Otherwise water escaping from vege-
tables or fruit will drip onto the hotplate and
burn.
2. Cut the washed and peeled food into cubes
approx. 1 cm in size (Fig. L).
Food Water Approx.
cooking time
Apples 100 ml 20 min.
Broccoli 100 ml 20 min.
Beef/Pork 150 ml 30 min.
Carrots 200 ml 40 min.
Cauliflower 150 ml 30 min.
Courgettes 100 ml 20 min.
Fennel 100 ml 20 min.
Fish 50 ml 10 min.
Green Beans 100 ml 20 min.
Kohlrabi 150 ml 30 min.
Peach 100 ml 20 min.
Pears 100 ml 20 min.
Peas 100 ml 20 min.
Potatoes 100 ml 20 min.
Poultry 150 ml 30 min.
Tomatoes 100 ml 20 min.
Approx. cooking
time
Quantity of water
10 min. 50 ml
20 min. 100 ml
30 min. 150 ml
40 min. 200 ml
50 min. 250 ml
Vaporisator 04/10 Seite 10 Freitag, 30. Juli 2010 11:07 11
zur Verfügung gestellt von Gebrauchs.info
Aktualisierungsstand Gebrauchs.info November 2013

11
3. Add the cubes of food to the bottom basket
7(Fig. M).
4. Add the necessary amount of water to the
evaporation tray 10. Refer to the tables
above for the amount of water required.
Attention:The water must be added to the
bottom of the evaporation tray with the hot-
plate and not to the basket with the drip tray
or the unit will not function (Fig. N).
5. Place the basket with the food in the unit
(Fig. O).
6. Place the lid 2on the unit, insert the plug 14
into the socket and switch the unit on with
the On switch 12 (marked). The indicator
lamp 11 lights up (Fig. P).
The unit switches off automatically after
cooking.
Please Note: As the steam steriliser and the
basket may still be hot after cooking, please
remove food carefully.
The cooking process can be stopped with the
Off switch 13.
If the unit has automatically switched itself off
and the food is not yet cooked, add 50 ml of
water and continue to cook. Please note that
the unit cannot be switched back on for one
minute after it has switched itself off automati-
cally.
4.4 Cooking several types of food at
once
You can also cook foods with different cooking
times at the same time. Proceed as in the fol-
lowing example (100 g each of beef and peas).
1. The beef needs to cook for 10 minutes
longer than the peas, so put the meat in first
with 50 ml of water for 10 minutes’ cooking
time (see cooking times table).After 10 min-
utes, the unit switches off.
2. Now put the peas and 100 ml of water into
the unit for the remaining 20 minutes’ cook-
ing time. Continue cooking.
After another 20 minutes’ cooking, both
foods are ready together and the unit swit-
ches off automatically.
5. Cleaning/maintenance of your steam steriliser
5.1 Cleaning
Always unplug the unit before cleaning it.
Clean the unit only once it has cooled down.
Do not use acid or abrasive cleaning agents as
these may damage the surfaces.
Wipe the evaporation tray/hotplate 10 and the
lid 2with a damp cloth after every use.
Drip tray 9can be removed from bottom
basket 7for cleaning.
• Press in three of the four locks 8on the
base of the basket as shown in Figure A.
Drip tray 9can now be folded and put away.
To fit drip tray 9back onto the basket, push
the basket into the drip tray until locks 8
engage.
The top and bottom baskets 4+ 7, bottle
holder 5, drip tray 9and bottle tongs 6are
dishwasher-proof.
Note: Natural dyes from food can leave perma-
nent stains on the plastic parts of your steriliser,
but this does not affect the steam steriliser’s
performance.
5.2 Descaling
After some time (depending on the hardness of
your tapwater), the cooking process will cause
limescale to form in the evaporator tray of the
steam steriliser. You should remove this regu-
larly to ensure the steriliser functions correctly
as limescale can greatly reduce its performance
during cooking and sterilisation.
Vaporisator 04/10 Seite 11 Freitag, 30. Juli 2010 11:07 11
zur Verfügung gestellt von Gebrauchs.info
Aktualisierungsstand Gebrauchs.info November 2013

12
Note: With light scaling the best method to
remove the limescale is household vinegar (see
below). With heavy scaling you should use a
standard descaling product and follow the
manufacturers instructions for its use.
• To descale, mix 100 ml of hot water with
100 ml of household vinegar and pour into
the evaporator tray 10. Leave the solution
for 30 minutes and then pour away. Next
wipe out the unit with a damp cloth to
ensure there is no solution left in the tray.
Do not connect the power supply cable to the
mains during the descaling operation as electric-
ity is not needed.
6.Technical Data
Voltage: 230-240V~/50 Hz
Power consumption: 380 watt
7. Guarantee
If the products condition is well maintained and
the operating instructions are followed, the
manufacturer’s guarantee is valid for 2 years
from the date of purchase.
In the event of defective materials or workman-
ship, the manufacturer’s, at their discretion, can
either repair or replace the product free of
charge within a reasonable time scale.
If the defect is for any reason, not covered by
this guarantee we can repair/replace as neces-
sary but reserve the right to charge for any such
repairs. Please identify in an accompanying note
the full name and address of the person respon-
sible for paying this charge should this circum-
stance arise. Should the guarantee or other
evidence of purchase be unavailable the product
will be repaired/replaced and a charge will be
made for this service and payment will be on
delivery.
The product itself and details of the complaint
must be received by the manufacturer, or the
manufacturer’s representative, within 2 years of
the date of purchase.
Damage caused to the product by misuse and/
or lack of cleaning/maintenance will invalidate
the guarantee.
The power cable and plug are covered by this
guarantee, but this does not extend to normal
wear and tear.
In the event of a complaint, the product must be
returned to the manufacturer, or the manufac-
turers representative, accompanied by the guar-
antee or other proof of purchase date.
Please ensure that this guarantee is completed
by the retailer when you purchase this product.
It should be kept in a safe place. Lost guaran-
tees cannot be replaced.
This guarantee does not affect your statutory
rights.
Vaporisator 04/10 Seite 12 Freitag, 30. Juli 2010 11:07 11
zur Verfügung gestellt von Gebrauchs.info
Aktualisierungsstand Gebrauchs.info November 2013

13
Chers parents,
Le stérilisateur cuiseur vapeur est un produit
performant qui allie qualité et sécurité pour le
bien-être des mamans et leur bébé.
Il désinfecte à la vapeur jusqu'à 6 biberons et
leurs accessoires de manière simple et fiable.
Durant les premiers mois de la vie, le système
immunitaire de bébé est encore fragile. En
stérilisant biberons et tétines, vous éviterez
tout risque de développement de microbes.
Plus tard, le stérilisateur se transforme en
cuiseur vapeur et vous permet de préparer à
bébé des repas sains et riches en vitamines. La
cuisson vapeur, sans ajout de matières grasses,
préserve toutes les qualités nutritionnelles et
les saveurs des aliments.
Lire attentivement le mode d'emploi avant la
première utilisation.
1. Composants du stérilisateur cuiseur vapeur
1Evacuation de la vapeur
2Couvercle
3Poignée
4Panier supérieur
5Support à biberons
6Pince
7Panier inférieur
8Pattes de verrouillage
9Egouttoir
10 Cuve à eau / Plaque chauffante
11 Voyant de contrôle lumineux
12 Interrupteur de marche (avec marquage)
13 Interrupteur d'arrêt
14 Câble et prise secteur
Non illustré : un enrouleur de câble sous
l'appareil.
2. Consignes de sécurité
• Utiliser l'appareil uniquement pour la
stérilisation des biberons et accessoires, et
la cuisson des aliments. Toute autre
utilisation pourrait s'avérer dangereuse.
• Vérifier que la tension de votre installation
électrique est compatible avec l'appareil
(voir les valeurs indiquées sous l'appareil).
• Lorsque le câble secteur 14 est
endommagé, il doit être remplacé par le
fabricant, son S.A.V. ou une personne
qualifiée afin d’éviter des mises en danger.
• L’emploi de cet appareil est interdit aux
personnes (y compris les enfants) souffrant
de capacités physiques, sensorielles ou
mentales restreintes ou ne pouvant pas s'en
servir pour cause d'un manque
d'expériences et / ou de connaissances, sauf
s’ils sont surveillés par une personne
compétente pour la sécurité ou si ladite
personne leur a donné des instructions
d’emploi pour l’appareil.
• Ne pas laisser l'appareil à la portée des
enfants et vérifier que le câble est hors
d'atteinte.
• Les enfants ne sont fréquemment pas à
même d’évaluer correctement les dangers,
risquant ainsi de se blesser. Par conséquent,
ne jamais laisser les enfants sans surveillance
pour qu’ils ne jouent pas avec l’appareil.
• Poser l'appareil sur une surface plane et sèche.
• Ne jamais plonger l'appareil dans l'eau, ni le
remplir complètement d'eau.
• Ne jamais mettre l’appareil en marche sans
eau.
• Ne pas déplacer l'appareil en cours de
fonctionnement.
Vaporisator 04/10 Seite 13 Freitag, 30. Juli 2010 11:07 11
zur Verfügung gestellt von Gebrauchs.info
Aktualisierungsstand Gebrauchs.info November 2013

14
• En marche, l'appareil peut devenir très
chaud. Ne toucher que les poignées et les
interrupteurs.
• Les biberons sont très chauds à leur sortie
du stérilisateur cuiseur vapeur. Les retirer à
l'aide de la pince livrée avec l'appareil.
• Consommer de suite les aliments préparés.
Ne pas les maintenir au chaud trop longtemps.
• Avant de donner à manger à bébé, goûter
les aliments pour en vérifier la température
et éviter tout risque de brûlure !
• Débrancher l'appareil après chaque utilisation
pour éviter toute mise en marche accidentelle.
• Vérifier régulièrement l'état de l'appareil et
de son câble.
• Seule une personne qualifiée est autorisée à
ouvrir l'appareil. Sans quoi, la garantie serait
nulle.
• Les réparations ne doivent être effectuées
que par un professionnel. La manipulation
pourrait s'avérer dangereuse.
3. Désinfection des biberons, des tétines et accessoires
3.1 Généralités relatives à la
désinfection
Les nouveaux-nés n'ont pas suffisamment d'anti-
corps pour se protéger contre les microbes. Il
est donc indispensable de stériliser biberons et
tétines durant les 4 premiers mois. Attention à
bien les nettoyer auparavant : de simples traces
de lait peuvent entraîner la propagation des
bactéries.
L'appareil fonctionne selon le principe de la
stérilisation à chaud. L'eau est portée à 95-97°C
et se transforme en vapeur pour une
désinfection fiable et rapide. Il s'agit d'un
procédé naturel qui consomme peu d'électricité
compte tenu de la faible quantité d'eau utilisée.
3.2 Désinfection
Attention : Tous les biberons et accessoires
doivent être soigneusement nettoyés pour ôter
tout résidu de nourriture, avant la désinfection.
Les figures Aà Isont reproduites sur la face
rabattable de la notice.
1. Appuyer sur trois des quatre pattes de
verrouillage 8sur le socle du panier inférieur
7. L’égouttoir 9peut être rabattu vers le bas
(fig. A).
2. Poser le support à biberons 5dans le panier
inférieur 7(fig. B).
3. Placer les capuchons empilés les uns au-
dessus des autres, l’ouverture vers le bas,
dans une ouverture du support à biberons
(fig. C).
4. Poser les biberons, la tête en bas, dans le panier
inférieur dans les espaces libres (fig.
D
).
5. Placer le panier supérieur 4sur la poignée
du panier inférieur (fig. E).
6. Placer les tétines et les bagues dans le panier
supérieur. Ceux-ci peuvent également être
légèrement empilés (fig. F).
7. Ajouter 90 ml d’eau du robinet dans la cuve
à eau 10 (fig. G).
8. Poser le panier rempli dans l’appareil de
manière à ce que la gravure soit tournée vers
l’avant et vers l’interrupteur (fig. H).
Attention : le couvercle ne ferme pas
complètement dans toutes les autres
positions, ce qui peut entraîner une sortie de
vapeur et un écoulement de l’eau sur
l’appareil.
9. Poser le couvercle 2sur l’appareil, brancher
la prise secteur 14 et allumer l’appareil avec
l’interrupteur de marche 12 (avec
marquage). Le voyant de contrôle lumineux
11 est allumé (fig. I).
10.L'appareil s'arrête automatiquement à la fin
du processus de désinfection.
Vaporisator 04/10 Seite 14 Freitag, 30. Juli 2010 11:07 11
zur Verfügung gestellt von Gebrauchs.info
Aktualisierungsstand Gebrauchs.info November 2013

15
3.3 Attention à bien respecter les
points suivants :
• Toujours se laver les mains avant de
préparer un biberon.
• La stérilisation dure environ 15 minutes.
• Une totale désinfection n'est garantie que si
le processus n'est pas interrompu.
• Utiliser l'eau du robinet sans aucun additif.
• Veiller à effectuer un détartrage régulier
conformément au paragraphe
« Détartrage » de la page 17 afin que
l’appareil puisse continuer à fonctionner.
4. La cuisson vapeur
4.1 Introduction sur le principe de la
cuisson vapeur
Le procédé de cuisson ou stérilisateur cuiseur
vapeur permet de préserver une grande partie
des vitamines des aliments. Idéal pour préparer
rapidement les petits plats de bébé avec des
produits frais. Le temps de cuisson est
directement lié à la quantité d'eau présente
dans l'appareil : l'arrêt automatique se
déclenche lorsque toute l'eau s'est évaporée.
Le tableau ci-dessous indique la quantité d'eau à
insérer dans la cuve de l'appareil pour les
aliments de base.
Remarque : les quantités d’eau et temps de
cuisson indiqués peuvent varier légèrement
selon la qualité des aliments.
Pour les autres aliments, la quantité d'eau à
insérer est déterminée par le temps de cuisson
(voir le tableau ci-dessous).
4.2 Tableau des temps de cuisson :
Ne pas cuire plus de 500 g d'aliments à la fois.
4.3 Cuisson
Les figures Kà Pcorrespondant à la cuisson des
aliments se trouvent sur la page à déplier.
1. Placer l’égouttoir 9par en dessous sur le
panier inférieur 7.Veiller à ce que les quatre
pattes de verrouillage 8s’enclenchent
correctement (fig. K).
Attention : pour la cuisson, vous devez
absolument fixer l’égouttoir 9, sinon, la
vapeur des légumes et des fruits qui
s’échappe pourrait goutter sur la plaque
chauffante et attacher.
2. Couper les aliments lavés et épluchés en dés
d’env. 1 cm (fig. L).
3. Verser les dés dans le panier inférieur
7
(fig.
M
).
Aliment Eau Temps de
cuisson
Bœuf / Porc 150 ml 30 min
Brocolis 100 ml 20 min
Carottes 200 ml 40 min
Choux 150 ml 30 min
Choux-raves 150 ml 30 min
Courgettes 100 ml 20 min
Fenouil 100 ml 20 min
Haricots 100 ml 20 min
Petits-pois 100 ml 20 min
Pommes 100 ml 20 min
Pommes de
terre
100 ml 20 min
Poires 100 ml 20 min
Poisson 50 ml 10 min
Pêche 100 ml 20 min
Tomates 100 ml 20 min
Volaille 150 ml 30 min
Temps de cuisson Quantité d’eau
10 min. 50 ml
20 min. 100 ml
30 min. 150 ml
40 min. 200 ml
50 min. 250 ml
Vaporisator 04/10 Seite 15 Freitag, 30. Juli 2010 11:07 11
zur Verfügung gestellt von Gebrauchs.info
Aktualisierungsstand Gebrauchs.info November 2013

16
4. Verser la quantité d’eau nécessaire dans la
cuve à eau 10.Vous trouverez les quantités
d’eau nécessaires dans le tableau ci-dessus.
Attention : l’eau doit être versée en bas
dans la cuve à eau avec la plaque chauffante
et non dans le panier avec l’égouttoir, sinon,
l’appareil ne fonctionne pas (fig. N).
5. Placer le panier avec les aliments dans
l’appareil (fig. O).
6. Placer le couvercle 2sur l’appareil, brancher
la prise secteur 14 et allumer l’appareil avec
l’interrupteur de marche 12 (avec
marquage). Le voyant de contrôle lumineux
11 est allumé (fig. P).
L’appareil se coupe automatiquement après la
cuisson.
Attention : puisque le stérilisateur et le bord
du panier peuvent être encore chauds après la
cuisson, il est nécessaire d’être vigilent lorsque
vous retirez les aliments.
Il est possible d’arrêter la cuisson à l’aide de
l’interrupteur d’arrêt 13.
Si les aliments ne sont pas encore cuits, ajouter
50 ml d'eau et reprendre la cuisson. Après
l'arrêt automatique de l'appareil, ce dernier ne
se remet en marche qu'au bout d'une minute.
Attention au moment de retirer les aliments :
après la cuisson, l’appareil et le panier peuvent
être encore chauds.
4.4 Cuisson simultanée de plusieurs
aliments
Vous pouvez cuire simultanément des aliments
qui ont des temps de cuisson différents. Pour
cela, procéder comme dans l'exemple suivant :
pour 100g de bœuf et petits-pois
1. Le bœuf doit cuire 10 minutes de plus que
les petits-pois. Cuire d’abord la viande avec
50 ml d’eau pendant 10 minutes (voir le
tableau des temps de cuisson). Au bout de
10 minutes, l’appareil s’arrête.
2. Ajouter maintenant les petits-pois et 100 ml
d’eau et cuire pendant 20 minutes
supplémentaires.
Au bout de ce laps de temps, les deux
aliments sont cuits et l’appareil s’arrête
automatiquement.
5. Nettoyage et entretien de l’appareil
5.1 Nettoyage
Toujours débrancher l'appareil et attendre qu'il
soit froid avant de le nettoyer.
Ne pas utiliser de produits abrasifs qui
pourraient endommager l'appareil.
Après chaque utilisation, nettoyer le panier de
cuisson 10 et le couvercle 2à l'aide d'un chiffon
humide.
Pour nettoyer l'égouttoir 9, le détacher du
panier inférieur 7de la façon suivante :
• Appuyer comme indiqué dans la figure A
sur trois des quatre pattes de verrouillage 8
sur le socle du panier. L’égouttoir 9peut
être rabattu vers le bas.
Pour réemboiter l'égouttoir 9sur le panier,
introduire le panier dans l’égouttoir et
appuyer jusqu’à ce que les pattes de
verrouillage 8s’enclenchent.
Les paniers inférieur et supérieur 4+ 7, les
support à biberons 5, l’égouttoir 9et la pince 6
sont résistants au lave-vaisselle.
Remarque : les colorants naturels provenant
des aliments peuvent laisser des colorations
restant sur les parties plastiques. Vous pouvez
continuer sans aucun problème à stériliser les
biberons avec l’appareil
Vaporisator 04/10 Seite 16 Freitag, 30. Juli 2010 11:07 11
zur Verfügung gestellt von Gebrauchs.info
Aktualisierungsstand Gebrauchs.info November 2013
Table of contents
Languages:
Other NUK Steriliser manuals
Popular Steriliser manuals by other brands

Munchkin
Munchkin 59S owner's guide

Sterident
Sterident 200 operating instructions

Beurer
Beurer BY 76 instruction manual

Lena Lighting
Lena Lighting UV-C STERILON 36W Installation instruction

ATS
ATS DWS-7 Installation, operation and maintenance manual

MILOO-ELECTRONICS
MILOO-ELECTRONICS STERYLIS PURE AIR-100 instructions