NUK 10.256.254 User manual

Vaporizzatore per microonde NUK
Destinazione d’uso
Il vaporizzatore per microonde NUK
è pratico, economico e
adatto per tutti i biberon NUK (First Choice e biberon standard),
nonché per tutti gli altri biberon per neonati in commercio.
Disinfetta fino a 4 biberon con accessori in soli 4 minuti.Tutti i
componenti da disinfettare devono essere adatti al microonde.
Attenzione:
tettarelle, succhietti, componenti di tiralatte, alcuni
articoli in plastica e utensili in vetro, nonché altri eventuali
componenti non adatti al microonde,
non devono essere
disinfettati con questo apparecchio.
L’apparecchio è indicato per forni a microonde di potenza
compresa tra 500 e 1000 Watt.
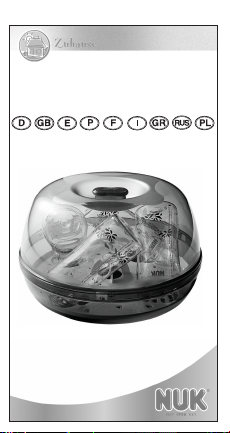
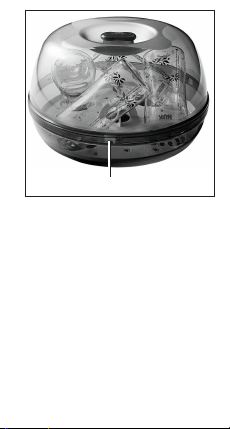
Inclusi nella confezione
1 Coperchio
(1)
; 1 Supporto per biberon
(2)
; 1Vaschetta di
riempimento
(3)
; 1 Pinza di prelievo biberon (non raffigurata)
Descrizione del funzionamento
Porre l'apparecchio ben chiuso all'interno di un forno a
microonde.Attraverso l’azione delle microonde, l’acqua presente
in esso viene vaporizzata. Il vapore caldo disinfetta i componenti
contenuti nell'apparecchio.
Avvertenze di sicurezza
Avvertenze generali
–Leggere attentamente le presenti istruzioni prima dell’uso.
Esse costituiscono parte integrante dell’apparecchio e
devono sempre essere tenute a portata di mano.
–L’apparecchio deve essere utilizzato esclusivamente per lo
scopo descritto.
–In caso di sterilizzazione in un microonde con funzioni
accessorie, assicurarsi che sia attivata SOLO la funzione
microonde, ad esempio non inserire la funzione grill, cambi di
temperatura, ecc poiché potrebbero danneggiare il materiale.
–Non lasciare mai l’apparecchio incustodito durante il
funzionamento.
–Collocare l’apparecchio esclusivamente su una superficie di
appoggio fissa, orizzontale, asciutta e non infiammabile.
–Non porre l’apparecchio su piani di cottura, nel forno caldo
o in prossimità di scaldaacqua istantanei elettrici o a gas.
–Attenzione: dopo la disinfezione, i biberon rimangono
protetti dai germi (disinfettati) solo finché l’apparecchio
resta chiuso. Se l’apparecchio non viene aperto, i biberon
rimangono esenti da germi per circa 30 minuti.
Protezione con bruciature e ustioni
L’apparecchio utilizza temperature elevate e vapore caldo. Per
proteggersi da bruciature e ustioni, attenersi alle seguenti
istruzioni:
–Il vaporizzatore per microonde è molto caldo all’uscita dal
forno a microonde.Attendere almeno 5 minuti affinché esso
si sia sufficientemente raffreddato.
–Trasferire l’apparecchio ancora caldo nella nuova postazione
utilizzando sempre apposite presine/guanti di protezione.
–Se ancora caldo, l’apparecchio deve essere trasportato solo
munito della relativa vaschetta.
–Non utilizzare la maniglia del coperchio per il trasporto, in
quanto la parte inferiore potrebbe allentarsi e distaccarsi.
–Prestare attenzione al momento dell’apertura del coperchio:
pericolo di ustioni per la presenza del vapore caldo!Aprire il
coperchio solo ribaltandolo, onde evitare fuoriuscite del
vapore caldo.
–Prelevare i biberon e i relativi accessori solo con l’apposita
pinza.
Per la protezione del vostro bambino:
Attenzione!
I bambini spesso non sono in grado di valutare
correttamente i pericoli e corrono quindi il rischio di procurarsi
lesioni. Osservare pertanto le seguenti indicazioni:
–Il presente prodotto può essere utilizzato solamente sotto la
supervisione da parte di un adulto.
–Accertarsi scrupolosamente che l’apparecchio sia sempre
lontano dalla portata dei bambini.
–Attenzione: il cellofan dell’imballo può essere causa di
soffocamento per i bambini. Non lasciare che sia utilizzato
come giocattolo.
Uso
1. Lavare e risciacquare accuratamente i biberon e i relativi
accessori.
2. Rimuovere il coperchio del vaporizzatore per microonde.
3. Versare 200 ml di acqua nella vaschetta di riempimento del
vaporizzatore.
Attenzione!
Utilizzare sempre una caraffa graduata per
misurare e rispettare esattamente la quantità di 200 ml, onde
evitare danneggiamenti del vaporizzatore.
4. Introdurre i biberon capovolti nelle apposite aperture del
supporto per biberon e distribuire gli accessori sulla
rimanente superficie libera a disposizione.
5. Chiudere il coperchio del vaporizzatore per microonde. Per
accertarsi che esso sia chiuso correttamente, verificare che le
marcature
(4)
siano debitamente allineate.
6. Collocare il vaporizzatore all’interno del forno a microonde.
7. Impostare il microonde sulla potenza e sul tempo desiderati. È
importante non superare i tempi rispettivamente indicati di
seguito:
Attenzione!
Onde evitare qualsiasi pericolo di ustioni
dovute al vapore caldo o all’umidità riscaldata, attendere
5 minuti prima di prelevare il vaporizzatore dal forno a
microonde.
8. Aprire delicatamente il coperchio facendolo ruotare con le
dita (vedi Fig. 2) finché non si udirà lo scatto di apertura.
Rimuovere quindi il coperchio.
Proteggere
adeguatamente le mani e le dita.
Pulizia e disinfezione
1. Onde evitare depositi di calcare, asciugare sempre il
vaporizzatore per microonde dopo ogni utilizzo con un panno.
2. Se lo sterilizzatore per microonde diventasse particolarmente
sporco,può essere pulito con acqua tiepida saponata.
3. Se ciò non dovesse comunque bastare per rimuovere i
depositi di calcare, utilizzare aceto per uso domestico diluito.
Smaltimento
L’apparecchio può essere smaltito insieme ai normali rifiuti
domestici.
L’imballo deve invece essere indirizzato ad un apposito centro di
smaltimento separato, conformemente alle normative vigenti nei
rispettivi paesi.
Conservare indirizzo e numero dell’articolo per eventuali reclami
futuri.
Potenza Durata
1000 Watt 4 minuti
800 - 950 Watt 5 minuti
500 - 750 Watt 7 minuti
NUK ΑΠΟΣΤΕΙΡΩΤΗΡΑΣ
ΑΤΜΟΥ ΜΙΚΡΟΚΥΜΑΤΩΝ
Σκοπός χρήσης
Ο NUK αποστειρωτήρας ατµού µικροκυµάτων
είναι πρακτικός,
οικονοµικός και κατάλληλος για όλα τα NUK µπιµπερό (First
Choice και κλασικά µπιµπερό) όπως επίσης και για όλα τα
διαθέσιµα µπιµπερό του εµπορίου. Αποστειρώνει έως και 4
µπιµπερό µε αξεσουάρ µόνο σε 4 λεπτά. Ολα τα προς
αποστείρωση εξαρτήµατα θα πρέπει να είναι κατάλληλα για
αποστείρωση µικροκυµάτων.
Προσοχή:
Θηλές, εξαρτήµατα θηλάστρων, µερικά πλαστικά
προϊόντα και γυάλινοι εξοπλισµοί, όπως επίσης όλα τα άλλα
εξαρτήµατα, τα οποία δεν είναι κατάλληλα για συσκευές
µικροκυµάτων,
δεν επιτρέπεται
να αποστειρώνονται µε αυτή
τη συσκευή.
Η συσκευή είναι κατάλληλη για συσκευές µικροκυµάτων µε
ισχύ από 500 έως 1000 Watt.
Περιεχόµενο παράδοσης
1 Καπάκι
(1)
, 1 Στήριγµα µπιµπερό
(2)
, 1 Βάση πλήρωσης
(3)
,
1 Λαβίδα µπιµπερό (χωρίς απεικόνιση)
Περιγραφή λειτουργίας
Η κλειστή συσκευή τοποθετείται µέσα σε συσκευή
µικροκυµάτων. Το περιεχόµενο νερό παράγει ατµούς µε τη
βοήθεια µικροκυµάτων. Οι υπέρθερµοι ατµοί αποστειρώνουν
τα εξαρτήµατα που βρίσκονται µέσα στη συσκευή.
Υποδείξεις ασφάλειας
Γενικές υποδείξεις:
–Πριν χρησιµοποιήσετε τη συσκευή, διαβάστε προσεκτικά
αυτές τις οδηγίες χειρισµού. Αποτελούν συστατικό µέρος της
συσκευής και πρέπει να είναι ανά πάσα στιγµή διαθέσιµες.
–Χρσιµοποιείτε τη συσκευή µόνο για τον περιγραφόµενο
σκοπό χρήσης.
–Όταν αποστειρώνετε σε φούρνο µικροκυµάτων που έχει επιπλέον
λειτουργίες, παρακαλούµε εξασφαλίστε ότι έχει ενεργοποιηθεί
ΜΟΝΟ η λειτουργία των µικροκυµάτων, π.χ. µην ενεργοποιήσετε
την λειτουργία του γκριλ, την πάνω κάτω αντίσταση, κ.α. καθώς
αυτό µπορεί να οδηγήσει σε φθορά υλικού.
–Μην αφήνετε ποτέ ανεπίβλεπτη τη συσκευή κατά τη
διάρκεια της λειτουργίας.
–Η συσκευή επιτρέπεται να τοποθετείται αποκλειστικά σε
σταθερή, επίπεδη, στεγνή και µη εύφλεκτη επιφάνεια.
–Η συσκευή δεν επιτρέπεται να τοποθετείται σε υπέρθερµες
εστίες ηλεκτρικής κουζίνας, ούτε να εισάγεται σε
υπέρθερµους ηλεκτρικούς φούρνους, ούτε να τοποθετείται
πλησίον ταχυθερµοσιφώνων και θερµοσιφώνων αερίου.
–Εχετε υπόψη σας ότι τα µπιµπερό µετά την αποστείρωση
παραµένουν ελεύθερα παθογόνων µικροβίων
(αποστειρωµένα), µόνο όση ώρα παραµένει κλειστή η
συσκευή. Με κλειστή συσκευή τα µπιµπερό παραµένουν
ελεύθερα παθογόνων µικροβίων περίπου 30 λεπτά.
Προστασία από εγκαύµατα και ζεµατίσµατα:
Η συσκευή λειτουργεί µε υψηλές θερµοκρασίες και υπέρθερµους
ατµούς. Για να προστατευτείτε από ζεµατίσµατα και εγκαύµατα,
πρέπει να προσέχετε τα ακόλουθα:
–Ο αποστειρωτήρας ατµού µικροκυµάτων είναι πάρα πολύ
καυτός, όταν εξέρχεται από τη συσκευή µικροκυµάτων.
Περιµένετε τουλάχιστον 5 λεπτά, έως ότου κρυώσει αρκετά.
–Η µεταφορά της υπέρθερµης συσκευής από τη συσκευή
µικροκυµάτων στο σηµείο απόθεσης επιτρέπεται µόνο µε τη
χρήση γαντιών φούρνου.
–Η µεταφορά σε υπέρθερµη κατάσταση επιτρέπεται µόνο
από τη βάση.
–∆εν επιτρέπεται η χρήση της λαβής του καπακιού για τη
µεταφορά, διότι διαφορετικά ενδέχεται να λυθεί το κάτω
µέρος και να πέσει στο δάπεδο.
–Προσοχή κατά το άνοιγµα του καπακιού. Εξαιτίας των
υπέρθερµων υδρατµών υπάρχει κίνδυνος ζεµατίσµατος.
Ανοίγετε το καπάκι γέρνοντάς το, ώστε να είναι εφικτή η
διαφυγή των υπέρθερµων ατµών.
–Αφαιρείτε τα µπιµπερό και τα αξεσουάρ µόνο µε τη λαβίδα
µπιµπερό.
Για την προστασία του παιδιού σας:
Προειδοποίηση!
Τα παιδιά δεν είναι συχνά σε θέση να
υπολογίσουν σωστά τους κινδύνους και συνεπώς µπορεί να
υποστούν τραυµατισµούς. Συνεπώς πρέπει να προσέχετε:
–Το προϊόν αυτό επιτρέπεται να χρησιµοποιείται µόνο υπό την
επίβλεψη ενηλίκων.
–Προσέχετε επιµελώς ώστε η συσκευή να βρίσκεται πάντα
µακριά από την εµβέλεια παιδιών.
–Προσέχετε ώστε το φύλλο συσκευασίας να µην αποτελέσει
θανατηφόρα παγίδα για παιδιά. Τα φύλλα συσκευασίας δεν
είναι παιχνίδια.
Χρήση
1. Πλένετε καλά και ξεπλένετε τα µπιµπερό και τα αξεσουάρ.
2. Αφαιρείτε το καπάκι του αποστειρωτήρα ατµού
µικροκυµάτων.
3. Βάζετε 200 ml νερό στη βάση πλήρωσης του
αποστειρωτήρα ατµού µικροκυµάτων.
Προσοχή!
Χρησιµοποιείτε οπωσδήποτε µετρικό κύπελλο για
να τηρείτε ακριβώς την ποσότητα πλήρωσης 200 ml, διότι
διαφορετικά ενδέχεται να υποστεί φθορές ο
αποστειρωτήρας ατµού µικροκυµάτων.
4. Τοποθετείτε τα µπιµπερό µε το άνοιγµα προς τα κάτω στις
προβλεπόµενες οπές του στηρίγµατος µπιµπερό και
διανέµετε τα αξεσουάρ στην υπόλοιπη επιφάνεια.
5. Κλείνετε το καπάκι του αποστειρωτήρα ατµού
µικροκυµάτων. Για να βεβαιωθείτε ότι έκλεισε καλά το
καπάκι, προσέχετε ώστε οι σηµάνσεις
(4)
να εµφανίζουν την
ανάλογη ευθυγράµµιση.
6. Τοποθετείτε τον αποστειρωτήρα ατµού µικροκυµάτων στη
συσκευή µικροκυµάτων.
7. Ρυθµίζετε τη συσκευή µικροκυµάτων στην ανάλογη ισχύ και
ώρα. ∆εν επιτρέπεται να γίνεται υπέρβαση της
αναφερόµενης ώρας:
Προσοχή!
Προς αποφυγή κάθε κινδύνου ζεµατίσµατος
εξαιτίας υπέρθερµων υδρατµών ή υπέρθερµης υγρασίας,
περιµένετε 5 λεπτά, προτού αφαιρέσετε τον αποστειρωτήρα
ατµού µικροκυµάτων από τη συσκευή µικροκυµάτων.
8. Για εύκολο άνοιγµα περιστρέφετε το καπάκι µε τα δάκτυλα
(βλέπε εικ. 2), έως ότου ανοίξει η ασφάλεια. Κατόπιν
αφαιρείτε το καπάκι.
Προσέχετε
ώστε να προστατεύονται επαρκώς χέρια και
δάκτυλα.
Καθαρισµός και αποστείρωση
1. Προς αποφυγή εναπόθεσης αλάτων, στεγνώνετε τον
αποστειρωτήρα ατµού µικροκυµάτων µετά από κάθε χρήση
µε ένα πανί.
2. Εάν ο αποστειρωτήρας λερώσει ιδιαίτερα, τότε µπορεί να
καθαριστεί χρησιµοποιώντας ζεστό νερό µε σαπούνι.
3. Σε περίπτωση που πρέπει να αποµακρύνετε εναποθέσεις
αλάτων, χρησιµοποιείτε αραιωµένο ξύδι οικιακής χρήσης.
Απόσυρση
Η συσκευή µπορεί να αποσυρθεί µε τα οικιακά απορρίµµατα.
Αποσύρετε τη συσκευασία σε ξεχωριστή συλλογή
απορριµµάτων σύµφωνα µε τις προδιαγραφές της χώρας σας.
Σε περίπτωση παραπόνων διαφυλάξτε τη διεύθυνση και τον
κωδικό του προϊόντος.
Ισχύς ∆ιάρκεια
1000 Watt
4 λεπτά
800 - 950 Watt
5 λεπτά
500 - 750 Watt
7 λεπτά
NUK
NUK
, NUK
(First Choice Standard),
.
4
4 .
.
!
, -, ,
,
,
,
.
500 1000 .
1
(1)
; 1
(2)
;
1
(3)
; 1 (
)
.
.
.
:
–
.
.
–
.
–
, ,
,
. , ,
,
.
–
.
– ,
, .
– ,
.
–,
(),
.
30 .
":
.
, :
–
. 5
, .
–
.
–
.
–
, ..
.
–
;
.
,
.
–
.
# $ " :
!
.
:
–
.
– ,
.
– ,
. –
.
1.
.
2. .
3. 200
.
!
,
200 ,
.
4.
,
.
5. .
, ,
(4)
.
6. .
7.
.
:
!
5 ,
.
8. , ,
. (.
.2) .
%
, .
& '
1. ,
.
2.
.
3.
.
.
,
.
.
() ))
1000 4
800 - 950 5
500 - 750 7
Mikrofalowy sterylizator parowy NUK
Zastosowanie
Mikrofalowy sterylizator parowy NUK jest praktyczny,
ekonomiczny i nadaje się do wszystkich butelek NUK (butelek
First Choice i standardowych) oraz do innych butelek dla
niemowląt dostępnych w handlu. Można w nim
zdezynfekować do 4 butelek z akcesoriami w ciągu tylko 4
minut. Większość elementów, z których składa się butelka
powinna się nadawać do kuchenki mikrofalowej.
Uwaga:
Smoczki do butelek, smoczki uspokajające, części
laktatorów, niektóre elementy z tworzywa sztucznego i
przyrządy szklane oraz niektóre inne części nie nadają się do
kuchenki mikrofalowej. Przed sterylizacją należy sprawdzić,
czy każdy element można umieścić w mikrofalówce.
Urządzenie nadaje się do kuchenek mikrofalowych o mocy od
500 do 1000 W.
Opakowanie zawiera
1 pokrywę
(1)
; 1 podtrzymywacz do butelek
(2)
;
1 podstawkę
(3)
; 1 szczypce do butelek (bez rysunku)
Opis działania
Zamknięte urządzenie należy wstawić do kuchenki
mikrofalowej. Wskutek działania mikrofal znajdująca się w nim
woda paruje, a gorąca para dezynfekuje części znajdujące się
w urządzeniu.
Wskazówki bezpieczeństwa
Uwagi ogólne:
–Przed użyciem należy zapoznać się uważnie z niniejszą
instrukcją obsługi. Jest ona elementem wyposażenia
urządzenia i musi być stale pod ręką.
–Stosować urządzenie tylko zgodnie z opisanym
przeznaczeniem.
–Jeżeli do sterylizacji używacie kuchenki mikrofalowej z
dodatkowymi funkcjami, należy zwrócić uwagę na to, aby
włączona była TYLKO funkcja mikrofali - nie włączajcie np.
funkcji grilla, dolnego lub górnego podgrzewania itp., gdyż
może to doprowadzić do uszkodzenia materiału.
–Nigdy nie zostawiać urządzenia bez nadzoru w czasie
trwania procesu sterylizacji.
–Urządzenie można stawiać tylko na twardym, równym,
suchym i niepalnym podłożu.
–Urządzenia nie wolno stawiać na gorących płytach
kuchennych, w pobliżu grzejników gazowych lub
przepływowych ani wkładać do gorącego piekarnika.
–Należy pamiętać, że butelki po zdezynfekowaniu pozostają
sterylne tylko tak długo, jak długo urządzenie jest
zamknięte. W zamkniętym urządzeniu butelki pozostają
sterylne przez około 30 minut.
Ochrona przed poparzeniem:
Urządzenie sterylizuje za pomocą gorącej pary i podczas
pracy wewnątrz występuje wysoka temperatura. Aby uchronić
się przed poparzeniem, należy przestrzegać następujących
zaleceń:
–Mikrofalowy sterylizator parowy po zakończeniu sterylizacji
jest bardzo gorący. Odczekać co najmniej 5 minut, aż
wystygnie przed wyjęciem go z kuchenki mikrofalowej.
–Gorące urządzenie przenosić od kuchenki mikrofalowej do
miejsca postawienia tylko w rękawicach kuchennych.
–Gdy urządzenie jest gorące, przenosić je, trzymając tylko
za podstawkę.
–Nie przenosić za uchwyt pokrywy, w przeciwnym razie
dolna część może się zluzować i spaść na podłogę.
–Zachować ostrożność przy otwieraniu pokrywy, gdyż
istnieje niebezpieczeństwo poparzenia się gorącą parą
wodną. Przy otwieraniu pokrywy lekko ją uchylić, aby
gorąca para miała ujście.
–Butelki i akcesoria wyjmować tylko szczypcami do butelek.
Dla bezpieczeństwa dziecka:
Ostrzeżenie!
Dzieci często nie są w stanie prawidłowo ocenić
niebezpieczeństwa i przez to mogą doznawać urazów. Należy
przestrzegać poniższych zasad:
–Produkt można stosować tylko pod nadzorem dorosłych.
–Dołożyć starań, aby urządzenie zawsze znajdowało się w
miejscu niedostępnym dla dzieci.
–Przechowywać foliowe opakowania w miejscu niedostępnym
dla dzieci. Foliowe opakowanie nie jest zabawką.
Sposób użytkowania:
1. Butelki i akcesoria starannie umyć i wypłukać.
2. Zdjąć pokrywę mikrofalowego sterylizatora parowego.
3. Do podstawki mikrofalowego sterylizatora parowego wlać
200 ml wody.
Uwaga!
Należy koniecznie używać naczynia z miarką, aby
dokładnie odmierzyć 200 ml wody, inaczej mikrofalowy
sterylizator może zostać uszkodzony.
4. Wstawić butelki otworem w dół do przewidzianych do tego
otworów w podtrzymywaczu do butelek, a akcesoria
rozłożyć na pozostałej powierzchni.
5. Zamknąć pokrywę mikrofalowego sterylizatora parowego.
Aby mieć pewność, że jest dobrze zamknięta, należy zwrócić
uwagę, czy oznaczenia
(4)
są odpowiednio ustawione.
6. Wstawić mikrofalowy sterylizator parowy do kuchenki
mikrofalowej.
7. Nastawić kuchenkę mikrofalową na odpowiednią moc
i czas. Nie należy przekraczać podanego poniżej czasu:
Uwaga!
Aby uniknąć niebezpieczeństwa poparzenia się
gorącą parą wodną lub gorącą wilgocią, odczekać 5 minut
przed wyjęciem mikrofalowego sterylizatora parowego
z kuchenki mikrofalowej.
8. W celu łatwego otwarcia sterylizatora obrócić pokrywę
palcami (patrz rysunek 2), aż otworzy się zatrzask. Potem
zdjąć pokrywę.
Należy uważać na ręce i palce.
Czyszczenie i dezynfekcja
1. Aby uniknąć osadzania się kamienia, po każdym użyciu
wytrzeć mikrofalowy sterylizator parowy ściereczką.
2. Jeżeli urządzenie zostanie bardzo zabrudzone, można je
czyścić, używając ciepłej wody z mydłem.
3. Jeżeli trzeba usunąć kamień, zastosować rozcieńczony
ocet używany w gospodarstwach domowych.
Utylizacja
Urządzenie można wyrzucić do domowego kosza na śmieci.
Opakowanie wyrzucić oddzielnie zgodnie z lokalnymi
przepisami dotyczącymi gospodarki odpadami.
Na wypadek reklamacji należy zachować adres dystrybutora
i numer artykułu.
Moc Czas
1000 W 4 minuty
800 - 950 W 5 minut
500 - 750 W 7 minut
NUK Mikrowellen-Dampf-Vaporisator
NUK Microwave Steam Steriliser
Art.-Nr. 10.256.254
NUK is a registered trademark owned by MAPA
10.???.??? Rev 000
NUK is a registered trademark
of MAPA GmbH/Germany
Matr.-Nr. 10.520.124
Rev 300
NUK Mikrowellen-Dampf-Vaporisator
NUK Microwave Steam Steriliser
Esterilizador a vapor NUK para
microondas
Esterilizador a vapor para microondas NUK
Stérilisateur à vapeur pour micro-ondes NUK
Vaporizzatore per microonde NUK
NUK ΑΠΟΣΤΕΙΡΩΤΗΡΑΣ ΑΤΜΟΥ
ΜΙΚΡΟΚΥΜΑΤΩΝ
NUK
Mikrofalowy sterylizator parowy NUK
MAPA GmbH
Industriestraße 21-25
D-27404 Zeven
Germany
www.nuk.com
1
3
2
4
Stérilisateur à vapeur pour micro-
ondes NUK
Usage prévu
Le stérilisateur à vapeur pour micro-ondes NUK est pratique,
économique et convient à tous les biberons NUK (First Choice
et Standard) et aux autres biberons en usage dans le
commerce. Il désinfecte au maximum 4 biberons et leurs
accessoires en 4 minutes uniquement. Toutes les pièces à
désinfecter doivent être adaptées au micro-ondes.
Attention :
Les tétines, les sucettes, les éléments des tire-
laits, certains articles en plastique et en verre, et les autres
pièces qui ne sont pas adaptées au micro-ondes,
ne doivent
pas
être désinfectés avec cet appareil.
L’appareil est adapté aux micro-ondes d’ une puissance de 500
à 1000 Watt.
Descriptif de l’appareil
1 couvercle
(1)
; 1 support de biberon
(2)
; 1 socle de
remplissage
(3)
; 1 pince pour biberon (non illustrée)
Description du fonctionnement de l’appareil
L’appareil fermé est placé dans un micro-ondes. L’eau contenu
est évaporée par le micro-ondes. La vapeur chaude désinfecte
les pièces se trouvant dans l’appareil.
Consignes de sécurité
Consignes générales :
–Veuillez lire attentivement cette notice d’emploi avant
l’utilisation. Elle fait partie intégrante de l’appareil et doit
être disponible à tout moment.
–Utilisez l’appareil uniquement pour l’usage prévu.
–En stérilisant avec un micro-onde multifonctions, assurez-
vous que seule la fonction micro-onde est activée, et non
la fonction grill ou d'autres fonctions car cela pourrait
endommager le matériau.
–Ne laissez jamais l’appareil sans surveillance pendant le
fonctionnement.
–L’appareil peut être placé uniquement sur une surface
fixe, plane, sèche et non inflammable.
–L’appareil ne peut en aucun cas être posé sur des plaques
chaudes ou être introduit dans un four chaud. En outre, il
ne peut pas être placé à proximité d’un chauffe-eau
instantané à gaz.
–N’oubliez pas que les biberons restent stérilisés tant que
l’appareil reste fermé. L’appareil fermé, les biberons
restent stérilisés pendant 30 minutes environ.
Protection contre les brûlures :
L’appareil fonctionne avec des températures élevées et une
vapeur chaude. Afin de se protéger contre les brûlures,
respectez les points suivants :
–Le stérilisateur à vapeur pour micro-ondes est très chaud
lorsqu’il sort du micro-ondes. Attendez 5 minutes au
minimum jusqu’à ce qu’il soit suffisamment refroidi.
–Transportez l’appareil chaud uniquement en utilisant des
gants pour le sortir du micro-ondes.
–Lorsque l’appareil est chaud, tenez le uniquement au
niveau du socle.
–N’utilisez pas la poignée du couvercle pour le transporter,
sinon la partie inférieure pourrait se détacher et tomber
par terre.
–Attention, en ouvrant le couvercle ; un risque de brûlure
existe en raison de la vapeur d’eau chaude. Ouvrez le
couvercle uniquement en le faisant basculer pour que la
vapeur chaude puisse s’échapper.
–Retirez les biberons et les accessoires uniquement avec la
pince fournie.
Pour la protection de votre enfant :
Avertissement !
Les enfants ne peuvent pas estimer
correctement les dangers et par conséquent peuvent se
blesser. Respectez les points suivants :
–Ce produit doit être utilisé uniquement sous la
surveillance d’adultes.
–Veillez à ce que l’appareil se trouve toujours hors de
portée des enfants.
–Veillez à ne pas laisser jouer les enfants avec le film
d’emballage; danger de suffocation. Le film plastique n’est
pas un jouet !
Utilisation
1. Lavez et rincez soigneusement les biberons et les
accessoires.
2. Retirez le couvercle du stérilisateur à vapeur pour micro-
ondes.
3. Versez 200 ml d’eau dans le socle de remplissage du
stérilisateur.
Attention !
Utilisez absolument un verre gradué pour
respecter les 200 ml ; le stérilisateur pourrait être sinon
endommagé.
4. Placez les biberons, tête en bas, dans les orifices prévus du
support et répartissez les accessoires sur la surface
restante.
5. Fermez le couvercle du stérilisateur à vapeur pour micro-
ondes. Afin de vérifier la fermeture correcte, veillez à ce
que les marquages
(4)
soient positionnés correctement.
6. Placez le stérilisateur à vapeur dans le micro-ondes.
7. Réglez la puissance et la durée sur le micro-ondes. La durée
indiquée ne doit pas être dépassée :
Attention !
Afin d’éviter tout risque de brûlure par la
vapeur ou l’humidité chaude, attendez 5 minutes avant de
sortir le stérilisateur du micro-ondes.
8. Pour ouvrir facilement le couvercle, tournez-le avec les
doigts (fig. 2) jusqu’à ce que le verrouillage s’ouvre, puis
retirez le couvercle.
Protégez
suffisamment vos doigts et mains.
Nettoyage et stérilisation
1. Afin d’éviter les dépôts de calcaire, essuyez le stérilisateur à
vapeur pour micro-ondes avec un torchon après chaque
utilisation.
2. Si le stérilisateur devient particulièrement sale, il peut être
lavé avec de l'eau chaude et savonneuse.
3. Si vous devez enlever des résidus de dépôts de calcaire,
utilisez du vinaigre blanc dilué.
Mise au rebut
L’appareil peut être éliminé avec les déchets ménagers
normaux. Eliminez l’emballage séparément conformément aux
spécifications de votre pays.
En cas de réclamation, conservez l’adresse et le n° de réf du
produit.
Puissance Durée
1000 Watt 4 minutes
800 - 950 Watt 5 minutes
500 - 750 Watt 7 minutes
MicrowellenSterilisator Seite 2 Donnerstag, 24. M rz 2011 5:04 17

NUK Mikrowellen-Dampf-Vaporisator
Verwendungszweck
Der NUK Mikrowellen-Dampf-Vaporisator
ist praktisch,
wirtschaftlich und für alle NUK Flaschen (First Choice und
Standard Flaschen) sowie weitere handelsübliche Babyflaschen
geeignet. Er desinfiziert bis zu 4 Flaschen mit Zubehör in nur
4 Minuten. Alle zu desinfizierenden Teile müssen mikrowellen-
geeignet sein.
Vorsicht:
Sauger, Beruhigungssauger, Teile von Milchpumpen,
einige Kunststoffartikel und Glasgeräte, sowie alle anderen Teile,
die nicht mikrowellen-geeignet sind,
dürfen nicht
mit diesem
Gerät desinfiziert werden.
Das Gerät ist für Mikrowellen-Herde mit einer Leistung von
500 bis 1000 Watt geeignet.
Lieferumfang
1 Deckel
(1)
; 1 Flaschenhalter
(2)
; 1 Füllsockel
(3)
;
1 Flaschenzange (ohne Abbildung)
Funktionsbeschreibung
Das geschlossene Gerät wird in einen Mikrowellen-Herd gestellt.
Durch Mikrowellen wird das enthaltene Wasser verdampft. Der
heiße Dampf desinfiziert die im Gerät befindlichen Teile.
Sicherheitshinweise
Allgemeine Hinweise:
–Lesen Sie vor dem Gebrauch bitte sorgfältig diese
Bedienungsanleitung. Sie ist Bestandteil des Gerätes und
muss jederzeit verfügbar sein.
–Verwenden Sie das Gerät nur für den beschriebenen
Verwendungszweck.
–Wenn Sie zum Vaporisieren ein Mikrowellen-Gerät mit
Zusatzfunktionen benutzen, achten Sie darauf, dass nur die
Mikrowellenfunktion eingeschaltet ist. Grill-, Ober- und
Unterhitze sowie Umluft können zu Materialschäden am
Vaporisator führen.
–Lassen Sie das Gerät während des Betriebes niemals
unbeaufsichtigt.
–Das Gerät darf ausschließlich auf einem festen, ebenen,
trockenen und nicht brennbaren Untergrund aufgestellt
werden.
1
3
2
–Das Gerät darf nicht auf heiße Herdplatten gestellt, in den
heißen Backofen geschoben oder in der Nähe von Gas- und
Durchlauferhitzern aufgestellt werden.
–Beachten Sie, dass die Flaschen nach dem Desinfizieren nur
so lange keimarm (desinfiziert) bleiben, wie das Gerät
geschlossen bleibt. Bei geschlossenem Gerät bleiben die
Flaschen etwa 30 min keimarm.
Schutz vor Verbrennungen und Verbrühungen:
Das Gerät arbeitet mit hohen Temperaturen und heißem Dampf.
Um sich vor Verbrühungen und Verbrennungen zu schützen,
beachten Sie daher folgendes:
–Der Mikrowellen-Dampf-Vaporisator ist sehr heiß, wenn er
aus dem Mikrowellen-Herd kommt. Mindestens 5 Minuten
abwarten, bis er ausreichend abgekühlt ist.
–Das heiße Gerät nur unter Verwendung von Handschuhen
vom Mikrowellen-Herd zurAblagestelle transportieren.
–Im heißen Zustand nur am Sockel transportieren.
–Nicht den Deckelgriff zumTransport benutzen, da sich sonst
das Unterteil lösen und zu Boden fallen könnte.
–Vorsicht beim Öffnen des Deckels; durch den heißen
Wasserdampf besteht Verbrühungsgefahr. Deckel nur durch
Kippen öffnen, damit heißer Dampf entweichen kann.
–Flaschen und Zubehör nur mit der Flaschenzange
entnehmen.
Zum Schutz Ihres Kindes:
Warnung!
Kinder können Gefahren oft nicht richtig einschätzen
und sich dadurchVerletzungen zuziehen. Beachten Sie daher:
–Dieses Produkt darf nur unter Aufsicht von Erwachsenen
verwendet werden.
–Achten Sie sorgfältig darauf, dass sich das Gerät immer
außerhalb der Reichweite von Kindern befindet.
–Achten Sie darauf, dass die Verpackungsfolie nicht zur
tödlichen Falle für Kinder wird.Verpackungsfolien sind kein
Spielzeug.
Anwendung
1. Flaschen und Zubehör sorgfältig waschen und spülen.
2. Deckel des Mikrowellen-Dampf-Vaporisators abnehmen.
3. 200 ml Wasser in den Füllsockel des Mikrowellen-Dampf-
Vaporisators eingießen.
Achtung!
Benutzen Sie unbedingt einen Messbecher um die
Füllmenge von 200 ml exakt einzuhalten, da sonst
Beschädigungen des Mikrowellen-Dampf-Vaporisators möglich
sind.
4. Die Flaschen mit der Öffnung nach unten in die dafür
vorgesehenen Öffnungen des Flaschenhalters setzen und das
Zubehör auf der verbleibenden Fläche verteilen.
5. Deckel des Mikrowellen-Dampf-Vaporisators schließen. Um
sicher zu gehen, dass er richtig verschlossen ist, darauf achten,
dass die Markierungen
(4)
entsprechend ausgerichtet sind.
6. Den Mikrowellen-Dampf-Vaporisator in den Mikrowellen-
Herd stellen.
7. Stellen Sie den Mikrowellen-Herd auf die entsprechende
Leistung und Zeit. Die angegebene Zeit sollte nicht
überschritten werden:
Achtung!
Um jegliche Verbrühungsgefahr durch heißen
Wasserdampf oder heiße Feuchtigkeit zu vermeiden,
5 Minuten warten, bevor Sie den Mikrowellen-Dampf-
Vaporisator aus dem Mikrowellen-Herd herausnehmen.
8. Zum leichten Öffnen den Deckel mit den Fingern drehen
(siehe Abb. 2), bis Verrastung sich öffnet. Dann Deckel
abnehmen.
Achten
Sie auf ausreichenden Hand-/ und Fingerschutz.
Reinigung und Desinfektion
1. Um Kalkablagerungen zu vermeiden, den Mikrowellen-Dampf-
Vaporisator nach jedem Gebrauch mit einem Tuch abtrocknen.
2. Bei größeren Verschmutzungen kann das Gerät mit einem
Handspülmittel gereinigt werden.
3. Sollten Sie noch Kalkablagerungen entfernen müssen,
verwenden Sie verdünnten Haushaltsessig.
Entsorgung
Das Gerät kann über den normalen Hausmüll entsorgt werden.
Führen Sie die Verpackung einer getrennten Entsorgung
entsprechend derVorschriften in Ihrem Land zu.
Bewahren Sie für den Reklamationsfall Anschrift und Art.-Nr. auf.
Leistung Dauer
1000 Watt 4 Minuten
800 - 950 Watt 5 Minuten
500 - 750 Watt 7 Minuten
4
NUK Microwave Steam Steriliser
Usage
The NUK Microwave Steam Steriliser
is practical, economical
and suitable for all NUK bottles (First Choice and Standard
bottles) and for other commercially available baby feeding bottles.
The Steriliser disinfects up to 4 bottles and accessories in just
4 minutes. Most of your baby feeding bottle parts should be
suitable for microwave sterilisation.
Caution:
Teats, soothers, breast pump parts, some plastic items,
glass equipment and some other parts which are unsuitable for
microwaving
must not be
disinfected in this appliance, therefore
please always check before microwaving any items.
The Steriliser is suitable for microwaves with an output of
between 500 and 1000W.
Scope of supply
1 lid
(1)
; 1 bottle-holder
(2)
; 1 base for filling
(3)
;
1 pair of bottle tongs (not illustrated)
Description of use
The sealed Microwave Steam Steriliser is placed in the microwave.
The microwave then allows the water to evaporate and the hot
steam which is generated to disinfect the parts inside.
Safety instructions
General instructions
–Please read these operating instructions carefully before
using the Steriliser. These instructions are part of the
Steriliser and must be available at all times.
–Use the Steriliser only for the intended purpose described.
–When sterilising in a microwave oven with additional
functions, please ensure that ONLY the microwave function
is activated, i.e. do not activate the grill function, the upper
and lower heat, etc. as this may lead to material damage.
–Never leave the unit unsupervised during operation.
–The Steriliser may only be set up on a firm, level, dry and
non-flammable surface.
–The Steriliser must not be placed on cooker hotplates, put
in a hot oven or set up close to gas and flow heaters.
–Be aware that after disinfecting, bottles only remain sterile
(disinfected) as long as the Steriliser remains closed. The
bottles will remain sterile for about 30 minutes with the unit
closed.
Preventing burns and scalds
The Steriliser operates at high temperatures using hot steam.To
avoid burning or scalding yourself please follow the instructions
below.
–The Microwave Steam Steriliser is very hot when it comes
out of the microwave oven.Wait at least 5 minutes until it
has cooled down before removing.
–Wear oven gloves to transport the hot Steriliser from the
microwave oven to the place you are putting it down.
–When the unit is hot, only move it by the base.
–Do not use the handle of the lid to transport the unit just
incase the bottom part becomes loose and drop on the
floor.
–Take care when opening the lid as there is a risk of scalding
from the hot steam. Only open the lid by tilting so that hot
steam can escape.
–Remove bottles and accessories using the tongs provided.
To protect your child
Warning!
Children are often poor judges of hazards and this
results in them sustaining injuries, so please note the following.
–This product may only be used under adult supervision.
–Take care to ensure that the unit is always kept out of the
reach of children.
–Ensure that the plastic packaging is kept out of reach of
children - plastic packaging is not a toy.
Use
1. Carefully wash and rinse bottles and accessories.
2. Remove the lid of the Microwave Steam Steriliser.
3. Pour 200 ml water into the base of the Microwave Steam
Steriliser.
Warning!
It is essential to use a measuring jug to ensure the
200 ml capacity is adhered to exactly, otherwise the
Microwave Steam Steriliser may be damaged.
4. Put the bottles upside down in the openings provided for
them in the bottle-holder and arrange the accessories over
the remaining surface.
5. Close the lid of the Microwave Steam Steriliser.To ensure that
it is properly locked, check that the markings
(4)
are aligned.
6. Put the Microwave Steam Steriliser in the microwave oven.
7. Set the microwave oven to the relevant power and time. Do
not exceed the time quoted.
Warning!
To prevent any risk of scalding from hot steam or
hot moisture, wait 5 minutes before removing the Microwave
Steam Steriliser from the microwave oven.
8. To open the Steriliser easily,turn the lid with your fingers (see
Fig. 2), until the latch opens.Then remove the lid.
Ensure
you protect your hands/fingers adequately.
Cleaning and disinfecting
1. To avoid limescale deposits, dry the Microwave Steam
Steriliser with a cloth after every use.
2. If the steriliser becomes particularly dirty, then it can be
cleaned using warm, soapy water.
3. If you have to remove limescale, use dilute household vinegar.
Disposal
The unit can be disposed of in normal domestic waste.
Dispose of the packaging separately in accordance with your
national waste disposal regulations.
Keep the address and article no. in case of a complaint.
Power Time
1000 W 4 minutes
800 - 950 W 5 minutes
500 - 750 W 7 minutes
Esterilizador a vapor NUK
para microondas
Uso previsto
El esterilizador a vapor NUK para microondas
es práctico,
económico y apto para todos los biberones NUK (First Choice y
biberones estándar), así como para muchos otros biberones
convencionales.En él se pueden desinfectar hasta 4 biberones con
sus accesorios en tan solo 4 minutos. Todas las piezas a
desinfectar deben ser aptas para microondas.
Precaución:
Las tetinas, los chupetes, las piezas de los
sacaleches, algunos artículos de plástico y aparatos de vidrio, así
como otras piezas que no son aptas para microondas,
no deben
desinfectarse con este aparato.
El aparato es adecuado para hornos microondas con una potencia
de 500 a 1000 vatios.
Piezas suministradas
1 Tapa
(1)
; 1 Soporte para biberones
(2)
; 1 Base de llenado
(3)
;
1 Pinza para biberones (no aparece en la ilustración)
Descripción del funcionamiento
El aparato se introduce cerrado en un horno microondas. Las
microondas hacen que el agua que hay en el aparato se evapore. El
vapor caliente desinfecta las piezas que se encuentran en el aparato.
Indicaciones de seguridad
Indicaciones generales:
–Antes del uso, lea atentamente estas instrucciones de uso.
Éstas forman parte del aparato y tienen que estar a mano en
todo momento.
–Utilice el aparato solamente para el uso descrito.
–Si se esteriliza en un microondas con funciones adicionales,
por favor asegúrese de que sólo se activa la función de
microondas, es decir, no activar la función del grill, calor
superior e inferior, etc., ya que esto podría producir daños
materiales.
–No deje nunca el aparato sin vigilancia durante su utilización.
–El aparato sólo debe colocarse sobre una base firme, plana,
seca y no inflamable.
–El aparato no debe ser colocado sobre placas de cocina
calientes, en el horno caliente ni cerca de calentadores de
gas o de flujo continuo.
–Tenga en cuenta que, después de la desinfección, los
biberones sólo seguirán siendo estériles (libres de
gérmenes) mientras el aparato permanezca cerrado. Con el
aparato cerrado, los biberones permanecen sin gérmenes
durante aproximadamente 30 min.
Protección frente a las quemaduras y las escaldaduras:
El aparato funciona a altas temperaturas y con vapor caliente.
Para protegerse frente a las escaldaduras y las quemaduras, tenga
en cuenta lo siguiente:
–El esterilizador a vapor para microondas está muy caliente
cuando se saca del horno microondas. Espere al menos 5
minutos hasta que se haya enfriado lo suficiente.
–Para transportar el aparato caliente desde el horno
microondas hasta la superficie de colocación debe utilizar
siempre guantes.
–Cuando esté caliente, transpórtelo sólo por la base.
–No utilice el mango de la tapa para transportar el aparato,ya
que de lo contrario se puede soltar la parte de abajo y caer
al suelo.
–Tenga cuidado al abrir la tapa; existe peligro de escaldadura
debido al vapor de agua caliente.Abra la tapa sólo de forma
ladeada, para que pueda salir el vapor caliente.
–Para sacar los biberones y los accesorios utilice siempre las
pinzas.
Para proteger a su hijo:
¡Advertencia!
Con frecuencia, los niños no son capaces de
estimar el peligro correctamente y esto hace que se lesionen.Por
tanto, debe tener en cuenta que:
–Este producto debe utilizarse únicamente bajo la supervisión
de un adulto.
–Preste mucha atención a que el aparato se encuentre
siempre fuera del alcance de los niños.
–Tenga cuidado de que la bolsa de plástico no represente un
peligro mortal para los niños. Las bolsas de plástico del
envase no son un juguete.
Utilización
1. Lavar a fondo el biberón y los accesorios.
2. Quitar la tapa del esterilizador a vapor para microondas.
3. Poner 200 ml de agua en la base de llenado del esterilizador a
vapor para microondas.
¡Atención!
Es necesario utilizar un vaso medidor para
comprobar que la cantidad de agua sea exactamente 200 ml,
ya que de lo contrario se pueden producir daños en el
esterilizador a vapor para microondas.
4. Colocar los biberones con la abertura hacia abajo en los
orificios correspondientes del soporte de biberones, y
distribuir los accesorios por la superficie restante.
5. Cerrar la tapa del esterilizador a vapor para microondas. Para
asegurarse de que está bien cerrada, compruebe que las
marcas
(4)
estén alineadas correctamente.
6. Meter el esterilizador a vapor en el horno microondas.
7. Ajuste el horno microondas a la potencia y el tiempo
correspondiente. No debe sobrepasarse el tiempo indicado:
¡Atención!
Para evitar todo riesgo de escaldaduras debido al
vapor de agua caliente o al líquido caliente, espere 5 minutos
antes de sacar el esterilizador a vapor del horno microondas.
8. Para abrirlo fácilmente, gire la tapa con los dedos (ver fig. 2)
hasta que se abra el enclavamiento. A continuación, quitar la
tapa.
Tenga cuidado
de protegerse suficientemente las manos y
los dedos.
Limpieza y desinfección
1. Para evitar depósitos de cal, después de cada uso secar con un
paño el esterilizador a vapor para microondas.
2. Si el esterilizador se ensucia, se puede limpiar con agua tibia y
jabón.
3. Si todavía quedan depósitos de cal por limpiar, utilice vinagre
doméstico diluido.
Eliminación
El aparato se puede eliminar en la basura doméstica,
recomendándose desecharlo por separado, de acuerdo a las
normas de su país
Guarde la dirección del distribuidor y el número de referencia del
producto,por si se produjesen reclamaciones.
Potencia Tiempo
1000 vatios 4 minutos
800 - 950 vatios 5 minutos
500 - 750 vatios 7 minutos
Esterilizador a vapor para
microondas NUK
Campo de aplicação
O esterilizador a vapor para microondas NUK é prático,
económico e adequado para todos os biberões NUK (biberões
First Choice e standard), bem como para outros biberões
convencionais. Desinfecta até 4 biberões com acessórios em
apenas 4 minutos. Todas as peças a desinfectar têm de ser
adequadas para microondas.
Cuidado:
tetinas, chupetas, peças das bombas tira-leite, alguns
artigos de plástico e aparelhos de vidro, assim como outras peças
não adequadas para microondas
, não podem
ser desinfectadas
neste aparelho.
O aparelho é adequado para fornos microondas com uma
potência de 500 a 1000 Watt.
Conteúdo
1 Tampa
(1)
; 1 Suporte para biberões
(2)
; 1 Base de enchimento
(3)
; 1 Pinça para biberões (sem figura)
Descrição do funcionamento
O aparelho é colocado fechado no forno microondas. No
microondas a água é transformada em vapor. O vapor quente
desinfecta as peças que se encontram no aparelho.
Instruções de segurança
Indicações gerais:
–Antes da utilização, leia atentamente este manual de
instruções. O manual é parte integrante do aparelho e tem
de estar sempre disponível.
–Utilize o aparelho apenas para o fim aqui descrito.
–Quando proceder à esterilização num forno microondas que
contenha funções adicionais, por favor certifique-se que
APENAS a função microondas está activada, por exemplo:
não active a função grill, o aquecimento simultâneo em cima
e em baixo, pois pode conduzir a deformação no material.
–Nunca deixe o aparelho a funcionar sem vigilância.
–Oaparelho só pode ser colocado sobre uma superfície fixa,
plana, seca e não inflamável.
–O aparelho não pode ser colocado sobre uma placa de
fogão quente, dentro de um forno quente, nem junto de
esquentadores a gás ou caldeiras.
–Tenha em atenção que após a desinfecção os biberões só
permanecem esterilizados (desinfectados) se o aparelho
permanecer fechado. Os biberões, com o aparelho fechado,
permanecem esterilizados durante aprox.30 min.
Protecção contra queimaduras e escaldões:
O aparelho trabalha a altas temperaturas e vapor quente. Para se
proteger contra escaldões e queimaduras, tenha em atenção o
seguinte:
–O esterilizador a vapor para microondas está demasiado
quente quando sai do forno microondas. Aguarde pelo
menos 5 minutos até que este tenha arrefecido o suficiente.
–Apenas transporte o aparelho quente do forno microondas
utilizando luvas.
–Se estiver quente, transporte o aparelho só pela base.
–Não utilize a pega da tampa para transporte, uma vez que a
parte inferior do aparelho se pode soltar e cair ao chão.
–Tenha cuidado ao abrir a tampa, pois existe o perigo de
escaldão devido ao vapor quente da água. Retire a tampa
inclinando-a, para que o vapor possa sair.
–Retire os biberões e os acessórios apenas com a pinça para
biberões.
Para a protecção do seu filho:
Aviso!
A maior parte das vezes, as crianças não conseguem
avaliar os perigos correctamente podendo, por isso, sofrer
ferimentos. Por conseguinte, tenha em atenção que:
–Este produto só pode ser usado sob a vigilância de adultos.
–Assegure-se sempre de que o aparelho se encontra fora do
alcance das crianças.
–Tenha em atenção que a película da embalagem pode ser
fatal para as crianças. As películas da embalagem não são
brinquedos.
Utilização
1. Lave cuidadosamente os biberões e acessórios.
2. Retire a tampa do esterilizador a vapor para microondas.
3. Coloque 200 ml de água na base de enchimento do
esterilizador a vapor para microondas.
Atenção!
Utilize impreterivelmente um recipiente graduado
para obedecer à quantidade de água exacta de 200 ml, caso
contrário o esterilizador a vapor para microondas pode ficar
danificado.
4. Coloque os biberões com o gargalo virado para baixo nas
aberturas do suporte para biberões previstas para o efeito e
distribua os acessórios pelas restantes superfícies.
5. Feche a tampa do esterilizador a vapor para microondas. Para
se certificar de que o aparelho se encontra bem fechado,
verifique se as marcações
(4)
estão bem alinhadas.
6. Coloque o esterilizador a vapor para microondas no forno
microondas.
7. Regule o forno microondas para a potência e o tempo
correspondentes. O tempo indicado não deve ser excedido:
Atenção!
Aguarde 5 minutos antes de retirar o esterilizador
a vapor para microondas do forno microondas para evitar o
perigo de queimaduras devido ao vapor e humidade da água
quentes
8. Para abrir facilmente o aparelho, rode a tampa com os dedos
(ver fig. 2) até que esta se desencaixe. De seguida, retire a
tampa.
Proteja
as mãos e os dedos de forma adequada.
Limpeza e desinfecção
1. Para evitar a formação de calcário, seque o esterilizador a
vapor para microondas com um pano após cada utilização.
2. Se o esterilizador ficar particularmente sujo, pode limpá-lo
utilizando água morna com sabão.
3. Se ainda tiver camadas de calcário para remover, utilize
vinagre diluído.
Eliminação
O aparelho pode ser eliminado juntamente com o lixo doméstico
normal.
Coloque a embalagem para reciclagem de acordo com as normas
do seu país.
Guarde a morada do representante e a referência do artigo para
o caso de reclamação.
Potência Duração
1000 Watt 4 minutos
800 - 950 Watt 5 minutos
500 - 750 Watt 7 minutos
Contact addresses
MAPA GmbH
Industriestraße 21-25
D-27404 Zeven
01801 / 62 72 46
(0,04 EUR/ Min. aus dem
deutschen Festnetz, maximal
0,42 EUR/Min. aus dem
Mobilfunknetz)
e-mail: nuk-info@mapa.de
www.nuk.de
MAPA Spontex U.K. Ltd.
Berkeley Business Park,
Wainwright Road
Worcester WR4 9ZS
0845 300 2467
www.nukbaby.co.uk
Intrapharma Consumer Health
Magna Business Park
Citywest Road
Dublin 24
1.United Drug House
Roche Diagnostics, S.L.
Av. Generalitat, 171-173
08174 Sant Cugat delVallès,
Barcelona
www.nuk.com.es
Roche Sistemas de
Diagnósticos, Lda.
Estrada Nacional 249-1
2720-413 Amadora
+351 800 200 265
e-mail: info@nuk.pt
www.nuk.pt
Allègre Puériculture SNC
41 rue Edouard Martel -
BP 197
42 013 Saint Etienne Cedex 2
+33 4 77 81 81 81
www.nuk.fr
MAPA GmbH
Industriestraße 21-25
D-27404 Zeven
Germania
e-mail: nuk-italia@mapa.de
www.nuk.it
GREECE (South)
ΑΦΟΙ Κ. ΤΖΕΒΕΛΕΚΟΥ Ο.Ε.
Θράκης 34
171 21 Ν. Σµύρνη-Αθήνα
210 93 22 165
Φαξ: 210 93 50 870
GREECE (North)
ΦΑΡΜΑΠΟ ΕΕ-Χ.ΤΖΗΜΟ
& ΣΙΑ
Τ.Θ. 291 - ΚΑΛΟΧΩΡÏ 57009
ΘΗΣΣΑΛΟΝΙΚΗ
2310 751 525
Φαξ: 2310 789 621
e-mail: info@nuk.gr
A..
. .16
. 2
391-392
117292
www.nuk-baby.ru
BABY LAND
Dariusz Staniszewski
al.Stanów Zjednoczonych 67/D7
04-028 Warszawa
022 773 36 76 (78, 79, 81)
www.nuk.pl
Bitte beachten Sie auch die anderen Produkte aus
dem NUK-Programm, zum Beispiel …
NUK Eco Control+
Babyphone mit DECTTechnologie
Höchste Sicherheit mit dem Plus an Wohlbefinden!
Ausgehen macht Eltern nur Spaß, wenn sie sich auf ihren
Babysitter oder ihr Babyphone verlassen können.
Das NUK ECO Control+ Babyphone setzt deshalb auf
modernste DECT-Technologie.
•für 100% störungsfreie Signale und höchste Über-
tragungssicherheit
•mit einstellbarer Reichweite bis zu 300 m
•mit niedriger Strahlungsemission, reduzierter Strah-
lungsstärke und geringem Stromverbrauch im
Eco-Mode
•mit zwei Stationen, die perfekt aufeinander abgestimmt
sind
Weitere Informationen erhalten Sie auf
www.nuk.com
Please also bear in mind the other products from
the NUK range, for example …
NUK Eco Control+
Babyphone with DECT technology
Ensuring your child is both safe and well!
Parents can only really relax and enjoy their evening off
when they can rely on their babysitter or babyphone.
The NUK ECO Control+ Babyphone thus features the
latest DECT technology
•for 100 % interference-free signals and the most
reliable of transmission
•with adjustable coverage of up to 300 m
•with low radiation emissions, reduced emission
strength and low power consumption in eco-mode
•with two stations that work in perfect co-ordination
For more information, please visit: www.nuk.com
MicrowellenSterilisator Seite 1 Donnerstag, 24. M rz 2011 5:04 17

NUK Mikrowellen-Dampf-Vaporisator
Verwendungszweck
Der NUK Mikrowellen-Dampf-Vaporisator
ist praktisch,
wirtschaftlich und für alle NUK Flaschen (First Choice und
Standard Flaschen) sowie weitere handelsübliche Babyflaschen
geeignet. Er desinfiziert bis zu 4 Flaschen mit Zubehör in nur
4 Minuten. Alle zu desinfizierenden Teile müssen mikrowellen-
geeignet sein.
Vorsicht:
Sauger, Beruhigungssauger, Teile von Milchpumpen,
einige Kunststoffartikel und Glasgeräte, sowie alle anderen Teile,
die nicht mikrowellen-geeignet sind,
dürfen nicht
mit diesem
Gerät desinfiziert werden.
Das Gerät ist für Mikrowellen-Herde mit einer Leistung von
500 bis 1000 Watt geeignet.
Lieferumfang
1 Deckel
(1)
; 1 Flaschenhalter
(2)
; 1 Füllsockel
(3)
;
1 Flaschenzange (ohne Abbildung)
Funktionsbeschreibung
Das geschlossene Gerät wird in einen Mikrowellen-Herd gestellt.
Durch Mikrowellen wird das enthaltene Wasser verdampft. Der
heiße Dampf desinfiziert die im Gerät befindlichen Teile.
Sicherheitshinweise
Allgemeine Hinweise:
–Lesen Sie vor dem Gebrauch bitte sorgfältig diese
Bedienungsanleitung. Sie ist Bestandteil des Gerätes und
muss jederzeit verfügbar sein.
–Verwenden Sie das Gerät nur für den beschriebenen
Verwendungszweck.
–Wenn Sie zum Vaporisieren ein Mikrowellen-Gerät mit
Zusatzfunktionen benutzen, achten Sie darauf, dass nur die
Mikrowellenfunktion eingeschaltet ist. Grill-, Ober- und
Unterhitze sowie Umluft können zu Materialschäden am
Vaporisator führen.
–Lassen Sie das Gerät während des Betriebes niemals
unbeaufsichtigt.
–Das Gerät darf ausschließlich auf einem festen, ebenen,
trockenen und nicht brennbaren Untergrund aufgestellt
werden.
1
3
2
–Das Gerät darf nicht auf heiße Herdplatten gestellt, in den
heißen Backofen geschoben oder in der Nähe von Gas- und
Durchlauferhitzern aufgestellt werden.
–Beachten Sie, dass die Flaschen nach dem Desinfizieren nur
so lange keimarm (desinfiziert) bleiben, wie das Gerät
geschlossen bleibt. Bei geschlossenem Gerät bleiben die
Flaschen etwa 30 min keimarm.
Schutz vor Verbrennungen und Verbrühungen:
Das Gerät arbeitet mit hohen Temperaturen und heißem Dampf.
Um sich vor Verbrühungen und Verbrennungen zu schützen,
beachten Sie daher folgendes:
–Der Mikrowellen-Dampf-Vaporisator ist sehr heiß, wenn er
aus dem Mikrowellen-Herd kommt. Mindestens 5 Minuten
abwarten, bis er ausreichend abgekühlt ist.
–Das heiße Gerät nur unter Verwendung von Handschuhen
vom Mikrowellen-Herd zurAblagestelle transportieren.
–Im heißen Zustand nur am Sockel transportieren.
–Nicht den Deckelgriff zum Transport benutzen, da sich sonst
das Unterteil lösen und zu Boden fallen könnte.
–Vorsicht beim Öffnen des Deckels; durch den heißen
Wasserdampf besteht Verbrühungsgefahr. Deckel nur durch
Kippen öffnen, damit heißer Dampf entweichen kann.
–Flaschen und Zubehör nur mit der Flaschenzange
entnehmen.
Zum Schutz Ihres Kindes:
Warnung!
Kinder können Gefahren oft nicht richtig einschätzen
und sich dadurchVerletzungen zuziehen. Beachten Sie daher:
–Dieses Produkt darf nur unter Aufsicht von Erwachsenen
verwendet werden.
–Achten Sie sorgfältig darauf, dass sich das Gerät immer
außerhalb der Reichweite von Kindern befindet.
–Achten Sie darauf, dass die Verpackungsfolie nicht zur
tödlichen Falle für Kinder wird.Verpackungsfolien sind kein
Spielzeug.
Anwendung
1. Flaschen und Zubehör sorgfältig waschen und spülen.
2. Deckel des Mikrowellen-Dampf-Vaporisators abnehmen.
3. 200 ml Wasser in den Füllsockel des Mikrowellen-Dampf-
Vaporisators eingießen.
Achtung!
Benutzen Sie unbedingt einen Messbecher um die
Füllmenge von 200 ml exakt einzuhalten, da sonst
Beschädigungen des Mikrowellen-Dampf-Vaporisators möglich
sind.
4. Die Flaschen mit der Öffnung nach unten in die dafür
vorgesehenen Öffnungen des Flaschenhalters setzen und das
Zubehör auf der verbleibenden Fläche verteilen.
5. Deckel des Mikrowellen-Dampf-Vaporisators schließen. Um
sicher zu gehen, dass er richtig verschlossen ist, darauf achten,
dass die Markierungen
(4)
entsprechend ausgerichtet sind.
6. Den Mikrowellen-Dampf-Vaporisator in den Mikrowellen-
Herd stellen.
7. Stellen Sie den Mikrowellen-Herd auf die entsprechende
Leistung und Zeit. Die angegebene Zeit sollte nicht
überschritten werden:
Achtung!
Um jegliche Verbrühungsgefahr durch heißen
Wasserdampf oder heiße Feuchtigkeit zu vermeiden,
5 Minuten warten, bevor Sie den Mikrowellen-Dampf-
Vaporisator aus dem Mikrowellen-Herd herausnehmen.
8. Zum leichten Öffnen den Deckel mit den Fingern drehen
(siehe Abb. 2), bis Verrastung sich öffnet. Dann Deckel
abnehmen.
Achten
Sie auf ausreichenden Hand-/ und Fingerschutz.
Reinigung und Desinfektion
1. Um Kalkablagerungen zu vermeiden, den Mikrowellen-Dampf-
Vaporisator nach jedem Gebrauch mit einem Tuch abtrocknen.
2. Bei größeren Verschmutzungen kann das Gerät mit einem
Handspülmittel gereinigt werden.
3. Sollten Sie noch Kalkablagerungen entfernen müssen,
verwenden Sie verdünnten Haushaltsessig.
Entsorgung
Das Gerät kann über den normalen Hausmüll entsorgt werden.
Führen Sie die Verpackung einer getrennten Entsorgung
entsprechend derVorschriften in Ihrem Land zu.
Bewahren Sie für den Reklamationsfall Anschrift und Art.-Nr.auf.
Leistung Dauer
1000 Watt 4 Minuten
800 - 950 Watt 5 Minuten
500 - 750 Watt 7 Minuten
4
NUK Microwave Steam Steriliser
Usage
The NUK Microwave Steam Steriliser
is practical, economical
and suitable for all NUK bottles (First Choice and Standard
bottles) and for other commercially available baby feeding bottles.
The Steriliser disinfects up to 4 bottles and accessories in just
4 minutes. Most of your baby feeding bottle parts should be
suitable for microwave sterilisation.
Caution:
Teats, soothers, breast pump parts, some plastic items,
glass equipment and some other parts which are unsuitable for
microwaving
must not be
disinfected in this appliance, therefore
please always check before microwaving any items.
The Steriliser is suitable for microwaves with an output of
between 500 and 1000W.
Scope of supply
1 lid
(1)
; 1 bottle-holder
(2)
; 1 base for filling
(3)
;
1 pair of bottle tongs (not illustrated)
Description of use
The sealed Microwave Steam Steriliser is placed in the microwave.
The microwave then allows the water to evaporate and the hot
steam which is generated to disinfect the parts inside.
Safety instructions
General instructions
–Please read these operating instructions carefully before
using the Steriliser. These instructions are part of the
Steriliser and must be available at all times.
–Use the Steriliser only for the intended purpose described.
–When sterilising in a microwave oven with additional
functions, please ensure that ONLY the microwave function
is activated, i.e. do not activate the grill function, the upper
and lower heat, etc. as this may lead to material damage.
–Never leave the unit unsupervised during operation.
–The Steriliser may only be set up on a firm, level, dry and
non-flammable surface.
–The Steriliser must not be placed on cooker hotplates, put
in a hot oven or set up close to gas and flow heaters.
–Be aware that after disinfecting, bottles only remain sterile
(disinfected) as long as the Steriliser remains closed. The
bottles will remain sterile for about 30 minutes with the unit
closed.
Preventing burns and scalds
The Steriliser operates at high temperatures using hot steam.To
avoid burning or scalding yourself please follow the instructions
below.
–The Microwave Steam Steriliser is very hot when it comes
out of the microwave oven.Wait at least 5 minutes until it
has cooled down before removing.
–Wear oven gloves to transport the hot Steriliser from the
microwave oven to the place you are putting it down.
–When the unit is hot, only move it by the base.
–Do not use the handle of the lid to transport the unit just
incase the bottom part becomes loose and drop on the
floor.
–Take care when opening the lid as there is a risk of scalding
from the hot steam. Only open the lid by tilting so that hot
steam can escape.
–Remove bottles and accessories using the tongs provided.
To protect your child
Warning!
Children are often poor judges of hazards and this
results in them sustaining injuries, so please note the following.
–This product may only be used under adult supervision.
–Take care to ensure that the unit is always kept out of the
reach of children.
–Ensure that the plastic packaging is kept out of reach of
children - plastic packaging is not a toy.
Use
1. Carefully wash and rinse bottles and accessories.
2. Remove the lid of the Microwave Steam Steriliser.
3. Pour 200 ml water into the base of the Microwave Steam
Steriliser.
Warning!
It is essential to use a measuring jug to ensure the
200 ml capacity is adhered to exactly, otherwise the
Microwave Steam Steriliser may be damaged.
4. Put the bottles upside down in the openings provided for
them in the bottle-holder and arrange the accessories over
the remaining surface.
5. Close the lid of the Microwave Steam Steriliser.To ensure that
it is properly locked, check that the markings
(4)
are aligned.
6. Put the Microwave Steam Steriliser in the microwave oven.
7. Set the microwave oven to the relevant power and time. Do
not exceed the time quoted.
Warning!
To prevent any risk of scalding from hot steam or
hot moisture, wait 5 minutes before removing the Microwave
Steam Steriliser from the microwave oven.
8. To open the Steriliser easily, turn the lid with your fingers (see
Fig. 2), until the latch opens.Then remove the lid.
Ensure
you protect your hands/fingers adequately.
Cleaning and disinfecting
1. To avoid limescale deposits, dry the Microwave Steam
Steriliser with a cloth after every use.
2. If the steriliser becomes particularly dirty, then it can be
cleaned using warm, soapy water.
3. If you have to remove limescale, use dilute household vinegar.
Disposal
The unit can be disposed of in normal domestic waste.
Dispose of the packaging separately in accordance with your
national waste disposal regulations.
Keep the address and article no. in case of a complaint.
Power Time
1000 W 4 minutes
800 - 950 W 5 minutes
500 - 750 W 7 minutes
Esterilizador a vapor NUK
para microondas
Uso previsto
El esterilizador a vapor NUK para microondas
es práctico,
económico y apto para todos los biberones NUK (First Choice y
biberones estándar), así como para muchos otros biberones
convencionales.En él se pueden desinfectar hasta 4 biberones con
sus accesorios en tan solo 4 minutos. Todas las piezas a
desinfectar deben ser aptas para microondas.
Precaución:
Las tetinas, los chupetes, las piezas de los
sacaleches, algunos artículos de plástico y aparatos de vidrio, así
como otras piezas que no son aptas para microondas,
no deben
desinfectarse con este aparato.
El aparato es adecuado para hornos microondas con una potencia
de 500 a 1000 vatios.
Piezas suministradas
1 Tapa
(1)
; 1 Soporte para biberones
(2)
; 1 Base de llenado
(3)
;
1 Pinza para biberones (no aparece en la ilustración)
Descripción del funcionamiento
El aparato se introduce cerrado en un horno microondas. Las
microondas hacen que el agua que hay en el aparato se evapore. El
vapor caliente desinfecta las piezas que se encuentran en el aparato.
Indicaciones de seguridad
Indicaciones generales:
–Antes del uso, lea atentamente estas instrucciones de uso.
Éstas forman parte del aparato y tienen que estar a mano en
todo momento.
–Utilice el aparato solamente para el uso descrito.
–Si se esteriliza en un microondas con funciones adicionales,
por favor asegúrese de que sólo se activa la función de
microondas, es decir, no activar la función del grill, calor
superior e inferior, etc., ya que esto podría producir daños
materiales.
–No deje nunca el aparato sin vigilancia durante su utilización.
–El aparato sólo debe colocarse sobre una base firme, plana,
seca y no inflamable.
–El aparato no debe ser colocado sobre placas de cocina
calientes, en el horno caliente ni cerca de calentadores de
gas o de flujo continuo.
–Tenga en cuenta que, después de la desinfección, los
biberones sólo seguirán siendo estériles (libres de
gérmenes) mientras el aparato permanezca cerrado. Con el
aparato cerrado, los biberones permanecen sin gérmenes
durante aproximadamente 30 min.
Protección frente a las quemaduras y las escaldaduras:
El aparato funciona a altas temperaturas y con vapor caliente.
Para protegerse frente a las escaldaduras y las quemaduras, tenga
en cuenta lo siguiente:
–El esterilizador a vapor para microondas está muy caliente
cuando se saca del horno microondas. Espere al menos 5
minutos hasta que se haya enfriado lo suficiente.
–Para transportar el aparato caliente desde el horno
microondas hasta la superficie de colocación debe utilizar
siempre guantes.
–Cuando esté caliente, transpórtelo sólo por la base.
–No utilice el mango de la tapa para transportar el aparato,ya
que de lo contrario se puede soltar la parte de abajo y caer
al suelo.
–Tenga cuidado al abrir la tapa; existe peligro de escaldadura
debido al vapor de agua caliente.Abra la tapa sólo de forma
ladeada, para que pueda salir el vapor caliente.
–Para sacar los biberones y los accesorios utilice siempre las
pinzas.
Para proteger a su hijo:
¡Advertencia!
Con frecuencia, los niños no son capaces de
estimar el peligro correctamente y esto hace que se lesionen.Por
tanto, debe tener en cuenta que:
–Este producto debe utilizarse únicamente bajo la supervisión
de un adulto.
–Preste mucha atención a que el aparato se encuentre
siempre fuera del alcance de los niños.
–Tenga cuidado de que la bolsa de plástico no represente un
peligro mortal para los niños. Las bolsas de plástico del
envase no son un juguete.
Utilización
1. Lavar a fondo el biberón y los accesorios.
2. Quitar la tapa del esterilizador a vapor para microondas.
3. Poner 200 ml de agua en la base de llenado del esterilizador a
vapor para microondas.
¡Atención!
Es necesario utilizar un vaso medidor para
comprobar que la cantidad de agua sea exactamente 200 ml,
ya que de lo contrario se pueden producir daños en el
esterilizador a vapor para microondas.
4. Colocar los biberones con la abertura hacia abajo en los
orificios correspondientes del soporte de biberones, y
distribuir los accesorios por la superficie restante.
5. Cerrar la tapa del esterilizador a vapor para microondas. Para
asegurarse de que está bien cerrada, compruebe que las
marcas
(4)
estén alineadas correctamente.
6. Meter el esterilizador a vapor en el horno microondas.
7. Ajuste el horno microondas a la potencia y el tiempo
correspondiente. No debe sobrepasarse el tiempo indicado:
¡Atención!
Para evitar todo riesgo de escaldaduras debido al
vapor de agua caliente o al líquido caliente, espere 5 minutos
antes de sacar el esterilizador a vapor del horno microondas.
8. Para abrirlo fácilmente, gire la tapa con los dedos (ver fig. 2)
hasta que se abra el enclavamiento. A continuación, quitar la
tapa.
Tenga cuidado
de protegerse suficientemente las manos y
los dedos.
Limpieza y desinfección
1. Para evitar depósitos de cal, después de cada uso secar con un
paño el esterilizador a vapor para microondas.
2. Si el esterilizador se ensucia, se puede limpiar con agua tibia y
jabón.
3. Si todavía quedan depósitos de cal por limpiar, utilice vinagre
doméstico diluido.
Eliminación
El aparato se puede eliminar en la basura doméstica,
recomendándose desecharlo por separado, de acuerdo a las
normas de su país
Guarde la dirección del distribuidor y el número de referencia del
producto,por si se produjesen reclamaciones.
Potencia Tiempo
1000 vatios 4 minutos
800 - 950 vatios 5 minutos
500 - 750 vatios 7 minutos
Esterilizador a vapor para
microondas NUK
Campo de aplicação
O esterilizador a vapor para microondas NUK é prático,
económico e adequado para todos os biberões NUK (biberões
First Choice e standard), bem como para outros biberões
convencionais. Desinfecta até 4 biberões com acessórios em
apenas 4 minutos. Todas as peças a desinfectar têm de ser
adequadas para microondas.
Cuidado:
tetinas, chupetas, peças das bombas tira-leite, alguns
artigos de plástico e aparelhos de vidro, assim como outras peças
não adequadas para microondas
, não podem
ser desinfectadas
neste aparelho.
O aparelho é adequado para fornos microondas com uma
potência de 500 a 1000 Watt.
Conteúdo
1 Tampa
(1)
; 1 Suporte para biberões
(2)
; 1 Base de enchimento
(3)
; 1 Pinça para biberões (sem figura)
Descrição do funcionamento
O aparelho é colocado fechado no forno microondas. No
microondas a água é transformada em vapor. O vapor quente
desinfecta as peças que se encontram no aparelho.
Instruções de segurança
Indicações gerais:
–Antes da utilização, leia atentamente este manual de
instruções. O manual é parte integrante do aparelho e tem
de estar sempre disponível.
–Utilize o aparelho apenas para o fim aqui descrito.
–Quando proceder à esterilização num forno microondas que
contenha funções adicionais, por favor certifique-se que
APENAS a função microondas está activada, por exemplo:
não active a função grill, o aquecimento simultâneo em cima
e em baixo, pois pode conduzir a deformação no material.
–Nunca deixe o aparelho a funcionar sem vigilância.
–Oaparelho só pode ser colocado sobre uma superfície fixa,
plana, seca e não inflamável.
–O aparelho não pode ser colocado sobre uma placa de
fogão quente, dentro de um forno quente, nem junto de
esquentadores a gás ou caldeiras.
–Tenha em atenção que após a desinfecção os biberões só
permanecem esterilizados (desinfectados) se o aparelho
permanecer fechado. Os biberões, com o aparelho fechado,
permanecem esterilizados durante aprox.30 min.
Protecção contra queimaduras e escaldões:
O aparelho trabalha a altas temperaturas e vapor quente. Para se
proteger contra escaldões e queimaduras, tenha em atenção o
seguinte:
–O esterilizador a vapor para microondas está demasiado
quente quando sai do forno microondas. Aguarde pelo
menos 5 minutos até que este tenha arrefecido o suficiente.
–Apenas transporte o aparelho quente do forno microondas
utilizando luvas.
–Se estiver quente, transporte o aparelho só pela base.
–Não utilize a pega da tampa para transporte, uma vez que a
parte inferior do aparelho se pode soltar e cair ao chão.
–Tenha cuidado ao abrir a tampa, pois existe o perigo de
escaldão devido ao vapor quente da água. Retire a tampa
inclinando-a, para que o vapor possa sair.
–Retire os biberões e os acessórios apenas com a pinça para
biberões.
Para a protecção do seu filho:
Aviso!
A maior parte das vezes, as crianças não conseguem
avaliar os perigos correctamente podendo, por isso, sofrer
ferimentos. Por conseguinte, tenha em atenção que:
–Este produto só pode ser usado sob a vigilância de adultos.
–Assegure-se sempre de que o aparelho se encontra fora do
alcance das crianças.
–Tenha em atenção que a película da embalagem pode ser
fatal para as crianças. As películas da embalagem não são
brinquedos.
Utilização
1. Lave cuidadosamente os biberões e acessórios.
2. Retire a tampa do esterilizador a vapor para microondas.
3. Coloque 200 ml de água na base de enchimento do
esterilizador a vapor para microondas.
Atenção!
Utilize impreterivelmente um recipiente graduado
para obedecer à quantidade de água exacta de 200 ml, caso
contrário o esterilizador a vapor para microondas pode ficar
danificado.
4. Coloque os biberões com o gargalo virado para baixo nas
aberturas do suporte para biberões previstas para o efeito e
distribua os acessórios pelas restantes superfícies.
5. Feche a tampa do esterilizador a vapor para microondas. Para
se certificar de que o aparelho se encontra bem fechado,
verifique se as marcações
(4)
estão bem alinhadas.
6. Coloque o esterilizador a vapor para microondas no forno
microondas.
7. Regule o forno microondas para a potência e o tempo
correspondentes. O tempo indicado não deve ser excedido:
Atenção!
Aguarde 5 minutos antes de retirar o esterilizador
a vapor para microondas do forno microondas para evitar o
perigo de queimaduras devido ao vapor e humidade da água
quentes
8. Para abrir facilmente o aparelho, rode a tampa com os dedos
(ver fig. 2) até que esta se desencaixe. De seguida, retire a
tampa.
Proteja
as mãos e os dedos de forma adequada.
Limpeza e desinfecção
1. Para evitar a formação de calcário, seque o esterilizador a
vapor para microondas com um pano após cada utilização.
2. Se o esterilizador ficar particularmente sujo, pode limpá-lo
utilizando água morna com sabão.
3. Se ainda tiver camadas de calcário para remover, utilize
vinagre diluído.
Eliminação
O aparelho pode ser eliminado juntamente com o lixo doméstico
normal.
Coloque a embalagem para reciclagem de acordo com as normas
do seu país.
Guarde a morada do representante e a referência do artigo para
o caso de reclamação.
Potência Duração
1000 Watt 4 minutos
800 - 950 Watt 5 minutos
500 - 750 Watt 7 minutos
Contact addresses
MAPA GmbH
Industriestraße 21-25
D-27404 Zeven
01801 / 62 72 46
(0,04 EUR/ Min. aus dem
deutschen Festnetz, maximal
0,42 EUR/Min. aus dem
Mobilfunknetz)
e-mail: nuk-info@mapa.de
www.nuk.de
MAPA Spontex U.K. Ltd.
Berkeley Business Park,
Wainwright Road
Worcester WR4 9ZS
0845 300 2467
www.nukbaby.co.uk
Intrapharma Consumer Health
Magna Business Park
Citywest Road
Dublin 24
1.United Drug House
Roche Diagnostics, S.L.
Av. Generalitat, 171-173
08174 Sant Cugat delVallès,
Barcelona
www.nuk.com.es
Roche Sistemas de
Diagnósticos, Lda.
Estrada Nacional 249-1
2720-413 Amadora
+351 800 200 265
e-mail: info@nuk.pt
www.nuk.pt
Allègre Puériculture SNC
41 rue Edouard Martel -
BP 197
42 013 Saint Etienne Cedex 2
+33 4 77 81 81 81
www.nuk.fr
MAPA GmbH
Industriestraße 21-25
D-27404 Zeven
Germania
e-mail: nuk-italia@mapa.de
www.nuk.it
GREECE (South)
ΑΦΟΙ Κ. ΤΖΕΒΕΛΕΚΟΥ Ο.Ε.
Θράκης 34
171 21 Ν. Σµύρνη-Αθήνα
210 93 22 165
Φαξ: 210 93 50 870
GREECE (North)
ΦΑΡΜΑΠΟ ΕΕ-Χ.ΤΖΗΜΟ
& ΣΙΑ
Τ.Θ. 291 - ΚΑΛΟΧΩΡÏ 57009
ΘΗΣΣΑΛΟΝΙΚΗ
2310 751 525
Φαξ: 2310 789 621
e-mail: info@nuk.gr
A..
. .16
. 2
391-392
117292
www.nuk-baby.ru
BABY LAND
Dariusz Staniszewski
al.Stanów Zjednoczonych 67/D7
04-028 Warszawa
022 773 36 76 (78, 79, 81)
www.nuk.pl
Bitte beachten Sie auch die anderen Produkte aus
dem NUK-Programm, zum Beispiel …
NUK Eco Control+
Babyphone mit DECTTechnologie
Höchste Sicherheit mit dem Plus an Wohlbefinden!
Ausgehen macht Eltern nur Spaß, wenn sie sich auf ihren
Babysitter oder ihr Babyphone verlassen können.
Das NUK ECO Control+ Babyphone setzt deshalb auf
modernste DECT-Technologie.
•für 100% störungsfreie Signale und höchste Über-
tragungssicherheit
•mit einstellbarer Reichweite bis zu 300 m
•mit niedriger Strahlungsemission, reduzierter Strah-
lungsstärke und geringem Stromverbrauch im
Eco-Mode
•mit zwei Stationen, die perfekt aufeinander abgestimmt
sind
Weitere Informationen erhalten Sie auf
www.nuk.com
Please also bear in mind the other products from
the NUK range, for example …
NUK Eco Control+
Babyphone with DECT technology
Ensuring your child is both safe and well!
Parents can only really relax and enjoy their evening off
when they can rely on their babysitter or babyphone.
The NUK ECO Control+ Babyphone thus features the
latest DECT technology
•for 100 % interference-free signals and the most
reliable of transmission
•with adjustable coverage of up to 300 m
•with low radiation emissions, reduced emission
strength and low power consumption in eco-mode
•with two stations that work in perfect co-ordination
For more information, please visit: www.nuk.com
MicrowellenSterilisator Seite 1 Donnerstag, 24. M rz 2011 5:04 17

NUK Mikrowellen-Dampf-Vaporisator
Verwendungszweck
Der NUK Mikrowellen-Dampf-Vaporisator
ist praktisch,
wirtschaftlich und für alle NUK Flaschen (First Choice und
Standard Flaschen) sowie weitere handelsübliche Babyflaschen
geeignet. Er desinfiziert bis zu 4 Flaschen mit Zubehör in nur
4 Minuten. Alle zu desinfizierenden Teile müssen mikrowellen-
geeignet sein.
Vorsicht:
Sauger, Beruhigungssauger, Teile von Milchpumpen,
einige Kunststoffartikel und Glasgeräte, sowie alle anderen Teile,
die nicht mikrowellen-geeignet sind,
dürfen nicht
mit diesem
Gerät desinfiziert werden.
Das Gerät ist für Mikrowellen-Herde mit einer Leistung von
500 bis 1000 Watt geeignet.
Lieferumfang
1 Deckel
(1)
; 1 Flaschenhalter
(2)
; 1 Füllsockel
(3)
;
1 Flaschenzange (ohne Abbildung)
Funktionsbeschreibung
Das geschlossene Gerät wird in einen Mikrowellen-Herd gestellt.
Durch Mikrowellen wird das enthaltene Wasser verdampft. Der
heiße Dampf desinfiziert die im Gerät befindlichen Teile.
Sicherheitshinweise
Allgemeine Hinweise:
–Lesen Sie vor dem Gebrauch bitte sorgfältig diese
Bedienungsanleitung. Sie ist Bestandteil des Gerätes und
muss jederzeit verfügbar sein.
–Verwenden Sie das Gerät nur für den beschriebenen
Verwendungszweck.
–Wenn Sie zum Vaporisieren ein Mikrowellen-Gerät mit
Zusatzfunktionen benutzen, achten Sie darauf, dass nur die
Mikrowellenfunktion eingeschaltet ist. Grill-, Ober- und
Unterhitze sowie Umluft können zu Materialschäden am
Vaporisator führen.
–Lassen Sie das Gerät während des Betriebes niemals
unbeaufsichtigt.
–Das Gerät darf ausschließlich auf einem festen, ebenen,
trockenen und nicht brennbaren Untergrund aufgestellt
werden.
1
3
2
–Das Gerät darf nicht auf heiße Herdplatten gestellt, in den
heißen Backofen geschoben oder in der Nähe von Gas- und
Durchlauferhitzern aufgestellt werden.
–Beachten Sie, dass die Flaschen nach dem Desinfizieren nur
so lange keimarm (desinfiziert) bleiben, wie das Gerät
geschlossen bleibt. Bei geschlossenem Gerät bleiben die
Flaschen etwa 30 min keimarm.
Schutz vor Verbrennungen und Verbrühungen:
Das Gerät arbeitet mit hohen Temperaturen und heißem Dampf.
Um sich vor Verbrühungen und Verbrennungen zu schützen,
beachten Sie daher folgendes:
–Der Mikrowellen-Dampf-Vaporisator ist sehr heiß, wenn er
aus dem Mikrowellen-Herd kommt. Mindestens 5 Minuten
abwarten, bis er ausreichend abgekühlt ist.
–Das heiße Gerät nur unter Verwendung von Handschuhen
vom Mikrowellen-Herd zurAblagestelle transportieren.
–Im heißen Zustand nur am Sockel transportieren.
–Nicht den Deckelgriff zumTransport benutzen, da sich sonst
das Unterteil lösen und zu Boden fallen könnte.
–Vorsicht beim Öffnen des Deckels; durch den heißen
Wasserdampf besteht Verbrühungsgefahr. Deckel nur durch
Kippen öffnen, damit heißer Dampf entweichen kann.
–Flaschen und Zubehör nur mit der Flaschenzange
entnehmen.
Zum Schutz Ihres Kindes:
Warnung!
Kinder können Gefahren oft nicht richtig einschätzen
und sich dadurchVerletzungen zuziehen. Beachten Sie daher:
–Dieses Produkt darf nur unter Aufsicht von Erwachsenen
verwendet werden.
–Achten Sie sorgfältig darauf, dass sich das Gerät immer
außerhalb der Reichweite von Kindern befindet.
–Achten Sie darauf, dass die Verpackungsfolie nicht zur
tödlichen Falle für Kinder wird.Verpackungsfolien sind kein
Spielzeug.
Anwendung
1. Flaschen und Zubehör sorgfältig waschen und spülen.
2. Deckel des Mikrowellen-Dampf-Vaporisators abnehmen.
3. 200 ml Wasser in den Füllsockel des Mikrowellen-Dampf-
Vaporisators eingießen.
Achtung!
Benutzen Sie unbedingt einen Messbecher um die
Füllmenge von 200 ml exakt einzuhalten, da sonst
Beschädigungen des Mikrowellen-Dampf-Vaporisators möglich
sind.
4. Die Flaschen mit der Öffnung nach unten in die dafür
vorgesehenen Öffnungen des Flaschenhalters setzen und das
Zubehör auf der verbleibenden Fläche verteilen.
5. Deckel des Mikrowellen-Dampf-Vaporisators schließen. Um
sicher zu gehen, dass er richtig verschlossen ist, darauf achten,
dass die Markierungen
(4)
entsprechend ausgerichtet sind.
6. Den Mikrowellen-Dampf-Vaporisator in den Mikrowellen-
Herd stellen.
7. Stellen Sie den Mikrowellen-Herd auf die entsprechende
Leistung und Zeit. Die angegebene Zeit sollte nicht
überschritten werden:
Achtung!
Um jegliche Verbrühungsgefahr durch heißen
Wasserdampf oder heiße Feuchtigkeit zu vermeiden,
5 Minuten warten, bevor Sie den Mikrowellen-Dampf-
Vaporisator aus dem Mikrowellen-Herd herausnehmen.
8. Zum leichten Öffnen den Deckel mit den Fingern drehen
(siehe Abb. 2), bis Verrastung sich öffnet. Dann Deckel
abnehmen.
Achten
Sie auf ausreichenden Hand-/ und Fingerschutz.
Reinigung und Desinfektion
1. Um Kalkablagerungen zu vermeiden, den Mikrowellen-Dampf-
Vaporisator nach jedem Gebrauch mit einem Tuch abtrocknen.
2. Bei größeren Verschmutzungen kann das Gerät mit einem
Handspülmittel gereinigt werden.
3. Sollten Sie noch Kalkablagerungen entfernen müssen,
verwenden Sie verdünnten Haushaltsessig.
Entsorgung
Das Gerät kann über den normalen Hausmüll entsorgt werden.
Führen Sie die Verpackung einer getrennten Entsorgung
entsprechend derVorschriften in Ihrem Land zu.
Bewahren Sie für den Reklamationsfall Anschrift und Art.-Nr. auf.
Leistung Dauer
1000 Watt 4 Minuten
800 - 950 Watt 5 Minuten
500 - 750 Watt 7 Minuten
4
NUK Microwave Steam Steriliser
Usage
The NUK Microwave Steam Steriliser
is practical, economical
and suitable for all NUK bottles (First Choice and Standard
bottles) and for other commercially available baby feeding bottles.
The Steriliser disinfects up to 4 bottles and accessories in just
4 minutes. Most of your baby feeding bottle parts should be
suitable for microwave sterilisation.
Caution:
Teats, soothers, breast pump parts, some plastic items,
glass equipment and some other parts which are unsuitable for
microwaving
must not be
disinfected in this appliance, therefore
please always check before microwaving any items.
The Steriliser is suitable for microwaves with an output of
between 500 and 1000W.
Scope of supply
1 lid
(1)
; 1 bottle-holder
(2)
; 1 base for filling
(3)
;
1 pair of bottle tongs (not illustrated)
Description of use
The sealed Microwave Steam Steriliser is placed in the microwave.
The microwave then allows the water to evaporate and the hot
steam which is generated to disinfect the parts inside.
Safety instructions
General instructions
–Please read these operating instructions carefully before
using the Steriliser. These instructions are part of the
Steriliser and must be available at all times.
–Use the Steriliser only for the intended purpose described.
–When sterilising in a microwave oven with additional
functions, please ensure that ONLY the microwave function
is activated, i.e. do not activate the grill function, the upper
and lower heat, etc. as this may lead to material damage.
–Never leave the unit unsupervised during operation.
–The Steriliser may only be set up on a firm, level, dry and
non-flammable surface.
–The Steriliser must not be placed on cooker hotplates, put
in a hot oven or set up close to gas and flow heaters.
–Be aware that after disinfecting, bottles only remain sterile
(disinfected) as long as the Steriliser remains closed. The
bottles will remain sterile for about 30 minutes with the unit
closed.
Preventing burns and scalds
The Steriliser operates at high temperatures using hot steam.To
avoid burning or scalding yourself please follow the instructions
below.
–The Microwave Steam Steriliser is very hot when it comes
out of the microwave oven.Wait at least 5 minutes until it
has cooled down before removing.
–Wear oven gloves to transport the hot Steriliser from the
microwave oven to the place you are putting it down.
–When the unit is hot, only move it by the base.
–Do not use the handle of the lid to transport the unit just
incase the bottom part becomes loose and drop on the
floor.
–Take care when opening the lid as there is a risk of scalding
from the hot steam. Only open the lid by tilting so that hot
steam can escape.
–Remove bottles and accessories using the tongs provided.
To protect your child
Warning!
Children are often poor judges of hazards and this
results in them sustaining injuries, so please note the following.
–This product may only be used under adult supervision.
–Take care to ensure that the unit is always kept out of the
reach of children.
–Ensure that the plastic packaging is kept out of reach of
children - plastic packaging is not a toy.
Use
1. Carefully wash and rinse bottles and accessories.
2. Remove the lid of the Microwave Steam Steriliser.
3. Pour 200 ml water into the base of the Microwave Steam
Steriliser.
Warning!
It is essential to use a measuring jug to ensure the
200 ml capacity is adhered to exactly, otherwise the
Microwave Steam Steriliser may be damaged.
4. Put the bottles upside down in the openings provided for
them in the bottle-holder and arrange the accessories over
the remaining surface.
5. Close the lid of the Microwave Steam Steriliser.To ensure that
it is properly locked, check that the markings
(4)
are aligned.
6. Put the Microwave Steam Steriliser in the microwave oven.
7. Set the microwave oven to the relevant power and time. Do
not exceed the time quoted.
Warning!
To prevent any risk of scalding from hot steam or
hot moisture, wait 5 minutes before removing the Microwave
Steam Steriliser from the microwave oven.
8. To open the Steriliser easily,turn the lid with your fingers (see
Fig. 2), until the latch opens.Then remove the lid.
Ensure
you protect your hands/fingers adequately.
Cleaning and disinfecting
1. To avoid limescale deposits, dry the Microwave Steam
Steriliser with a cloth after every use.
2. If the steriliser becomes particularly dirty, then it can be
cleaned using warm, soapy water.
3. If you have to remove limescale, use dilute household vinegar.
Disposal
The unit can be disposed of in normal domestic waste.
Dispose of the packaging separately in accordance with your
national waste disposal regulations.
Keep the address and article no. in case of a complaint.
Power Time
1000 W 4 minutes
800 - 950 W 5 minutes
500 - 750 W 7 minutes
Esterilizador a vapor NUK
para microondas
Uso previsto
El esterilizador a vapor NUK para microondas
es práctico,
económico y apto para todos los biberones NUK (First Choice y
biberones estándar), así como para muchos otros biberones
convencionales.En él se pueden desinfectar hasta 4 biberones con
sus accesorios en tan solo 4 minutos. Todas las piezas a
desinfectar deben ser aptas para microondas.
Precaución:
Las tetinas, los chupetes, las piezas de los
sacaleches, algunos artículos de plástico y aparatos de vidrio, así
como otras piezas que no son aptas para microondas,
no deben
desinfectarse con este aparato.
El aparato es adecuado para hornos microondas con una potencia
de 500 a 1000 vatios.
Piezas suministradas
1 Tapa
(1)
; 1 Soporte para biberones
(2)
; 1 Base de llenado
(3)
;
1 Pinza para biberones (no aparece en la ilustración)
Descripción del funcionamiento
El aparato se introduce cerrado en un horno microondas. Las
microondas hacen que el agua que hay en el aparato se evapore. El
vapor caliente desinfecta las piezas que se encuentran en el aparato.
Indicaciones de seguridad
Indicaciones generales:
–Antes del uso, lea atentamente estas instrucciones de uso.
Éstas forman parte del aparato y tienen que estar a mano en
todo momento.
–Utilice el aparato solamente para el uso descrito.
–Si se esteriliza en un microondas con funciones adicionales,
por favor asegúrese de que sólo se activa la función de
microondas, es decir, no activar la función del grill, calor
superior e inferior, etc., ya que esto podría producir daños
materiales.
–No deje nunca el aparato sin vigilancia durante su utilización.
–El aparato sólo debe colocarse sobre una base firme, plana,
seca y no inflamable.
–El aparato no debe ser colocado sobre placas de cocina
calientes, en el horno caliente ni cerca de calentadores de
gas o de flujo continuo.
–Tenga en cuenta que, después de la desinfección, los
biberones sólo seguirán siendo estériles (libres de
gérmenes) mientras el aparato permanezca cerrado. Con el
aparato cerrado, los biberones permanecen sin gérmenes
durante aproximadamente 30 min.
Protección frente a las quemaduras y las escaldaduras:
El aparato funciona a altas temperaturas y con vapor caliente.
Para protegerse frente a las escaldaduras y las quemaduras, tenga
en cuenta lo siguiente:
–El esterilizador a vapor para microondas está muy caliente
cuando se saca del horno microondas. Espere al menos 5
minutos hasta que se haya enfriado lo suficiente.
–Para transportar el aparato caliente desde el horno
microondas hasta la superficie de colocación debe utilizar
siempre guantes.
–Cuando esté caliente, transpórtelo sólo por la base.
–No utilice el mango de la tapa para transportar el aparato,ya
que de lo contrario se puede soltar la parte de abajo y caer
al suelo.
–Tenga cuidado al abrir la tapa; existe peligro de escaldadura
debido al vapor de agua caliente.Abra la tapa sólo de forma
ladeada, para que pueda salir el vapor caliente.
–Para sacar los biberones y los accesorios utilice siempre las
pinzas.
Para proteger a su hijo:
¡Advertencia!
Con frecuencia, los niños no son capaces de
estimar el peligro correctamente y esto hace que se lesionen.Por
tanto, debe tener en cuenta que:
–Este producto debe utilizarse únicamente bajo la supervisión
de un adulto.
–Preste mucha atención a que el aparato se encuentre
siempre fuera del alcance de los niños.
–Tenga cuidado de que la bolsa de plástico no represente un
peligro mortal para los niños. Las bolsas de plástico del
envase no son un juguete.
Utilización
1. Lavar a fondo el biberón y los accesorios.
2. Quitar la tapa del esterilizador a vapor para microondas.
3. Poner 200 ml de agua en la base de llenado del esterilizador a
vapor para microondas.
¡Atención!
Es necesario utilizar un vaso medidor para
comprobar que la cantidad de agua sea exactamente 200 ml,
ya que de lo contrario se pueden producir daños en el
esterilizador a vapor para microondas.
4. Colocar los biberones con la abertura hacia abajo en los
orificios correspondientes del soporte de biberones, y
distribuir los accesorios por la superficie restante.
5. Cerrar la tapa del esterilizador a vapor para microondas. Para
asegurarse de que está bien cerrada, compruebe que las
marcas
(4)
estén alineadas correctamente.
6. Meter el esterilizador a vapor en el horno microondas.
7. Ajuste el horno microondas a la potencia y el tiempo
correspondiente. No debe sobrepasarse el tiempo indicado:
¡Atención!
Para evitar todo riesgo de escaldaduras debido al
vapor de agua caliente o al líquido caliente, espere 5 minutos
antes de sacar el esterilizador a vapor del horno microondas.
8. Para abrirlo fácilmente, gire la tapa con los dedos (ver fig. 2)
hasta que se abra el enclavamiento. A continuación, quitar la
tapa.
Tenga cuidado
de protegerse suficientemente las manos y
los dedos.
Limpieza y desinfección
1. Para evitar depósitos de cal, después de cada uso secar con un
paño el esterilizador a vapor para microondas.
2. Si el esterilizador se ensucia, se puede limpiar con agua tibia y
jabón.
3. Si todavía quedan depósitos de cal por limpiar, utilice vinagre
doméstico diluido.
Eliminación
El aparato se puede eliminar en la basura doméstica,
recomendándose desecharlo por separado, de acuerdo a las
normas de su país
Guarde la dirección del distribuidor y el número de referencia del
producto,por si se produjesen reclamaciones.
Potencia Tiempo
1000 vatios 4 minutos
800 - 950 vatios 5 minutos
500 - 750 vatios 7 minutos
Esterilizador a vapor para
microondas NUK
Campo de aplicação
O esterilizador a vapor para microondas NUK é prático,
económico e adequado para todos os biberões NUK (biberões
First Choice e standard), bem como para outros biberões
convencionais. Desinfecta até 4 biberões com acessórios em
apenas 4 minutos. Todas as peças a desinfectar têm de ser
adequadas para microondas.
Cuidado:
tetinas, chupetas, peças das bombas tira-leite, alguns
artigos de plástico e aparelhos de vidro, assim como outras peças
não adequadas para microondas
, não podem
ser desinfectadas
neste aparelho.
O aparelho é adequado para fornos microondas com uma
potência de 500 a 1000 Watt.
Conteúdo
1 Tampa
(1)
; 1 Suporte para biberões
(2)
; 1 Base de enchimento
(3)
; 1 Pinça para biberões (sem figura)
Descrição do funcionamento
O aparelho é colocado fechado no forno microondas. No
microondas a água é transformada em vapor. O vapor quente
desinfecta as peças que se encontram no aparelho.
Instruções de segurança
Indicações gerais:
–Antes da utilização, leia atentamente este manual de
instruções. O manual é parte integrante do aparelho e tem
de estar sempre disponível.
–Utilize o aparelho apenas para o fim aqui descrito.
–Quando proceder à esterilização num forno microondas que
contenha funções adicionais, por favor certifique-se que
APENAS a função microondas está activada, por exemplo:
não active a função grill, o aquecimento simultâneo em cima
e em baixo, pois pode conduzir a deformação no material.
–Nunca deixe o aparelho a funcionar sem vigilância.
–Oaparelho só pode ser colocado sobre uma superfície fixa,
plana, seca e não inflamável.
–O aparelho não pode ser colocado sobre uma placa de
fogão quente, dentro de um forno quente, nem junto de
esquentadores a gás ou caldeiras.
–Tenha em atenção que após a desinfecção os biberões só
permanecem esterilizados (desinfectados) se o aparelho
permanecer fechado. Os biberões, com o aparelho fechado,
permanecem esterilizados durante aprox.30 min.
Protecção contra queimaduras e escaldões:
O aparelho trabalha a altas temperaturas e vapor quente. Para se
proteger contra escaldões e queimaduras, tenha em atenção o
seguinte:
–O esterilizador a vapor para microondas está demasiado
quente quando sai do forno microondas. Aguarde pelo
menos 5 minutos até que este tenha arrefecido o suficiente.
–Apenas transporte o aparelho quente do forno microondas
utilizando luvas.
–Se estiver quente, transporte o aparelho só pela base.
–Não utilize a pega da tampa para transporte, uma vez que a
parte inferior do aparelho se pode soltar e cair ao chão.
–Tenha cuidado ao abrir a tampa, pois existe o perigo de
escaldão devido ao vapor quente da água. Retire a tampa
inclinando-a, para que o vapor possa sair.
–Retire os biberões e os acessórios apenas com a pinça para
biberões.
Para a protecção do seu filho:
Aviso!
A maior parte das vezes, as crianças não conseguem
avaliar os perigos correctamente podendo, por isso, sofrer
ferimentos. Por conseguinte, tenha em atenção que:
–Este produto só pode ser usado sob a vigilância de adultos.
–Assegure-se sempre de que o aparelho se encontra fora do
alcance das crianças.
–Tenha em atenção que a película da embalagem pode ser
fatal para as crianças. As películas da embalagem não são
brinquedos.
Utilização
1. Lave cuidadosamente os biberões e acessórios.
2. Retire a tampa do esterilizador a vapor para microondas.
3. Coloque 200 ml de água na base de enchimento do
esterilizador a vapor para microondas.
Atenção!
Utilize impreterivelmente um recipiente graduado
para obedecer à quantidade de água exacta de 200 ml, caso
contrário o esterilizador a vapor para microondas pode ficar
danificado.
4. Coloque os biberões com o gargalo virado para baixo nas
aberturas do suporte para biberões previstas para o efeito e
distribua os acessórios pelas restantes superfícies.
5. Feche a tampa do esterilizador a vapor para microondas. Para
se certificar de que o aparelho se encontra bem fechado,
verifique se as marcações
(4)
estão bem alinhadas.
6. Coloque o esterilizador a vapor para microondas no forno
microondas.
7. Regule o forno microondas para a potência e o tempo
correspondentes. O tempo indicado não deve ser excedido:
Atenção!
Aguarde 5 minutos antes de retirar o esterilizador
a vapor para microondas do forno microondas para evitar o
perigo de queimaduras devido ao vapor e humidade da água
quentes
8. Para abrir facilmente o aparelho, rode a tampa com os dedos
(ver fig. 2) até que esta se desencaixe. De seguida, retire a
tampa.
Proteja
as mãos e os dedos de forma adequada.
Limpeza e desinfecção
1. Para evitar a formação de calcário, seque o esterilizador a
vapor para microondas com um pano após cada utilização.
2. Se o esterilizador ficar particularmente sujo, pode limpá-lo
utilizando água morna com sabão.
3. Se ainda tiver camadas de calcário para remover, utilize
vinagre diluído.
Eliminação
O aparelho pode ser eliminado juntamente com o lixo doméstico
normal.
Coloque a embalagem para reciclagem de acordo com as normas
do seu país.
Guarde a morada do representante e a referência do artigo para
o caso de reclamação.
Potência Duração
1000 Watt 4 minutos
800 - 950 Watt 5 minutos
500 - 750 Watt 7 minutos
Contact addresses
MAPA GmbH
Industriestraße 21-25
D-27404 Zeven
01801 / 62 72 46
(0,04 EUR/ Min. aus dem
deutschen Festnetz, maximal
0,42 EUR/Min. aus dem
Mobilfunknetz)
e-mail: nuk-info@mapa.de
www.nuk.de
MAPA Spontex U.K. Ltd.
Berkeley Business Park,
Wainwright Road
Worcester WR4 9ZS
0845 300 2467
www.nukbaby.co.uk
Intrapharma Consumer Health
Magna Business Park
Citywest Road
Dublin 24
1.United Drug House
Roche Diagnostics, S.L.
Av. Generalitat, 171-173
08174 Sant Cugat delVallès,
Barcelona
www.nuk.com.es
Roche Sistemas de
Diagnósticos, Lda.
Estrada Nacional 249-1
2720-413 Amadora
+351 800 200 265
e-mail: info@nuk.pt
www.nuk.pt
Allègre Puériculture SNC
41 rue Edouard Martel -
BP 197
42 013 Saint Etienne Cedex 2
+33 4 77 81 81 81
www.nuk.fr
MAPA GmbH
Industriestraße 21-25
D-27404 Zeven
Germania
e-mail: nuk-italia@mapa.de
www.nuk.it
GREECE (South)
ΑΦΟΙ Κ. ΤΖΕΒΕΛΕΚΟΥ Ο.Ε.
Θράκης 34
171 21 Ν. Σµύρνη-Αθήνα
210 93 22 165
Φαξ: 210 93 50 870
GREECE (North)
ΦΑΡΜΑΠΟ ΕΕ-Χ.ΤΖΗΜΟ
& ΣΙΑ
Τ.Θ. 291 - ΚΑΛΟΧΩΡÏ 57009
ΘΗΣΣΑΛΟΝΙΚΗ
2310 751 525
Φαξ: 2310 789 621
e-mail: info@nuk.gr
A..
. .16
. 2
391-392
117292
www.nuk-baby.ru
BABY LAND
Dariusz Staniszewski
al.Stanów Zjednoczonych 67/D7
04-028 Warszawa
022 773 36 76 (78, 79, 81)
www.nuk.pl
Bitte beachten Sie auch die anderen Produkte aus
dem NUK-Programm, zum Beispiel …
NUK Eco Control+
Babyphone mit DECTTechnologie
Höchste Sicherheit mit dem Plus an Wohlbefinden!
Ausgehen macht Eltern nur Spaß, wenn sie sich auf ihren
Babysitter oder ihr Babyphone verlassen können.
Das NUK ECO Control+ Babyphone setzt deshalb auf
modernste DECT-Technologie.
•für 100% störungsfreie Signale und höchste Über-
tragungssicherheit
•mit einstellbarer Reichweite bis zu 300 m
•mit niedriger Strahlungsemission, reduzierter Strah-
lungsstärke und geringem Stromverbrauch im
Eco-Mode
•mit zwei Stationen, die perfekt aufeinander abgestimmt
sind
Weitere Informationen erhalten Sie auf
www.nuk.com
Please also bear in mind the other products from
the NUK range, for example …
NUK Eco Control+
Babyphone with DECT technology
Ensuring your child is both safe and well!
Parents can only really relax and enjoy their evening off
when they can rely on their babysitter or babyphone.
The NUK ECO Control+ Babyphone thus features the
latest DECT technology
•for 100 % interference-free signals and the most
reliable of transmission
•with adjustable coverage of up to 300 m
•with low radiation emissions, reduced emission
strength and low power consumption in eco-mode
•with two stations that work in perfect co-ordination
For more information, please visit: www.nuk.com
MicrowellenSterilisator Seite 1 Donnerstag, 24. M rz 2011 5:04 17

NUK Mikrowellen-Dampf-Vaporisator
Verwendungszweck
Der NUK Mikrowellen-Dampf-Vaporisator
ist praktisch,
wirtschaftlich und für alle NUK Flaschen (First Choice und
Standard Flaschen) sowie weitere handelsübliche Babyflaschen
geeignet. Er desinfiziert bis zu 4 Flaschen mit Zubehör in nur
4 Minuten. Alle zu desinfizierenden Teile müssen mikrowellen-
geeignet sein.
Vorsicht:
Sauger, Beruhigungssauger, Teile von Milchpumpen,
einige Kunststoffartikel und Glasgeräte, sowie alle anderen Teile,
die nicht mikrowellen-geeignet sind,
dürfen nicht
mit diesem
Gerät desinfiziert werden.
Das Gerät ist für Mikrowellen-Herde mit einer Leistung von
500 bis 1000 Watt geeignet.
Lieferumfang
1 Deckel
(1)
; 1 Flaschenhalter
(2)
; 1 Füllsockel
(3)
;
1 Flaschenzange (ohne Abbildung)
Funktionsbeschreibung
Das geschlossene Gerät wird in einen Mikrowellen-Herd gestellt.
Durch Mikrowellen wird das enthaltene Wasser verdampft. Der
heiße Dampf desinfiziert die im Gerät befindlichen Teile.
Sicherheitshinweise
Allgemeine Hinweise:
–Lesen Sie vor dem Gebrauch bitte sorgfältig diese
Bedienungsanleitung. Sie ist Bestandteil des Gerätes und
muss jederzeit verfügbar sein.
–Verwenden Sie das Gerät nur für den beschriebenen
Verwendungszweck.
–Wenn Sie zum Vaporisieren ein Mikrowellen-Gerät mit
Zusatzfunktionen benutzen, achten Sie darauf, dass nur die
Mikrowellenfunktion eingeschaltet ist. Grill-, Ober- und
Unterhitze sowie Umluft können zu Materialschäden am
Vaporisator führen.
–Lassen Sie das Gerät während des Betriebes niemals
unbeaufsichtigt.
–Das Gerät darf ausschließlich auf einem festen, ebenen,
trockenen und nicht brennbaren Untergrund aufgestellt
werden.
1
3
2
–Das Gerät darf nicht auf heiße Herdplatten gestellt, in den
heißen Backofen geschoben oder in der Nähe von Gas- und
Durchlauferhitzern aufgestellt werden.
–Beachten Sie, dass die Flaschen nach dem Desinfizieren nur
so lange keimarm (desinfiziert) bleiben, wie das Gerät
geschlossen bleibt. Bei geschlossenem Gerät bleiben die
Flaschen etwa 30 min keimarm.
Schutz vor Verbrennungen und Verbrühungen:
Das Gerät arbeitet mit hohen Temperaturen und heißem Dampf.
Um sich vor Verbrühungen und Verbrennungen zu schützen,
beachten Sie daher folgendes:
–Der Mikrowellen-Dampf-Vaporisator ist sehr heiß, wenn er
aus dem Mikrowellen-Herd kommt. Mindestens 5 Minuten
abwarten, bis er ausreichend abgekühlt ist.
–Das heiße Gerät nur unter Verwendung von Handschuhen
vom Mikrowellen-Herd zurAblagestelle transportieren.
–Im heißen Zustand nur am Sockel transportieren.
–Nicht den Deckelgriff zum Transport benutzen, da sich sonst
das Unterteil lösen und zu Boden fallen könnte.
–Vorsicht beim Öffnen des Deckels; durch den heißen
Wasserdampf besteht Verbrühungsgefahr. Deckel nur durch
Kippen öffnen, damit heißer Dampf entweichen kann.
–Flaschen und Zubehör nur mit der Flaschenzange
entnehmen.
Zum Schutz Ihres Kindes:
Warnung!
Kinder können Gefahren oft nicht richtig einschätzen
und sich dadurchVerletzungen zuziehen. Beachten Sie daher:
–Dieses Produkt darf nur unter Aufsicht von Erwachsenen
verwendet werden.
–Achten Sie sorgfältig darauf, dass sich das Gerät immer
außerhalb der Reichweite von Kindern befindet.
–Achten Sie darauf, dass die Verpackungsfolie nicht zur
tödlichen Falle für Kinder wird.Verpackungsfolien sind kein
Spielzeug.
Anwendung
1. Flaschen und Zubehör sorgfältig waschen und spülen.
2. Deckel des Mikrowellen-Dampf-Vaporisators abnehmen.
3. 200 ml Wasser in den Füllsockel des Mikrowellen-Dampf-
Vaporisators eingießen.
Achtung!
Benutzen Sie unbedingt einen Messbecher um die
Füllmenge von 200 ml exakt einzuhalten, da sonst
Beschädigungen des Mikrowellen-Dampf-Vaporisators möglich
sind.
4. Die Flaschen mit der Öffnung nach unten in die dafür
vorgesehenen Öffnungen des Flaschenhalters setzen und das
Zubehör auf der verbleibenden Fläche verteilen.
5. Deckel des Mikrowellen-Dampf-Vaporisators schließen. Um
sicher zu gehen, dass er richtig verschlossen ist, darauf achten,
dass die Markierungen
(4)
entsprechend ausgerichtet sind.
6. Den Mikrowellen-Dampf-Vaporisator in den Mikrowellen-
Herd stellen.
7. Stellen Sie den Mikrowellen-Herd auf die entsprechende
Leistung und Zeit. Die angegebene Zeit sollte nicht
überschritten werden:
Achtung!
Um jegliche Verbrühungsgefahr durch heißen
Wasserdampf oder heiße Feuchtigkeit zu vermeiden,
5 Minuten warten, bevor Sie den Mikrowellen-Dampf-
Vaporisator aus dem Mikrowellen-Herd herausnehmen.
8. Zum leichten Öffnen den Deckel mit den Fingern drehen
(siehe Abb. 2), bis Verrastung sich öffnet. Dann Deckel
abnehmen.
Achten
Sie auf ausreichenden Hand-/ und Fingerschutz.
Reinigung und Desinfektion
1. Um Kalkablagerungen zu vermeiden, den Mikrowellen-Dampf-
Vaporisator nach jedem Gebrauch mit einem Tuch abtrocknen.
2. Bei größeren Verschmutzungen kann das Gerät mit einem
Handspülmittel gereinigt werden.
3. Sollten Sie noch Kalkablagerungen entfernen müssen,
verwenden Sie verdünnten Haushaltsessig.
Entsorgung
Das Gerät kann über den normalen Hausmüll entsorgt werden.
Führen Sie die Verpackung einer getrennten Entsorgung
entsprechend derVorschriften in Ihrem Land zu.
Bewahren Sie für den Reklamationsfall Anschrift und Art.-Nr.auf.
Leistung Dauer
1000 Watt 4 Minuten
800 - 950 Watt 5 Minuten
500 - 750 Watt 7 Minuten
4
NUK Microwave Steam Steriliser
Usage
The NUK Microwave Steam Steriliser
is practical, economical
and suitable for all NUK bottles (First Choice and Standard
bottles) and for other commercially available baby feeding bottles.
The Steriliser disinfects up to 4 bottles and accessories in just
4 minutes. Most of your baby feeding bottle parts should be
suitable for microwave sterilisation.
Caution:
Teats, soothers, breast pump parts, some plastic items,
glass equipment and some other parts which are unsuitable for
microwaving
must not be
disinfected in this appliance, therefore
please always check before microwaving any items.
The Steriliser is suitable for microwaves with an output of
between 500 and 1000W.
Scope of supply
1 lid
(1)
; 1 bottle-holder
(2)
; 1 base for filling
(3)
;
1 pair of bottle tongs (not illustrated)
Description of use
The sealed Microwave Steam Steriliser is placed in the microwave.
The microwave then allows the water to evaporate and the hot
steam which is generated to disinfect the parts inside.
Safety instructions
General instructions
–Please read these operating instructions carefully before
using the Steriliser. These instructions are part of the
Steriliser and must be available at all times.
–Use the Steriliser only for the intended purpose described.
–When sterilising in a microwave oven with additional
functions, please ensure that ONLY the microwave function
is activated, i.e. do not activate the grill function, the upper
and lower heat, etc. as this may lead to material damage.
–Never leave the unit unsupervised during operation.
–The Steriliser may only be set up on a firm, level, dry and
non-flammable surface.
–The Steriliser must not be placed on cooker hotplates, put
in a hot oven or set up close to gas and flow heaters.
–Be aware that after disinfecting, bottles only remain sterile
(disinfected) as long as the Steriliser remains closed. The
bottles will remain sterile for about 30 minutes with the unit
closed.
Preventing burns and scalds
The Steriliser operates at high temperatures using hot steam.To
avoid burning or scalding yourself please follow the instructions
below.
–The Microwave Steam Steriliser is very hot when it comes
out of the microwave oven.Wait at least 5 minutes until it
has cooled down before removing.
–Wear oven gloves to transport the hot Steriliser from the
microwave oven to the place you are putting it down.
–When the unit is hot, only move it by the base.
–Do not use the handle of the lid to transport the unit just
incase the bottom part becomes loose and drop on the
floor.
–Take care when opening the lid as there is a risk of scalding
from the hot steam. Only open the lid by tilting so that hot
steam can escape.
–Remove bottles and accessories using the tongs provided.
To protect your child
Warning!
Children are often poor judges of hazards and this
results in them sustaining injuries, so please note the following.
–This product may only be used under adult supervision.
–Take care to ensure that the unit is always kept out of the
reach of children.
–Ensure that the plastic packaging is kept out of reach of
children - plastic packaging is not a toy.
Use
1. Carefully wash and rinse bottles and accessories.
2. Remove the lid of the Microwave Steam Steriliser.
3. Pour 200 ml water into the base of the Microwave Steam
Steriliser.
Warning!
It is essential to use a measuring jug to ensure the
200 ml capacity is adhered to exactly, otherwise the
Microwave Steam Steriliser may be damaged.
4. Put the bottles upside down in the openings provided for
them in the bottle-holder and arrange the accessories over
the remaining surface.
5. Close the lid of the Microwave Steam Steriliser.To ensure that
it is properly locked, check that the markings
(4)
are aligned.
6. Put the Microwave Steam Steriliser in the microwave oven.
7. Set the microwave oven to the relevant power and time. Do
not exceed the time quoted.
Warning!
To prevent any risk of scalding from hot steam or
hot moisture, wait 5 minutes before removing the Microwave
Steam Steriliser from the microwave oven.
8. To open the Steriliser easily, turn the lid with your fingers (see
Fig. 2), until the latch opens.Then remove the lid.
Ensure
you protect your hands/fingers adequately.
Cleaning and disinfecting
1. To avoid limescale deposits, dry the Microwave Steam
Steriliser with a cloth after every use.
2. If the steriliser becomes particularly dirty, then it can be
cleaned using warm, soapy water.
3. If you have to remove limescale, use dilute household vinegar.
Disposal
The unit can be disposed of in normal domestic waste.
Dispose of the packaging separately in accordance with your
national waste disposal regulations.
Keep the address and article no. in case of a complaint.
Power Time
1000 W 4 minutes
800 - 950 W 5 minutes
500 - 750 W 7 minutes
Esterilizador a vapor NUK
para microondas
Uso previsto
El esterilizador a vapor NUK para microondas
es práctico,
económico y apto para todos los biberones NUK (First Choice y
biberones estándar), así como para muchos otros biberones
convencionales.En él se pueden desinfectar hasta 4 biberones con
sus accesorios en tan solo 4 minutos. Todas las piezas a
desinfectar deben ser aptas para microondas.
Precaución:
Las tetinas, los chupetes, las piezas de los
sacaleches, algunos artículos de plástico y aparatos de vidrio, así
como otras piezas que no son aptas para microondas,
no deben
desinfectarse con este aparato.
El aparato es adecuado para hornos microondas con una potencia
de 500 a 1000 vatios.
Piezas suministradas
1 Tapa
(1)
; 1 Soporte para biberones
(2)
; 1 Base de llenado
(3)
;
1 Pinza para biberones (no aparece en la ilustración)
Descripción del funcionamiento
El aparato se introduce cerrado en un horno microondas. Las
microondas hacen que el agua que hay en el aparato se evapore. El
vapor caliente desinfecta las piezas que se encuentran en el aparato.
Indicaciones de seguridad
Indicaciones generales:
–Antes del uso, lea atentamente estas instrucciones de uso.
Éstas forman parte del aparato y tienen que estar a mano en
todo momento.
–Utilice el aparato solamente para el uso descrito.
–Si se esteriliza en un microondas con funciones adicionales,
por favor asegúrese de que sólo se activa la función de
microondas, es decir, no activar la función del grill, calor
superior e inferior, etc., ya que esto podría producir daños
materiales.
–No deje nunca el aparato sin vigilancia durante su utilización.
–El aparato sólo debe colocarse sobre una base firme, plana,
seca y no inflamable.
–El aparato no debe ser colocado sobre placas de cocina
calientes, en el horno caliente ni cerca de calentadores de
gas o de flujo continuo.
–Tenga en cuenta que, después de la desinfección, los
biberones sólo seguirán siendo estériles (libres de
gérmenes) mientras el aparato permanezca cerrado. Con el
aparato cerrado, los biberones permanecen sin gérmenes
durante aproximadamente 30 min.
Protección frente a las quemaduras y las escaldaduras:
El aparato funciona a altas temperaturas y con vapor caliente.
Para protegerse frente a las escaldaduras y las quemaduras, tenga
en cuenta lo siguiente:
–El esterilizador a vapor para microondas está muy caliente
cuando se saca del horno microondas. Espere al menos 5
minutos hasta que se haya enfriado lo suficiente.
–Para transportar el aparato caliente desde el horno
microondas hasta la superficie de colocación debe utilizar
siempre guantes.
–Cuando esté caliente, transpórtelo sólo por la base.
–No utilice el mango de la tapa para transportar el aparato,ya
que de lo contrario se puede soltar la parte de abajo y caer
al suelo.
–Tenga cuidado al abrir la tapa; existe peligro de escaldadura
debido al vapor de agua caliente.Abra la tapa sólo de forma
ladeada, para que pueda salir el vapor caliente.
–Para sacar los biberones y los accesorios utilice siempre las
pinzas.
Para proteger a su hijo:
¡Advertencia!
Con frecuencia, los niños no son capaces de
estimar el peligro correctamente y esto hace que se lesionen.Por
tanto, debe tener en cuenta que:
–Este producto debe utilizarse únicamente bajo la supervisión
de un adulto.
–Preste mucha atención a que el aparato se encuentre
siempre fuera del alcance de los niños.
–Tenga cuidado de que la bolsa de plástico no represente un
peligro mortal para los niños. Las bolsas de plástico del
envase no son un juguete.
Utilización
1. Lavar a fondo el biberón y los accesorios.
2. Quitar la tapa del esterilizador a vapor para microondas.
3. Poner 200 ml de agua en la base de llenado del esterilizador a
vapor para microondas.
¡Atención!
Es necesario utilizar un vaso medidor para
comprobar que la cantidad de agua sea exactamente 200 ml,
ya que de lo contrario se pueden producir daños en el
esterilizador a vapor para microondas.
4. Colocar los biberones con la abertura hacia abajo en los
orificios correspondientes del soporte de biberones, y
distribuir los accesorios por la superficie restante.
5. Cerrar la tapa del esterilizador a vapor para microondas. Para
asegurarse de que está bien cerrada, compruebe que las
marcas
(4)
estén alineadas correctamente.
6. Meter el esterilizador a vapor en el horno microondas.
7. Ajuste el horno microondas a la potencia y el tiempo
correspondiente. No debe sobrepasarse el tiempo indicado:
¡Atención!
Para evitar todo riesgo de escaldaduras debido al
vapor de agua caliente o al líquido caliente, espere 5 minutos
antes de sacar el esterilizador a vapor del horno microondas.
8. Para abrirlo fácilmente, gire la tapa con los dedos (ver fig. 2)
hasta que se abra el enclavamiento. A continuación, quitar la
tapa.
Tenga cuidado
de protegerse suficientemente las manos y
los dedos.
Limpieza y desinfección
1. Para evitar depósitos de cal, después de cada uso secar con un
paño el esterilizador a vapor para microondas.
2. Si el esterilizador se ensucia, se puede limpiar con agua tibia y
jabón.
3. Si todavía quedan depósitos de cal por limpiar, utilice vinagre
doméstico diluido.
Eliminación
El aparato se puede eliminar en la basura doméstica,
recomendándose desecharlo por separado, de acuerdo a las
normas de su país
Guarde la dirección del distribuidor y el número de referencia del
producto,por si se produjesen reclamaciones.
Potencia Tiempo
1000 vatios 4 minutos
800 - 950 vatios 5 minutos
500 - 750 vatios 7 minutos
Esterilizador a vapor para
microondas NUK
Campo de aplicação
O esterilizador a vapor para microondas NUK é prático,
económico e adequado para todos os biberões NUK (biberões
First Choice e standard), bem como para outros biberões
convencionais. Desinfecta até 4 biberões com acessórios em
apenas 4 minutos. Todas as peças a desinfectar têm de ser
adequadas para microondas.
Cuidado:
tetinas, chupetas, peças das bombas tira-leite, alguns
artigos de plástico e aparelhos de vidro, assim como outras peças
não adequadas para microondas
, não podem
ser desinfectadas
neste aparelho.
O aparelho é adequado para fornos microondas com uma
potência de 500 a 1000 Watt.
Conteúdo
1 Tampa
(1)
; 1 Suporte para biberões
(2)
; 1 Base de enchimento
(3)
; 1 Pinça para biberões (sem figura)
Descrição do funcionamento
O aparelho é colocado fechado no forno microondas. No
microondas a água é transformada em vapor. O vapor quente
desinfecta as peças que se encontram no aparelho.
Instruções de segurança
Indicações gerais:
–Antes da utilização, leia atentamente este manual de
instruções. O manual é parte integrante do aparelho e tem
de estar sempre disponível.
–Utilize o aparelho apenas para o fim aqui descrito.
–Quando proceder à esterilização num forno microondas que
contenha funções adicionais, por favor certifique-se que
APENAS a função microondas está activada, por exemplo:
não active a função grill, o aquecimento simultâneo em cima
e em baixo, pois pode conduzir a deformação no material.
–Nunca deixe o aparelho a funcionar sem vigilância.
–Oaparelho só pode ser colocado sobre uma superfície fixa,
plana, seca e não inflamável.
–O aparelho não pode ser colocado sobre uma placa de
fogão quente, dentro de um forno quente, nem junto de
esquentadores a gás ou caldeiras.
–Tenha em atenção que após a desinfecção os biberões só
permanecem esterilizados (desinfectados) se o aparelho
permanecer fechado. Os biberões, com o aparelho fechado,
permanecem esterilizados durante aprox.30 min.
Protecção contra queimaduras e escaldões:
O aparelho trabalha a altas temperaturas e vapor quente. Para se
proteger contra escaldões e queimaduras, tenha em atenção o
seguinte:
–O esterilizador a vapor para microondas está demasiado
quente quando sai do forno microondas. Aguarde pelo
menos 5 minutos até que este tenha arrefecido o suficiente.
–Apenas transporte o aparelho quente do forno microondas
utilizando luvas.
–Se estiver quente, transporte o aparelho só pela base.
–Não utilize a pega da tampa para transporte, uma vez que a
parte inferior do aparelho se pode soltar e cair ao chão.
–Tenha cuidado ao abrir a tampa, pois existe o perigo de
escaldão devido ao vapor quente da água. Retire a tampa
inclinando-a, para que o vapor possa sair.
–Retire os biberões e os acessórios apenas com a pinça para
biberões.
Para a protecção do seu filho:
Aviso!
A maior parte das vezes, as crianças não conseguem
avaliar os perigos correctamente podendo, por isso, sofrer
ferimentos. Por conseguinte, tenha em atenção que:
–Este produto só pode ser usado sob a vigilância de adultos.
–Assegure-se sempre de que o aparelho se encontra fora do
alcance das crianças.
–Tenha em atenção que a película da embalagem pode ser
fatal para as crianças. As películas da embalagem não são
brinquedos.
Utilização
1. Lave cuidadosamente os biberões e acessórios.
2. Retire a tampa do esterilizador a vapor para microondas.
3. Coloque 200 ml de água na base de enchimento do
esterilizador a vapor para microondas.
Atenção!
Utilize impreterivelmente um recipiente graduado
para obedecer à quantidade de água exacta de 200 ml, caso
contrário o esterilizador a vapor para microondas pode ficar
danificado.
4. Coloque os biberões com o gargalo virado para baixo nas
aberturas do suporte para biberões previstas para o efeito e
distribua os acessórios pelas restantes superfícies.
5. Feche a tampa do esterilizador a vapor para microondas. Para
se certificar de que o aparelho se encontra bem fechado,
verifique se as marcações
(4)
estão bem alinhadas.
6. Coloque o esterilizador a vapor para microondas no forno
microondas.
7. Regule o forno microondas para a potência e o tempo
correspondentes. O tempo indicado não deve ser excedido:
Atenção!
Aguarde 5 minutos antes de retirar o esterilizador
a vapor para microondas do forno microondas para evitar o
perigo de queimaduras devido ao vapor e humidade da água
quentes
8. Para abrir facilmente o aparelho, rode a tampa com os dedos
(ver fig. 2) até que esta se desencaixe. De seguida, retire a
tampa.
Proteja
as mãos e os dedos de forma adequada.
Limpeza e desinfecção
1. Para evitar a formação de calcário, seque o esterilizador a
vapor para microondas com um pano após cada utilização.
2. Se o esterilizador ficar particularmente sujo, pode limpá-lo
utilizando água morna com sabão.
3. Se ainda tiver camadas de calcário para remover, utilize
vinagre diluído.
Eliminação
O aparelho pode ser eliminado juntamente com o lixo doméstico
normal.
Coloque a embalagem para reciclagem de acordo com as normas
do seu país.
Guarde a morada do representante e a referência do artigo para
o caso de reclamação.
Potência Duração
1000 Watt 4 minutos
800 - 950 Watt 5 minutos
500 - 750 Watt 7 minutos
Contact addresses
MAPA GmbH
Industriestraße 21-25
D-27404 Zeven
01801 / 62 72 46
(0,04 EUR/ Min. aus dem
deutschen Festnetz, maximal
0,42 EUR/Min. aus dem
Mobilfunknetz)
e-mail: nuk-info@mapa.de
www.nuk.de
MAPA Spontex U.K. Ltd.
Berkeley Business Park,
Wainwright Road
Worcester WR4 9ZS
0845 300 2467
www.nukbaby.co.uk
Intrapharma Consumer Health
Magna Business Park
Citywest Road
Dublin 24
1.United Drug House
Roche Diagnostics, S.L.
Av. Generalitat, 171-173
08174 Sant Cugat delVallès,
Barcelona
www.nuk.com.es
Roche Sistemas de
Diagnósticos, Lda.
Estrada Nacional 249-1
2720-413 Amadora
+351 800 200 265
e-mail: info@nuk.pt
www.nuk.pt
Allègre Puériculture SNC
41 rue Edouard Martel -
BP 197
42 013 Saint Etienne Cedex 2
+33 4 77 81 81 81
www.nuk.fr
MAPA GmbH
Industriestraße 21-25
D-27404 Zeven
Germania
e-mail: nuk-italia@mapa.de
www.nuk.it
GREECE (South)
ΑΦΟΙ Κ. ΤΖΕΒΕΛΕΚΟΥ Ο.Ε.
Θράκης 34
171 21 Ν. Σµύρνη-Αθήνα
210 93 22 165
Φαξ: 210 93 50 870
GREECE (North)
ΦΑΡΜΑΠΟ ΕΕ-Χ.ΤΖΗΜΟ
& ΣΙΑ
Τ.Θ. 291 - ΚΑΛΟΧΩΡÏ 57009
ΘΗΣΣΑΛΟΝΙΚΗ
2310 751 525
Φαξ: 2310 789 621
e-mail: info@nuk.gr
A..
. .16
. 2
391-392
117292
www.nuk-baby.ru
BABY LAND
Dariusz Staniszewski
al.Stanów Zjednoczonych 67/D7
04-028 Warszawa
022 773 36 76 (78, 79, 81)
www.nuk.pl
Bitte beachten Sie auch die anderen Produkte aus
dem NUK-Programm, zum Beispiel …
NUK Eco Control+
Babyphone mit DECTTechnologie
Höchste Sicherheit mit dem Plus an Wohlbefinden!
Ausgehen macht Eltern nur Spaß, wenn sie sich auf ihren
Babysitter oder ihr Babyphone verlassen können.
Das NUK ECO Control+ Babyphone setzt deshalb auf
modernste DECT-Technologie.
•für 100% störungsfreie Signale und höchste Über-
tragungssicherheit
•mit einstellbarer Reichweite bis zu 300 m
•mit niedriger Strahlungsemission, reduzierter Strah-
lungsstärke und geringem Stromverbrauch im
Eco-Mode
•mit zwei Stationen, die perfekt aufeinander abgestimmt
sind
Weitere Informationen erhalten Sie auf
www.nuk.com
Please also bear in mind the other products from
the NUK range, for example …
NUK Eco Control+
Babyphone with DECT technology
Ensuring your child is both safe and well!
Parents can only really relax and enjoy their evening off
when they can rely on their babysitter or babyphone.
The NUK ECO Control+ Babyphone thus features the
latest DECT technology
•for 100 % interference-free signals and the most
reliable of transmission
•with adjustable coverage of up to 300 m
•with low radiation emissions, reduced emission
strength and low power consumption in eco-mode
•with two stations that work in perfect co-ordination
For more information, please visit: www.nuk.com
MicrowellenSterilisator Seite 1 Donnerstag, 24. M rz 2011 5:04 17
Table of contents
Other NUK Steriliser manuals
Popular Steriliser manuals by other brands

Twin-Star International
Twin-Star International M3 product manual

Guzzanti
Guzzanti GZ-181D instruction manual

MILOO-ELECTRONICS
MILOO-ELECTRONICS STERYLIS PURE AIR-100 instructions

Viqua
Viqua Sterilight Platinum P410-HO owner's manual

Rhima
Rhima DEKO 190GT Operator's manual

Beaba
Beaba SterilExpress instructions