Nukeproof MEGAWATT 297 2021 User manual

BIKE MANUAL

MEGAWATT BIKE GUIDE 2022 | 2
Congratulations on your Megawatt purchase and welcome to the
Nukeproof family!
Getting you back to the top faster to enjoy the descents again and again (and again). We hope
you enjoy the ride!
This manual will help you get familiar with your Megawatt, its Shimano STEPS EP8 system and a
helpful resource for maintaining and setting up your bike. Please read this manual carefully to help
look after and enjoy your Megawatt to its fullest. If there is any doubts or queries with the set-up,
use or maintenance of your Megawatt, please consult with an authorised dealer. Full dealer listing
can be found at
nukeproof.com
Please ensure you read the General Bike Manual as well before use.
congratulations!

MEGAWATT BIKE GUIDE 2022 | 3
Contents
Section 1 - Unboxing your bike
Section 2 - Assembling your bike
Section 3 - How to use your Shimano STEPS system
Section 4 - Shimano E-Tube
Section 5 - Suspension set-up
Section 6 - Maintenance and Care
Section 7 - Specifications/Sizing/Geometry
Section 8 - Assembly and Spares
Section 9 - Shimano STEPS Components
Section 10 - Warnings
Section 11 - Warranty
4
8
25
36
45
52
55
57
64
65
69

MEGAWATT BIKE GUIDE 2022 | 4
SECTION 1 - unboxing your bike
For mail order customers your new Megawatt will be delivered in a specically designed bike
box, the type and size of box will vary from retailer to retailer. The bike will come with a number of
spares, Nukeproof provides tubeless valves, reectors, SW300 tool, additional items will depend
on the dealer you have purchased the bike from. Some Nukeproof dealers will provide pedals and
basic tools with the bike on delivery, typically a pedal spanner and Allen Key set.
PACKAGING ON ARRIVAL
1. Bike will arrive in large carboard box, box
size will depend on retailer purchased from
2. Open end of box carefully, remove parts box
and battery box and set aside, please note
battery is heavy and dealer may have installed
it before shipping

MEGAWATT BIKE GUIDE 2022 | 5
3. Remove cardboard front wheel support from
box, this will now allow you to remove the bike
4. Carefully pull bike out of box, we would
advise help at this point from another person
to hold the box. If your dealer has stapled
the box, please ensure they are removed to
prevent paint damage
5. The bike will be carefully wrapped before
shipping to prevent any damage in transit. If
any damage is found, report directly to your
dealer
6. Carefully remove protective wrapping,
please dispose of appropriately and recycle
where possible

MEGAWATT BIKE GUIDE 2022 | 6
BOX CONTENT
1. Parts content will vary with dealer, but
at a minimum you will get tubeless valves,
Shimano STEPS charger, BTE80 adaptor,
EW300 tool, reectors, bell, third party
component manuals, basic tools, fork tokens
depending on the make and model of fork and
spare cable-ties for cabling
2. Basic tools for assembling bike, pedals
and tools supplied are at the discretion of the
dealer
3. The BTE80 adaptor is needed to charge the
battery when removed from the bike
4. The EW300 tool is needed to t the
Shimano SD50 cables to the display when
tting the handlebars, this is shown in the
assembly guide

MEGAWATT BIKE GUIDE 2022 | 7
5. The Shimano STEPS charger is supplied
with plugs to suit the country the bike is
purchased in or delivered to

MEGAWATT BIKE GUIDE 2022 | 8
SECTION 2 - Assembling your bike
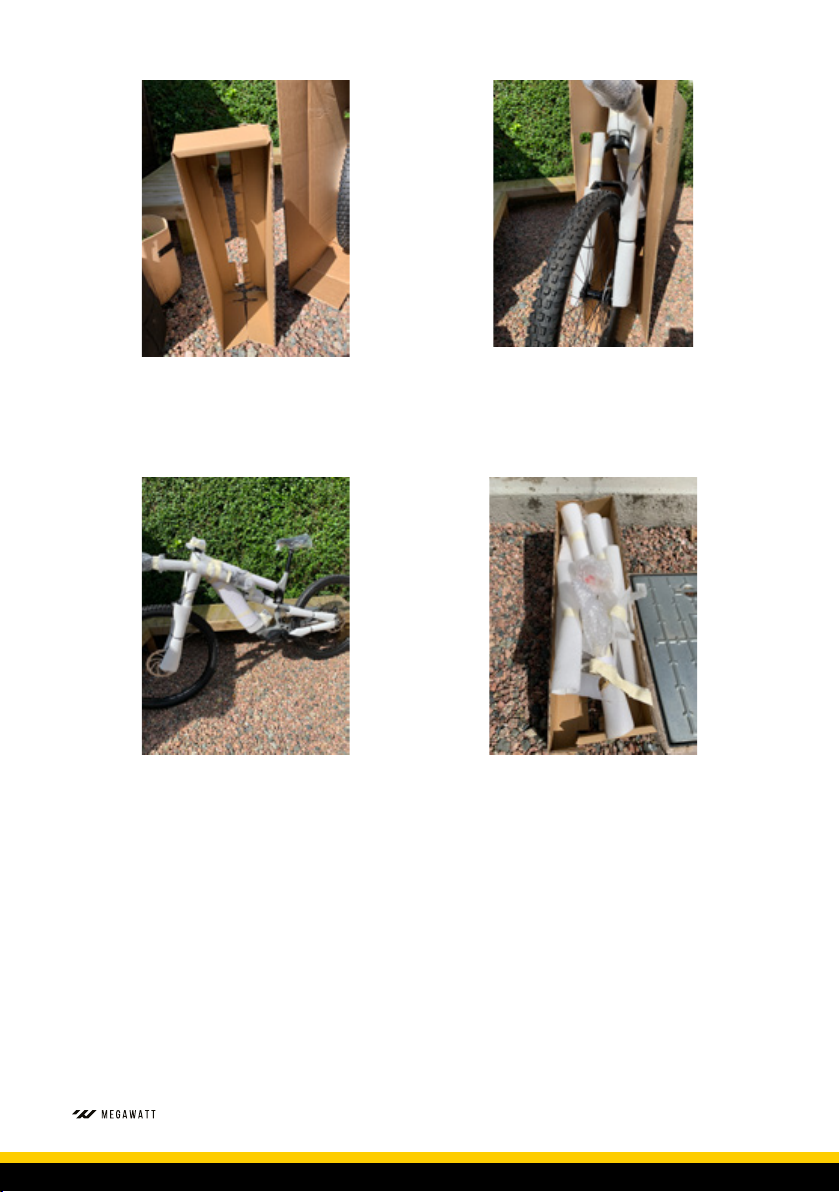
This section details how to get your bike ready for setting up and riding out of the box, this will
be relevant for mail order bikes, generally the following will be done already if purchased and
collected through a local authorised Nukeproof dealer.
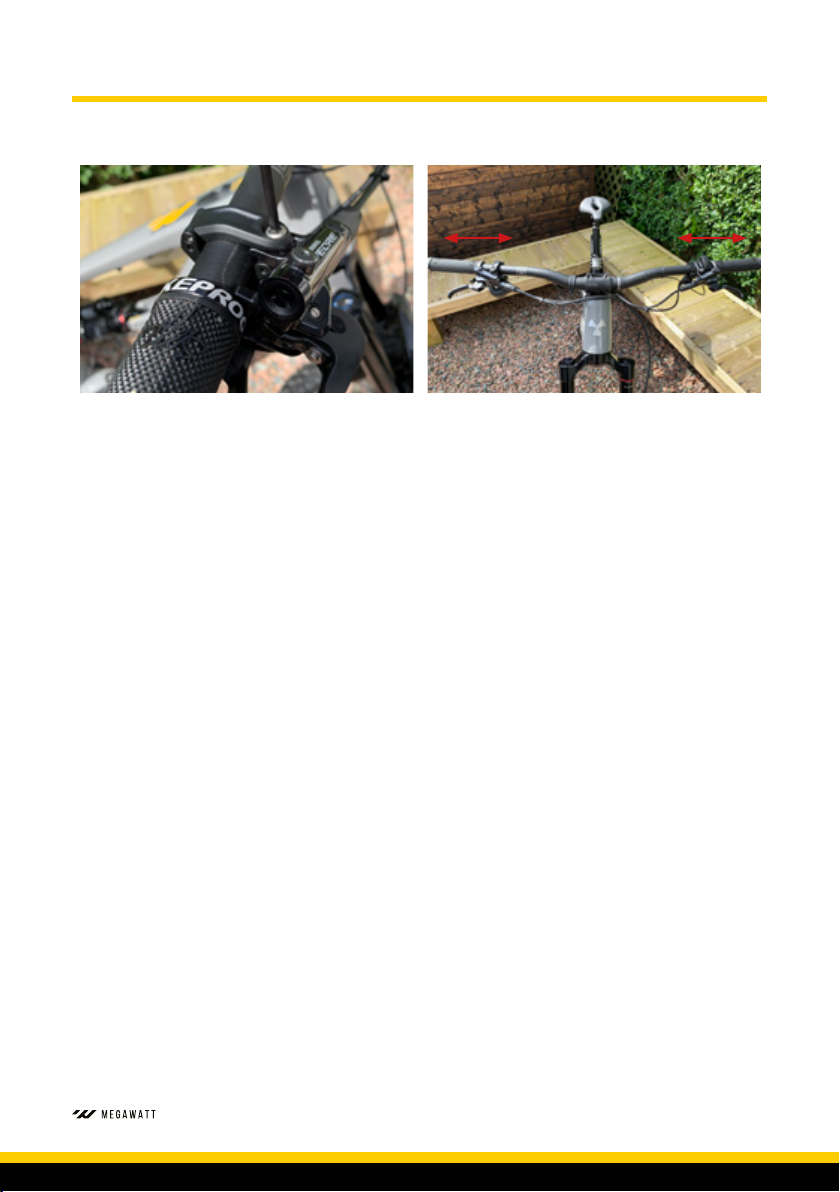
FIT BARS
1. Unscrew face plate bolts from stem with a
4mm Allen Key, remove stem face plate and
bolts, set aside safely for installing later
2. Place bars to stem, using the set-up lines to
position the bars centrally. Ensure cables and
brake lines are not tangled at this point
3. Tighten the face plate bolts to the stem with
a 4mm Allen Key, start with the top bolts and
move to the bottom bolts. Ensure bolt torque
is evenly spread around all four bolts before
fully tightening. Reference the torque details
on the stem
4. Two SD50 wires need to be installed to the
display on the handlebars. Place the SD50
wire in the EW300 tool, ensure the wire is
seated correctly in the EW300 tool to ensure
correct tting

MEGAWATT BIKE GUIDE 2022 | 9
5. Push the SD50 wire into the display socket
until there is a noticeable seating click
6. Repeat install with 2nd SD50 wire
7. You can adjust the roll of the bars back
or forward at this point to your personal
preference. Ensure the bars are still centered
when adjusting and use the markings on the
bars to help

MEGAWATT BIKE GUIDE 2022 | 10
Adjust controls
Once you have adjusted the roll of your bars, the controls can be changed to suit rider preference.
1. The angles of the brakes, gear shifter,
dropper lever, Shimano STEPS display and
mode selector can be changed
2. The controls can be moved laterally along
the bars as well to suit rider preference and
suit the position of your hands

MEGAWATT BIKE GUIDE 2022 | 1 1
Fit pedals
All Nukeproof pedals are standard 9/16 x 20BSA threading so are compatible with all modern
cranks.
Tools Required
8mm Hex Key (All pedals) Or 15mm Spanner (Alloy pedals only)
Torque Wrench
Grease
How to determine the difference between the left and right pedal
This step is very important, failure to install the pedals on the correct side of the bike will cause
irreparable damage your crank and pedal.
Alloy pedals
Alloy pedal axles are marked “L” indicating the left pedal (non-driveside) and “R” indicating the
right pedal (drive-side).
Left Pedal Right Pedal
Plastic Pedals
Plastic pedal bodies have an “L” moulded in the body indicating the left pedal (non-driveside) and
“R” moulded indicating the right pedal (driveside).
The axles are also different, the left axle has a ring indented around the lip of the axle whereas
the right does not.

MEGAWATT BIKE GUIDE 2022 | 12
Left Pedal Right Pedal Left Axle Right Axle
Fitting
1. Check the threads on your crankarm are
clean and have no damage.
2. Take your RIGHT pedal and grease the
axle.

MEGAWATT BIKE GUIDE 2022 | 13
3. Line the pedal up to the driveside crank,
place your 8mm hex key through the driveside
crank and into the back of the pedal axle.
Start to turn the hex key in a clockwise
direction (as you look at the crank towards the
handlebars). There should be no resistance
as you turn the hex key, if there is resistance
STOP immediately and check you are tting
the correct pedal and the threads are correctly
aligned between the axle and crank. Do not
force the pedal into the crank.
4. Take your LEFT pedal and grease the axle.
5. Line the pedal up to the non-driveside
crank, place your 8mm hex key through the
non-driveside crank and into the back of
the pedal axle. Start to turn the hex key in
a anticlockwise direction (as you look at the
crank towards the handlebars). There should
be no resistance as you turn the hex key, if
there is resistance STOP immediately and
check you are tting the correct pedal and
the threads are correctly aligned between the
axle and crank. Do not force the pedal into the
crank.
6. With both pedals now on the crank arms,
tighten to 30Nm with a torque wrench.
Your pedals are now tted and safe to ride.

MEGAWATT BIKE GUIDE 2022 | 14
Adjust saddle Height
1. To adjust the height of the saddle, loosen
the seat clamp bolt with a 5mm Allen Key,
once height is adjusted, retighten
2. To get a starting point for your saddle
height, stand beside your bike and adjust the
height to your hip bone
3. Sit on the bike with assistance from another
person or leaning against a secure structure.
Pedal to the 6 o’clock position to identify if the
saddle height is suitable and you can begin to
adjust to suit your preference
4. Do not exceed the minimum insertion depth
marked on the post

MEGAWATT BIKE GUIDE 2022 | 15
Adjust saddle Angle
1. The saddle angle can be adjusted by
loosening and tightening the saddle rail clamp
bolts with a 5mm Allen Key. Saddle angle is
personal preference and subjective to each
rider. Good starting point is to have the saddle
at horizontal and adjust as you spend more
time on your bike
2. To lower the nose of the saddle, loosen the
rear bolt and tighten the front bolt. To raise the
nose of the saddle, loosen the front bolt and
tighten the rear bolt. Please ensure both bolts
are tight once adjustment has been made.
Please ensure the bolts are not loosened
too much as the clamp parts may become
unseated and fall out.

MEGAWATT BIKE GUIDE 2022 | 16
Adjust saddle Position
The saddle can be moved forward and backwards to suit the rider preference. To adjust the
saddle position the two clamp bolts need loosened. Start in the middle of the adjustment range
and with time on the bike move forward or backwards to suit.
3. Ensure the saddle stays within the
adjustment range of the rails to avoid damage

MEGAWATT BIKE GUIDE 2022 | 17
Adjusting stem Height
The stem height can be made higher or lower to suit rider preference. The headset spacers can
be placed below or above the stem. Do not add too many additional spacers under the stem, as
both stem bolts must be clamping fork steerer. If you are unsure on this process, please consult
with your authorised Nukeproof dealer to complete the work.
1. Loosen and remove top cap bolt and cover
with a 5mm Allen Key.
2. Loosen both stem steerer clamp bolts with a
4mm Allen Key
3. Remove stem and place spacers to your
preference, in this example two below the
stem to raise height. Both spacers can be
placed above the stem to lower height as well.
4. Install stem to steerer, replace top cap and
bolt and tighten with 5mm Allen Key. If steering
becomes stiff, top cap bolt is overtightened.
5. Straighten stem and retighten stem steerer
clamp bolts with a 4mm Allen key.

MEGAWATT BIKE GUIDE 2022 | 18
Convert to Tubeless
All of our adult complete bike’s are supplied with tubeless tape installed, tubeless valves and
tubeless compatible tyres to make tubeless conversation fast and simple. This guide will take you
through the steps to make your bike tubeless.
Items Required
• Tubeless pump
• Tubeless Sealant
• Tubeless valves
• Tools to remove wheels (Usually 5mm /
6mm hex for thru axles)
• Tyre levers (not essential with good tyre
tting technique)
1. Remove your wheel from the bike. 2. Remove valve cap
3. Loosen presta value nut and push to deate
the inner tube.
4. When the tube is deated, remove the nut
holding the valve in place.

MEGAWATT BIKE GUIDE 2022 | 19
5. Unseat tyre by pushing the bead to the
centre of the rim. Do this on both sides of the
tyre
6. Remove one side of the tyre by taking the
bead over the rim.
7. Push the valve through the rim and remove
the inner tube.
8. Get your tubeless valve and get it ready to
install. At this point also double check that the
tubeless tape is still correctly stuck down and not
damaged. If it has been damaged the rim will
need retaped.
9. Push the valve through the valve hole. 10. Put the o-ring on the valve.

MEGAWATT BIKE GUIDE 2022 | 20
11. Fit the tubeless valve nut and tighten. 12. Start to ret the tyre, leave 1⁄4 open.
13. Add tubeless sealant as per sealant
manufacturer recommended amount.
14. Finish tting tyre. Make sure the bead is
pushed to the centre of the rim as this will
make it much easier.
15. Connect your tubeless pump to the valve. 16. Charge the tubeless pump cannister and
then release air blast.
Table of contents
Other Nukeproof Bicycle manuals