manuals.online logo
Brands
  1. Home
  2. •
  3. Brands
  4. •
  5. NUMENN
  6. •
  7. Indoor Furnishing
  8. •
  9. NUMENN 5 Tier Bookshelf C03 Series User manual

NUMENN 5 Tier Bookshelf C03 Series User manual

Other NUMENN Indoor Furnishing manuals

NUMENN C02 Series User manual

NUMENN

NUMENN C02 Series User manual

NUMENN Modern Computer Desk C01 User manual

NUMENN

NUMENN Modern Computer Desk C01 User manual

Popular Indoor Furnishing manuals by other brands

Regency LWMS3015 Assembly instructions

Regency

Regency LWMS3015 Assembly instructions

Furniture of America CM7751C Assembly instructions

Furniture of America

Furniture of America CM7751C Assembly instructions

Safavieh Furniture Estella CNS5731 manual

Safavieh Furniture

Safavieh Furniture Estella CNS5731 manual

PLACES OF STYLE Ovalfuss Assembly instruction

PLACES OF STYLE

PLACES OF STYLE Ovalfuss Assembly instruction

Trasman 1138 Bo1 Assembly manual

Trasman

Trasman 1138 Bo1 Assembly manual

Costway JV10856 manual

Costway

Costway JV10856 manual

moss DESIGN Caisson Credenza Assembly instructions

moss DESIGN

moss DESIGN Caisson Credenza Assembly instructions

Aquaglide FULL DECK 15.0 owner's manual

Aquaglide

Aquaglide FULL DECK 15.0 owner's manual

AREBOS AR-HE-SW30 user manual

AREBOS

AREBOS AR-HE-SW30 user manual

Till-Hilft Fulda 87005.330 Assembly instructions

Till-Hilft

Till-Hilft Fulda 87005.330 Assembly instructions

Twoey Outside 2010 quick start guide

Twoey Outside

Twoey Outside 2010 quick start guide

Hettich Easys 200 operating instructions

Hettich

Hettich Easys 200 operating instructions

The bedboss RELAX 404 Series owner's manual

The bedboss

The bedboss RELAX 404 Series owner's manual

Oeseder Möbelindustrie Bern 991 720 Assembly instructions

Oeseder Möbelindustrie

Oeseder Möbelindustrie Bern 991 720 Assembly instructions

Costway HW68469 user manual

Costway

Costway HW68469 user manual

Next ALIX A27743 Assembly instructions

Next

Next ALIX A27743 Assembly instructions

BROSA Hans Assembly guide

BROSA

BROSA Hans Assembly guide

Prodigg MINIKA PBA015T-FUR installation manual

Prodigg

Prodigg MINIKA PBA015T-FUR installation manual

manuals.online logo
manuals.online logoBrands
  • About & Mission
  • Contact us
  • Privacy Policy
  • Terms and Conditions

Copyright 2025 Manuals.Online. All Rights Reserved.

5 Tier Bookshelf
NUMENN
Product Series: C03
Assembly Instructions-Please keep for future reference
[email protected]
If you need any help or have damaged/missing parts, please contact us
on Amazon or email: [email protected]
Important - Please read these instructions before assembly
Dimensions
Tools included
Width: 24''
Depth: 12''
Height: 62''
121
Please Read
NUMENN
Thank you for choosing NUMENN product.
[email protected]
Please contact us on Amazon in case of any problem
regarding assembly or the product itself.
A smile on your face is our top priority.
Important Assembly Advice
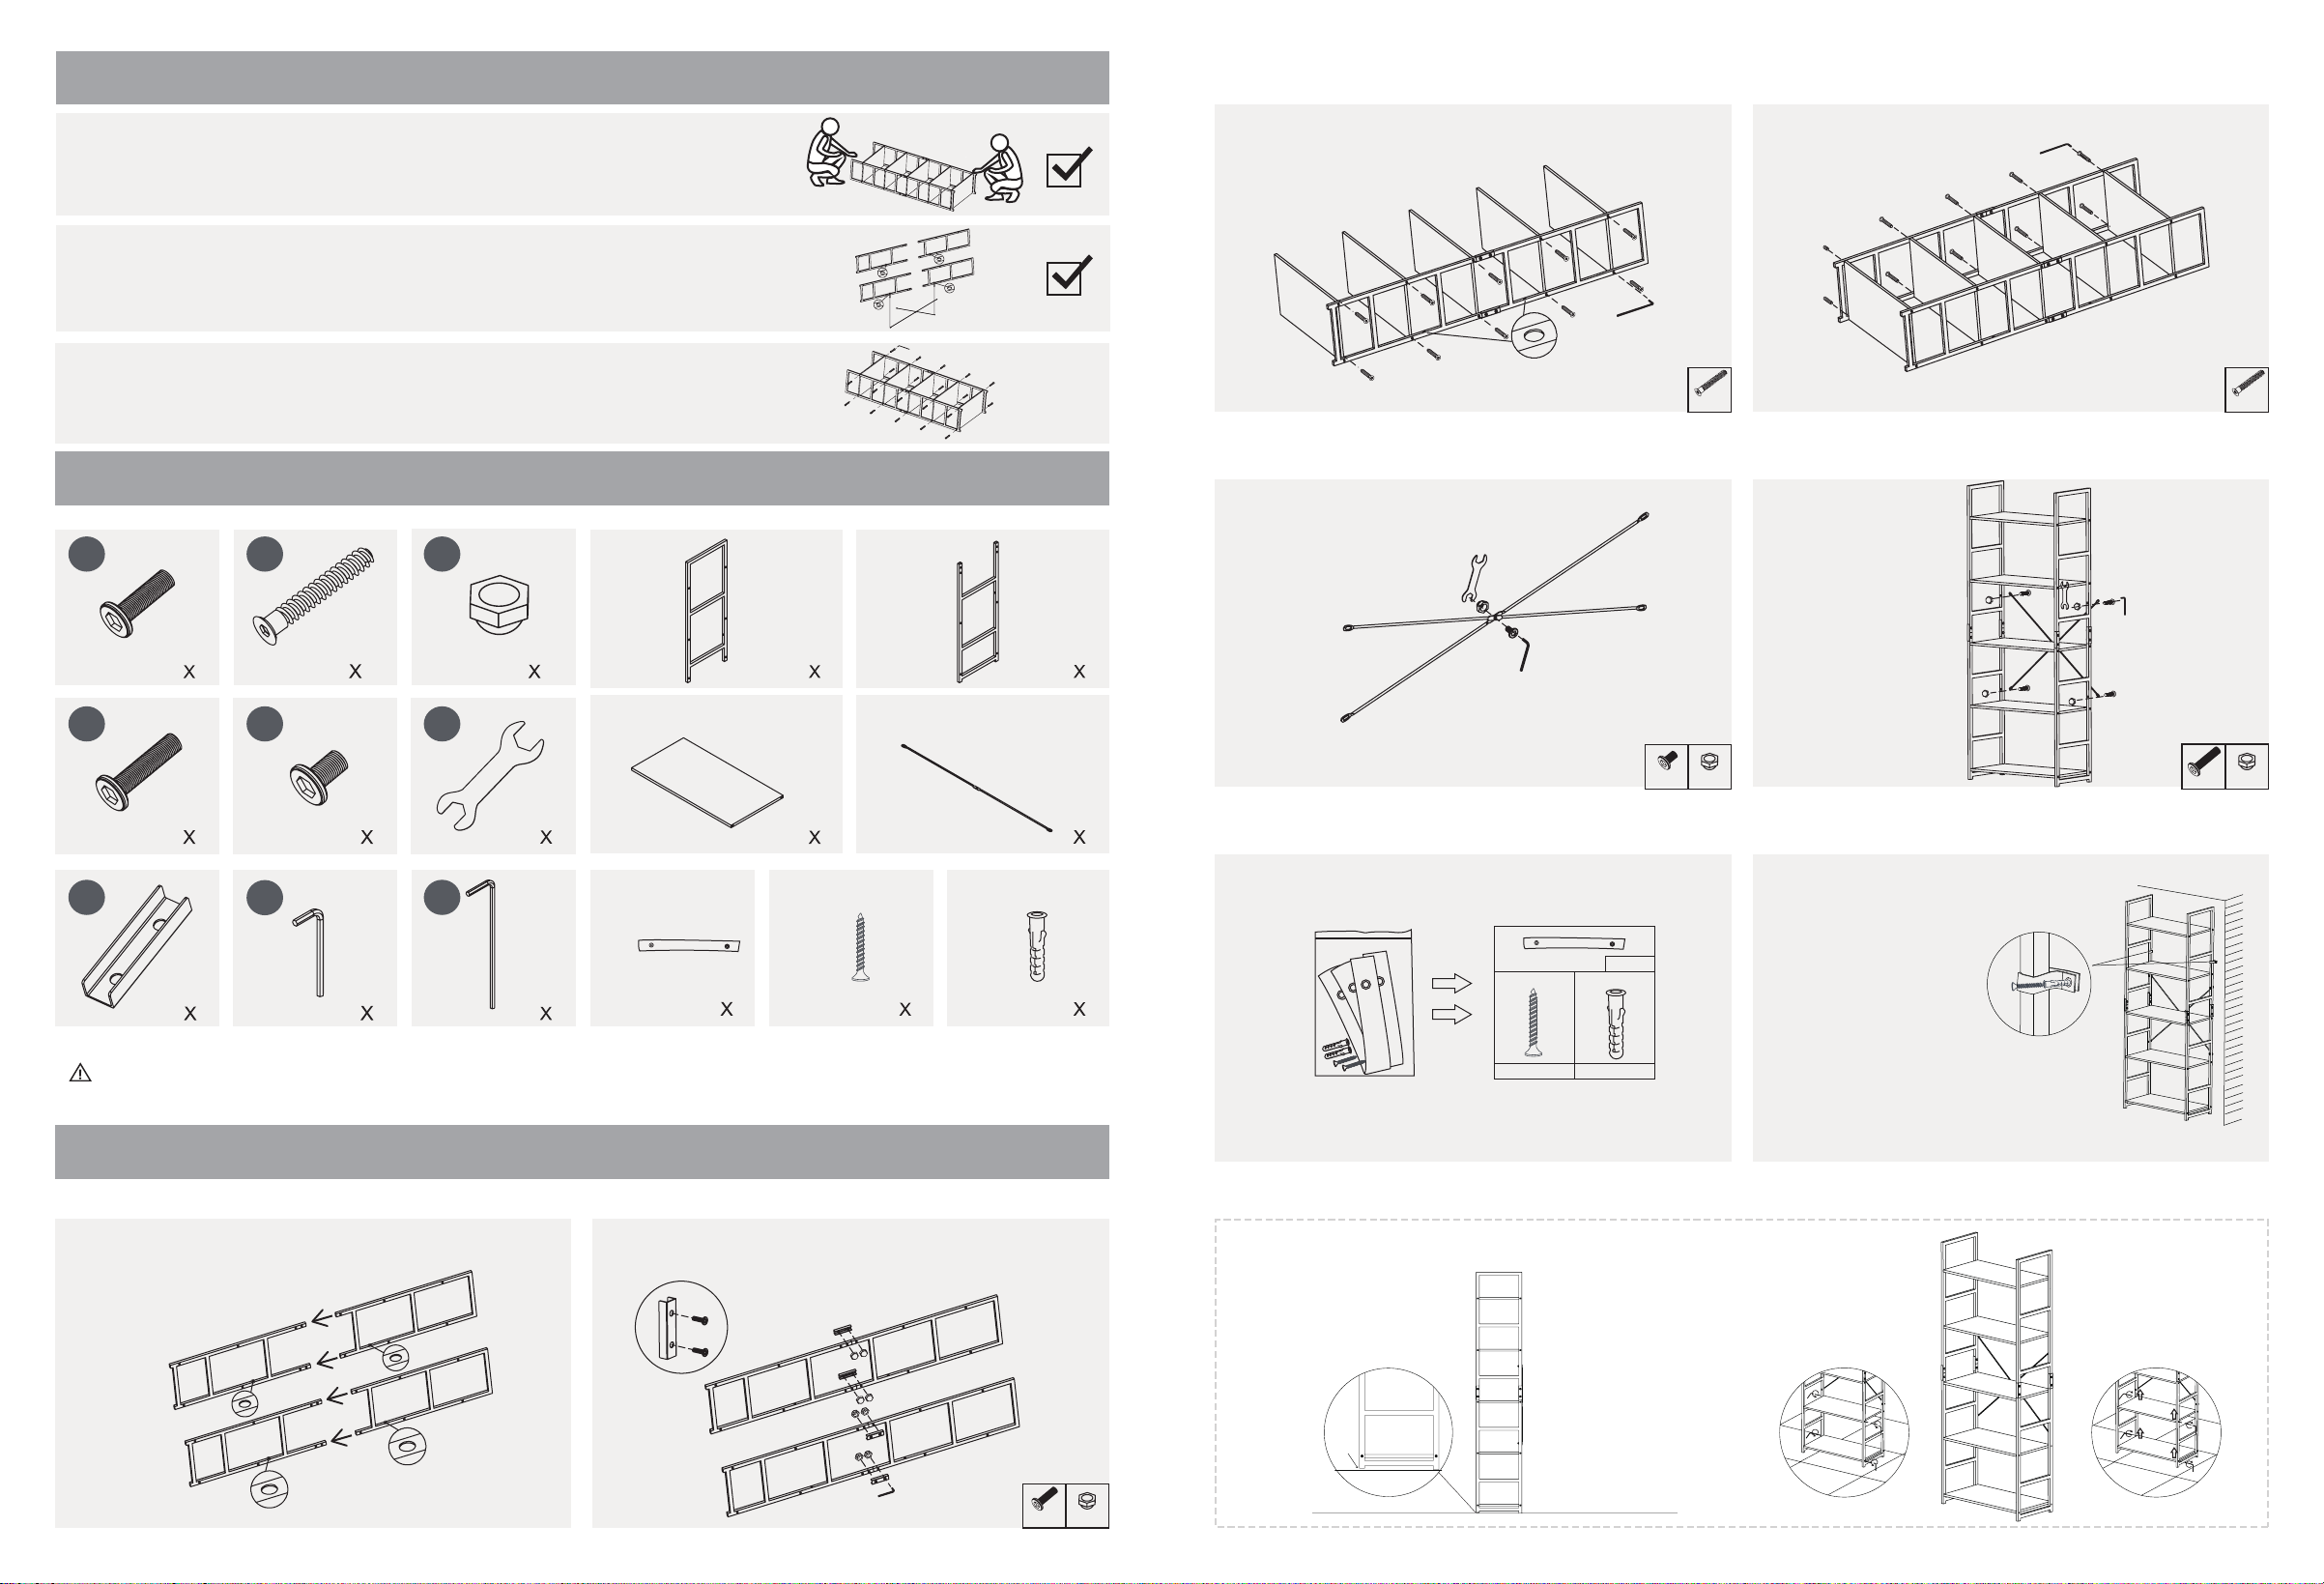
Components
Assembly Instructions
1. Place the Metal Frames Correctly
3. Connecting Boards and Frame 4. Connecting Boards and Frame
5.Fix the Supporting Bars
7.Take out the Fall Preventing Kit 8.Install the Fall Preventing Kit
6. Put the supporting bars on and tightening all screws
Just in Case You Find the Shelf Uneven
2. Connecting Frames
1. Parts of assembly will be MUCH EASIER with 2 people.
3. Please keep a mild tightness on all the screwing during
assembly. After the whole bookshelf is assembled, firmly
tighten all the screws.
2. Please make sure all the holes for connecting part D
are facing toward the same side.
789
1 2 AB
C
abc
D
3
4 5 6
8M6X20
M6X25 M6X10
M6 M5
M5X40 20 13 2 2
52
2
22
4
4
1
1
1
1
B
B
A
A
All Facing Down
⑦①
①Please put ① into ⑦ first
③
⑦
① ⑧
*8
③
①*8
⑨
All Facing Down
C
C
C
C
C
②
②*10 ②*10
②
⑨
D
D
③
⑤
⑥
⑧
③
③
③④
④
④
④
③⑧
⑥
*1
③
*1
⑤*4
③
*4
④
B
D
B
A
A
Please make sure all parts are included, if anything is missing, please contact us for
replacement. Please make sure you are using the correct screw for different components.
On each frame there is a hole drilled for connecting Part D.
Please make sure all of them are facing towards the same
side so that Part D can be correctly installed.
Put Screw ① into Part ⑦ before connecting to frames.
Mildly screw in ② to connect boards and the frame,
80% tightness on screws.
Repeat step 3 for the other side.
Find the short leg which causes instability. (1).Loosen the screws (2).Lift & Screw
Loosen the screws
between metal frames
and bottom 2 wooden
boards at the unstable
corner and the diagonal
corner.
Lift the loosened boards
(Apply force on the
loosened corners ). While
applying the lifting force,
screw in the boards and
the metal frames tight.
Loosely screw in supporting
bars, make sure they fit
in.Then tighten all screws
including the ones
connecting metal frames
and wooden boards.
1mm
a
bc
Step1: Choose a position above the second shelf, drill a
6mm(diameter) hole into the wall.
Step2: Wrap the anti falling belt(part a)
around one of the frame, then overlap
the grommets.
Step3: Insert the plastic shell
(part c) through the overlapped
grommets, insert it into the drilled
hole on the wall.
Step4: Screw in part b into the plastic shell(part c),
shell will expand thus fixing the belt and the shelf.
Step5: Repeat step 1-4 for the other side.
a x 2
b x 2c x 2