NUTRIBULLET NBA07200 User manual

User guide.
TWIN DRAWER
AIR FRYER

PERSONAL SAFETY
DO NOT TOUCH HOT
SURFACES. Never touch the
sides of the drawers, crisper
plates or inside of the
appliance during or after
operation. Always use
insulated oven gloves or use
the drawer handles when
using the appliance.
During hot air frying, hot steam
is released through air vents
located on the sides and back
of the unit. Keep your hands and
face away from the steam and
from the air vents. Use caution
when removing the Cooking
Drawers from the appliance as
there may be hot steam.
Before moving or storing the
unit, turn the unit OFF, UNPLUG
the power cord, and wait for the
appliance to cool.
Always turn the appliance
OFF and UNPLUG from the
outlet when not in use and
before cleaning. Allow to cool
down before assembling or
Important safeguards and
cautionary information.
Warning! To avoid the risk of serious injury, carefully read all
instructions before operating your nutribullet®Twin Drawer Air Fryer.
When using any electrical appliance, basic safety precautions should
always be observed, including the following important information.
WARNING: To prevent risk of severe personal injury and/or property
damage, use extreme caution when cooking.
disassembling parts, and before
cleaning the appliance.
DO NOT leave the appliance
unattended when in use.
DO NOT attempt to remove
the Cooking Drawers while
the unit is in operation. Pause
or turn the appliance o and
ensure that the cooking action
has completely stopped before
removing the Cooking Drawers
from the Base.
Removing the Cooking Drawer
too quickly or forcefully may
result in splattering of hot
contents and may cause serious
burns and injuries.
This appliance is not intended for
use by persons (including children)
with reduced physical, sensory,
or mental capabilities, or lack of
experience and knowledge, unless
they are closely supervised and
instructed concerning use of the
appliance by a person responsible
for their safety.
Close supervision is necessary
when any appliance is used by
or near children. Children should
be supervised to ensure that they
DO NOT play with the appliance.
The use of attachments not
recommended or sold by
nutribullet®may cause personal
injury or property damage.
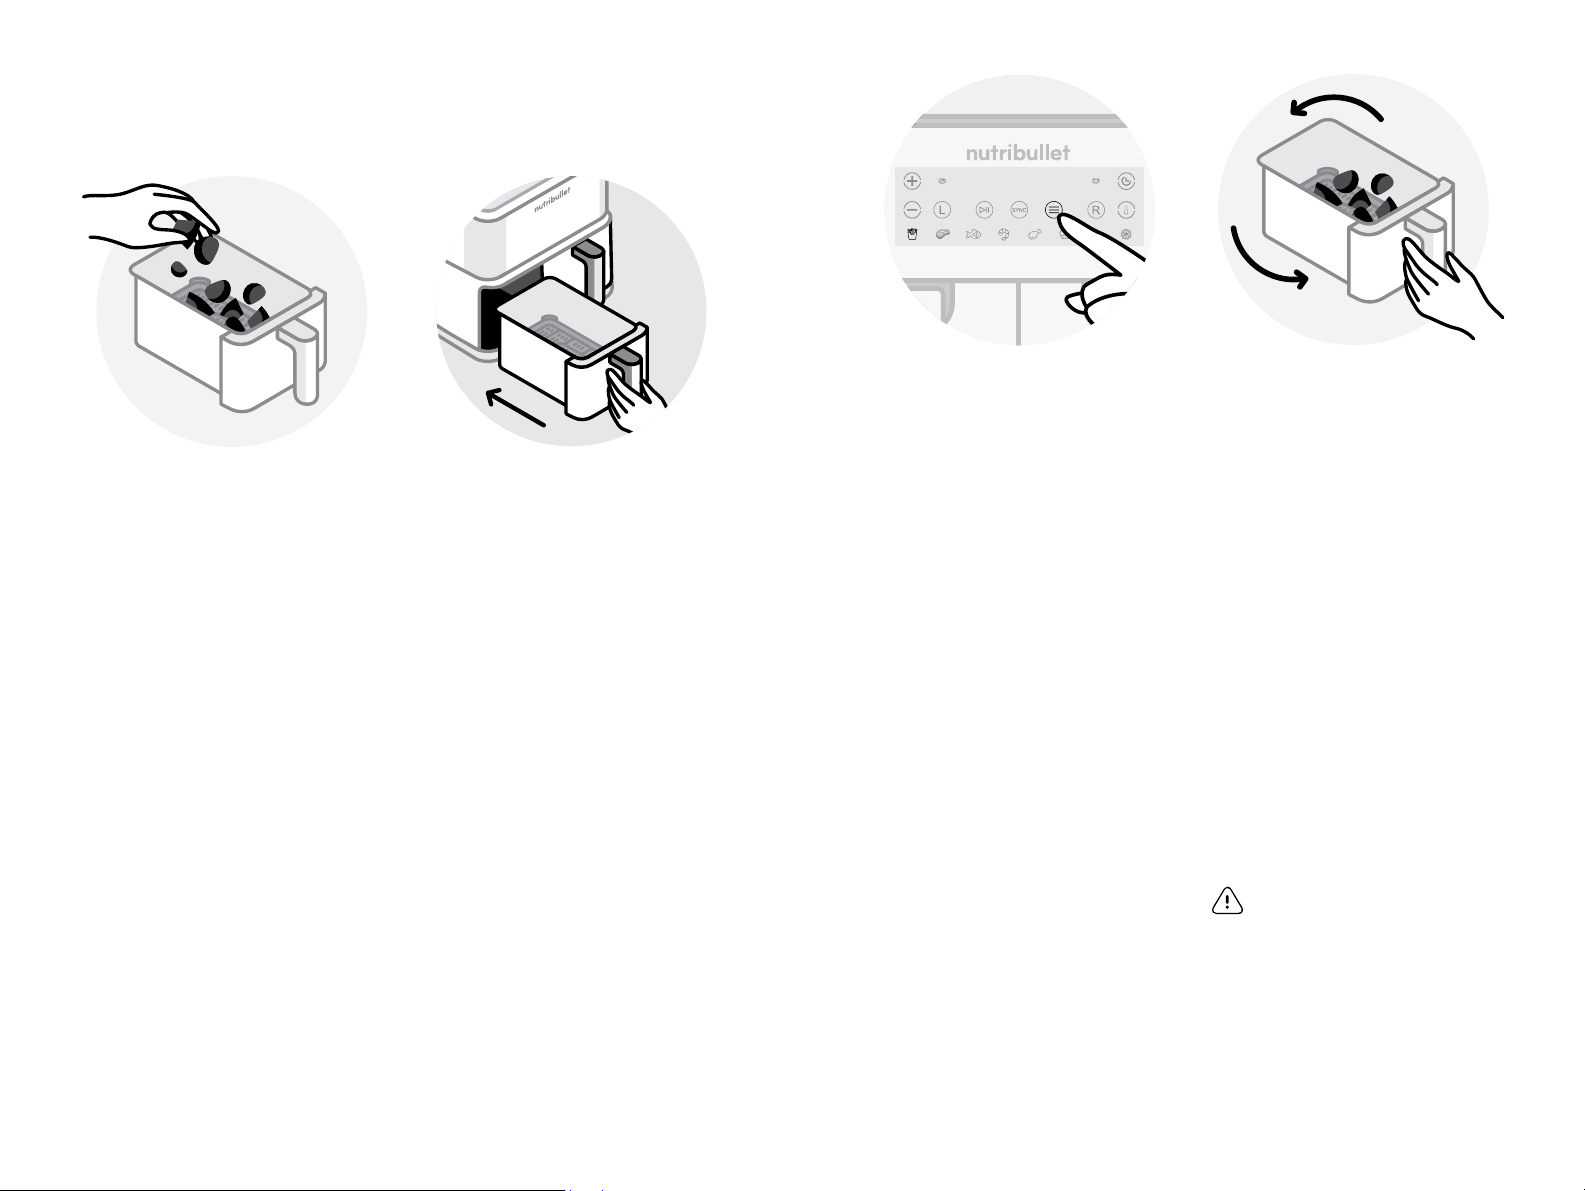
Never overfill ingredients.
Leave at least 50mm of space
between your food and the top
of the Cooking Drawer. Keep all
ingredients within the basket
and prevent any direct contact
with the heating element.
Overfilling the unit may result
in personal injury, property
damage, or aect the safe use
of the appliance.
Do not use the appliance for any
other purpose than described in
this manual. Misuse may cause
injury.
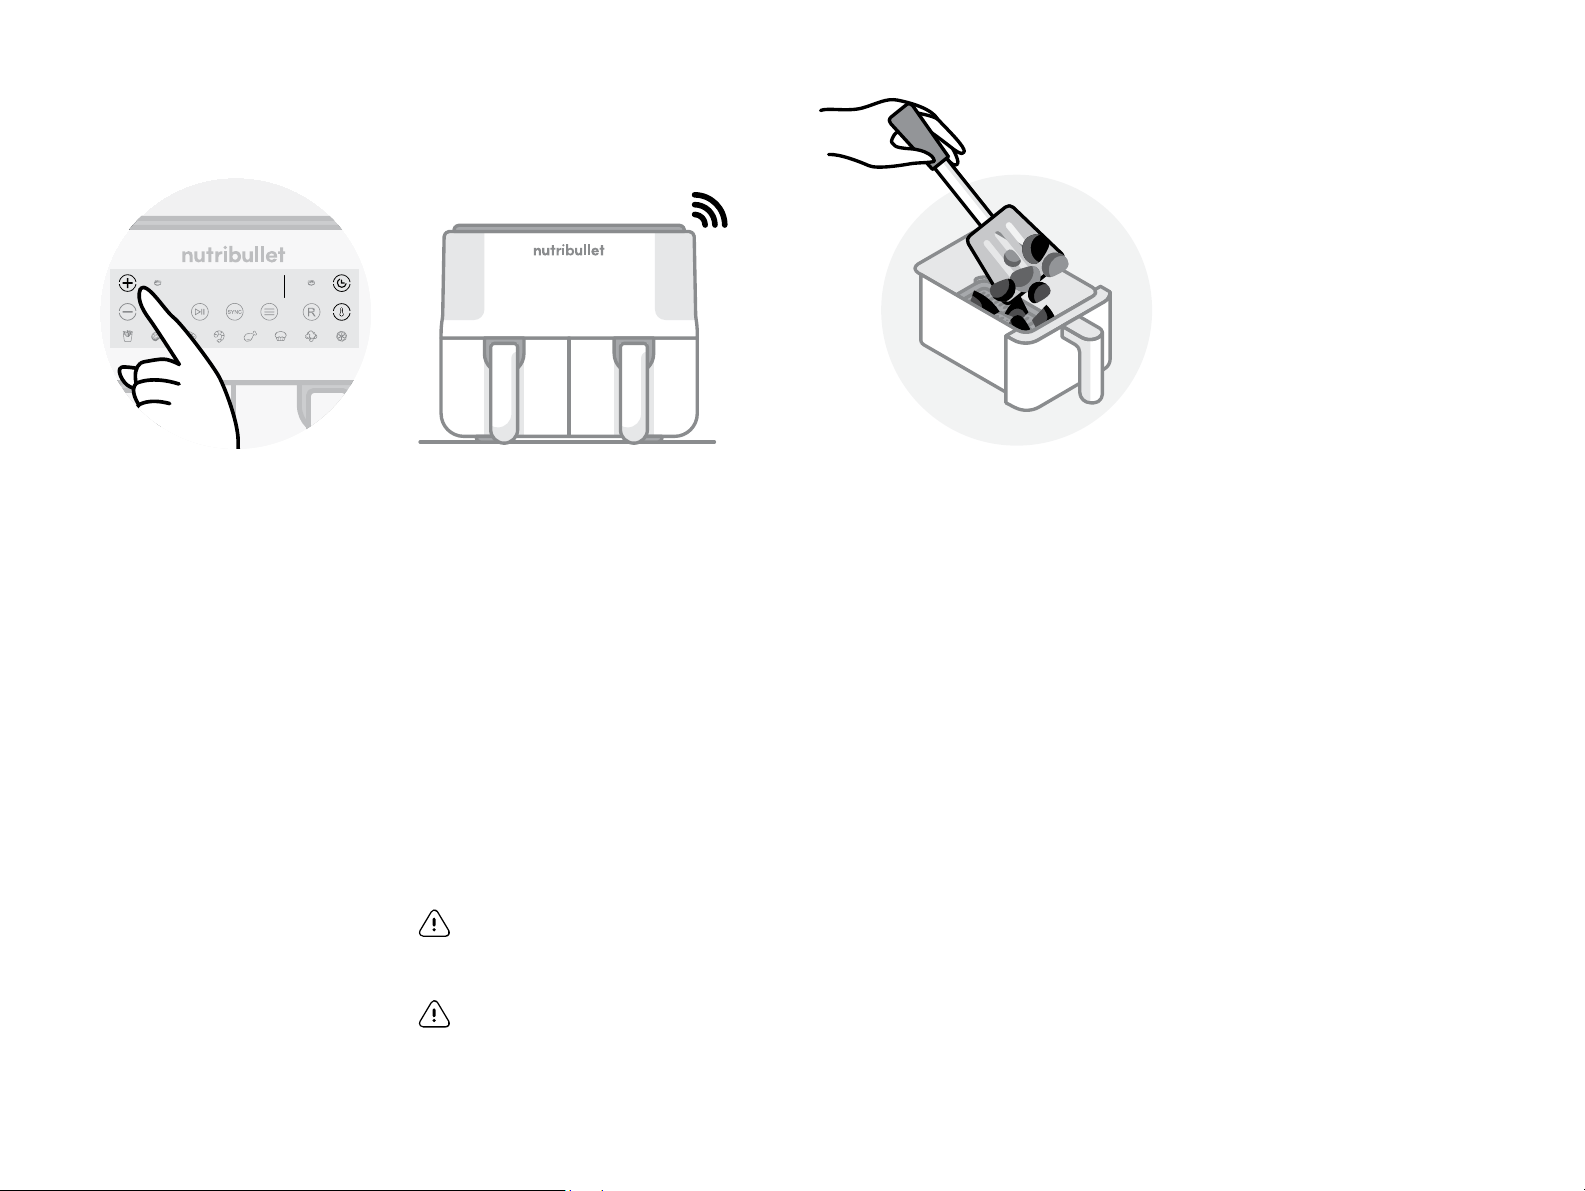
Always use caution when
operating the appliance with
hot food. Improper use not in
accordance with the safeguards
contained in the user manual
may result in serious personal
injury or property damage.
DO NOT immerse the appliance,
or power cord in water or any
other liquid. To prevent electric
shock and short-circuit, avoid any
liquid from entering the appliance.
NEVER pour oil into the Cooking
Drawers as this could result in fire
or personal injury.
PRODUCT SAFETY
FOR COUNTERTOP USE ONLY.
Make sure the surface is level,
heat-resistant, stable, clean and
dry. DO NOT place the unit near
the edge of the countertop during
use. Never use a power outlet
below counter which can make
the cord accessible to children.
We recommend placing a heat
proof mat underneath your
appliance when in use, to protect
your benchtop from the risk of
heat damage.
Any significant spillage onto the
surface under or around the
appliance, or onto the appliance
itself, should be cleaned and
dried before continuing to use the
appliance.
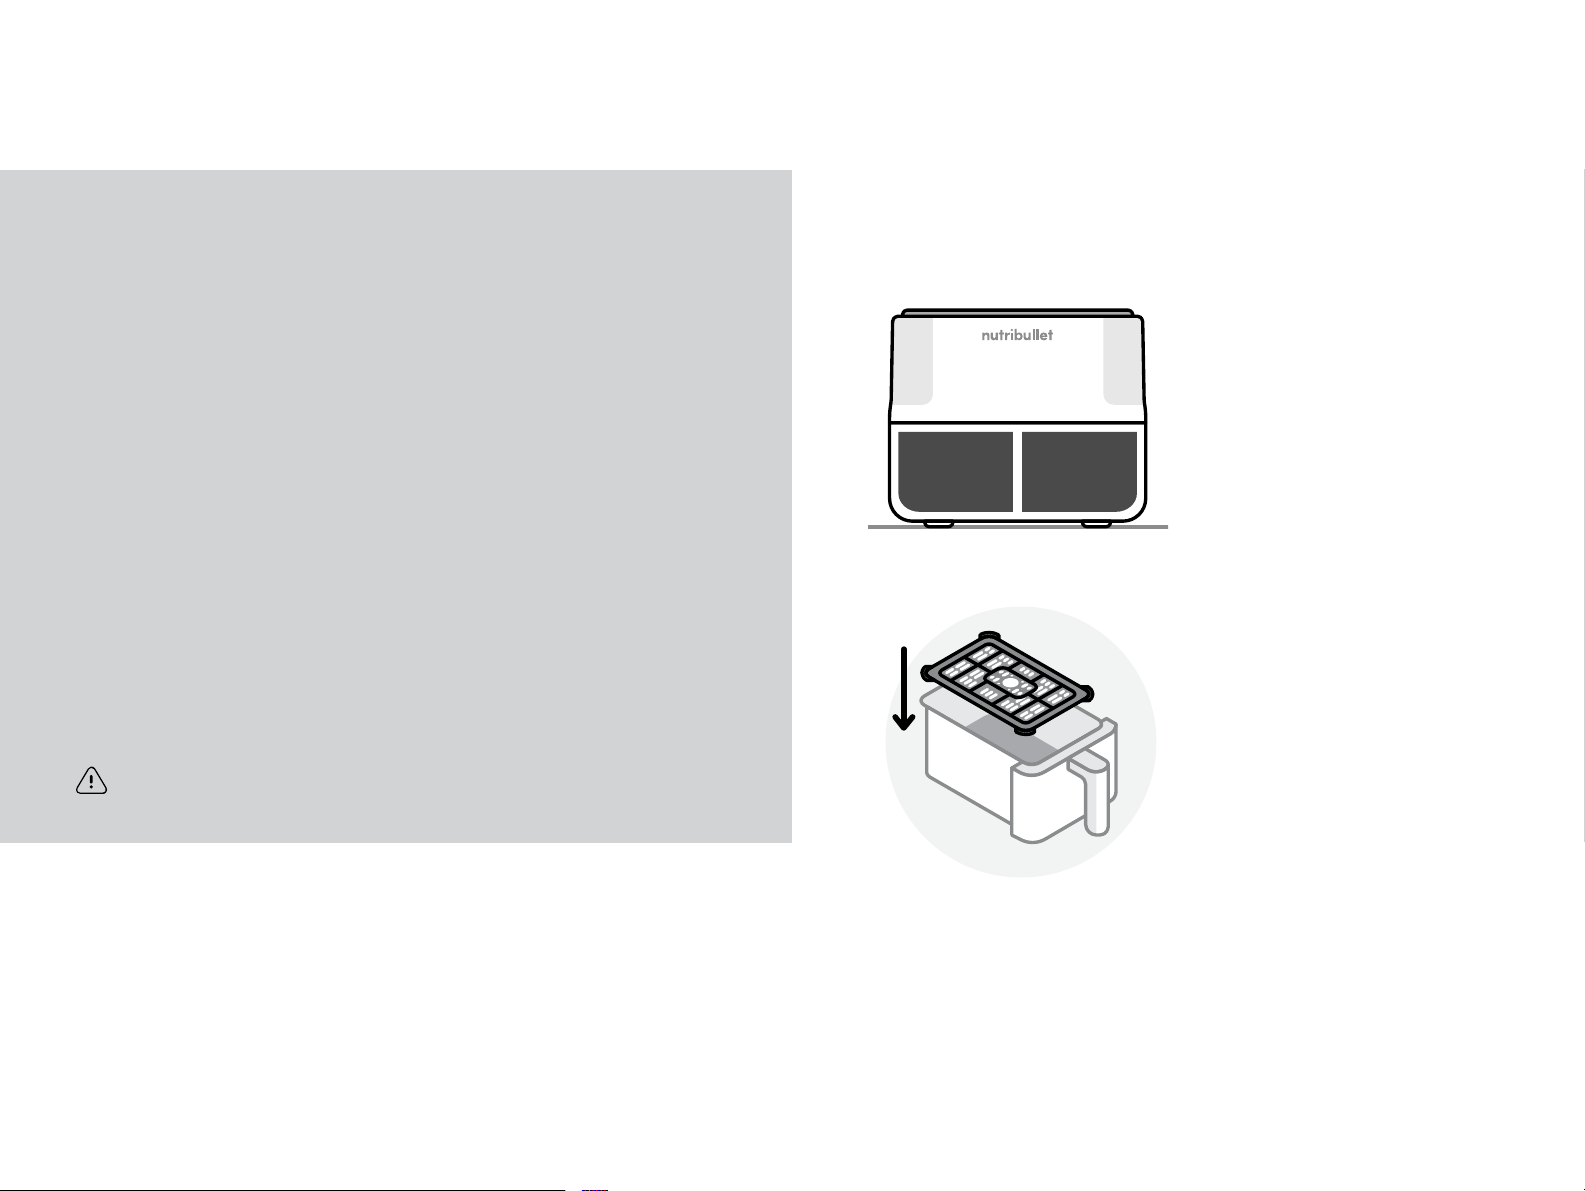
Always ensure that the Cooking
Drawer is thoroughly dried
after cleaning and is positioned
correctly before use.
DO NOT put any NON-food items
into the Cooking Drawer for the
purpose of frying or heating.
DO NOT use the appliance for
deep frying with oil. DO NOT use
the appliance for deep frying.
When using this appliance,
provide adequate air space (at
least 200mm) above, below, and
on all sides for circulation.
DO NOT cover the air outlet vent,
located on the back of the unit,
while the unit is operating.
32

DO NOT place on or near a hot
gas or electric burner, in a heated
oven, or on a stovetop.
DO NOT place the appliance
close to flammable materials such
as curtains, and DO NOT place
anything above or on top of the
appliance when in use.
DO NOT use this appliance if any
parts appear to be damaged.
If you have any questions or
concerns, please contact customer
service (AU: 1300 285538 /
NZ: 0800 232 633).
This product is not intended
for use outside of Australia
and New Zealand. DO NOT
use this product in locations
with dierent electrical
specifications or plug types.
DO NOT operate with any type
of plug adapter or voltage
converter device, as these may
cause electrical shorting, fire,
electric shock, personal injury
or product damage.
DO NOT modify the plug in any
way.
To unplug, grasp the plug and pull
from the outlet. Never pull from the
power cord.
DO NOT let the power supply cord
hang over the edge of a table or
countertop.
DO NOT let the power supply cord
touch hot surfaces, including stove,
or become knotted or tangled.
Regularly inspect the power
cord, plug, and appliance for
any damage. DO NOT operate
any appliance with a damaged
cord or plug or if the appliance
malfunctions, or is dropped
or damaged in any manner. If
the supply cord is damaged, it
must be replaced by a qualified
electrician in order to avoid a
hazard.
The appliance is not intended to be
operated by means of an external
timer or separate remote-control
system.
Remove and safely discard any
packaging material orpromotional
labels before using the appliance
for the first time.
If your nutribullet®malfunctions in
any way, immediately discontinue
use and contact Customer
Service. You may purchase
new nutribullet®attachments
or other parts at bulletbrands.
com.au/bulletbrands.co.nz or by
contacting customer service (AU:
1300 285538 / NZ: 0800 232 633).
Any maintenance other than
cleaning should be performed by
a qualified electrician. DO NOT
attempt to repair or service this
appliance yourself.
This appliance is for household use
only. Do not use this appliance for
anything other than its intended
use. Do not use in moving vehicle
or boats. Do not use outdoors.
!
WARNING!
This appliance is intended to be
used in household and similar
applications such as:
· sta kitchen areas in shops,
oces and other working
environments;
· farm houses;
· by clients in hotels, motels
and other residential type
environments;
· bed and breakfast type
environments
If you have any questions or
comments or if some aspect of
this user guide is not clear, please
contact customer service for
assistance at bulletbrands.com.
au/bulletbrands.co.nz.
Save these
instructions!
54

Contents.
08 What’s included
09 Assembly guide
10 Control panel
12 Usage instructions
12 Before first use
13 Assembly
14 Using the Air Fryer
18 Care & maintenance
18 Replacement parts
19 nutribullet®Twin Drawer Air Fryer
One-year limited warranty
Thank you for purchasing the nutribullet® Twin Drawer Air Fryer.
76

Assembly Guide
What’s included.
base 2 cooking
drawers
2 crisping
trays
Assembly guide.
base
2 crisping trays
2 cooking drawers
98
Base Unit
Cooking Basket
Crisping Tray

Control panel.
To select a cooking mode, first
select which Cooking Drawer
you will be using (L or R). Then,
press the Menu button until
your desired cooking mode is
fully illuminated. The mode will
load with its default time and
temperature, as noted in the
table on the next page. Press
the Time/Temperature Select
buttons to view the settings on
the display.
NOTE: The time is displayed in minutes
for all modes except for Dried Fruit,
which is displayed in hours and minutes.
Icon Mode Default
Temperature
Default Cooking
Time
Fry 200°C 20 minutes
Steak 200°C 12 minutes
Fish 200°C 12 minutes
Shellfish 180°C 12 minutes
Poultry 200°C 25 minutes
Bake 180°C 12 minutes
Veggie 160°C 16 minutes
Dried Fruit 50°C 5 hours
• To manually adjust the mode
time or temperature, first
press the Time/Temperature
Select buttons, followed by
the +/- buttons to adjust
as needed. You can adjust
either setting before cooking
has started or at any time
during the cooking process.
NOTE: For the Dried Fruit mode,
the time can be increased or
decreased in 15 minute increments,
and the time displayed is indicated
in hours (1:00 hour to 12:00 hours).
For all other modes, time can be
adjusted in 1 minute increments,
and time displayed is in minutes
(1:00 minute to 60:00 minutes).
Cooking temperature can be
adjusted in increments of 5 degrees).
• The Start/Stop button can be
used to pause the Cooking
Drawer(s). Press and hold
the Start/Stop button for 3
seconds to cancel cooking.
• If no selections are made
for 5 minutes, the unit will
enter standby mode. To
wake the unit from standby
mode, press and hold
L, R, or SYNC.
veggiefry shellfish poultryfishsteak dried fruitbake
temperature/time
decrease
left drawer
selection
start/
stop
two drawer
sync
menu
time
select
temperature
select
right drawer
selection
cooking
indicator
(right)
cooking
indicator
(left)
time/temp
display
(right drawer)
time/temp
display
(left drawer)
Default settings for each mode are noted in the table below.
To begin cooking, press the
Start/Stop button, the icon for
the selected mode will remain
illuminated, all other icons
will be extinguished. Once the
mode has started, the Cooking
Indicator icon will illuminate to
indicate that the Air Fryer has
started cooking.
Follow the same process for the
other Cooking Drawer. To set the
same mode for both Cooking
Drawers, press SYNC and
then press Menu to select your
desired cooking mode.
temperature/
time increase
Disclaimer: All default settings should be viewed as suggestions. As ingredients and
recipes dier in origin, size, shape as well as brand, we cannot guarantee the best setting
for your ingredients.
1110

Before first use.
Before using your nutribullet®Twin Drawer Air Fryer for the first
time, please take a moment to perform the steps below.
1. UNPACK
Open the box and remove the Air Fryer Base with Cooking Drawers
and Crisping Trays, placing all parts on a flat, level, and dry surface.
Remove inserts under each drawer before first use.
2. CLEAN
Rinse Cooking Drawers and Crisping Trays with hot soapy water.
Wipe exterior of Air Fryer Base with a clean, damp cloth.
3. PREPARE COOKING AREA AND ENSURE PROPER VENTILATION
Ensure the Air Fryer is used on a clean, dry, flat surface. Do not use
the unit outdoors. The Air Fryer should be at least 200mm away
from the wall when in operation, to ensure proper air ventilation
behind the unit.
NOTE: To eliminate any new-machine odors that may be present, you can run the
Air Fryer at its highest temperature for about 5 minutes without putting any food inside.
CAUTION: ONLY place the Air Fryer on a heat resistant surface or mat to prevent
heat damage.
Usage instructions.
Assembly.
Review all warning and caution statements in the Important
Safeguards section (pages 3-5) and in the previous section before
proceeding to Step 1.
1 Place the Base on a clean,
dry, flat surface, like a
countertop.
2 Insert the Crisping Trays
into the bottoms of the
Cooking Drawers. Make
sure the Crisping Trays are
seated securely and are
level with the bottom of the
Cooking Drawers.
Place the base on a clean, dry, flat surface, like a counter top.
Insert the crisping trays into the bottoms of the cooking basket.
1312

3 TO USE A COOKING MODE:
Press L or R to select the
Cooking Drawer you are
programming, or press
SYNC to choose the same
mode for both drawers.
Press the Menu button until
your desired cooking mode
is fully illuminated (the other
modes will dim). The default
temperature and time for the
selected mode will load on
the display for the selected
Cooking Drawer(s). Press
the Start/Stop button
to begin cooking.
TO MANUALLY SET
COOKING TEMPERATURE/
TIME: Press Lor Rto select
the Cooking Drawer you
are programming, or SYNC
to program the same
temperature and time for
both drawers. Next, press the
Time/Temperature Select
buttons and use the +/-
buttons to set your cooking
time and temperature. Press
the Start/Stop button to
begin cooking.
2Holding the Cooking
Drawers by their handles,
place the Cooking Drawers
into the Base. Ensure the
Air Fryer is properly
assembled with the
Cooking Drawers fully
seated inside of the Base.
NOTE: The Air Fryer will not
operate unless the Cooking
Drawers are installed correctly.
4TURNING FOOD DURING
COOKING: Some recipes
call for taking the Cooking
Drawers out during cooking
and turning food. If so,
first press the Start/Stop
button to pause the Air
Fryer. When the cooking
has paused, remove the
Cooking Drawers from the
Base using the handle. Turn
your food using a utensil,
and place the Cooking
Drawer securely back in the
Base. Press the Start/Stop
button to resume cooking.
If you remove a Cooking
Drawer at any time during
cooking, cooking will pause
until the Cooking Drawer is
reinserted.
WARNING: Contents may be very
hot. Use caution when removing
the Cooking Drawers as there may
be hot steam or splattering that
may cause bodily injury. Keep your
hands and face away from the
steam and from the air vents.
Using the Air Fryer.
1 Place food into the Cooking
Drawers, being careful not
to overfill. For best cooking
results, leave at least
50mm of space between
your food and the top of
the Cooking Drawer.
Place food into the cooking baskets, being careful not to overfill.
Turning food during cooking.
888 888
1514

7Remove the food from the
Cooking Drawer using a
utensil – NEVER use your
hands. Enjoy!
6 Once the Air Fryer has
reached the end of its
cooking time, you will hear
5 beeps to alert you that
the cooking has completed.
Wait a few seconds so
the cooking action comes to
a stop.
To cancel or end cooking
before the time is complete,
first select the Cooking
Drawer you want to cancel
(L or R). Then press and
hold the Start/Stop button
until the display turns o
and the Cooking Drawer
powers o.
CAUTION: Removing the Cooking
Drawers too quickly may result in
splattering and could potentially be
dangerous.
CAUTION: Be careful when
opening the Cooking Drawers as
there may be hot steam.
5 To adjust the time or
temperature while cooking
is already in progress,
first select the Cooking
Drawer you want to adjust
(L, R, or SYNC). Press the
Time/Temperature Select
buttons and then use the
+/- buttons to adjust either
setting.
Place food into the cooking baskets, being careful not to overfill.
888 888
1716

Replacement parts.
To order additional parts and accessories, please visit our website
at bulletbrands.com.au/bulletbrands.co.nz.
STEP 1:
Turn the Air Fryer OFF, UNPLUG
the unit, and allow it to cool
down thoroughly after use.
STEP 2:
Remove the Cooking Drawers
and Crisping Trays. The Cooking
Drawers and Crisping Trays are
TOP RACK dishwasher safe, or
can be cleaned by rinsing in
warm soapy water.
WARNING: NEVER use the sanitise
cycle. The temperature of the
sanitise cycle can warp the plastic.
CAUTION: DO NOT use an
abrasive or metal cleaning tool
to clean the Cooking Drawers
or Crisping Trays. Doing so can
damage the non-stick coating on
the surface of these items.
STEP 3:
Clean the inner wall of the Air
Fryer Base by gently wiping o
any residue with a warm cotton
cloth, then dry it with a dry cloth.
The interior and exterior of the
Base should only be cleaned by
wiping it with a damp cloth.
CAUTION: NEVER submerge the
Base in water or any other liquid.
Allow the unit to fully cool before
cleaning.
STEP 4:
Once all parts have been
cleaned and thoroughly dried,
store the Air Fryer fully assembled
in a safe, dry location.
Care & maintenance.
Cleaning the nutribullet®Twin Drawer Air Fryer is quick and easy. We
recommend cleaning all removable parts after each use to reduce
the buildup of residue.
If your product becomes
defective due to faulty
material or workmanship
within a period of One
(1) Year from the date of
purchase, we warrant
to do the following:
• For New Zealand Consumers:
We will replace the defective
product with a new product,
free of charge, or repair the
product at our cost, at our
discretion.
• For Australian Consumers:
Our goods come with
guarantees that cannot
be excluded under the
Australian Consumer
Law. You are entitled to
a replacement or refund
for a major failure and for
compensation for any other
reasonably foreseeable
loss or damage. You are
also entitled to have the
goods repaired or replaced
if the goods fail to be of
acceptable quality and the
failure does not amount to
a major failure.
one (1) year limited
replacement warranty
statement.
YOUR WARRANTY
IS SUBJECT TO THE
FOLLOWING CONDITIONS:
• DO NOT operate the
appliance with a damaged
plug or cord, or if the unit has
been dropped, damaged or
dropped in water. To avoid
the risk of electric shock, do
not disassemble or attempt
to repair the appliance
on your own. If the supply
cord is damaged, it must
be replaced by a qualified
electrician in order to
avoid a hazard. Incorrect
re-assembly or repair can
cause a risk of electric shock
or injury to persons when the
appliance is used.
• The item has not been
misused, abused, neglected,
altered, modified or repaired
by anyone.
• The item has been subjected
to fair wear and tear.
• The item has not been used
for trade, professional or
hire purposes.
1918

• The item has not sustained
damage through foreign
objects, substances or accident.
YOUR WARRANTY
DOES NOT COVER:
• Components that are
subject to natural wear
and tear caused by
normal use in accordance
with operating instructions.
• Unauthorised/improper
maintenance/handling or
overload is excluded from
this warranty.
• For guarantee claims, you
will need to submit a proof
of purchase in the form of
a valid receipt that displays
date and place of purchase.
This warranty does not replace
but is in addition to your
statutory rights.
This warranty does not apply
to accessories supplied with
the item.
This warranty applies only to
the original purchaser and
may not be transferred.
Replacement items will
be covered by the limited
warranty for the balance of the
warranty period from the date
of the original purchase.
PLEASE NOTE:
Only the defective product
or parts returned to place of
purchase will be replaced
under this warranty.
NEW ZEALAND
PO Box 100-707
NSMC
Auckland 0745
0800 232633
www.bulletbrands.co.nz
AUSTRALIA
PO Box 574
South Morang
Victoria 3752
1300 285538
www.bulletbrands.com.au
nutribullet is a registered trademark of CapBran Holdings, LLC.
Copyright © 2022 CapBran Holdings, LLC. All rights reserved.
Los Angeles, CA 90025, USA. Made in China.
2120

2322

230-240V AC 50-60Hz 2100-2300W
Capital Brands Distribution, LLC | bulletbrands.com.au / bulletbrands.co.nz
All rights reserved.
nutribullet®and the nutribullet®logo are trademarks of CapBran Holdings, LLC
registered in the U.S.A. and worldwide.
Illustrations may dier from the actual product. We are constantly striving
to improve our products, therefore the specifications contained herein
are subject to change without notice.
220715 _NBA07200 (NBA-200A)
Table of contents
Other NUTRIBULLET Fryer manuals

NUTRIBULLET
NUTRIBULLET XXL DIGITAL AIR FRYER User manual

NUTRIBULLET
NUTRIBULLET Nutricook TXG-S3T2 User manual

NUTRIBULLET
NUTRIBULLET Nutricook KF1828ELQ-H12D User manual

NUTRIBULLET
NUTRIBULLET XXL User manual

NUTRIBULLET
NUTRIBULLET Nutricook AF9204S User manual

NUTRIBULLET
NUTRIBULLET Magic Bullet User manual