NuvoH2O DPSB User manual

Installation Guide

nuvoH2O.com
877-688-6426
Welcome
Congratulations on your purchase of the nuvoH2O water softener!
Instead of using salt, nuvoH2O uses a proprietary citrus formulation
(CitraCharge) to naturally soften and condition water. First designed
for thefood services industries in the early 1980’s, these products
have been helping solve complex water problems for some of the
nation’s largest businesses.
Re-engineered for your home, the innovative nuvoH2O Salt-Free
Water Softener is uniquely effectivein preventing and removing
existing scale buildup from your pipes, fixtures, and appliances.
Thepatented process uses the basic scientific principle of Chelation
in which CitraCharge binds with the mineral ions in hard water
preventingscale formation.
You can now enjoy healthy, softened water that both prevents and
removes the hard-water buildup that clogs and corrodes water
heaters and other plumbing fixtures and appliances.
What to expect with your nuvoH2O Softener
ThenuvoH2O softener naturally binds minerals to prevent hard-water buildup
insteadof removing the minerals like old, salt-based water softeners. This
mineralized water is healthier and the nuvoH2O system will not changethe
taste of your water.
ThenuvoH2O-softened water requires less soap in your dishwasher. Please
decrease the amount of soap used by at least half, and avoid using pre-soaks
or rinse-aids. Using toomuch soap or using rinse-aids can cause a fine white
film or spots to form on dishes.This spotting can also be aggravated bysome
of theno-phosphate dishwasher detergents found in many states.
ThenuvoH2O softener creates natural, pH-balanced water that is very healthy
for hair and skin. This softened, mineralized water will not produce theslick
(can’t-rinse-off-the-soap) feeling you may have experienced in the shower
when using a traditional salt softener.
1

nuvoH2O.com
877-688-6426
Fast,Easy Installation
ThenuvoH2O softener is one of the most installation-friendly softeners on
themarket. No drains,no electricity, no calibration. Noadditionalplumbing is
required for asoft-water loop because nuvoH2O doesn’t change the taste of
your water; it is FDA approved and safe to drink. The built-in bypass makes
future cartridge replacement a snap without requiring additional shut-off valves.
Simply mount thenuvoH2O softener on the main water line and you’re well on
your way to enjoying softer, conditioned water in a fraction of the time it takes
to install a salt-based softener.
Package Contents
In addition tothe nuvoH2O softener and the Quick Start Cartridge, the
nuvoH2O softener package also includes a mountingback plate, mounting
bracket, screws, and housing wrench. Because plumbing standards vary,
other bushings and connectors are not included.
Keeping Your System Running
Once installed, the nuvoH2O requires no additional maintenance other than the
semi-annual cartridge replacement. Simply follow the instructions provided with
your replacement cartridge and filter. The system will not work without replacing
your cartridge and filter in a timely manner.
Again, thank you for choosing nuvoH2O. We look forward to working with you to
provide years of trouble-free, filtered and softened water. Welcome to nuvoH2O,
a new eraof easy-to-use,environmentally friendly water softening solutions.
2

nuvoH2O.com
877-688-64263
Studio System (Item #DPSB)
For apartments or RV’s
• Size: 5” x 14”
• Weight: 4.5 pounds
• Water flow: 12-15 gpm with 3/4” ports
• Max. pressure: 100 PSI (6.8 bar)
• Capacity:about 20,000 gallons or up to 6 months
• Uses 2” x 10” replacement cartridges
(Item #: S-2416 or SHP-2516)
• Built-in pressure relief valve
• FDA & NSF approved
Home System (Item #DPHB)
For houses with smaller families,
1 or 2 bathrooms, and average water use.
• Size: 5” x 24”
• Weight: 7 pounds
• Water flow: 12-15 gpm with 1” ports
• Max. pressure: 100 PSI (6.8 bar)
• Capacity: about 35,000 gallons or up to 6 months
• Uses 2“ x 20” replacement cartridges
(Item #: H-2416or HHP-2516)
• Built-in pressure relief valve
• FDA & NSF approved
Manor System (Item #DPMB)
3 or more bathrooms, and homes with
above average water use.
• Size: 8” x 26”
• Weight: 14 pounds
• Water flow: 15-18 gpm with 1.5”ports
• Max. pressure: 100 PSI (6.8 bar)
• Capacity:about 50,000 gallons or up to 6 months
• Uses 4” x 20” replacement cartridges
(Item #: M-42416 or MHP-42516)
• Built-in pressure relief valve
• FDA & NSF approved

nuvoH2O.com
877-688-64264
CAUTION!
Please Read All Instructions Before Beginning Installation
1Softener MUSTbe installed vertically.
2Verify that inflow and outlow lines are properly attached to inlet and outlet ports,
as marked on Housing Head.
3Thebrass inserts on the inlet and outlet ports provide stronger threadingbut can
split or break when over-tightened. DO NOT OVERTIGHTEN.
4The O-ring in theHousing Body MUST be seated properly. SeeBasic Installation
Steps for your system in this Guidefor details.
5If installed outdoors,System MUST be protected from sunlight or freezing.
Environmentaldamage dueto direct sunlight or freezing is not covered under
warranty.
6The recommended pressure setting is 65 psi (4.5 bar). Install a pressure
reduction valvebefore the housing inlet ifwater pressure may ever exceed the
Maximum PSI Rating: MAXIMUM PSI RATING – 100 (6.8 BAR)
7Make sure systemis appropriately sized for the intended use.Please check
system specifications on Page 3 prior to installing unit.
8Remove and discard the foam packing ring and plastic shrink wrapping from
around the cartridge and inside Housing before installation.
9CartridgeMUSTbe inserted properly inside housing body (large by-pass holes
at top).
10 If installing a with the nuvoH2O system, install the before the softening
system.
11 Water over 100°Fmay deplete the cartridge faster.
12 The nuvoH2O system cartridge is rated for usage and/or a time period.
The cartridgemust be replaced as directed to insure correct operation.
13 The nuvoH2O water softener is not a or a do not use with water
that contains microbiological pathogens, is unsafe, or does not meet the
minimum quality standards of municipal water.
14 The nuvoH2O softener isintended for thetreatment of hard water with above
normal pH, do not install if inlet water pH is 7.2or less.

nuvoH2O.com
877-688-64265
Please read allinstructions before beginning installation
1Turn off main water supply line leading to proposed installation site.
2Attach the Wall Mounting Panel horizontally (softener must hang vertically) to
wall studs with screws provided. It is very important that the panel is attached
to wall studs to allow for system weight and torqueneeded to adjust the system.
Do not attach bottomright screw at this time.
3Attach C-Bracket horizontally to Wall Mounting Panelunder “Softener” label.
The right C-Bracket screw should go through the Wall MountingPanel into the
wall stud.Another screw attaches the Wall Mounting Paneltothe wall stud
directly above theright C-Bracket screw. See FIG. 1
4Remove the blue Housing Head from white Housing Body by detaching Collar
(turn clockwiseor left—useprovided Wrench if necessary).
5Attach theblue Housing Head to the wall by inserting thenipples (not included)
in Housing Head through the side holes in the C-Bracket.
6Tighten nipples securely into the ports oneach side of the blue Housing Head.
WARNING: The inlet and outlet ports are tapered (NPT) and require thread seal
tape or sealant compound to prevent leakage. Be very careful, as over-tightening
thethreading can split or break the port. DO NOT OVERTIGHTEN.
These screws must be
securely attached to studs.
INSTALLATION STEPS
For Home and Studio System
FIG. 1
HOME / STUDIO

nuvoH2O.com
877-688-64266
7Securely connect water supply line inlet & outlet to thenipples in theblue Housing
Head. Softener functionality requires the correct water direction; make sure
water supply inlet pipe is attached to the inlet port. (Note: Ports on theblue
Housing Head are marked “IN” and “OUT”). See FIG. 2
Ports are marked“IN” and “OUT”
Cartridge must be insertedso
holes are at the top.
8Check that the O-ring is properly seated inside
the white HousingBody.
9Remove shrink wrap material from the cartridge and
packing foam ring, then insert Cartridge into Housing
Body. Make sure holes on side of cartridge are
located at the top. See FIG. 3
10 Attach the Collar (turn counter-clockwise or right)
and use the Wrench provided to securely tighten
the white HousingBody totheblue Housing Head.
11 Turn on the main water supply. Be sure theblue
Housing Head is turned to the “Softener”position.
FIG. 2
FIG. 3
immediately. Allow the newcartridge to remain in the housing with
HOME / STUDIO

nuvoH2O.com
877-688-6426
INSTALLATION STEPS
For ManorSystem
Please read allinstructions before beginning installation
1Turn off main water supply line leading to proposed installation site.
2Using screws provided, attach the Wall MountingPanelhorizontally (softener
must hang vertically) to wall studs through top left hole and top right hole of
Wall Mounting Panel.
3DO NOT REMOVE the blue Housing Head from the white Housing Body for
Installation Steps #4 through #6. After theBlack Top has been re-fastened in
Step #6, the Housing Body may be removed to make it easier to attach the
L-Bracket/Housing Head Assembly to the Mounting Panel.
4Unscrew the Black Top of theblue Housing
Unit. This is held together with a single
screw in themiddle. Only do this on the
Manor systems
5Attach theL-Bracket to theblue
Housing head and secure it with
thefour screws provided.
SeeFIG. 1
7
Attach L-Bracket
to Housing Head
with 4 Screws. FIG. 1
These screws must be
securelyattached to stud.
FIG. 2
6Replace the Black Top of the Housing
Unit and re-secure it with thesingle
screw removed in step 4.
7Attach the L-Bracket/Housing Head
assembly horizontally to the Wall
Mounting Panel under the “Softener”
label. Theright L-Bracket screw
should go through the Wall Mounting
Panel and into the wall stud.
See FIG. 2
MANOR

nuvoH2O.com
877-688-6426
8Attach the appropriate nipple(not included) securely into the ports on
each side of the Housing Head. The inlet and outlet ports are tapered
(NPT) and require thread seal tape or sealant compound to prevent leakage.
Be very careful, as over-tightening the threading can split or breakthe port.
DO NOT OVER-TIGHTEN.
9Securely connect the water supply
line inlet & outlet tothe nipples in the
Housing Head.Softener functionality
requires the correct flow direction;
make sure water supply inlet pipe
is attached to the inlet port.
See FIG.4
10 Check that the O-ring is properly
seated inside the Housing Body.
See FIG.4
11 Remove shrink wrap material
and packing foam ring,then insert
CartridgeintoHousing Body.
Make sure holes on side of
cartridge are located at the top.
12 Attach theCollar (turn counter-
clockwise or right) and use the
Wrench provided to securely
tighten the Housing Body to the
Housing Head.
13 Turn on the main water supply.
Be sure Housing Head is turned
to the “Softener” position.
8
Ports are marked
“IN” and “OUT”
Pressure Relief Valve
O-ring must be properlyseated
FIG. 4
FIG. 3
immediately. Allow the newcartridge to remain in the housing with
MANOR

nuvoH2O.com
877-688-64269
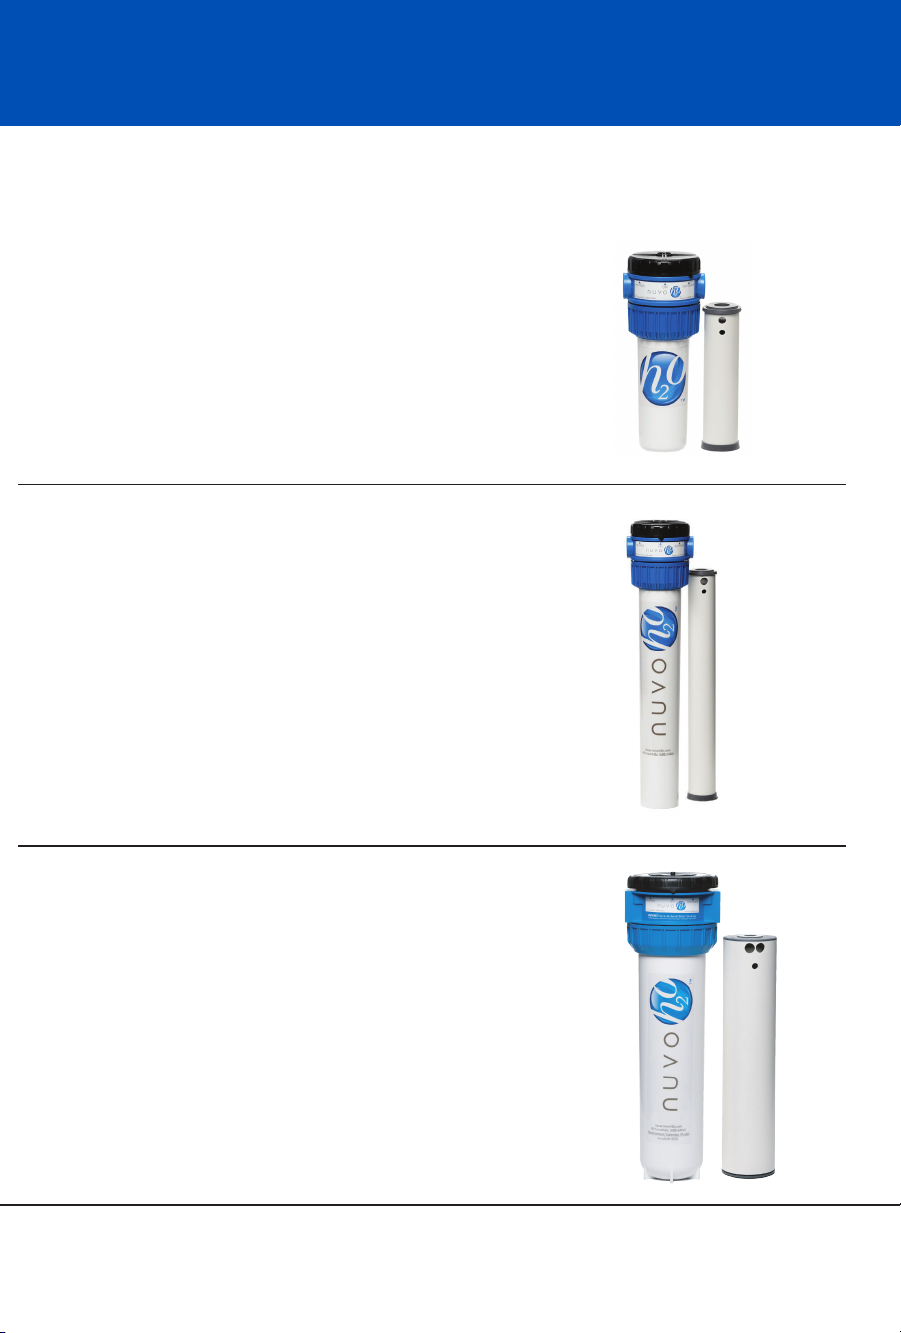
nuvoH2O Cartridge Replacement
1Before replacingyour cartridge, we recommend having a towel on hand
and placing a bucket underneath your softener system.
2 HOME/STUDIO CARTRIDGE - Turn the black cap at thetop of theunit to
“By-Pass” using the wrench that came with your system. (The “By-Pass” option
will allow water to continue to to the rest of your home while you replace
the cartridge.) Turn until you hear a clickingsound – this will activate the
pressure release valve.
Note: It is normal for water and air from the cartridge chamber to escape from
under the black cap as the pressure is released.
MANOR CARTRIDGE - Turn the system to “By-Pass”. (The “By-Pass” option
will allow water to continue to to the rest of your home while you replace the
cartridge.) Press and hold the pressure relief valve at the top of the head to relieve
pressure in thecartridge chamber.
Note: It is normal for water and air from the cartridge chamber to escape from
under the black cap as the pressure is released.
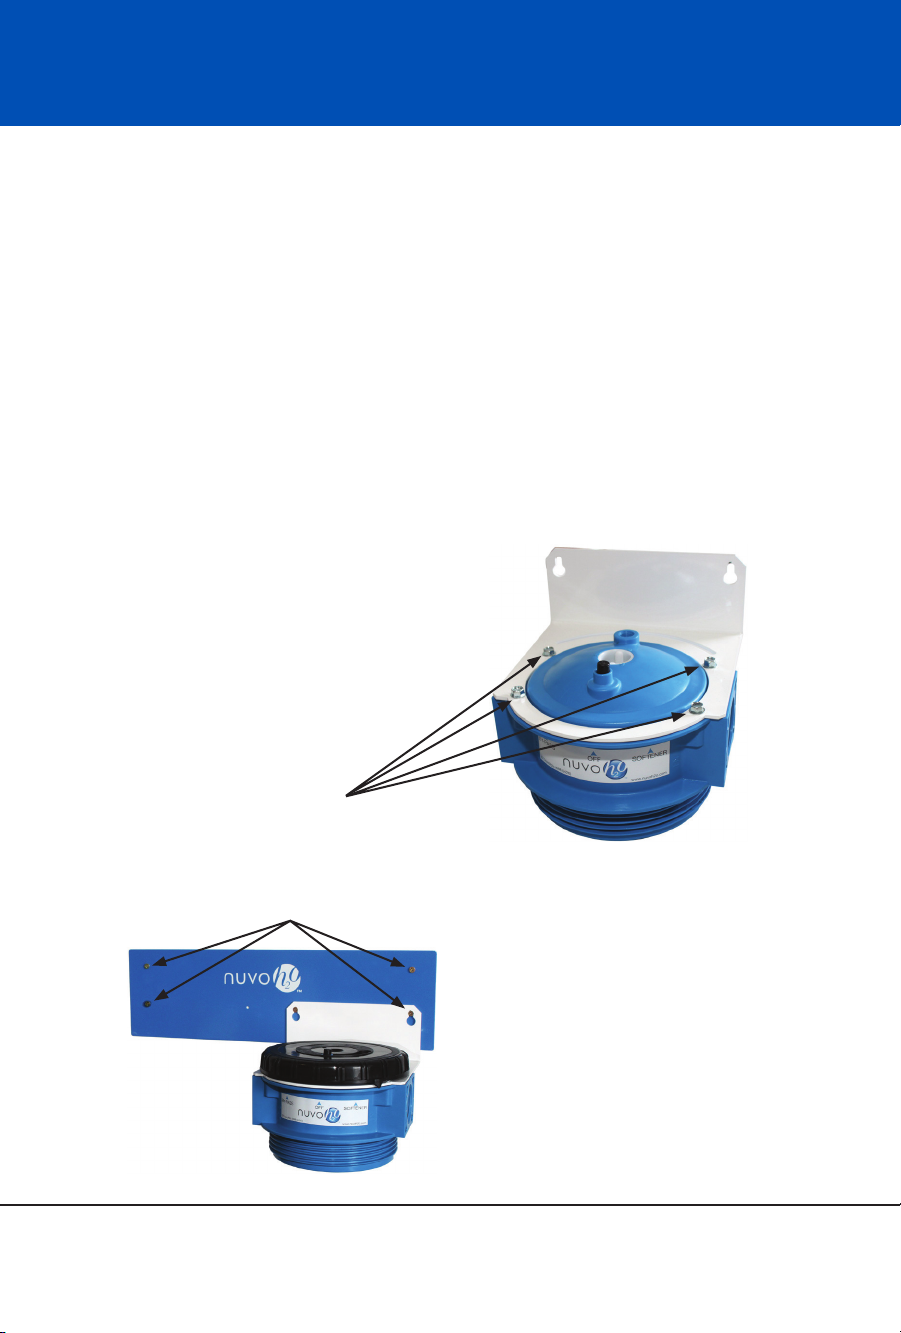
3Using the wrench that camewith your system, turn the blue collar clockwise
(to the left) to loosen the housing from the head of the system.
CAUTION: The housing will be heavy and full of water!
4Remove the spent cartridge. Turn it upside down intoasink or tub and let it drain
completely. Theoutside of the cartridge can be rinsed with warm water. Do not
drain the cartridge in a copper or naturalstone sink or tub, and do not let the
waste water come in contact with carpet or
5Clean the inside of the housing with dish soap,½teaspoon bleach, and water.
Rinse thoroughly.
6Remove the plastic shrink wrap from your new cartridge and insert the cartridge into
the housing. Thesmall, round holes on the side of the cartridge must be at the top.
7Inspect the O-ringthat seals the housing tothe head and ensure that it is seated
properly.
8Place the housingdirectly under the head so that thecollar may be re-tightened.
Tighten the collar by turning counterclockwise (right). Secure with wrench.
9Turn the blackcap at thetop of theunit back tothe “Softener”position.
immediately. Allow the new cartridge to remain in the housing with

nuvoH2O.com
877-688-6426
Money-Back Guarantee
We’re so in the performance of the nuvoH2O Salt-Free Water Softeners,
that if you are not completely within the 90 days from the date you
bought it,you may return it for a full refund of your purchase price, less shipping and
handling.
Everyone’s water quality is If you’re not getting the results you expect,
we may beabletohelp you adjust the treatment level from your softener to improve
your water quality. Please contact us if wecan be of any assistance.
Limited Warranty
In the unlikely event that you have trouble with your softener, nuvoH2O will, atits
option, repair, modify, or exchange it at no cost to you. To qualifyfor the warranty,
you must purchase the product from anauthorized nuvoH2O reseller and use only
genuine replacement cartridges and parts from nuvoH2O.
Registration
To register your nuvoH2O System, please go to:
http://www.nuvoH2O.com/register
If you do not have access to a computer please callone of our helpful customer
service agents at: 877-688-6426
10

877-688-6426 nuvoH2O.com
v.171013
This manual suits for next models
2
Table of contents
Other NuvoH2O Water Dispenser manuals
Popular Water Dispenser manuals by other brands

Royal Sovereign International
Royal Sovereign International RWD-300B owner's manual

BRIO
BRIO CLCTPOU520UVF2 Setup manual

Omnifilter
Omnifilter U25 Series E installation instructions

Kenmore
Kenmore 625.384200 Use & care guide

Elkay
Elkay EZS8WS 2G Series Installation & use manual

H2O
H2O H2O-56SE-R-80 instructions