Parts & Accessories8
NuWave®Elite Infrared
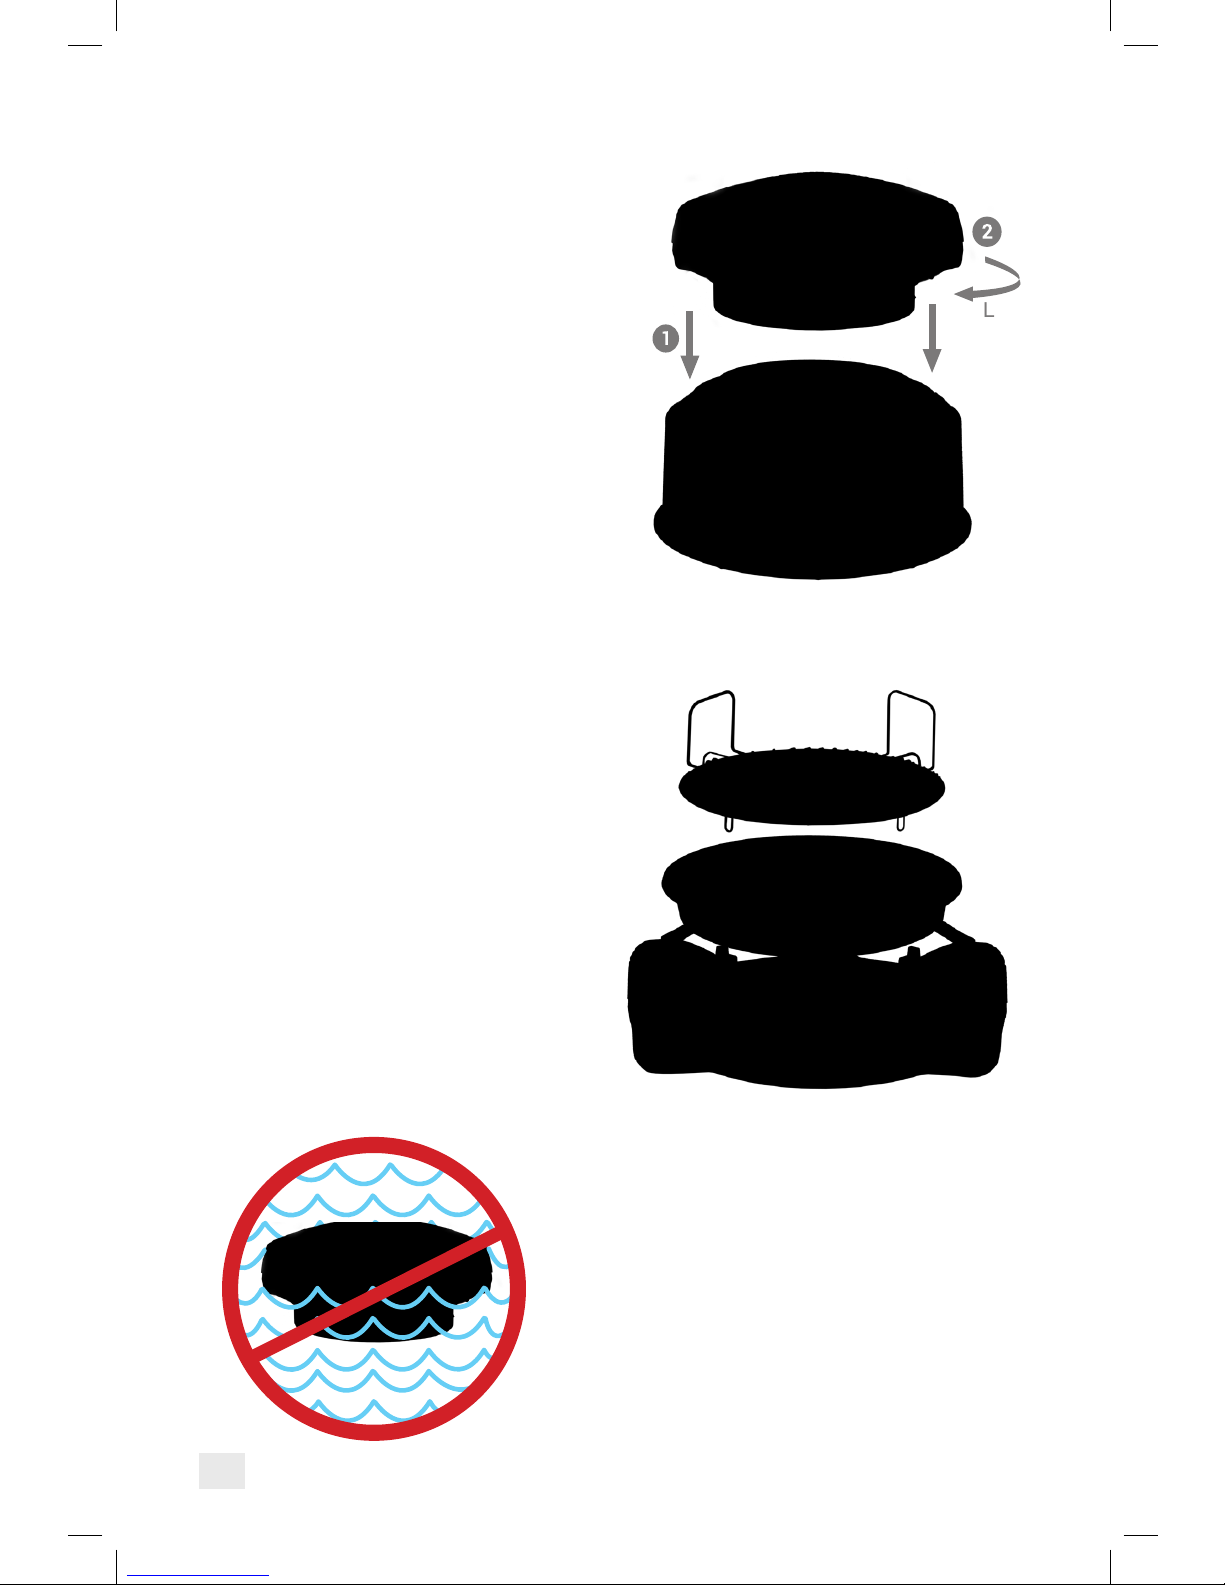
Oven Parts
Digital Power Head 22065
Black with Silver Accents Power Dome 22050
Base 22067 Black with
Silver Accents
Digital Power Head 22066
White with Silver Accents 1-inch/3-inch Reversible
Cooking Rack 22070
12-inch Stainless Steel
Liner Pan 22072 Dome Holder 22020
Base 22068 White with
Silver Accents
English Quick & Easy
Cooking Guide 22078
Spanish Quick & Easy
Cooking Guide 22078
1 inch
3 inch
3 inch
3 inch
3 inch
3 inch
3 inch
1 inch
3 inch
3 inch
3 inch
3 inch
3 inch
375˚
400˚
400˚
400˚
400˚
375˚
375˚
Searthen
cook at 375˚
375˚
375˚
400˚
400˚
10min per lb/side 12 min per lb/side
3min/side
3min/side N/A
4min/side
4-5min/side
3-4min/side
15-17min/side
4min/side
5min/side
5-6min/side
5-6min/side
1 inch
22-24min/side
Sear3 min/side
5-6min/side
Searthen
cook at 375˚ Sear 2 min/side
8-10min/side
Searthen
cook at 375˚ Sear 2 min/side
10-12min/side
Sear3 min/side
9-10min/side
Sear3 min/side
12-14min/side
Sear3 min/side
12-14min/side
2min/side
3min/side
2min/side
2min/side
3min/side
4min/side
3min/side
3min/side
3 inch 400˚ 6-7min/side 8-9min/side
Roasts 3-7 lbs
Ham
Sausage
Bacon
Patties
Italian, Bratwurst, Etc.
Chops
Tenderloins
Spare Ribs
Seafood
Fish, Fillets1/2 inch thick
Fish, Steaks& Fillets 1 inch thick
Shrimp & Scallops
Lobster Tails4 oz [Small]
Lobster Tails10 oz [Large]
3 inch 400˚ 10-12min/side 13-14 min/sideLobster*, Whole[Claws & all]
Country Style Ribs
3 inch
3 inch
3 inch
1 inch
420˚
420˚ or Sear
420˚ or Sear
Sear5 min one side
only then cook at 350˚
3-4min/side
2min/side Rare
5-6min/side
5min/side Rare
3min/side Med. Rare 6 min/side Med. Rare
4min/side Medium 7min/sideMedium
5min/side Well Done
3-4min/side Rare
5-6min/side Med. Rare
7-8min/side Medium
10-11min/side Well Done
8min/side Well Done
13min/lbs Rare 23min/lbs Rare
15min/lbs Med. Rare 25 min/lbs Med. Rare
18min/lbs Medium 27min/lbsMedium
20min/lbs Well Done 30 min/lbs Well Done
5-6min/side Rare
7-8min/side Med. Rare
9-10min/side Medium
12-13min/side Well Done
Beef & Lamb RackHeight
Patties 1/2 inch thick
Patties 1 inch thick
Steaks 1 inch thick
Steaks 2 inch thick
Roasts 2-10 lbs
Oven Temp. Fresh Frozen
3 inch 420˚ 2min/side 3min/side
Pork
3 inch
3 inch
NoExtender Ring
1 inch
1 inch
1 inch
1 inch
400˚
400˚
375˚
375˚
375˚
400˚
400˚
N/A
7-8min/side
4-5min/side
9-10min per pound
9-10min per pound
9-10min per pound
9-10min per pound
10-13min/side
6-7min/side
12-14min per pound
12-14min per pound
12-14min per pound
12-14min per pound
10min per pound
15-17min/side
20min/side
30min/side
12-14min per pound
18-20min/side
45min/side
30min/side
Chicken, [Bone-in]Pieces
Chicken, 1/2inch Boneless/Skinless
1 inch 375˚ 10-12min/lbs 15-17 min/lbs
Chicken, Whole
Turkey,Whole 8-10 lbs
(1)3 inch Ring 375˚
Turkey,Whole 11-16 lbs
(1)3 or 5 inch Ring 375˚ Turkey,Whole 17-24 lbs
(2)3 or 5 inch Ring 375˚ Turkey,Whole 25-30 lbs
Turkey,Breasts
Turkey,Legs
Cornish Hen, Whole 1- 11/2 lbs
Duck, Whole5-6 lbs
1 inch 275˚ 11-13min total
Eggs
Poultry
[Thickeradd 2 mins per 1/2 inch]
[*LiveLobsters: Bring large pot of water to a boil. Drop in lobsters head first. Cook for 2 minutes before placing in NuWave Oven.]
Quick & Easy Cooking Guide
The NuWave Oven Elite
LEAEL INSTRUCTIVO PARA INSTRUCCIONES COMPLETAS.
Estasson instrucciones únicamente. No utilizar como rectas. Las instrucciones pueden variar.
Copyright© 2015 by NuWave, LLC All rights reserved. www.NuWaveNow.com
1)Coloque la pizza en el sartén de silicon en su NuWave oven.
2)Hor née el, pan por tiempo indicado o hasta su preferencia.
3) Voltée la pizza con el queso bocariba y remueva el sartén de silicon.
4)Hor née la pizza 3-5 munitos más o nasta su preferencia.
Comidas Preparadas para una Persona
Pot Pies Individual
Chicken Tenders& Nuggets
VegetalesFrisados
Alimentos Congelados ya Preparados
1 pulg
1 pulg
3 pulg
1 pulg
1 pulg
3 pulg
3 pulg
3 pulg
3 pulg
3 pulg
3 pulg
3 pulg
400˚
375˚
350˚
325˚
350˚
350˚
375˚
350˚
350˚
350˚
350˚
375˚
22-25min c/lado
16-18min c/lado
6-8min c/lado
12min c/lado
8min c/lado
6-8min c/lado
9min c/lado
6-8min c/lado
6-8min c/lado
6-8min c/lado
6-8min c/lado
6-8min c/lado
Rollos de Pan ya Horniados
Hot Wings - Alitas de Pollo
1 pulg 325˚ 30min c/lado
Pies Congelados
Hot Pockets
Bagel Bites
Poppers - Chiles Enpanizados
Onion Rings
Champiñones Rellenos
Mozzarella Sticks
[Enun Plato para Horno]
[Enun Plato para Horno]
Altura de la Parrilla
Altura de la Parrilla
Altura de la Parrilla
Asado,
Cebolla,Ajo, Chile Morron Rojo,
Calabacín,y Calabacín Amarillo
Papas Fritas
Papas, EnteraMediana
Broccoli y Coliflor al Vapor
Elote, enCascara
Elote, Entero
3 pulg
3 pulg
1 pulg
1 pulg
1 pulg
1 pulg
1 pulg
400˚
420˚
420˚
420˚
420˚
375˚
420˚
5min c/lado N/A
N/A
N/A
N/A
N/A
N/A
27mins total
10-12mins total
10min c/lado
10min c/lado
3min c/lado
5min c/lado
4-5min/side
Fresca
Fresca
Congelada
Congelada
Vegetales
Alimentos ya Preparados
3 pulg
1 pulg
375˚
350˚
2min c/lado
15-17min c/lado
Pan Tostadocon Queso
Rollitos en Bote [Crudo]
Rollitos de Canela
La Cacerola
3 pulg
3 pulg
3 pulg
375˚
375˚
350˚
420˚
10-13min c/lado
3-5min c/lado
4min total
1min c/lado
Pan Tostado
Pop Tarts
Hot Dogs
Tabla de Preparación Rápida y Fácil
Horno Infrarrojo de The NuWave Elite
[Unplato apto para horno con tapa de vidrio o lámina]
Calabacín
Temp.del Horno
Temp.del Horno
Temp.del Horno
CortezaDelgada
CortezaRegular
CortezaGruesa
DeepDish
Quesadilla
Pizza &
Quesadilla
Direcciones
Altura de la Parrilla Temp. del Horno
3pulg
3pulg
3pulg
420˚/ 420˚
420˚/ 420˚
420˚/ 350˚
3pulg 350˚/ 350˚
3pulg 375˚/ 375˚
Congelada
7-9min costra hacia arriba/ 3-4 min queso hacia arriba
9-11min costra hacia arriba/ 3-5 min queso hacia arriba
12-16min costra hacia arriba/ 3-5 min queso hacia arriba
25min costra hacia arriba/ 10 min queso hacia arriba
2min c/lado
22078 QA-Q01
1 inch
3 inch
3 inch
3 inch
3 inch
3 inch
3 inch
1 inch
3 inch
3 inch
3 inch
3 inch
3 inch
375˚
400˚
400˚
400˚
400˚
375˚
375˚
Searthen
cook at 375˚
375˚
375˚
400˚
400˚
10min per lb/side 12 min per lb/side
3min/side
3min/side N/A
4min/side
4-5min/side
3-4min/side
15-17min/side
4min/side
5min/side
5-6min/side
5-6min/side
1 inch
22-24min/side
Sear3 min/side
5-6min/side
Searthen
cook at 375˚ Sear 2 min/side
8-10min/side
Searthen
cook at 375˚ Sear 2 min/side
10-12min/side
Sear3 min/side
9-10min/side
Sear3 min/side
12-14min/side
Sear3 min/side
12-14min/side
2min/side
3min/side
2min/side
2min/side
3min/side
4min/side
3min/side
3min/side
3 inch 400˚ 6-7min/side 8-9min/side
Roasts 3-7 lbs
Ham
Sausage
Bacon
Patties
Italian, Bratwurst, Etc.
Chops
Tenderloins
Spare Ribs
Seafood
Fish, Fillets1/2 inch thick
Fish, Steaks& Fillets 1 inch thick
Shrimp & Scallops
Lobster Tails4 oz [Small]
Lobster Tails10 oz [Large]
3 inch 400˚ 10-12min/side 13-14 min/side
Lobster*, Whole[Claws & all]
Country Style Ribs
3 inch
3 inch
3 inch
1 inch
420˚
420˚ or Sear
420˚ or Sear
Sear5 min one side
only then cook at 350˚
3-4min/side
2min/side Rare
5-6min/side
5min/side Rare
3min/side Med. Rare 6 min/side Med. Rare
4min/side Medium 7min/sideMedium
5min/side Well Done
3-4min/side Rare
5-6min/side Med. Rare
7-8min/side Medium
10-11min/side Well Done
8min/side Well Done
13min/lbs Rare 23min/lbs Rare
15min/lbs Med. Rare 25 min/lbs Med. Rare
18min/lbs Medium 27min/lbsMedium
20min/lbs Well Done 30 min/lbs Well Done
5-6min/side Rare
7-8min/side Med. Rare
9-10min/side Medium
12-13min/side Well Done
Beef & Lamb RackHeight
Patties 1/2 inch thick
Patties 1 inch thick
Steaks 1 inch thick
Steaks 2 inch thick
Roasts 2-10 lbs
Oven Temp. Fresh Frozen
3 inch 420˚ 2min/side 3min/side
Pork
3 inch
3 inch
NoExtender Ring
1 inch
1 inch
1 inch
1 inch
400˚
400˚
375˚
375˚
375˚
400˚
400˚
N/A
7-8min/side
4-5min/side
9-10min per pound
9-10min per pound
9-10min per pound
9-10min per pound
10-13min/side
6-7min/side
12-14min per pound
12-14min per pound
12-14min per pound
12-14min per pound
10min per pound
15-17min/side
20min/side
30min/side
12-14min per pound
18-20min/side
45min/side
30min/side
Chicken, [Bone-in]Pieces
Chicken, 1/2inch Boneless/Skinless
1 inch 375˚ 10-12min/lbs 15-17 min/lbs
Chicken, Whole
Turkey,Whole 8-10 lbs
(1)3 inch Ring 375˚
Turkey,Whole 11-16 lbs
(1)3 or 5 inch Ring 375˚ Turkey,Whole 17-24 lbs
(2)3 or 5 inch Ring 375˚ Turkey,Whole 25-30 lbs
Turkey,Breasts
Turkey,Legs
Cornish Hen, Whole 1- 11/2 lbs
Duck, Whole5-6 lbs
1 inch 275˚ 11-13min total
Eggs
Poultry
[Thickeradd 2 mins per 1/2 inch]
[*LiveLobsters: Bring large pot of water to a boil. Drop in lobsters head first. Cook for 2 minutes before placing in NuWave Oven.]
Quick & Easy Cooking Guide
The NuWave Oven Elite
1 pulg
3 pulg
3 pulg
3 pulg
3 pulg
3 pulg
3 pulg
1 pulg
3 pulg
3 pulg
3 pulg
3 pulg
3 pulg
375˚
400˚
400˚
400˚
400˚
375˚
375˚
Dorar(Sear) despues
cocinar a 375˚
Dorar(Sear) despues
cocinar a 350˚
Dorar(Sear) despues
cocinar a 375˚
Dorar(Sear) despues
cocinar a 375˚
375˚
375˚
400˚
400˚
10min/lbs 12 min/lbs
3min c/lado
3min c/lado N/A
4min c/lado
4-5min c/lado
3-4min c/lado
15-17min c/lado
4min c/lado
5min c/lado
5-6min c/lado
5-6min c/lado
1 pulg
22-24min c/lado
Dorar(Sear) 3 min c/lado
5-6min c/lado
Dorar(Sear) 3 min c/lado
9-10min c/lado
Dorar(Sear) 3 min c/lado
12-14min c/lado
Dorar(Sear) 2 min c/lado
8-10min c/lado
Dorar(Sear) 2 min c/lado
10-12min c/lado
Dorar(Sear) 3 min c/lado
12-14min c/lado
2min c/lado
3min c/lado
2min c/lado
2min c/lado
3min c/lado
4min c/lado
3min c/lado
3min c/lado
3 pulg 400˚ 6-7min c/lado 8-9 min c/lado
Asada 3-7 lbs
Jamón
Salchicas
Tocino
Trozo
Salchica Italiana, Bratwurst, Ect.
Chuleta
Lomo
Costilla al gusto
Mariscos
Pescado, Filetes1/2 pulgada de grueso
Pescado, Steaks& Fillets 1 inch thick
Camarones & Callos de Hacha
Cola de Langosta 4 onzas [Pequeño]
Cola de Langosta 10 onzas [Grande]
3 pulg 400˚ 10-12min c/lado 13-14 min c/lado
Langosta*, Entera
Costilla Estilo Country
3 pulg
3 pulg
3 pulg
1 pulg
420˚
420˚o Dorar (Sear)
420˚o Dorar (Sear)
3-4min c/lado
2min c/lado Poco Cocido
5-6min/side
5min/side Poco Cocido
3min c/lado Medio Cocido 6 min/side Medio Cocido
4min c/lado Cocido 7minc/lado Cocido
5min c/lado Bien Cocido
3-4min c/lado Poco Cocido
5-6min c/lado Medio Cocido
7-8min c/lado Cocido
10-11min c/lado Bien Cocido
8min c/lado Bien Cocido
5-6min c/lado Poco Cocido
7-8min c/lado Medio Cocido
9-10min c/lado Cocido
12-13min c/lado Bien Cocido
Res & Cordero Alturade la Parrilla
Trozode 1/2 pulgada de grueso
Trozode 1 pulgada de grueso
Bistec de 1 pulgada de grueso
Bistec de 2 pulgada de grueso
Roasts 2-10 lbs
Temp.del Horno Fresca Congelada
3 pulg 420˚ 2min c/lado 3 min/side
Puerco
3 pulg
3 pulg
Sinel Anillo Extendor
1 pulg
1 pulg
1 pulg
1 pulg
400˚
400˚
375˚
375˚
375˚
400˚
400˚
N/A
7-8min c/lado
4-5min c/lado
9-10min/lbs
9-10min/lbs
9-10min/lbs
9-10min/lbs
10-13min c/lado
6-7min c/lado
12-14min/lbs
12-14min/lbs
12-14min/lbs
12-14min/lbs
10min/lbs
15-17min c/lado
20min c/lado
30min c/lado
12-14min/lbs
18-20min c/lado
45min c/lado
30min c/lado
Pollo, [ConHueso] Piezas
Pollo, 1/2pulgada Sin Hueso/Sin Piel
1 pulg 375˚ 10-12min/lbs 15-17min/lbs
Pollo, Completo
Pavo, Completo8-10 lbs
(1)3 pulg Anillo Extendor 375˚
Pavo, Completo11-16 lbs
(1)3 o 5 pulg Anillo Extendor 375˚ Pavo,Completo 17-24 lbs
(2)3 o 5 pulg Anillo Extendor 375˚ Pavo,Completo 25-30 lbs
Pavo, Pechuga
Pavo, Piernas
Godomiz, Completo1- 11/2 lbs
Pato, Completo5-6 lbs
1 pulg 275˚ 11-13min total
Huevos
Aves
[Sies mas gruesa agregue 2 min. por 1/2 pulg]
[*Laslangostas vivas: Traiga una olla grande de agua a hervir. Meta de cabeza Primero. Cocine por 2 minutos antes de colocarlo en NuWaveOven]
13min/lbs Poco Cocido 23min/lbs Poco Cocido
15min/lbs Medio Cocido 25min/lbs Medio Cocido
18min/lbs Cocido 27min/lbsCocido
20min/lbs Bien Cocido 30 min/lbs Bien Cocido
Tabla de Preparación Rápida y Fácil
Horno Infrarrojo de The NuWave Elite
Upper Management / Executive
Management - Administración
Sales / Marketing - Ventas / Mercado Tecnia
Clerical / Service Worker
Tradesman / Machine Operator / Laborer
Healthcare- Physician / Nurse / Other
Homemaker - Ama de Casa
Retired - Jubilado
Work from Home Office - Trabajo en Casa
Comerciante / Operador de maquinaria / Obrero
Product Registration Form
Hoja de Registro del Producto
M.I.First Name - Nombre Last Name - Apellido
Street Address - Dirección
Apt. #
City - Ciudad State - Estado Zip Code - Código Postal
Telephone Number - Número Telefónico E-Mail Address - Correo Electrónico
Enjoy your NuWave Oven for 3 to 4 weeks before returning yourregistration card.
Disfrute de su NuWave Oven de 3 a 4 semanas antes de regresar a su tarjeta de registro.
1. Mr. Mrs. Ms. Miss
2. Please add me to the NuWave Mailing List
Por favor agregue mi nombre a la lista de correo NuWave.
69 +
3. Age Range
Rango de Edad 30-39
40-49
50-59
60-69
20-29
4. Marital Status
Estado Civil
Single
Married
SolteroCasado
6. Date of Purchase - Fecha de Compra
9. Model Number - Número de modelo
10. Serial Number - Número de serie
7. Where was this product purchased?
¿Dónde compro este producto?
8. How much did this product cost?
5. Number of Household Members?
¿Número de miembros en su hogar?
16. Have you owned a NuWave Oven
prior to the NuWave Elite?
( ) -
$
Professional / Technical
17. Have you ever purchased a product
from an infomerical?
15. Occupation / Employment Status
(check all that apply)
Easy to Use & Clean - Fácil de Usar y Limpiar
Compact Size - Tamaño Compacto
Healthy Cooking - Cocina Saludable
Energy Saving - El Ahorro de Energía
Food Tastes Better - La Comida Save Mejor
Cooks Fast & From Frozen
Cocina Rápida y de Congelados
Other - Otro
18. What do you like best about the NuWave Oven?
(check all that apply)
Retail Store Display - Visualización en las tiendas
Informercial / TV
Newspaper - Periódico
Friends / Family - Amigos / Familia
Catalog / Magazine - Catálogo / Revista
Internet - Internet
Other - Otro
19. How did you hear about this product?
(check all that apply)
(check highest levelcompleted)
11. Is this your first NuWave Oven?
If no, how many have you purchased?
High School - Preparatoria
College / University - Colegio / Universidad
Graduate School - Educación Superior
13. Level of Education
14. For your primary residence, do you:
Yes - Sí No
Yes - Sí No
Yes - Sí No
¿Cuato le costo el producto?
¿Ha sido dueño de un NuWave Oven
antes del NuWave Elite?
Unemployed- Desempleado
Cuidado de la Salud- Médico / Enfermera / Otros
¿Alguna vez has comprado un producto
de un infomercial?
Ocupación / Situación de Empleo
(marquetodos los que apliquen)
(marquetodos los que apliquen)
(marquetodos los que apliquen)
Own - Dueño Rent - Renta
¿Qué es lo que más le gusta el NuWave Oven?
Thanks for taking the time to fill out this questionnaire. Youranswers will be used for market research studies and reports only.
Failureto return this card will not void your warranty rights.
Copyright © 2015 All Rights Reserved.
Please seal with tape. Do not staple.
Por favor,sellar con cinta adhesiva.
No utilize una grapadora.
(marcael nivel más alto completado)
Nivel de Educación
Para su residencia principal, usted:
Profesionales / Técnicos
Alta Gerencia / Ejecutivo
Administrativo / Servicio de los Trabajadores
Propietario de Empresa
Self Employed / Business Owner
Military - Militar
¿Cómo te enteraste de este producto?
Yes - Sí No
Si no se devuelve esta tarjeta no vaa disminuir sus derechos de garantía.
Graciaspor tomarse el tiempo para llenar este cuestionario. Sus respuestas se utilizarán para estudios de mercado e informes solamente.
Don’t forget to register!
¡No te olvides de registrarte!
12. Would you recommend this product to friends or family?
Why or Why not?
Yes - Sí No
¿Es su primera NuWave Oven?
Si no, ¿cuántos has comprado?
¿Recomendarías este producto a sus amigos o familia?
¿Por qué o por qué no?