1
ARLINGTON PRO (ISO LEGEND) DROP BLADE LED SELF-TEST EXIT SIGN LUMINAIRE INSTRUCTIONS
Issue 01 18
th
February 2021
THANK YOU for buying this product. To help ensure it gives complete satisfaction please install it according to these instructions
and then pass the instructions to the appropriate person for retention and future reference.
SAFETY This is a mains powered product. It is designed to be installed by suitably qualified personnel only and in
accordance with the applicable building and electrical regulations. Before installation or maintenance the electrical
supply to the product must be isolated.
INSTALLATION SUPPORT If installation advice or accessories are required please contact us at the above address. We will do
our best to help. When reporting a suspected fault or seeking installation support the problem is likely to be resolved most quickly
if you have full product details to-hand, as well as details of when and where it was purchased.
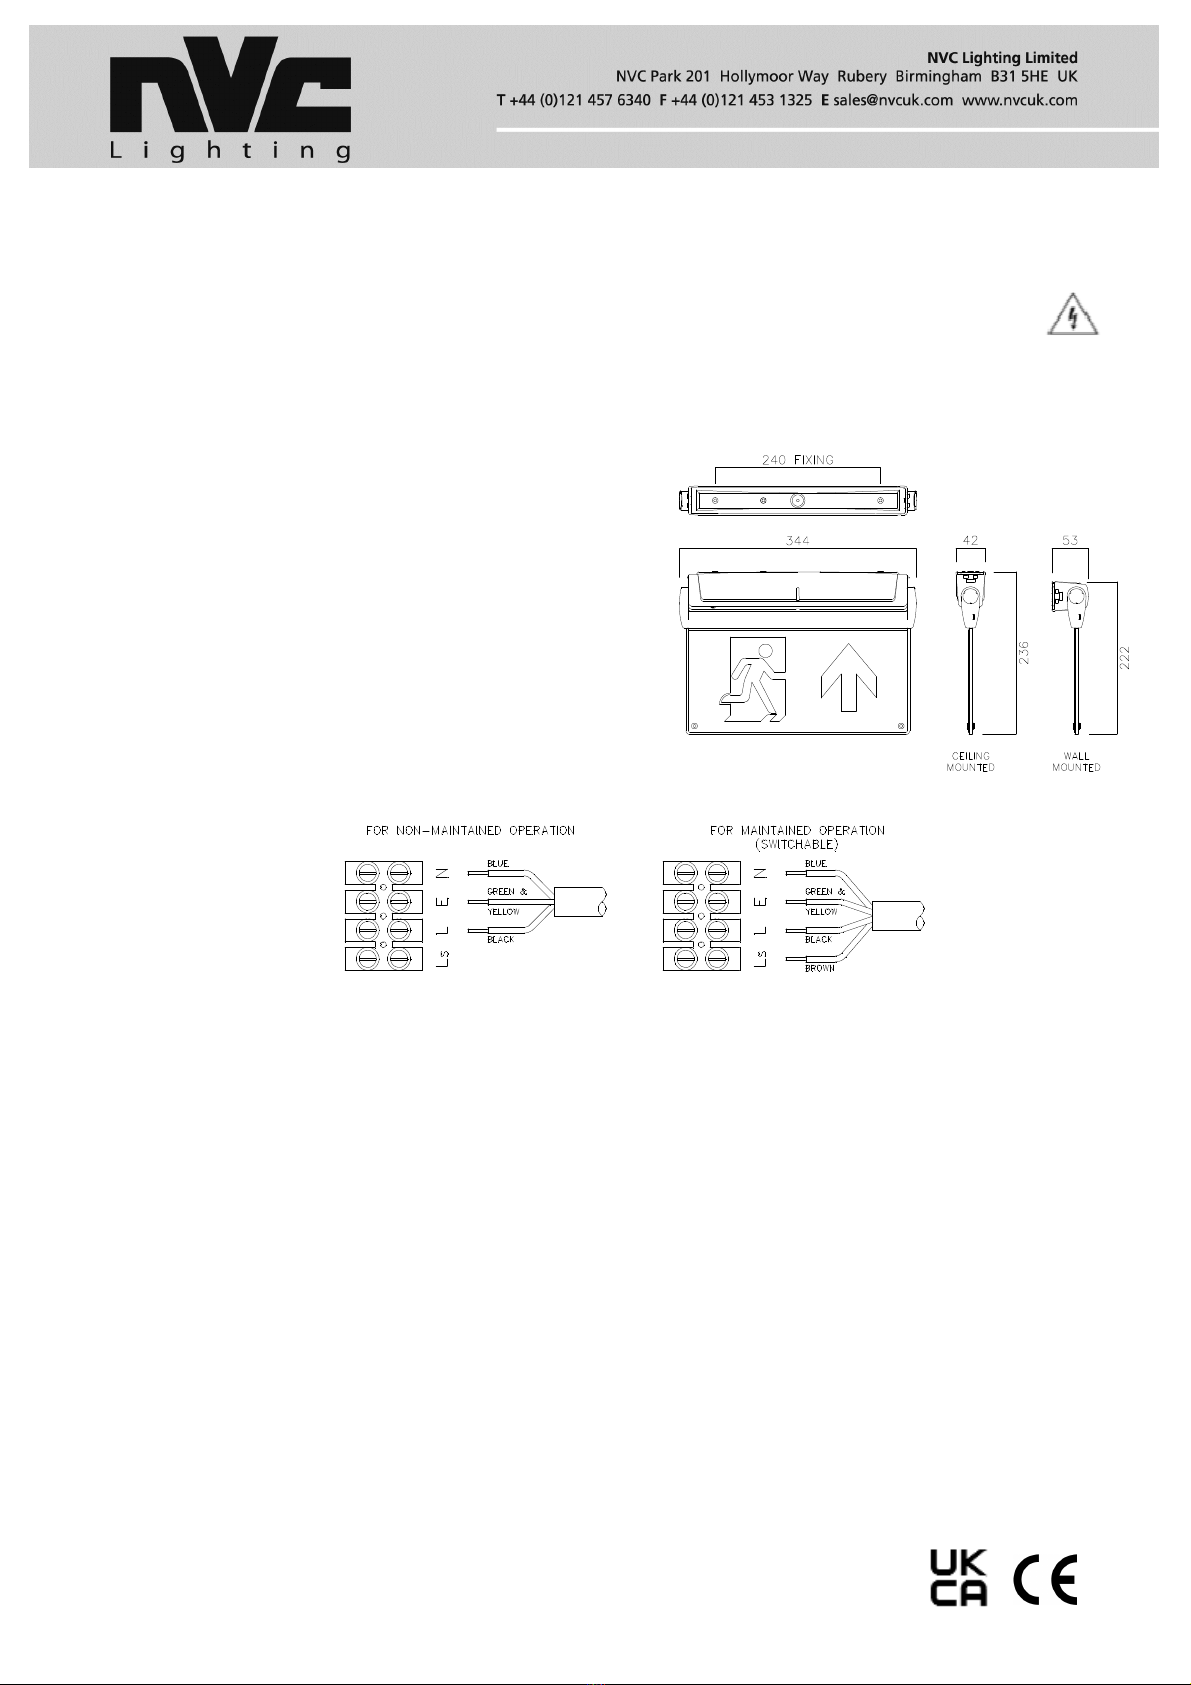
LUMINAIRE INSTALLATION (CEILING OR WALL)
1. Decide if mounting on ceiling or wall. If:
Ceiling then leave main body of fitting in current position
Wall the rotate the main body 90 degree (see diagram)
2. Undo the small screw located on one end of the fitting body.
3. Use a small flat head screwdriver (in identified position) to
lever the base plate away from the main fitting body.
4. Prepare the fixing surface (ceiling or wall) at the fixing
centres shown in the diagram & provide a central mains
supply cable.
5. Drill open the central cable entry point on the base plate.
6. Pass the mains supply cable through the cable entry hole in
the fixing base plate, offer the base plate up to the fixing
surface & secure. Ensure the fixing method is capable of
holding the weight of the luminaire. Screws & rawl plugs are
provided.
7. Route the mains supply cable to the terminal block in the
base plate & terminate, ensuring correct polarity is observed. A cable clamp is provided to restrain the cable.
NOTE! THIS LUMINAIRE MUST BE EARTHED NOTE! THIS LUMINAIRE NEEDS A PERMANENT LIVE SUPPLY
8. Connect the battery pack to the 2-pole connector on the main PCB & write the “installed date” in allocated position.
9. Offer the main fitting body to the base plate, locate the notch at one end & rotate to fully cover the base plate.
10. Secure in position using the small screw.
11. Reconnect the power supply & check the green LED charge indicator illuminate.
ALTERNATIVE LEGEND PANELS (SUPPLIED SEPARATELY)
This product comes as standard with the ISO “Running Man through door” legend. Alternative direction ISO legends & Euro
legends are also available from NVC – Please contact your local supplier.
To change legends:
1. Carefully pop apart the two clear plastic rivets located towards the bottom corners of the blade. Keep them safe.
2. Slide out the current legend panel.
3. Slide the top edge of the new legend panel into the head unit. Repeat for both sides.
4. Align the holes of the legends with the holes in the blade & secure using the two clear plastic rivets.
ALTERNATIVE MOUNTING OPTIONS (SUPPLIED SEPARATELY)
As standard this product suits either ceiling or wall mounting. There are further options via alternative mounting accessories
available from NVC. This includes:
•Recessed mount kit
•Side wall mount kit
•Wire suspension kit
Please contact your local supplier
MAINTENANCE
This unit is using Lithium Iron Phosphate cell (LiFeP04) in its battery pack. These batteries require close monitoring and
protection circuitry to operate safely. This pack uses a dedicated protection built into the module unit. Ensure like for
like batteries are used in any replacement maintenance