NX CEP00014 User manual

www.enix-energies.com
Imported by Enix Energies
BP 231
38522 Saint Egrève cedex FRANCE

6V/12V BATTERY CHARGER
FR
ES
UK
DE
IT
MANUEL D’UTILISATION..................................................... p. 6-9
MANUAL DE UTILIZACIÓN ..............................................p. 10-13
USER GUIDE ..........................................................................p. 2-5
BENUTZERHANDBUCH ....................................................p. 14-17
MANUALE DI ISTRUZIONI ...............................................p. 18-21
CEP00014
CEP9005
+
CONNECTEUR
ANDERSON

2
6V/12V BATTERY CHARGER
WARNING. READ THE ENTIRE MANUAL BEFORE USING THIS PRODUCT
This model is a multistep car battery charger (called appliance in the following) for charging and
charge retention of 6V or 12V lead batteries (in the following called battery). These may be the types
AGM-Ca/Ca-GEL-MF-VRLA with electrolyte solution or gel. But also the Lithium Iron Phosphate
batteries (LiFePO4) 6.4V and 12.8V.
-1CHARGER
-1ANDERSON CONNECTOR
-2CLAMPS (1 red, 1 black)
-1USER GUIDE
1. SCOPE OF DELIVERY
2. PART DESCRIPTION
1. 12V 0.8A (Programme 2)
2. 12V 3.8A (Programme 3)
3. 12V 3.8A (Programme 4)
4. 6V 0.8A (Programme 1)
5. LED reverse connection
6. LED stand by
7. Charge display
8. Condition display
9. Voltage display
10. Programme selection button (MODE)
1
9
10
8
7
5
6
3
2 4
Figure A:
See gure B:
See gure A:
UK
11. Charger
12. Anderson connector
13. Mains Lead
14. «+» pole clamp (Red)
15. «-» pole clamp (Black)
16. «-» pole connector cable (Black) inc. lug
17. «+» pole connector cable (Red) inc. lug
12
11
13
Figure B:
16
17
15
14

3
4. OPERATION
3. SPECIFICATION
Input voltage: 220-240V ~ 50/60Hz
Rated voltage outgoing: 6V/12V
Ambient temperature: 0°C to 40°C
Charging battery types: - 6V lead acid battery 1,2Ah-14Ah
- 12V lead acid battery 1,2Ah-120Ah
- LFP 6.4V: to 1.2Ah to 14Ah
12.8V: to 1.2Ah to 120Ah
Rated power: 60W
Rated output current: 0.8A/3.8A
Housing protection type: IP65
A-1. Connecting Anderson connector
1. Connect the charger connector to the battery connector
2. Connect the mains cable 13 of the charger to the mains socket
3. The battery voltage display 9 shows the current battery voltage
A-2. Connecting clamps
1. Connect the «+» pole clamp (red) 14 of the charger to the «+» pole of the battery
2. Connect the «-» pole clamp (black) 15 to the «-» pole of the battery
3. Connect the mains cable 13 of the charger to the mains socket
4. The battery voltage display 9 shows the current battery voltage.
Should the connection of the clamps be swapped, the LED «reverse connection» lights up 5
B. Disconnect
1. Disconnect the appliance from the mains supply
2. remove the connector from the battery
C. Measuring stand by / battery voltage
After connection to the grid, the appliance is on Standby. The standby display 6 lights up. When the clamps
are connected, the battery voltage is shown in the LCD (voltage display 9). The segments of the condition
display 8 are empty.
If the voltage is below 3,8V or above 15V, the battery will not be charged. Th display briey shows the
error message «Err». The appliance goes on stand by.
6V battery: If the voltage range of the battery is measured as between 3.7-7.3V, only programme 1 can
be selected.
12V batteries: if a battery is recognized in the critical voltage range of between 7.3-10.5V, the ap-
pliancechecks wether a fully charged 6V battery, or a discharged 12V battery is present. After pressing the
programme selection button 10 to select a programme, the appliance carries out a control measurement
for about 90 sec.
The display shows:
If after about 90 sec. between 7.3-7.5V are detected, a 12V battery is defective. The appliance goes on
standby.

4
D. Revitalizing
If after about 90 sec. between 7.5-10.5V are detected, a 12V battery is present. Charging starts with
a pulse charge for revitalizing. The voltage display 9 ashes. Once 10.5V are reached, the appliance
switches to the other charge steps.
Revitalizing is the same for all the 12V charge programmes.
E. Programme selection
NOTES: If a battery is detected in the voltage range of between 3.7-7.3V, the programmes 2-3-4
can not be selected.
The charging process takes place automatically.
Depending on the selected programme, the characteristic charge curve is monitored for voltage,
time and temperature. Included are the diagnostics programme, revitalizing mode and retention
charge.
• Programme 1 «6V» (7.3V/0.8A) and 6.4V LiFePO4
For charging 6V batteries with a capacity of less than 14Ah.
• Press the programme selection button 10, to select programme 1. The symbol “6V” is displayed
on the LCD. During charging, the charge display 7ashes and shows the progress of the charge
procedure (1-4 bars). When the battery is fully charged, the condition display 8shows 4 bars. The
ashing stops and the appliance automatically switches to retention charge.
• Programme 2 “12V” (14.4V/0.8A) and 12.8V LiFePO4
For charging 12V batteries with a capacity of less than 14Ah.
• Press the programme selection button 10 to select programme 2. The symbol is displayed
on the LCD. During charging, the charge display 7 ashes and shows the progress of the charge
procedure (1-4 bars). When the battery is fully charged, the condition display 8shows 4 bars. The
ashing stops and the appliance automatically switches to retention charge.
• Programme 3 “12V” (14.4V/3.8A) and 12.8V LiFePO4
For charging 12V batteries with a capacity between 14Ah-120Ah.
• Press the programme selection button 10, to select programme 3. The symbol is displayed
on the LCD. During charging, the charge display 7 ashes and shows the progress of the charge
procedure (1-4 bars). When the battery is fully charged, the condition display 8shows 4 bars. The
ashing stops and the appliance automatically switches to retention charge.
• Programme 4 “12V”(14.7V/3.8A) and 12.8V LiFePO4
For charging 12V batteries with a capacity between 14Ah-120Ah under cold conditions or for
charging AGM batteries.
• Press the programme selection button 10, to select programme 4. NOTE: This programme may
start with a minute delay. The symbol is displayed on the LCD. During charging, the charge display 7
ashes and shows the progress of the charge procedure (1-4 bars). When the battery is fully charged,
the condition display 8shows 4 bars. The ashing stops and the appliance automatically switches
to retention charge.
1 Reverse polarity protection
and diagnosis
2 Recharge / desulphation
3 Start of charging with a high
current strength
4 Charging up to 80%
5 Absorption - charging up to 100%
6 Trickle charging and monitoring
7 Demand recharging
A
V
0.8
7.5-10.5
10.5-12.8
14.1 14.4 14.4 12.8
0.8 0.80.13.8 3.0
125 763 4

5
• Retention charge
As described under programmes, this appliance features the automatic retention charge.
Depending on the voltage drop of the battery, caused by self-discharge, the appliance reacts with
different charge currents.
The battery can remain connected to the charger for longer periods of time.
• Appliance protection function
The charger switches the electronics off and switches the system instantly to the basic setting, as
soon as there is an abnormal situation, such as short circuit, critical voltage drop during charging,
broken circuit or swapped connection of the connector clamps is detected.
Should the appliance become too hot during charging, the output current is automatically
reduced. This protects the appliance from damage.
• Safety instructions
Children or persons who lack the knowledge or experience to use the device or whose physical,
sensory or intellectual capacities are limited must never be allowed to use the device without super-
vision or instruction by a person responsible for their safety. Children should be supervised in order
to ensure that they do not play with the appliance.
WARNING
- Do not use the the charger if the cable, the Anderson connector or the mains plug are damaged.
- Always disconnect the connector from the battery.
- Always unplug the charger from the Mains before to unplug the connector from the battery.
DANGER OF ELECTRIC SHOCK! Do not operate the appliance if the cables, the mains cable or
mains plug are damaged. A damaged mains cable indicates a life-threatening danger due to electric
shock.
- Disconnect the charger from the grid, before you make or break connections to the battery.
- First, connect the Anderson connector that is not connected to the bodywork. Then connect the
charger to the bodywork, away from battery and fuel pipe.
- Only after this, connect the charger to the grid. After charging, disconnect the charger from the
grid. Only after this remove the Anderson connector from the bodywork. Following this, remove the
Anderson connector from the battery.
5. SAFETY

6
6V/12V BATTERY CHARGER
ATTENTION, BIEN LIRE LA NOTICE AVANT TOUTE UTILISATION
Ce modèle de chargeur permet de charger et d’entretenir des batteries au plomb de 6V ou 12V
(AGM, Gel, Acide…) mais aussi les batteries lithium fer phosphate (LFP) 6.4V et 12.8V.
-1CHARGEUR LCD
-1CONNECTEUR ANDERSON
-2PINCES CROCODILES
-1NOTICE
1. CONTENU DE LA BOÎTE
2. DESCRIPTION DU PRODUIT
1. 12V 0.8A (Programme 2)
2. 12V 3.8A (Programme 3)
3. 12V 3.8A (Programme 4)
4. 6V 0.8A (Programme 1)
5. LED d’inversion de polarité
6. LED de mise sous tension
7. Indicateur de charge
8. Condition de charge
9. Indicateur de tension
10. Bouton de sélection du programme (MODE)
11. Chargeur
12. Connecteur Anderson
13. Prise secteur
14. Pince croco « + » (rouge)
15. Pince croco « - » (noir)
16. Câble « - » (noir)
17. Câble « + » (rouge)
1
9
10
8
7
5
6
3
2 4
Figure A:
Figure B:
See gure B:
See gure A:
FR
12
11
13
Figure B:
16
17
15
14

7
4. UTILISATION
3. INFORMATIONS TECHNIQUES
Tension d’entrée: 220-240V ~ 50/60Hz
Tension de sortie: 6V/12V
Température d’usage: 0°C to 40°C
Type de batterie à charger: - Batterie plomb 6V : de 1.2Ah à 14Ah
- Batterie plomb 12V : de 1.2Ah à 120Ah
- LFP 6.4V : de 1.2Ah à 14Ah
12.8V : de 1.2Ah à 120Ah
Courant de sortie: 0.8A/3.8A
Housing protection type: IP65 (étanche aux éclaboussures et à la poussière)
A-1. Etapes de branchement du connecteur Anderson
1. Connecter le connecteur du chargeur sur le connecteur de la batterie
2. Brancher le chargeur au secteur (220V)
3. L’écran LCD va s’éclairer et indiquer le niveau de tension actuel de la batterie.
A-2. Etapes de branchement des pinces crocodiles
1. Connecter la pince ou l’œillet « + » rouge sur le pôle « + » de la batterie
2. Connecter la pince ou l’œillet « - » noir sur le pôle « - » de la batterie
3. Brancher le chargeur au secteur (220V)
4. L’écran LCD va s’éclairer et indiquer le niveau de tension actuel de la batterie. Si la LED
d’inversion de polarité s’éclaire en rouge, débrancher le chargeur du secteur et inverser
les pinces « + » et « -». Rebrancher le chargeur au secteur.
B. Fin de charge
1. Une fois la charge terminée, débrancher le chargeur du secteur
2. Retirer le connecteur de la batterie
C. Test de la tension de la batterie
Une fois le chargeur branché au secteur, l’écran LCD s’éclaire et indique la tension de la batterie.
Si la tension, est inférieure à 3.8V ou supérieure à 15V, la batterie ne pourra pas être chargée et le
message d’erreur « ERR » apparaitra à l’écran.
Batterie 6V: Si la tension relevée se situe entre 3.8V et 7.3V, seul le programme 1 (6V) pourra être
sélectionné.
Batterie 12V: Si la tension relevée se situe entre 7.3V et 10.5V, le chargeur va analyser la batterie
pour voir s’il s’agit d’une batterie 6V pleinement chargée, ou d’une batterie 12V complètement
déchargée. Appuyez sur le bouton « MODE » lancera une analyse de la batterie durant 90 secondes.
L’écran indiquera :
Si après les 90 Sec de test, la tension détectée se situe entre 7.3V et 7.5V, la batterie 12V sera
considérée comme défectueuse : le chargeur restera en attente.
Si après les 90 Sec de test, la tension détectée se situe entre 7.5V et 10.5V, une charge avec
des courants d’impulsion commencera an de revitaliser la batterie. Une fois la tension de 10.5V
atteinte, les autres étapes de charges commenceront.

8
D. Sélection du programme de charge et maintien de charge
Selon le programme sélectionné, les caractéristiques de charge, de température et de durée seront
gérées selon le niveau de tension de la batterie. Une fois la batterie branchée et le chargeur connecté
au secteur, sélectionnez votre programme de charge.
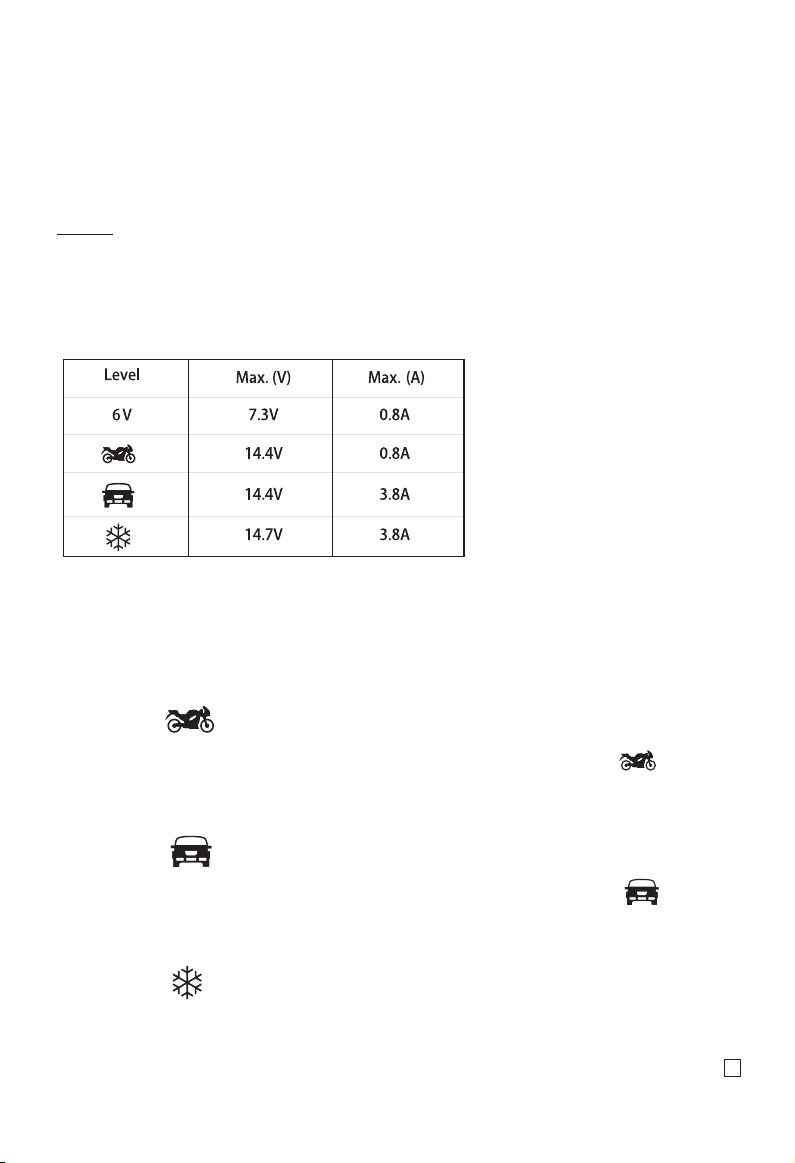
• Programme 1 «6V» (7.3V/0.8A) et 6.4V LFP
Pour batterie «6V» (jusqu’à 14Ah)
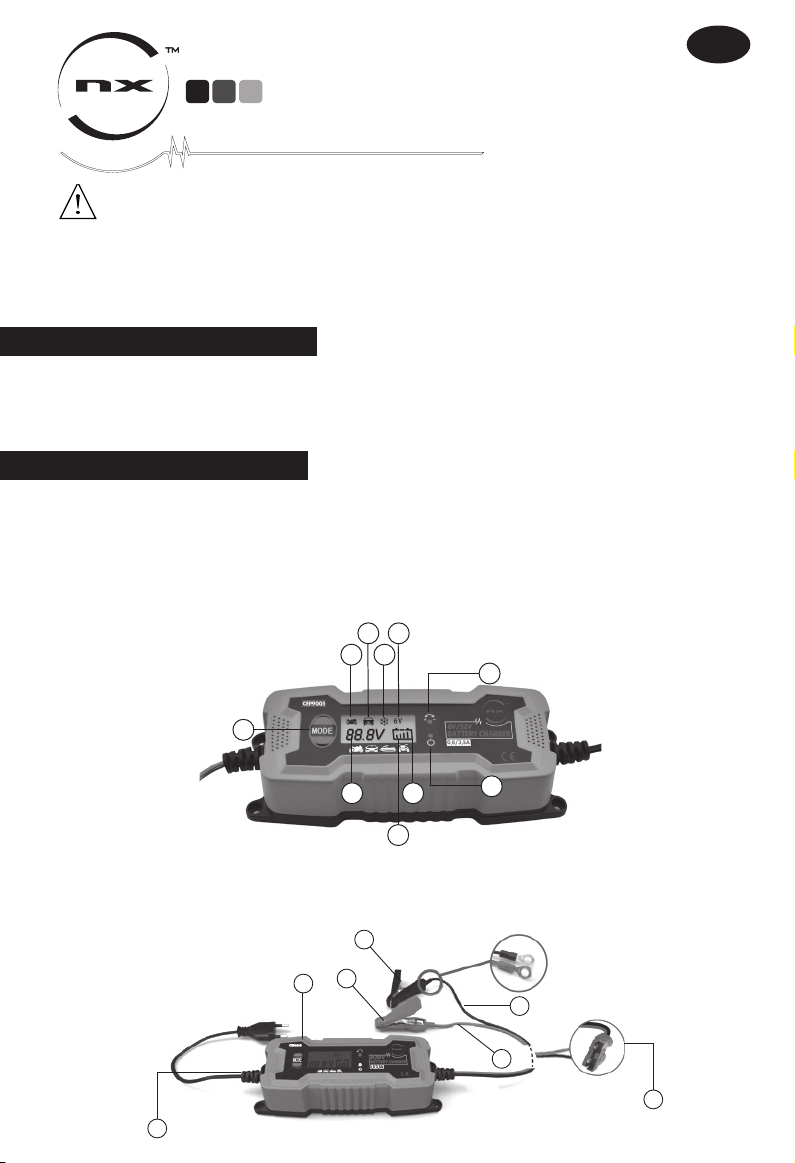
• Appuyez sur le bouton « MODE » et l’indicateur « 6V » apparaîtra sur l’écran LCD. Durant la charge,
le voyant 7clignotera et les 4 barres de charge indiqueront le niveau de charge. Lorsque la batterie
sera pleinement chargée, les 4 barres seront éclairées et le chargeur passera en charge de maintien.
• Selon la baisse de tension procurée par l’auto-décharge de la batterie, le chargeur enverra un
courant an de maintenir une charge optimale. La batterie peut ainsi rester branchée sur le chargeur
durant une longue période de stockage (sans risque d’endommager la batterie).
• Programme 2 “12V” (14.4V/0.8A) et 12.8V LFP
Pour batterie «12V» (jusqu’à 14Ah)
• Appuyez sur le bouton « MODE » et choisissez le programme 2. Le logo « » apparaîtra sur
l’écran LCD. Durant la charge, le voyant 7clignotera et les 4 barres de charge indiqueront le niveau
de charge. Lorsque la batterie sera pleinement chargée, les 4 barres seront éclairées et le chargeur
passera en charge de maintien.
• Selon la baisse de tension procurée par l’auto-décharge de la batterie, le chargeur enverra un
courant an de maintenir une charge optimale. La batterie peut ainsi rester branchée sur le
chargeur durant une longue période de stockage (sans risque d’endommager la batterie).
• Programme 3 “12V” (14.4V/3.8A) et 12.8V LFP
Pour batterie «12V» (de14Ah à 120Ah)
• Appuyez sur le bouton « MODE » et choisissez le programme 3. Le logo « » apparaîtra sur
l’écran LCD. Durant la charge, le voyant 7clignotera et les 4 barres de charge indiqueront le niveau
de charge. Lorsque la batterie sera pleinement chargée, les 4 barres seront éclairées et le chargeur
passera en charge de maintien.
• Selon la baisse de tension procurée par l’auto-décharge de la batterie, le chargeur enverra un courant
an de maintenir une charge optimale. La batterie peut ainsi rester branchée sur le chargeur durant
une longue période de stockage (sans risque d’endommager la batterie).
• Programme 4 “12V”(14.7V/3.8A) et 12.8V LFP
Pour batterie «12V» (de14Ah à 120Ah AGM ou pour une charge par froide température)
• Appuyez sur le bouton « MODE » et choisissez le programme 4. Le logo « » apparaîtra sur
l’écran LCD. Durant la charge, le voyant 7clignotera et les 4 barres de charge indiqueront le niveau
de charge. Lorsque la batterie sera pleinement chargée, les 4 barres seront éclairées et le chargeur
passera en charge de maintien.
• Selon la baisse de tension procurée par l’auto-décharge de la batterie, le chargeur enverra un
courant an de maintenir une charge optimale. La batterie peut ainsi rester branchée sur le chargeur
durant une longue période de stockage (sans risque d’endommager la batterie)
1 Reverse polarity protection
and diagnosis
2 Recharge / desulphation
3 Start of charging with a high
current strength
4 Charging up to 80%
5 Absorption - charging up to 100%
6 Trickle charging and monitoring
7 Demand recharging
A
V
0.8
7.5-10.5
10.5-12.8
14.1 14.4 14.4 12.8
0.8 0.80.13.8 3.0
125 763 4

9
• Auto protection du chargeur
Le chargeur se coupera automatiquement en cas de détection de situation anormale : court circuit,
mauvais branchement… En cas de surchauffe durant la charge, le courant de charge réduira auto-
matiquement.
ATTENTION : Ne jamais utiliser ce chargeur pour recharger des batteries non rechar-
geables ou d’autres technologies que le plomb ou le lithium fer phosphate. Durant la charge,
placer la batterie dans une pièce ventilée.
- Toujours débrancher le chargeur du secteur avant de débrancher le connecteur de la batterie.
- Toujours brancher le connecteur de la batterie avant de brancher le chargeur au secteur.
DANGER DE CHOC ÉLECTRIQUE !
- Ne pas utiliser le chargeur si les câbles de charge, connecteur Anderson ou prise secteur sont
endommagés.
- Ne pas laisser les enfants à proximité durant la charge.
- Ne pas utiliser ce chargeur à l’extérieur.
- Ne pas insérer de pièce métallique dans le chargeur.
- Ne pas jeter le chargeur dans l’eau ou le feu.
- Ne pas l’approcher d’une source de chaleur.
5. PRÉCAUTIONS D’USAGE

10
6V/12V BATTERY CHARGER
LEER ATENTAMENTE EL MANUAL ANTES DE LA PRIMERA UTILIZACIÓN
Este modelo de cargador permite cargar y mantener baterías de plomo de 6V o 12V
(AGM, Gel, Abierto, etc.) sino también baterías de 6,4V y 12,8V de litio ferrofosfato de litio (LFP).
- 1 CARGADOR LCD
- 1 CONECTOR ANDERSON
- 2 TERMINALES EN PINZA COCODRILO
- 1 MANUAL
1. CONTENIDO DE LA CAJA
2. DESCRIPCIÓN DEL PRODUCTO
1. 12V 0.8A (Programme 2)
2. 12V 3.8A (Programme 3)
3. 12V 3.8A (Programme 4)
4. 6V 0.8A (Programme 1)
5. LED de inversión de polaridad
6. LED de alimentación
7. Indicador de carga
8. Estado de carga
9. Indicador de tensión
10. Botón de selección de programa (modo)
11. Cargador
12. Conector Anderson
13. Toma de corriente
14. Pinza cocodrilo «+» (roja)
15. Pinza cocodrilo «-» (negra)
16. Cable «-» (negro)
17. Cable «+» (rojo)
1
9
10
8
7
5
6
3
2 4
Figure A:
See gure B:
See gure A:
ES
Figure B:
12
11
13
Figure B:
16
17
15
14

11
4. UTILIZACIÓN
3. INFORMACIÓN TÉCNICA
Tensión de entrada: 220-240V ~ 50/60Hz
Tensión de salida: 6V/12V
Temperatura de uso: 0°C to 40°C
Tipo de batería que puede cargar: - Batería de plomo 6V: 1.2Ah hasta 14Ah
- Batería de plomo 12V: 1.2Ah hasta 120Ah
- LFP 6.4V: 1.2Ah hasta 14Ah
12.8V: 1.2Ah hasta 120Ah
Corriente de salida: 0.8A hasta 3.8A
Cargador de tipo: IP65 (hermético a las salpicaduras y al polvo)
A-1. Etapas para conectar el conector Anderson
1. Conecte el conector del cargador al conector de la batería.
2. Enchufar el cargador a la toma de corriente 220V
3. La pantalla LCD se ilumina e indica el nivel de tensión actual de la batería.
A-2. Etapas para conectar las pinzas cocodrilo
1. Conectar la pinza o el Terminal «+» rojo en el borne «+» de la batería
2. Conectar la pinza o el Terminal «-» negro en el borne «-» de la batería
3. Enchufar el cargador a la toma de corriente 220V
4. La pantalla LCD se ilumina e indica el nivel de tensión actual de la batería. Si la led de
inversión de polaridad se ilumina en rojo, desenchufar el cargador de la toma de corriente
y invertir las pinzas «+» y «-».Enchufar de nuevo el cargador a la toma de corriente.
B. Fin de carga
1. Una vez que esté terminada la carga, desenchufar el cargador de la toma de corriente
2. Retire el conector de la batería
C. Prueba de tensión de la batería
Una vez que el cargador esté enchufado a la toma de corriente, la pantalla LCD se ilumina e indica
la tensión de la batería. Si la tensión es inferior a 3.8V o superior a 15V, no se podrá cargar la
batería y aparecerá un mensaje de error «ERR» en la pantalla.
Batería 6V: Si la tensión detectada está entre 3.8V y 7.3V, solo se puede escoger el programa
1 (6V).
Batería 12V: Si la tensión detectada está entre 7.3V y 10.5V, el cargador va a analizar la batería para
ver si se trata de una batería de 6V cargada, o de una batería de 12V descargada. Apretar el botón
«MODE» para analizar 1 batería durante 90 segundos.
La pantalla indicará:
Si después de 90 segundos de test, la tensión detectada está entre 7.3V y 7.5V, la batería 12V
será considerada como defectuosa. El cargador se quedará a la espera.
Si después de 90 segundos de test, la tensión detectada está entre 7.5V y 10.5V, empezará una
carga con pulsos de corriente para intentar revivir la batería. Una vez que la batería esté cargada a
10.5V, las otras etapas de cargas empezarán.

12
D. Selección del programa de carga y mantenimiento de carga
Según el programa seleccionado, las características de carga, de temperatura y de duración de la
carga se gestionarán de acuerdo con la tensión de la batería. Una vez que esté conectada la batería
y enchufado el cargador a la toma de corriente, hay que seleccionar su programa de carga.
• Programa 1 «6V» (7.3V/0.8A) y 6.4V LHF
Para batería de 6V (hasta 14Ah)
• Apretar el botón «MODE» y el indicador «6V» aparecerá en la pantalla LCD. Durante la carga, el
indicador luminoso 7 parpadeará y las 4 barras de carga indicarán el nivel de carga. En cuanto la
batería esté cargada, las 4 barras se iluminarán y el cargador pasará a modo de mantenimiento de
carga.
• Debido a la autodescarga de la batería, el cargador enviará siempre que sea necesario la cor-
riente suciente para mantener una carga óptima. Así, la batería puede permanecer enchu-
fada al cargador durante un largo periodo de almacenaje (sin riesgo de dañar la batería).
• Programa 2 “12V” (14.4V/0.8A) y 12.8V LHF
Para batería de 12V (hasta 14Ah)
• Apretar el botón «MODE» y escoger el programa 2. El logo « » aparecerá en la pantalla LCD.
Durante la carga, el indicador luminoso 7 parpadeará y las 4 barras de carga indicarán el nivel de
carga. En cuanto la batería esté cargada, las 4 barras se iluminarán y el cargador pasará a modo de
mantenimiento de carga.
• Debido a la autodescarga de la batería, el cargador enviará siempre que sea necesario la corriente
suciente para mantener una carga óptima. Así, la batería puedepermanecer enchufada al cargador
durante un largo periodo de almacenaje (sin riesgo de dañar la batería).
• Programa 3 “12V” (14.4V/3.8A) y 12.8V LHF
Para batería de 12V (de 14Ah a 120Ah)
• Apretar el botón «MODE» y escoger el programa 3. El logo « » aparecerá en la pantalla LCD.
Durante la carga, el indicador luminoso 7 parpadeará y las 4 barras de carga indicarán el nivel de
carga. En cuanto la batería esté cargada, las 4 barras se iluminarán y el cargador pasará a modo de
mantenimiento de carga.
• Selon la baisse de tension procurée par l’auto-décharge de la batterie, le chargeur enverra un courant
an de maintenir une charge optimale. La batterie peut ainsi rester branchée sur le chargeur durant
une longue période de stockage (sans risque d’endommager la batterie).
•Programa 4 “12V”(14.7V/3.8A) y 12.8V LHF
Para batería de 12V (de 14Ah a 120Ah AGM o para una carga a baja temperatura)
• Apretar el botón «MODE» y escoger el programa 4. El logo « » aparecerá en la pantalla LCD.
Durante la carga, el indicador luminoso 7 parpadeará y las 4 barras de carga indicarán el nivel de
carga. En cuanto la batería esté cargada, las 4 barras se iluminarán y el cargador pasará a modo de
mantenimiento de carga.
• Debido a la autodescarga de la batería, el cargador enviará siempre que sea necesario la corriente
1 Reverse polarity protection
and diagnosis
2 Recharge / desulphation
3 Start of charging with a high
current strength
4 Charging up to 80%
5 Absorption - charging up to 100%
6 Trickle charging and monitoring
7 Demand recharging
A
V
0.8
7.5-10.5
10.5-12.8
14.1 14.4 14.4 12.8
0.8 0.80.13.8 3.0
125 763 4

13
suciente para mantener una carga óptima. Así, la batería puedepermanecer enchufada al cargador
durante un largo periodo de almacenaje (sin riesgo de dañar la batería).
• Auto protección del cargador
El cargador se detendrá automáticamente si se detecta algo anormal: cortocircuito, conexión equi-
vocada, etc. En caso de sobrecalentamiento durante la carga, la corriente de carga se reducirá
automáticamente.
ATENCIÓN: Nunca utilizar este cargador para cargar baterías no recargables u otra
tecnología que no sea de plomo o litio hierro fosfato. Durante la carga, dejar la batería en un lugar
ventilado.
- Desenchufe siempre el cargador de la red eléctrica antes de desconectar el conector de la
batería.
- Conecte siempre el conector de la batería
RIESGO ELÉCTRICO:
- Revisar periódicamente que el cargador, los cables de carga, los Anderson conectores y la
toma de corriente se encuentran en perfectas condiciones.
- Mantener alejados a los niños durante la carga.
- No utilizar este cargador en el exterior
- No insertar piezas metálicas en el cargador.
- No tirar el cargador al agua o al fuego.
- No acercarlo a una fuente de calor.
5. PRECAUCIONES DE USO

14
6V/12V BATTERY CHARGER
!!! ACHTUNG HINWEIS:
Bitte das komplette Benutzerhandbuch vor dem Gebrauch lesen. Bei diesem Modell handelt es sich
um ein mehrstuges Autobatterieladegerät (im Folgenden nur noch: das Gerät genannt), welches 6V
oder 12V Batterien lädt oder deren Ladung erhält. Dieses Ladegerät ist ebenso geeignet für AGM,
Ca/Ca, Blei, MF, VRLA, Gel oder Lithium-Eisen-Phosphate (LiFePo4) Akkus.
-1LADEGERÄT
-1ANDERSON KLEMMEN
-2KLEMMEN (1 ROTE, 1 SCHWARZE)
- 1 BENUTZERHANDBUCH
1. LIEFERUMFANG
2. BESCHREIBUNG
1. 12V 0.8A (Programm 2)
2. 12V 3.8A (Programm 3)
3. 12V 3.8A (Programm 4)
4. 6V 0.8A (Programm 1)
5. LED „andersherum anschließen“
6. LED Stand by
7. Anzeige Ladung
8. Anzeige Stand
9. Anzeige Spannung Volt
10. Programmauswahl Knopf (MODE)
11. Ladegerät
12. Anderson Klemmen
13. Netzstecker
14. + Pol Klemme
15. – Pol Klemme
16. – Pol Anschluss (schwarz) inkl. Öse
17. + Pol Anschlusskabel(rot) inkl. Öse
1
9
10
8
7
5
6
3
2 4
Zeichnung A:
Siehe Zeichnung B:
Siehe bitte Zeichnung A:
DE
Zeichnung B:
12
11
13
Figure B:
16
17
15
14

15
4. BENUTZUNG
3. BESONDERHEITEN
Eingangsspannung Volt: 220-240V ca.50/60Hz
Nennspannung: 6V/12V
Umgebungstemperatur: 0°C bis 40°C
Lädt folgende Batterietypen: - 6V Blei Akku 1.2Ah bis 14Ah
- 12V Blei Akku 1.2Ah bis 120Ah
- 6.4V LiFePo4 Akku 1.2Ah bis 14Ah
- 12.8V LiFePo4 Akku 1.2Ah bis 120Ah
Nennleistung: 60W
Nennstrom: 0.8A/3.8A
Gehäuse: IP65
A-1. Anschluss Anderson Klemmen
1. Der Konnektor des Ladegeräts zu dem Konnektor des Akkus anschliessen.
2. Netzstecker des Ladegerätes in die Steckdose
3. Akku Spannung in Volt (9) wird angezeigt.
A-1. Anschluss Klemmen
1. + Polklemme (rot) 14 and den + Pol des Akkus
2. – Polklemme (schwarz) 15 an den – Pol des Akkus
3. Netzstecker des Ladegerätes in die Steckdose
4. Akku Spannung in Volt (9) wird angezeigt. Sollten die Pole verkehrt herum angeschlossen
sein, wird das Gerät „Reverse Connection“ anzeigen(5)
B. Trennung
1. Gerät vom Netzstrom trennen
2. Der Konnektor des Akkus ausziehen
C. Stand By Messung / Akku Spannung in Volt
Nach Anschluss an das Stromnetz bendet sich das Gerät im Stand By Modus. Das Display 6
leuchtet auf. Wenn die Klemmen angeschlossen sind, wird die Spannung in Volt auf dem LCD (9)
angezeigt. Die Anzeige 8 ist leer.
Sollte die Spannung unter 3.8V oder über 15V sein, wird der Akku nicht geladen. Die Anzeige zeigt
kurz Fehler „ERR“ an und das Gerät geht in den Stand By Modus.
6V-Akkus: Wird eine Spannung zwischen 3.7 und 7.3V gemessen, kann nur das Programm 1
ausgewählt werden.
12V-Akkus: Sollte bei einem Akku eine kritische Spannung von 7.3 – 10.5V festgestellt werden, wird
geprüft ob es sich um einen volle 6V oder aber einen entladenen 12V Akku handelt. Nachdem Knopf
19 gedrückt wurde, führt das Gerät eine Kontrollmessung für ca 90 Sekunden aus.
Die Anzeige zeigt dabei:
Falls nach 90 Sekunden zwischen 7.3 und 7.5 V festgestellt werden, ist ein 12V Akku denitiv
defekt. Das Gerät geht in den Stand By Modus.

16
D. Wiederbelebung
Falls nach ca.90 Sekunden zwischen 7.5 und 10.5V festgestellt werden, handelt es sich um einen
12V Akku. Die Ladung beginnt mit einer Impulsladung (Pulser) zur Wiederbelebung. Das Display
9 (Spannung) blinkt. Wenn 10.5V erreicht sind, schaltet das Gerät automatisch in die anderen
Ladungsschritte. Die Wiederbelebung ist für alle 12V Akkus das gleiche Programm.
• Programm 1 «6V» (7.3V/0.8A) und 6.4V LIFEPO4
Für die Ladung von 6V Akkus mit einer Kapazität von unter 14Ah
• Bitte drücken Sie den Programmknopf 10 und wählen das Programm 1. Das 6V Symbol leuchtet
auf dem LCD. Während der Ladung blinkt das Display 7(Ladung) auf und zeigt den Fortschritt der
Ladung an (1-4 Balken). Ist der Akku voll geladen, zeigt das Display 8(Zustand) 4 Balken. Das
Blinken erlischt und das Gerät geht automatisch in den Erhaltungsmodus über.
• Programm 2 “12V” (14.4V/0.8A) und 12.8V LIFEPO4
Für die Ladung von 12V Akkus mit einer Kapazität von unter 14Ah.
• Bitte drücken Sie den Programmknopf 10 und wählen das Programm 2. Das Symbol leuch-
tet auf dem LCD. Während der Ladung blinkt das Display 7(Ladung) auf und zeigt den Fortschritt
der Ladung an (1-4 Balken). Ist der Akku voll geladen, zeigt das Display 8(Zustand) 4 Balken. Das
Blinken erlischt und das Gerät geht automatisch in den Erhaltungsmodus über.
• Programm 3 “12V” (14.4V/3.8A) und 12.8V LIFEPO4
Für die Ladung von 12V Akkus mit einer Kapazität von 14Ah bis 120Ah.
• Bitte drücken Sie den Programmknopf 10 und wählen das Programm 2. Das Symbol leuch-
tet auf dem LCD. Während der Ladung blinkt das Display 7(Ladung) auf und zeigt den Fortschritt
der Ladung an (1-4 Balken). Ist der Akku voll geladen, zeigt das Display 8(Zustand) 4 Balken. Das
Blinken erlischt und das Gerät geht automatisch in den Erhaltungsmodus über.
• Programm 4 “12V”(14.7V/3.8A) und 12.8V LIFEPO4
Für die Ladung von 12V Akkus mit einer Kapazität von 14Ah bis 120Ah unter kalten Umgebungs-
bedingungen oder für AGM Akkus.
• Bitte drücken Sie den Programmknopf 10 und wählen das Programm 4. Bitte beachten Sie, dass
das Programm mit einer Minute Verzögerung startet. Das Symbol wird auf dem Display
angezeigt. Während der Ladung blinkt das Display 7(Ladung) auf und zeigt den Fortschritt der
Ladung an (1-4 Balken). Ist der Akku voll geladen, zeigt das Display 8(Zustand) 4 Balken. Das
Blinken erlischt und das Gerät geht automatisch in den Erhaltungsmodus über.
• Erhaltungsladung
Wie unter dem Punkt Programme erwähnt, bietet das Gerät eine automatische Erhaltungsladung.
Je nach dem Abfall der Spannung des Akkus durch Selbstentladung, reagiert das Gerät mit
verschiedenen Ladeströmen. Der Akku kann für eine längere Dauer mit dem Ladegerät verbunden
bleiben.
1 Reverse polarity protection
and diagnosis
2 Recharge / desulphation
3 Start of charging with a high
current strength
4 Charging up to 80%
5 Absorption - charging up to 100%
6 Trickle charging and monitoring
7 Demand recharging
A
V
0.8
7.5-10.5
10.5-12.8
14.1 14.4 14.4 12.8
0.8 0.80.13.8 3.0
125 763 4

17
Funktion zum Schutz des Gerätes
Das Ladegerät schaltet die Elektronik ab und behält nur die Basiseinstellungen bei, sobald eine
Anomalie auftritt(Kurzschluss, kritische Spannungsabfälle während der Ladung, vertauschte oder
defekte Anschlüsse etc). Sollte sich das Gerät zu sehr aufheizen, wird die der Ausgangsstrom
automatisch reduziert. Diese Maßahme schützen das Gerät vor Beschädigungen.
SICHERHEITSHINWEISE
Kinder oder Personen ohne Kenntnis und Kompetenz zum Gebrauch des Gerätes dürfen dieses
Gerät niemals benutzen oder in die Nähe des Gerätes gelangen sofern sie ohne Beaufsichtigung
sind. Dieses Gerät ist kein Spielzeug!
! WARNUNG!
Dieses Gerät darf unter keinen Umständen jemals mit oder für nicht auadbare Batterien(Primär-
zellen) genutzt werden.
- Immer das Ladegerät abklemmen bevor den Konnektor des Akkus abzuschalten.
- Immer der Konnektor des Akkus anschliessen.
Gefahr eines elektrischen Schocks!
- Wenn die Ladekabel, Anderson Klemmen oder der Stecker beschädigt wurden, bitte kein
Ladegerät nutzen.
- Ladegerät vom Netz trennen vor Anschluss/Trennung des Akkus.
- Zuerst die Klemme die nicht benötigt wird an die Karosserie klemmen. Danach die andere
Klemme an den Pol (nicht in der Nähe der Batterie, Benzinleitung).
- Erst danach kann das Ladegerät an das Netz angeschlossen werden. Nach Auadung bitte
das Ladegerät trennen. Danach die Klemmen von der Karosserie entfernen. Daraufhin kann
die Klemme von der Batterie entfernt werden.
Gefahr durch Explosion und Feuer
Schützen Sie sich und andere vor gefährlichen Wasserstoff-Sauerstoff Reaktionen.
- Stellen Sie sicher, dass während Ladung und Erhaltungsladung keine offene Flamme in der
Nähe ist und jeglicher Funken, Zunderschlag ausgeschlossen ist.
- Stellen Sie sicher, dass das + Kabel niemals in Kontakt mit Benzinleitungen kommt.
- Stellen Sie sicher, dass keine Zündquellen, explosive Gegenstände, Lösungsmittel oder entzün-
dliches Benzin eine Gefahr darstellen.
Gefahr durch chemische Verätzungen
Tragen Sie bei der Benutzung Schutzgläser und Handschuhe. Wenn Augen oder Haut mit Säure
in Berührung geraten sind, sofort aus-/abspülen und medizinische Hilfe in Anspruch nehmen.
- Verhindern Sie Kurzschlüsse. Negativ immer an Negativ und Positiv immer an Positiv klemmen.
Ladegerät niemals in die Nähe von Feuer, große Hitze oder Temperaturen über 50°C aussetzen.
- Stellen Sie sicher, dass keine Benzin, Hydraulik oder Wasserleitungen beschädigt werden durch
die Klemmen und Schrauben.
- Gerät nicht abdecken. Elektrische Kontaktächen der Akkus nicht Kurschließen.
- Ladegerät nur für die Auadung und Erhaltungsladung von 6V/ 12V Blei Akkus. Keine gefrore-
nen Akkus laden.
5. SICHERHEIT

18
6V/12V BATTERY CHARGER
ATTENZIONE: LEGGERE L’INTERO MANUALE PRIMA DELL’USO
Questo caricatore permette di caricare e gestire la manuntenzione delle batterie al piombo di 6V o
12V (AGM, Gel, Acido...) ma anche le batterie al litio ferro fosfato (LFP) 6.4V e12.8V.
-1CARICATORE LCD
-1CONNETTORE ANDERSON
-2MORSETTI (1 ROSSO E 1 NERO)
-1MANUALE DI ISTRUZIONI
1. MATERIALE FORNITO
2. DESCRIZIONE
1. 12V 0.8A (Programma 2)
2. 12V 3.8A (Programma 3)
3. 12V 3.8A (Programma 4)
4. 6V 0.8A (Programma 1)
5. LED connessione inversa
6. LED stand by
7. Display carica
8. Condizione stato della carica
9. Indice di voltaggio
10. Bottone di selezione programma (MODE)
11. Caricatore
12. Connettore Anderson
13. Cavo di alimentazione
14. Morsetto polo positivo “+” (rosso)
15. Morsetto polo negativo “-“ (nero)
16. Cavo di connessione polo “-” (nero)
17. Cavo di connessione polo “+” (rosso)
1
9
10
8
7
5
6
3
2 4
Figura A:
Figura B:
In merito alla gura B:
In merito alla gura A:
IT
12
11
13
Figure B:
16
17
15
14

19
4. UTILIZZO
3. INFORMAZIONI TECNICHE
Tensione di ingresso : 220-240V ~ 50/60Hz
Tensione nominale di uscita: 6V/12V
Temperatura per il funzionamento: da 0°C a 40°C
Tipi di batteria da ricaricare : - Batteria al piombo 6V: da 1.2Ah a 14Ah
- Batteria al piombo 12V: da 1.2Ah a 120Ah
- LFP 6.4V: da 1.2Ah a 14Ah
12.8V: da 1.2Ah a 120Ah
Potenza nominale : 60W
Potenza nominale d’uscita : 0.8A/3.8A
Classe di protezione : IP65
A-1. Connessione connettore Anderson
1. Collegare il connettore del caricabatteria sul connettore della batteria
2. Collegare il cavo di alimentazione del caricatore 13 alla presa elettrica (220V)
3. Lo schermo LCD si illumina e indica il livello di tensione attuale della batteria.
A-2. Connessione morsetti
1. Connettere il morsetto o l’occhiello del polo “+” (rosso) 14 del caricatore al terminale
positivo“+” della batteria
2. Connettere il morsetto o l’occhiello del polo “-” (nero) 15 al terminale negativo“-” della
batteria
3. Collegare il cavo di alimentazione del caricatore 13 alla presa elettrica (220V)
4. Lo schermo LCD si illumina e indica il livello di tensione attuale della batteria. Se l’icona
relativa alla connessione inversa è rossa, scollegare il caricatore dalla presa e invertire i
morsetti “+” e “-“. Ricollegare il caricatore alla presa.
B. Disconnessione
1. Scollegare l’apparecchio dalla rete elettrica
2. Togliere il connettore dalla batteria
C. Testare la tensione della batteria
Dopo aver collegato l’apparecchio, lo schermo LCD si illumina e indica la tensione della batteria.
Se il voltaggio è inferiore a 3.8V o superiore a 15V, la batteria non potrà essere ricaricata. Il display
quindi indicherà la presenza di un errore con il messaggio“Err”.
Batteria 6V : se il voltaggio della batteria indica un valore compreso tra 3.7 e 7.3V, l’unico program-
ma possibile e selezionabile è il numero 1
Batteria 12V : se la batteria presenta un voltaggio tra 7.3 e 10.5V l’apparecchio analizza la batteria
per vedere se si tratta di una batteria 6V completamente carica o di una batteria 12V completamente
scarica. Dopo aver premuto sul bottone relativo alla selezione del programma 10, l’apparecchio inizia
ad effettuare il controllo che dura circa 90 secondi. Il display indica :
Se dopo circa 90 secondi, viene rilevato un voltaggio compreso tra 7.3 e 7.5V, la batteria 12V viene
considerata difettosa e l’apparecchio passerà in stand by.
Se, trascorsi i 90 secondi, viene invece rilevato un voltaggio tra 7.5 e 10.5V, il processo di ricarica
inizia con una carica di impulso che ne permette il riavvio. Una volta raggiunti i 10.5V, l’apparecchio
passa alle altre fasi di carica.
This manual suits for next models
1
Table of contents
Languages:
Other NX Batteries Charger manuals
Popular Batteries Charger manuals by other brands

Analytic Systems
Analytic Systems BCA1505 SERIES Installation & operation manual

KUSSMAUL
KUSSMAUL AUTO CHARGE 4000 instruction manual

Griots Garage
Griots Garage BATTERY MANAGER V manual

Anton/Bauer
Anton/Bauer Interactive 2000 PowerCharger owner's manual

ETS
ETS 9903 operating manual

IKEA
IKEA LADDA instruction manual