Oasis HC308 User manual

Oasis Engineering Ltd
129 Birch Avenue, Tauranga, New Zealand.
T: +64 7 928 3808
W: www.OasisNGV.com
Servicing Video Instruction Manual
Failure to follow these instructions or to properly install and maintain this equipment could result in gas leak-
age, fire or explosion causing property damage and personal injury or death.
Oasis products must be installed, operated and maintained by trained and competent personnel in
accordance with all applicable local codes, rules and regulations in addition to the Oasis Instructions.
Oasis Engineering Ltd. will not be held liable in such circumstances where installation, operation and
maintenance procedures were performed by incompetent personnel resulting in improper assembly, unsafe
operation, equipment damage or personal injury.
Oasis recommends that all service technicians should watch the Product Servicing Video before attempting to
service this part.
HC308
Ultra-Fast Fill Quick Coupler
Instruction Manual

2
We reserve the right to modify product specifications without prior notice. HC308-INS-02 2822 © Oasis Engineering Limited
Safety
Ensure the system is clean of debris, vented and iso-
lated before any
installation or servicing work is carried out.
Warning!
High pressure gas and gas equipment can cause serious harm to both
infrastructure and personnel if safety precautions are not
followed.
Oasis recommends considering the use of the following PPE when working with
high pressure along with any other site specific health and safety requirements:
Spanner
(Wrenches)
Spray bottle
(Snoop or soapy water)
Yellow, Gas Rated, PTFE Thread Tape
- AW TITASEAL
- McMaster-Carr High-Density Thread Sealant Tape
- Blue-Monster gas-guard
- Or Similar
Anaerobic Thread Sealant
with PTFE (Optional)
- Loctite 567
- Swagelok SWAK
- Hernon Dripstop 940
- Gasoila FasSeal-ATS
- Or Similar
Interflon Fin Super
(Aerosol) or a similar product
If coupler is hard to uncouple due to cold temperature icing, spray
both male & female coupling faces with Interflon Fin Super
(aerosol) or a similar product to help with ease of
uncoupling in cold conditions.
Tools Required
To help with coupling in cold conditions

3
We reserve the right to modify product specifications without prior notice. HC308-INS-02 2822© Oasis Engineering Limited
Installation
Instructions
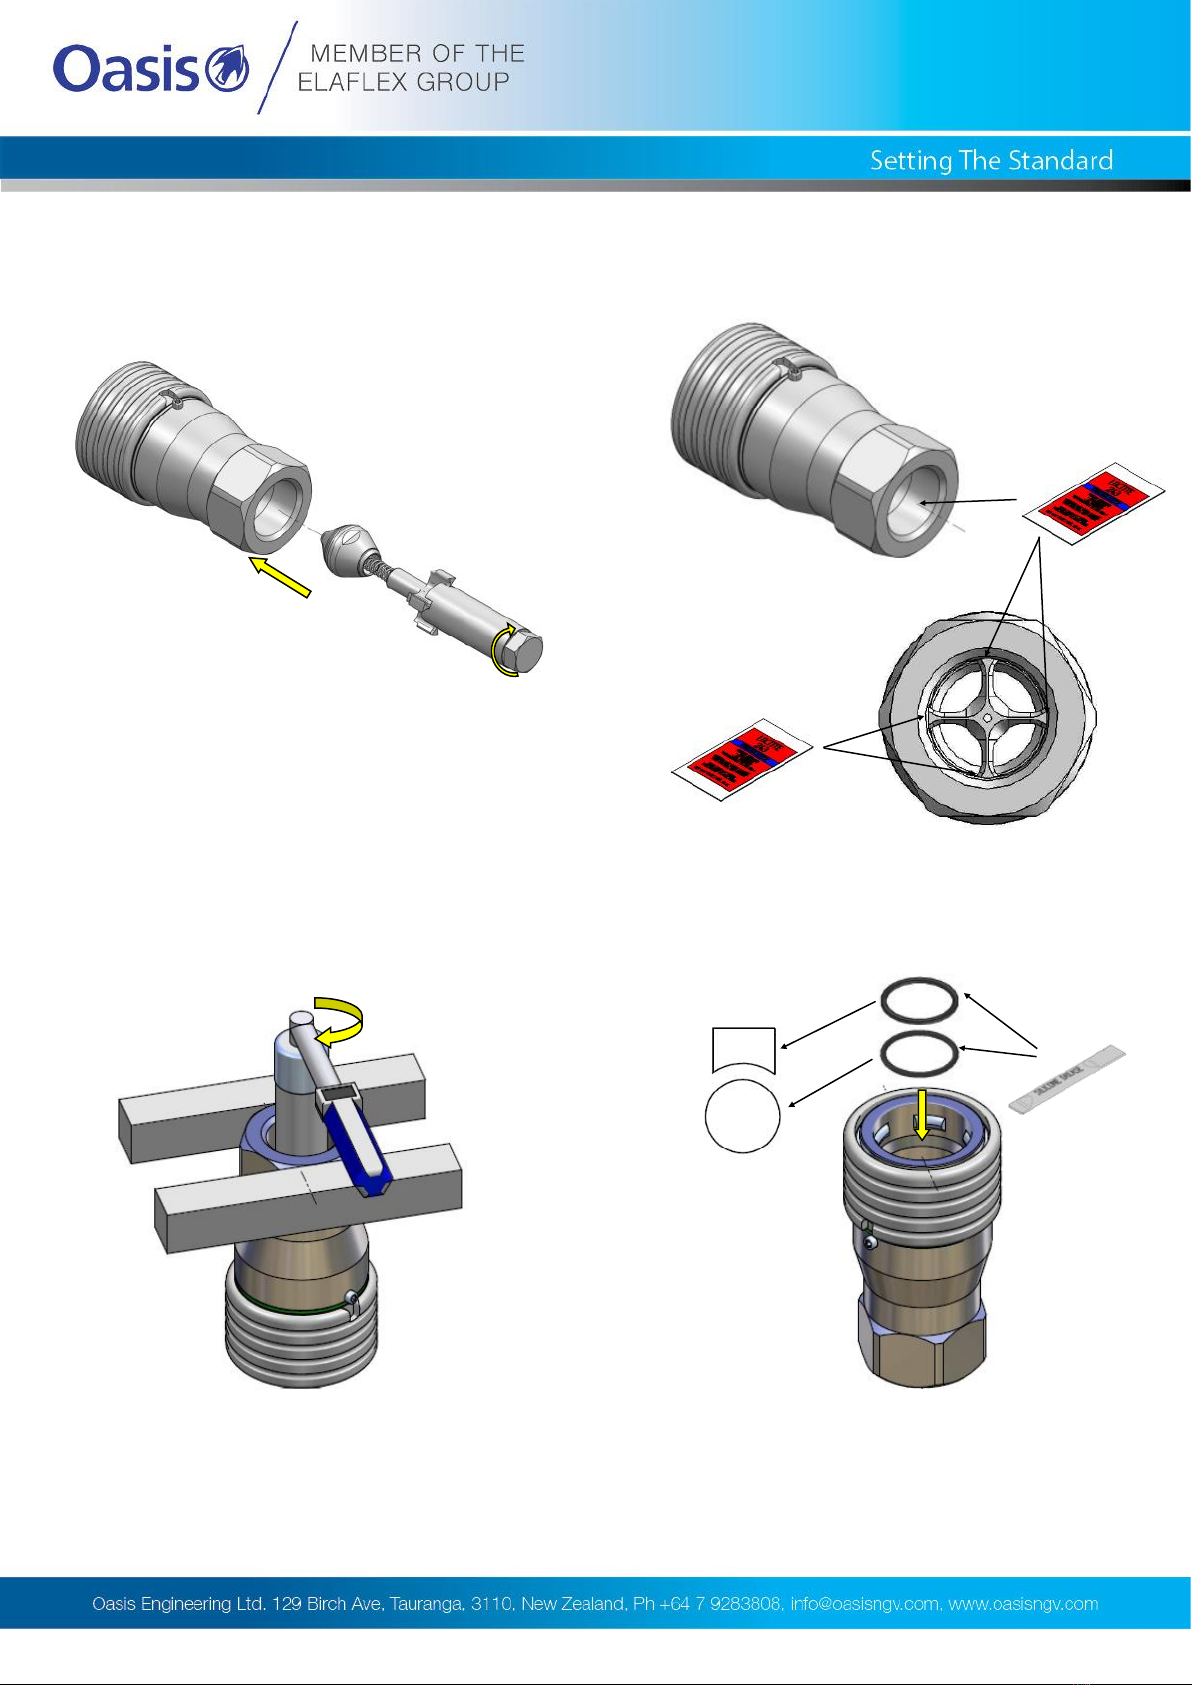
1. Apply thread tape and thread sealant.
4. Apply thread tape and thread sealant.
5. Place dust cap over fitting. Join and tighten
the connection.
Ensure it does not cross thread.
2. Join and tighten the connection.
Check for leaks on first
use with snoop or soapy
water.
Check for leaks on first
use with snoop or soapy
water.
3 to 4 turns
Please ensure that the tape
covers all threads, but does not
overlap the end of the fitting
(Optional)
If galling is a concern or unable to cover all
threads, apply a light coating over thread tape
and uncovered threads.
3. Complete.
Tighten connection
hand tight before apply
two full turns with
wrench
3 to 4 turns
Please ensure that the tape
covers all threads, but does not
overlap the end of the fitting
(Optional)
If galling is a concern or unable to
cover all threads, apply a light
coating over thread tape and un-
covered threads.
6. Complete. Put dust cap over
male end when uncoupled.
Tighten connection
hand tight before apply
two full turns with
wrench
We reserve the right to modify product specifications without prior notice. HC308-INS-02 2822© Oasis Engineering Limited

4
We reserve the right to modify product specifications without prior notice. HC308-INS-02 2822 © Oasis Engineering Limited
Connection
Instructions
1. Align notch in sleeve with locating screw.
4. Sleeve should click forward into place.
CLICK
3. Remove dust cap from male fitting and push
into female.
2. Pull back sleeve.
6. Apply pressure to begin using the Device.
5. If successfully coupled, the green ring
behind the sleeve will be visible. Twist the sleeve
and check that coupling is locked in place.
Stand clear of coupler when in use.
The use of hose restraints is recommended while
using the HC308 couplers, contact Oasis
Engineering for more info.
Oasis recommends the use of the
following PPE when operating coupler.
If coupler is hard to uncouple due to
cold temperature icing, spray both
male & female coupling faces with
Interflon Fin Super (aerosol) or a
similar product to help with ease of
uncoupling in cold conditions.

5
We reserve the right to modify product specifications without prior notice. HC308-INS-02 2822© Oasis Engineering Limited
Disconnection
Instructions
4. Sleeve should return forward.
3. Pull out male fitting.
Do not use excessive impact or twisting
force to separate coupler. For icing issues
use HC308-COVER (sold separately)
2. Align notch in sleeve with locating screw
and pull back the sleeve.
6. Return female fitting to a holder and
always keep off the ground.
5. Put dust cap over male
Fitting.
SHC308-18 — Plastic Dummy
Male Mount available separately
CLICK
1. Make sure the system is
depressurized.
We reserve the right to modify product specifications without prior notice. HC308-INS-02 2822© Oasis Engineering Limited

6
We reserve the right to modify product specifications without prior notice. HC308-INS-02 2822 © Oasis Engineering Limited
Servicing
Tools Required
Cleaner (Warm Soapy
Water or Similar)
Pick Tool
Part Number:
TOOL-PICK
(Sold separately )
Spanner
(Wrenches)
Anti Seize Grease
(Loctite 771 or Similar)
For All Threads
Sockets
Torque Wrench
Male PartFemale Part
Male poppet
(pre - assembled)
Poppet spring
Poppet spring Female poppet
(pre - assembled)
1x O-ring1x Backup
The Complete Oasis Seal Kit must be used
Silicone Grease
Rocol MX22 or similar
(For all O-rings)
Silicone Grease
Rocol MX22 or similar
(For all O-rings)
Service Kit Parts
243 Loctite
medium strength
243 Loctite
medium strength
Poppet Assembly tool
Part Number:
TOOL-HC308
(Sold separately )
Vice

7
We reserve the right to modify product specifications without prior notice. HC308-INS-02 2822© Oasis Engineering Limited
Servicing
Disassembly
1. Clamp female coupler in vice. 2. Position the assembly tool over the poppet
retainer.
3. Remove the poppet retainer using the
assembly tool.
4. Lift out the poppet retainer and put aside.
We reserve the right to modify product specifications without prior notice. HC308-INS-02 2822© Oasis Engineering Limited

8
We reserve the right to modify product specifications without prior notice. HC308-INS-02 2822 © Oasis Engineering Limited
Servicing
Disassembly
7. Clamp the male couple in the vice. 8. Position the assembly tool over the poppet
retainer.
5. Discard the poppet and spring. 6. Pick out the O-ring and backup and
discard.

9
We reserve the right to modify product specifications without prior notice. HC308-INS-02 2822© Oasis Engineering Limited
Servicing
Disassembly
9. Remove the poppet retainer using the
assembly tool. 10. Remove the poppet retainer using the
assembly tool.
11. Discard the poppet and spring. 12. Clean all of the components and Visually
Inspect parts for damage.
We reserve the right to modify product specifications without prior notice. HC308-INS-02 2822© Oasis Engineering Limited

10
We reserve the right to modify product specifications without prior notice. HC308-INS-02 2822 © Oasis Engineering Limited
Servicing
Assembly
3. Torque the poppet retainer into the body.
Recommended Torque :
40Nm
4. Insert the O-ring and back-up.
Backup
O-ring
1. Screw the female poppet assembly onto
the body. Be careful not to cross thread the
retainer.
2. With the poppet screwed hand tight into loca-
tion apply Loctite to the poppet
retainer thread.

11
We reserve the right to modify product specifications without prior notice. HC308-INS-02 2822© Oasis Engineering Limited
6. Screw the male poppet assembly into the
body. Be careful not to cross thread the
retainer.
5. Servicing of the female is complete.
Servicing
Assembly
7. With the poppet screwed hand tight into
location apply Loctite to the poppet retainer
thread
We reserve the right to modify product specifications without prior notice. HC308-INS-02 2822© Oasis Engineering Limited

12
We reserve the right to modify product specifications without prior notice. HC308-INS-02 2822 © Oasis Engineering Limited
10. Coupler servicing complete. Ensure male and female fittings couple successfully and refer to
installation instructions for refitting of the device and dust cap. It is recommended the product is
checked for leaks on first use.
9. Servicing of the male is complete.
8. Torque the poppet
retainer into the body.
Recommended Torque :
40Nm
Servicing
Assembly
Other manuals for HC308
1
Table of contents
Other Oasis Cables And Connectors manuals