OBaby ZeZu User manual

IMPORTANT PLEASE READ THESE INSTRUCTIONS CAREFULLY BEFORE USING THIS PRODUCT
KEEP FOR FUTURE REFERENCE
ZeZu Car Seat
Instruction Manual
PLEASE READ THOROUGHLY BEFORE COMMENCING INSTALLATION, AND FOLLOW THE INSTRUCTIONS CLOSELY
AS AN INCORRECT INSTALLATION COULD BE HIGHLY DANGEROUS.
Thank you for choosing Obaby. To ensure that you car seat is used in accordance with these instructions, please read them
fully. This car seat conforms to ECE Regulations 44.04 for babies from birth up to 13kg weight (about 12 months old) and is
guaranteed for 6 months from the date of purchase against manufacturing defects. If you have any problems please contact
Obaby - info@obaby.co.uk or 0845 078 0290
WARNING
A CHILD’S SAFETY IS YOUR RESPONSIBILITY.
Children should be harnessed in at all times and should never be left unattended in the seat, even whilst they are sleeping.
This car seat can be used in all vehicles equipped with 3 point safety belts, with a retractor approved to UN/ECE Regulation No.
16 or other equivalent standards.
• Do not use this child seat in passenger seats equipped with airbags.
• This child seat must only be installed in the rearward facing position. Do not use on side facing or rear facing vehicle seats.
• Never use this child seat without fastening the child’s harness correctly, and never attempt to use it without fastening it into
the car as specied in these instructions.
• It is most important that the seat belt is correctly routed with the lap portion of the belt through the side guides and the
diagonal belt going through the guides on the back of the child seat. Ensure the belt straps are not twisted.
• The child seat must be tightened down on the upholstery as tight as possible to ensure maximum protection. The
recommended method is shown in these instructions.
• Do not add to or modify the seat in any way. This could render the seat unsafe.
• It is recommended that this car seat should be replaced when it has been subjected to violent stresses in an accident or has
become badly worn.
• Periodically inspect the harness for wear, paying particular attention to the attachment points, stitching and adjusting devices.
• Never leave your child unattended in the seat.
• The carrying handle must be in the correct position when used in the car.
• Ensure that no part of the seat is trapped in a door or folding seat. If your car has a folding rear seat, ensure that it is correctly
latched in the upright position.
• Car interiors can become very hot when in direct sunlight, it is therefore recommended that the child seat is covered when not
in use. This prevents components, particularly those attached to the child seat, becoming hot and burning the child.
• In the event of an emergency, it is important that the child can be released quickly. This means that the buckle is not fully
tamper-proof and so your child must be taught never to play with the buckle. The buckle should always be easily accessible.
In an emergency your child can be released quickly by pressing the red button on the harness buckle.
• Luggage and other heavy or sharp objects should be secured in the car. Loose objects are liable to cause injury in the event of
an accident.
• Keep this user guide in a safe place where it can easily be found.
• If you travel with passengers using both front and rear seats, the lighter occupants should be in the back and heavier
occupants in the front of the vehicle.
• The seat should not be used without the correct covers. Never remove the polystyrene impact absorbent pads between the
seat shell and the cover.
• Never place the seat on a table or work surface with the child in it, or on high surfaces or beds, sofas or other soft surfaces.
• When the child seat is not in use in the car, it is recommended that it is fastened into the car with a seat belt to avoid it being
thrown about in the event of an accident.
• Store this child seat in a safe place when it is not being used. Avoid placing heavy objects on top of it.
• Do not allow the seat to come into contact with any corrosive substances eg. battery acid, or solvents.
ROUTINE CARE & MAINTENANCE
- For cleaning, use a mild detergent and warm water
- DO NOT USE BLEACH
- DO NOT USE any abrasive substances
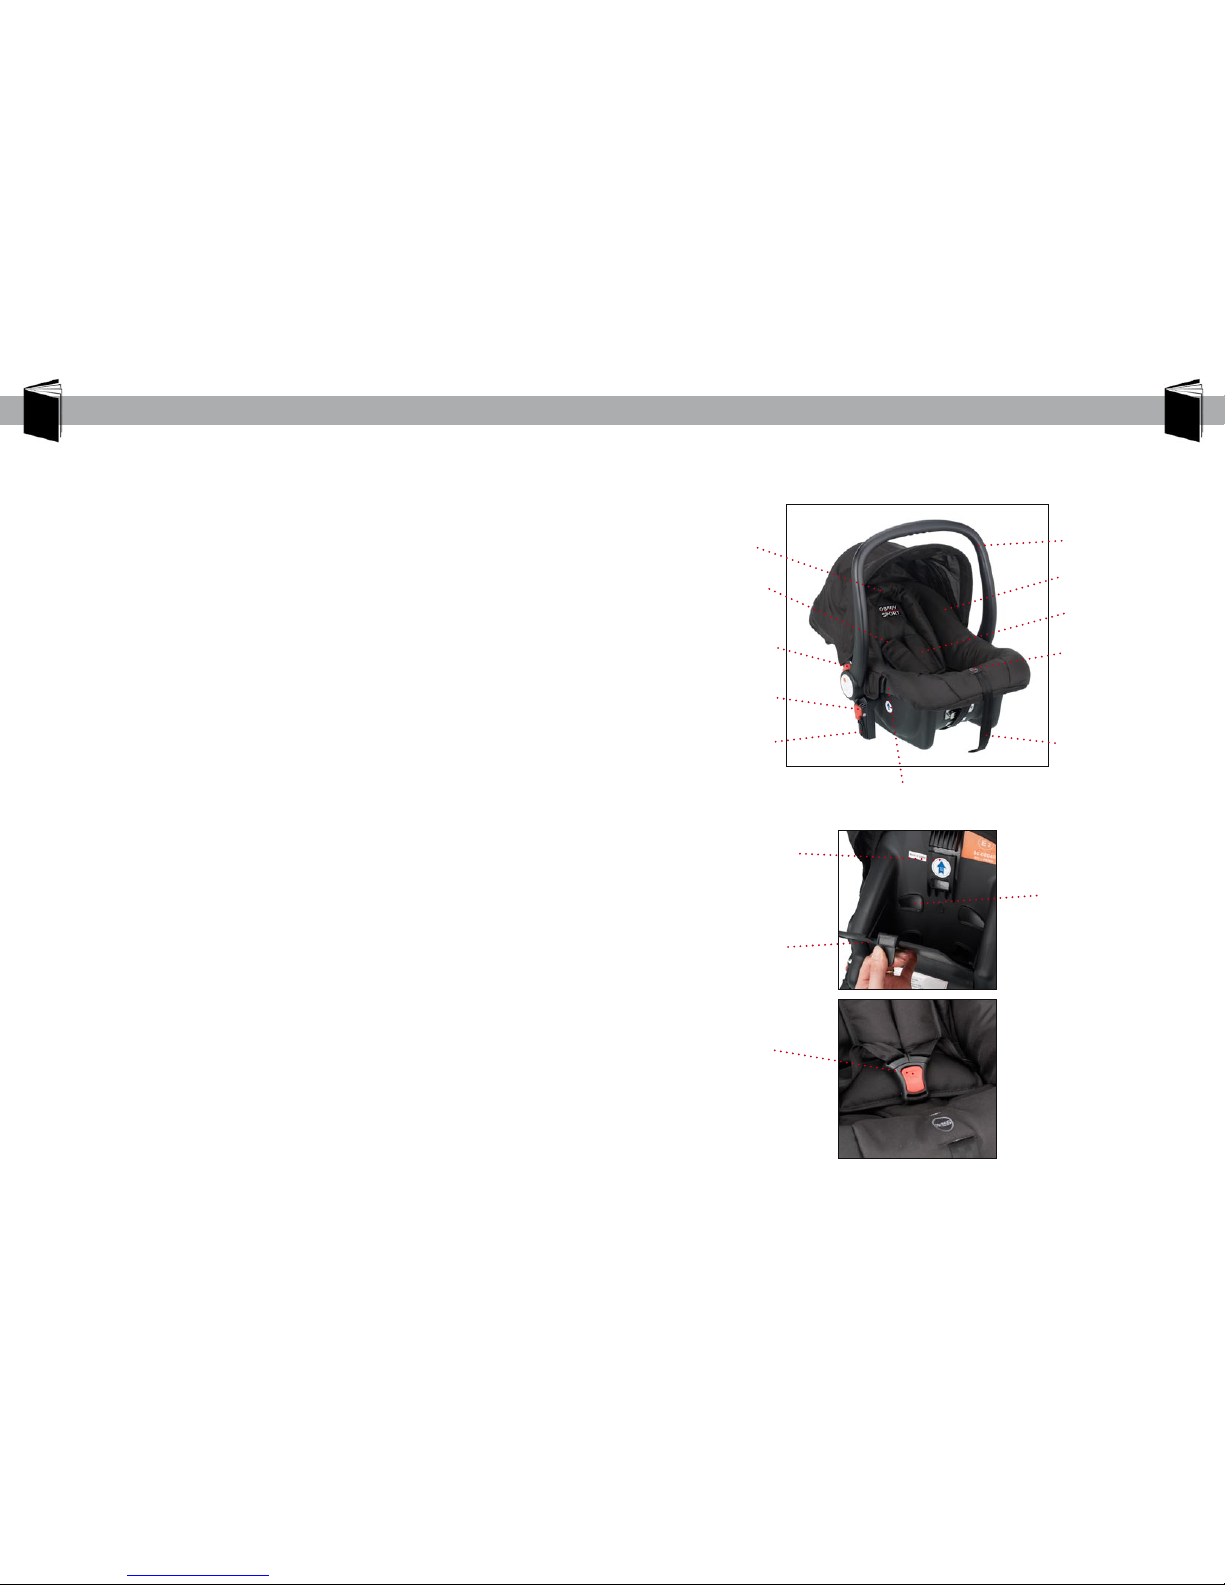
Safety Warnings Getting to know your Car Seat
This seat is classied as Group 0+ and is suitable for infants from birth to 13kg / 29 lbs (12-15 months approx.)
Lap belt guide
Red button handle adjuster
Shoulder straps
Head hugger Adjustable carry handle
Shoulder harness slots
Access hatch to alter
should strap height
Diagonal belt guide
Coupler - for tting to stroller
Release button for stroller.
Harness release button
(under press)
Harness adjuster strap
Harness buckle
Car seat cover
Harness pads
2
3
www.obaby.co.uk
www.obaby.co.uk

The Handle
The handle has 3 positions:
A - For carrying your child or tting in the car
B - When tted on the pushchair or for rocking your baby
C - When used as a seat, eg. for feeding
To move the handle from one position to another, press both release buttons at the same time, move the handle to
the required position, and release the buttons.
Check the handle has clicked into place by gently pushing it.
Always check that the handle is locked and the harness fastened before lifting the car seat.
A B C
Positioning the Head Hugger
A head hugger can be used to provide extra support for your
child’s head.
Position the shoulder straps of the car seat through the slots of the
head hugger. Ensure the head hugger is tted snugly around your
child’s head.
Fitting the Harness
Adjusting the shoulder height
Before putting your child in the car seat, loosen the harness each time so you can t it properly each time you use
the car seat.
The harness can be loosened by pulling on both straps, at the same time press down on the harness release
button that is located on the shell underneath the ‘PRESS’ word stitched on the car seat cover (g. 1).
To fasten the harness - slot the shoulder straps together using the two plastic sections (g. 2). Once these are
connected, slot them into the top of the buckle (g. 3) so that it clicks into place.
Before tightening the harness, ensure the shoulder straps sit comfortably on the child’s shoulders, and that the
straps are not twisted. The shoulder pads should be positioned so they sit on top of your child’s shoulders, not
just on the chest.
The harness should always be adjusted to t correctly every time you use the child seat.
To tighten the harness, pull on the adjustment strap until you are happy the harness is tight, but not so tight that
it is causing the child any discomfort. It is recommended that there is just enough room to insert two ngers
between the shoulder straps and the child’s chest.
g. 1 g. 2 g. 3
The harness has two positions. As your child grows you will need to
move the straps to the next slots.
The correct slots are those at, or just below your child’s shoulders. If
the slots are too far from the shoulders there will be too much slack.
To adjust the harness, remove each strap by passing it through the
slots from the front to the back of the seat. Re-route the straps
through the appropriate slots, as shown in the image above.
4
5
www.obaby.co.uk
www.obaby.co.uk

Fitting the child seat into the car
WARNING: This car seat can only be tted into a passenger seat of a car with a 3-point lap and
diagonal seat belt, and no air bag.
However safe a child seat is, however well built it is, your child’s safety depends
on you.
Read this section thoroughly before tting your child seat in your car.
REMEMBER: Misusing your child seat will reduce the protection and safety you
offer your child.
• Ensure the harness is adjusted to suit your child. A tting for winter clothes
will be too loose for a child wearing summer clothes.
• Install the child seat carefully using the 3-point lap and diagonal belt, as
described in this section.
• Check that your child seat is secure before each journey.
• Do not use in a car seat with an airbag.
• Always secure the seat belt around the car seat.
STEP 1
Put the child seat rearward facing into the car
and ensure that it is pushed rmly up against
the back rest of the car seat, as shown.
STEP 2
Route the lap section of the adult safety belt
through the two lap belt guides and fasten the
car seat belt.
STEP 3
Pass the diagonal section of the seat belt around
the back of the child seat, then pass the seat belt
through the diagonal belt guide.
When tted, the security of the child seat can be tested by pressing rmly into the backrest. The seat
should feel very rm and move only slightly. If the seat does not feel secure, go back and follow the tting
instructions closely.
Only once the seat is secure is it ready for use.
STEP 4
Take out all the slack in the seat belt, ensuring
that there are no twists or kinks in the seat belt.
Fitting the child seat onto the chassis
To put the car seat onto the chassis, remove the stroller seat unit.
Then t the car seat by lining up the car seat coupler with the chassis ttings on each side (g. 4), allowing it to
click into place on both sides.
You can adjust the handle by pressing the red button on each side of the car seat (g. 5).
When on the chassis the handle bar may be more suitable in position B (see page 5), pushed behind the back
support of the car seat.
To remove the car seat from the chassis, press both release buttons on each side of the car seat (g. 6) and lift
away from the chassis.
g. 4 g. 5 g. 6
6
7
www.obaby.co.uk
www.obaby.co.uk

info@obaby.co.uk
0845 078 0290
Table of contents
Other OBaby Car Seat manuals


