OBaby ZOOM User manual
NB: Keep these instructions
NB: Keep these instructionsNB: Keep these instructions
NB: Keep these instructions
for future reference!
for future reference!for future reference!
for future reference!
Instructi
InstructiInstructi
Instructions for use
ons for useons for use
ons for use

Safety instructions
Safety instructionsSafety instructions
Safety instructions
Read these instructions carefully before use and keep them for future reference. Failure to read these instructions may compromise the safety of your child.
Care instructions
Care instructionsCare instructions
Care instructions
- The materials used to manufacture our products comply with the AZO requirement, EN71-2 and EN71-3, and light fastness standards for textiles. Nevertheless, we
advise you not to leave the product exposed to bright sunlight for any length of time. No claims may be made for wear and tear or if the colours fade when
exposed to strong sunlight. The fabric covers on this product can be washed by hand or on a cold cycle in the washing machine (mild detergent).
- An ABC Design rain canopy is available in retail stores offering complete protection against the rain.
- All the frames on our products have been tested for conformity with EN1888 : 2005 and have met the required standards. In order to maintain the safety of the
product it is necessary to oil the moving parts or tighten the rivets as and when required.
NB: Please do not use any product for lubrication other than silicone oil or silicone spray lubricant.
- Regular care and upkeep have a major part to play in maintaining the safety and value of the product. Exposure to such things as salt in the air, road-gritting salt
or acid rain will encourage the onset of corrosion, as will inappropriate storage of the product.
- We recommend regular maintenance of all coated parts. In serious cases of soiling please clean the surface coating immediately.
- Check for loose parts and fastenings from time to time and tighten if necessary.
2
•Double buggy with reversible seat units
•Height-adjustable telescopic handle
•Four-position seat unit
•Swivel mode and locked setting on front wheels
•Tested for conformity with EN 1888:2005
•Compatible with ABC Design “Rider” car seat
•Compatible with “Maxi Cosi Cabrio” car seat
•Compatible with “Römer Baby-Safe plus SHR” car seat
•Compatible with ABC Design “Carrycot for Zoom”

NB:
NB:NB:
NB:
- This model is suitable for infants from 6 months (from birth with carrycot) and up to a maximum weight of 15 kg.
- The net bag can carry up to 2 kg.
- This stroller is suitable for maximum 2 Children.
- Do not use any accessories other than those approved by the manufacturer.
- You are advised to take your child out of the pushchair as a matter of principle when negotiating steps or flights of stairs or if the pushchair needs to be lifted or
carried.
- If you are using a carrier, ensure that it is correctly attached to the pushchair.
CAUTION:
CAUTION:CAUTION:
CAUTION:
- Do not leave your child unattended.
- The only mattresses suitable for use are those up to 50 mm thick.
- Use a safety harness as soon as your child can sit independently.
- This seat is not suitable for babies under 6 months old.
- Loads attached to the handle affect the stability of the pushchair.
- Before use, check that the pushchair attachment or seat is correctly engaged in position.
- This product is not suitable for jogging or skating.
- Do not make any modifications to the product which compromise its safety.
- Keep this product away from fire and other sources of heat.
Customer complaints
Customer complaintsCustomer complaints
Customer complaints
- No claims may be made for natural wear and tear or for damage caused by undue demands on the product or by exceeding the permissible load.
- No claims may be made for damage caused by improper use.
- No claims may be made for damage caused by incorrect assembly or operation.
- No claims may be made for damage caused by improper modifications to the product.
- Areas of rust may appear through lack of maintenance or improper care and do not constitute a fault with the product.
- Scratch marks are normal signs of wear and do not constitute a fault with the product.
- Mildew is likely to appear on textiles which are not dried out after getting wet and cannot be attributed to shortcomings in production conditions.
- The product may fade if exposed to sunlight, perspiration and detergents, or if subject to abrasion or excessive washing, therefore fading cannot be attributed to a
fault with the product.
- No claims may be made for wheels which become worn out as a natural result of wear and tear.
3
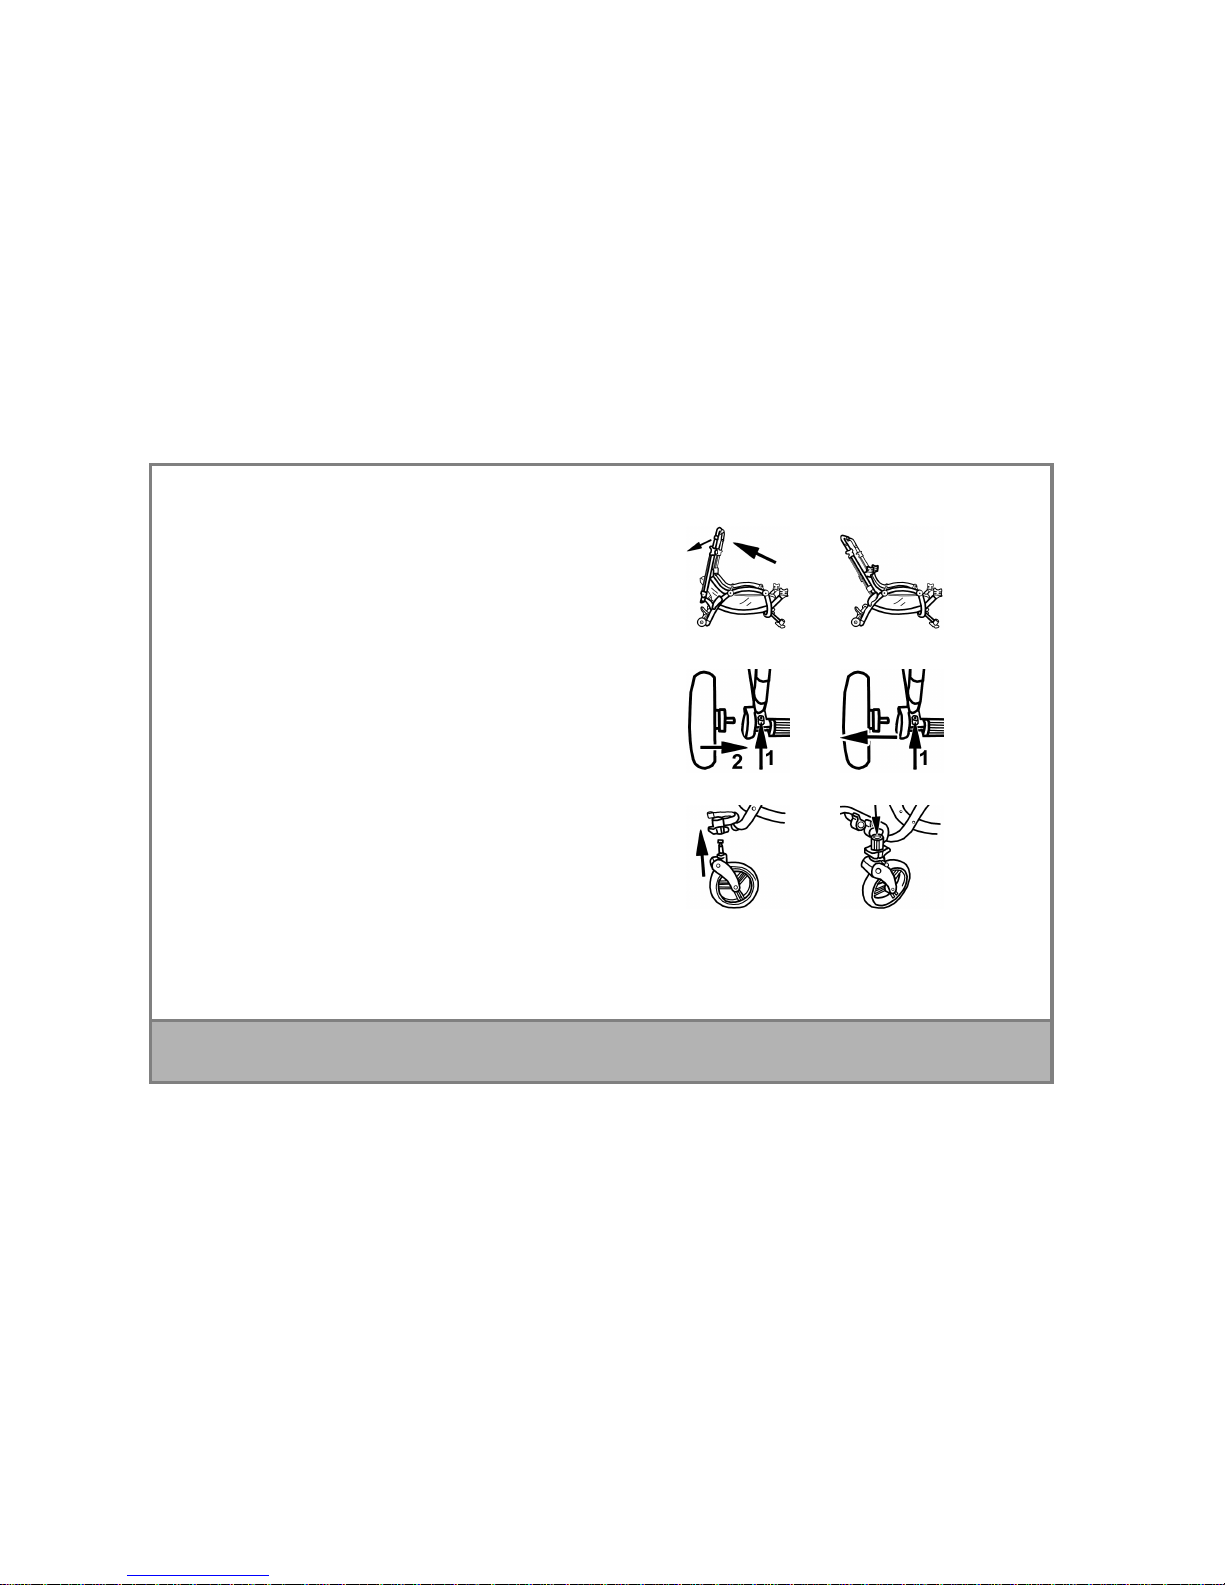
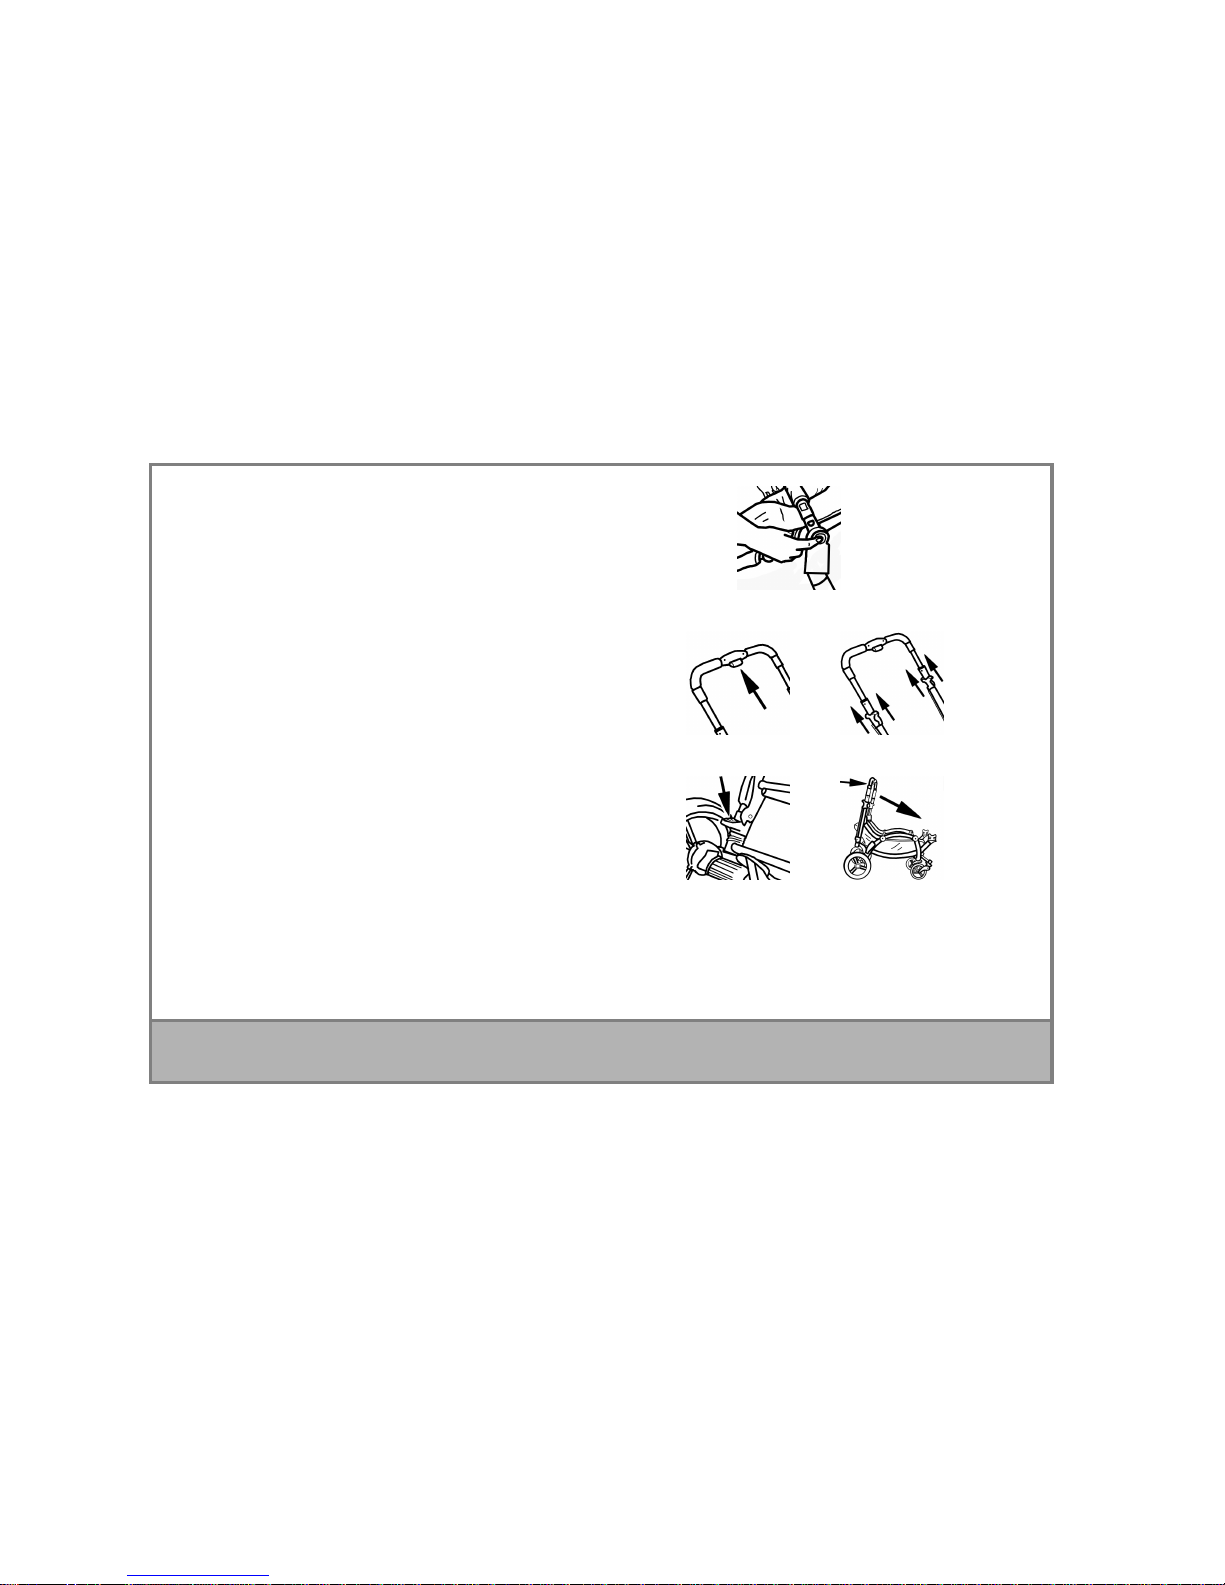
1. Opening the pushchair
Then pull the bar-type handle up until the frame engages.
CAUTION: Ensure that all the catches are engaged before use.
2. Fitting the wheels
ress the button (1) and insert the rear wheel in the slot (2) until it engages.
To remove the wheels, press the button (1) to release the wheels.
The wheels can then be removed from the axle.
Mount the front wheels by sliding the wheel assemblies onto the prongs until
they click into place.
To remove the wheel assemblies, press the button underneath the blocks and
remove the assemblies.
4
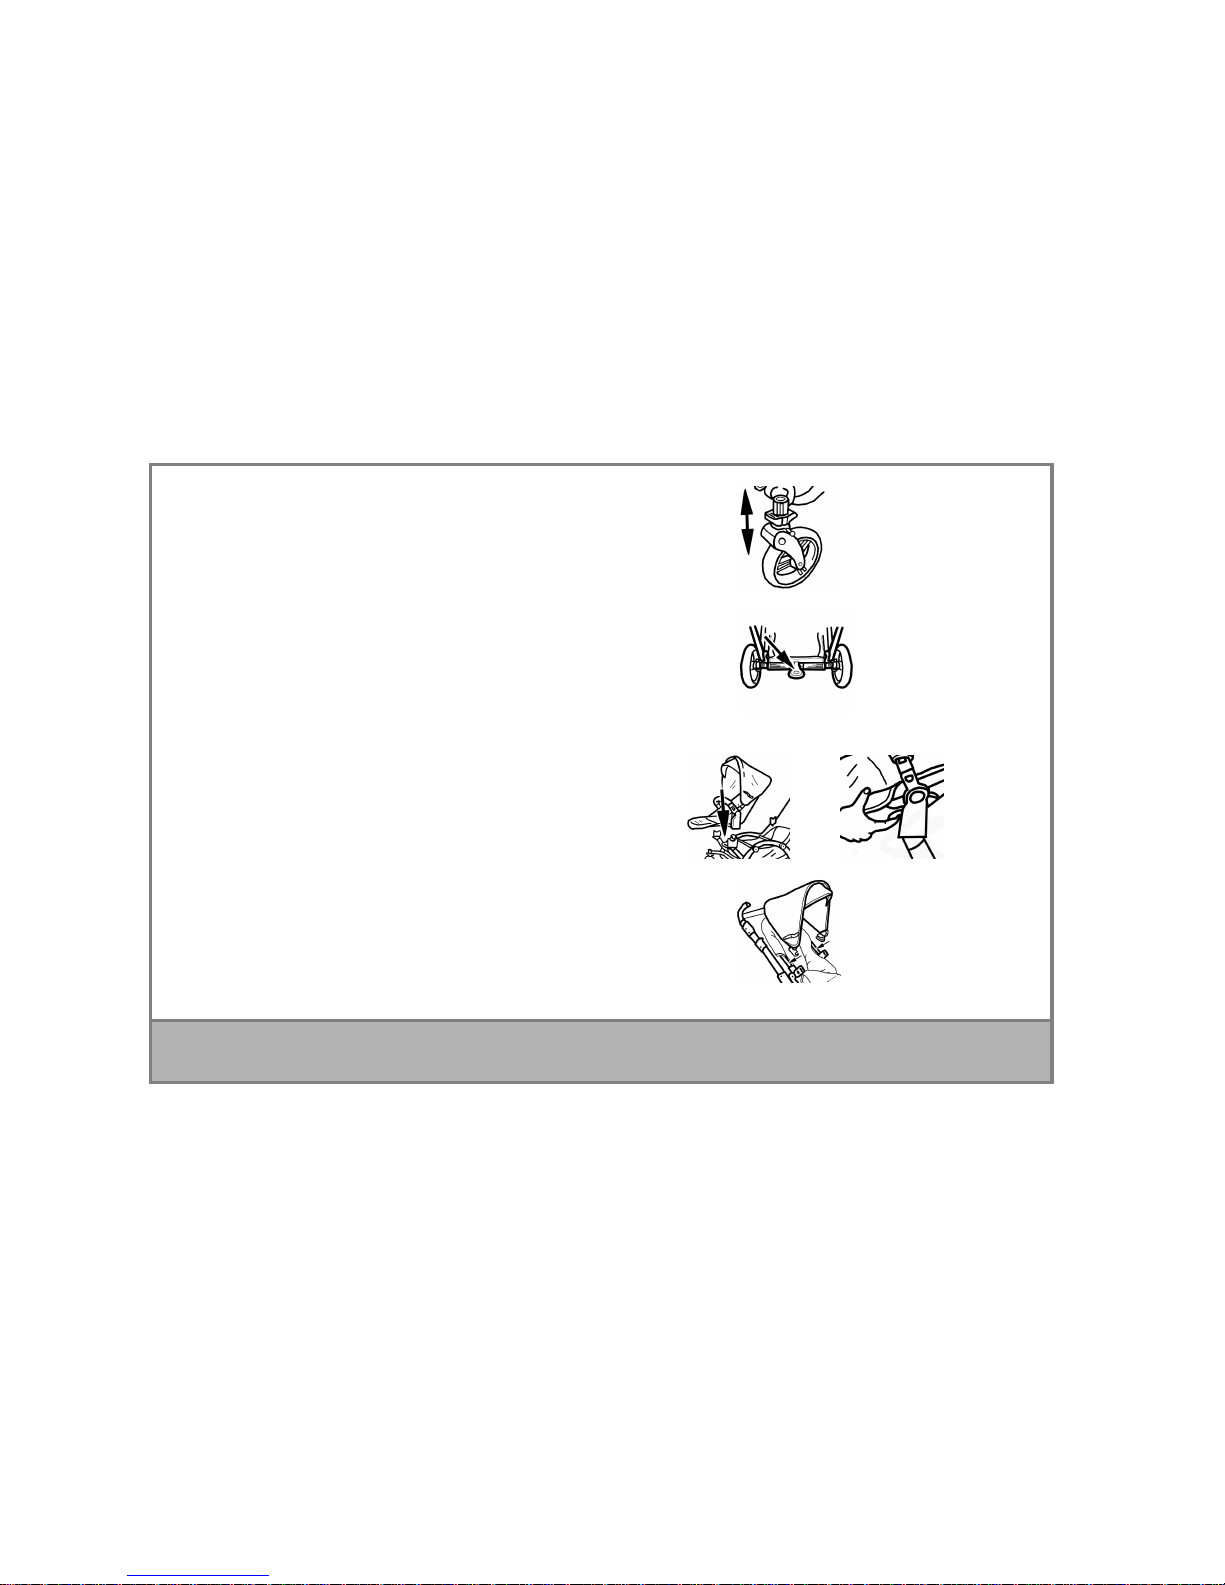
3. Wheel locking and swivel settings
ush the lever downwards to lock the wheels.
ush the lever upwards for swivel position.
4. Operating the brake
ress the lever down to engage the brake.
ress the lever up to disengage the brake.
NB: The brake must always be applied before lifting the children in and out of
the buggy.
5. ttaching and converting the seat
Attach the seat by placing it on the frame until it clicks into place.
To remove and convert the seat, pull the levers on both seat unit adapters
and lift up the seat.
6. ttaching the hood
Fit the hood on the seat frame with the two plastic brackets.
5
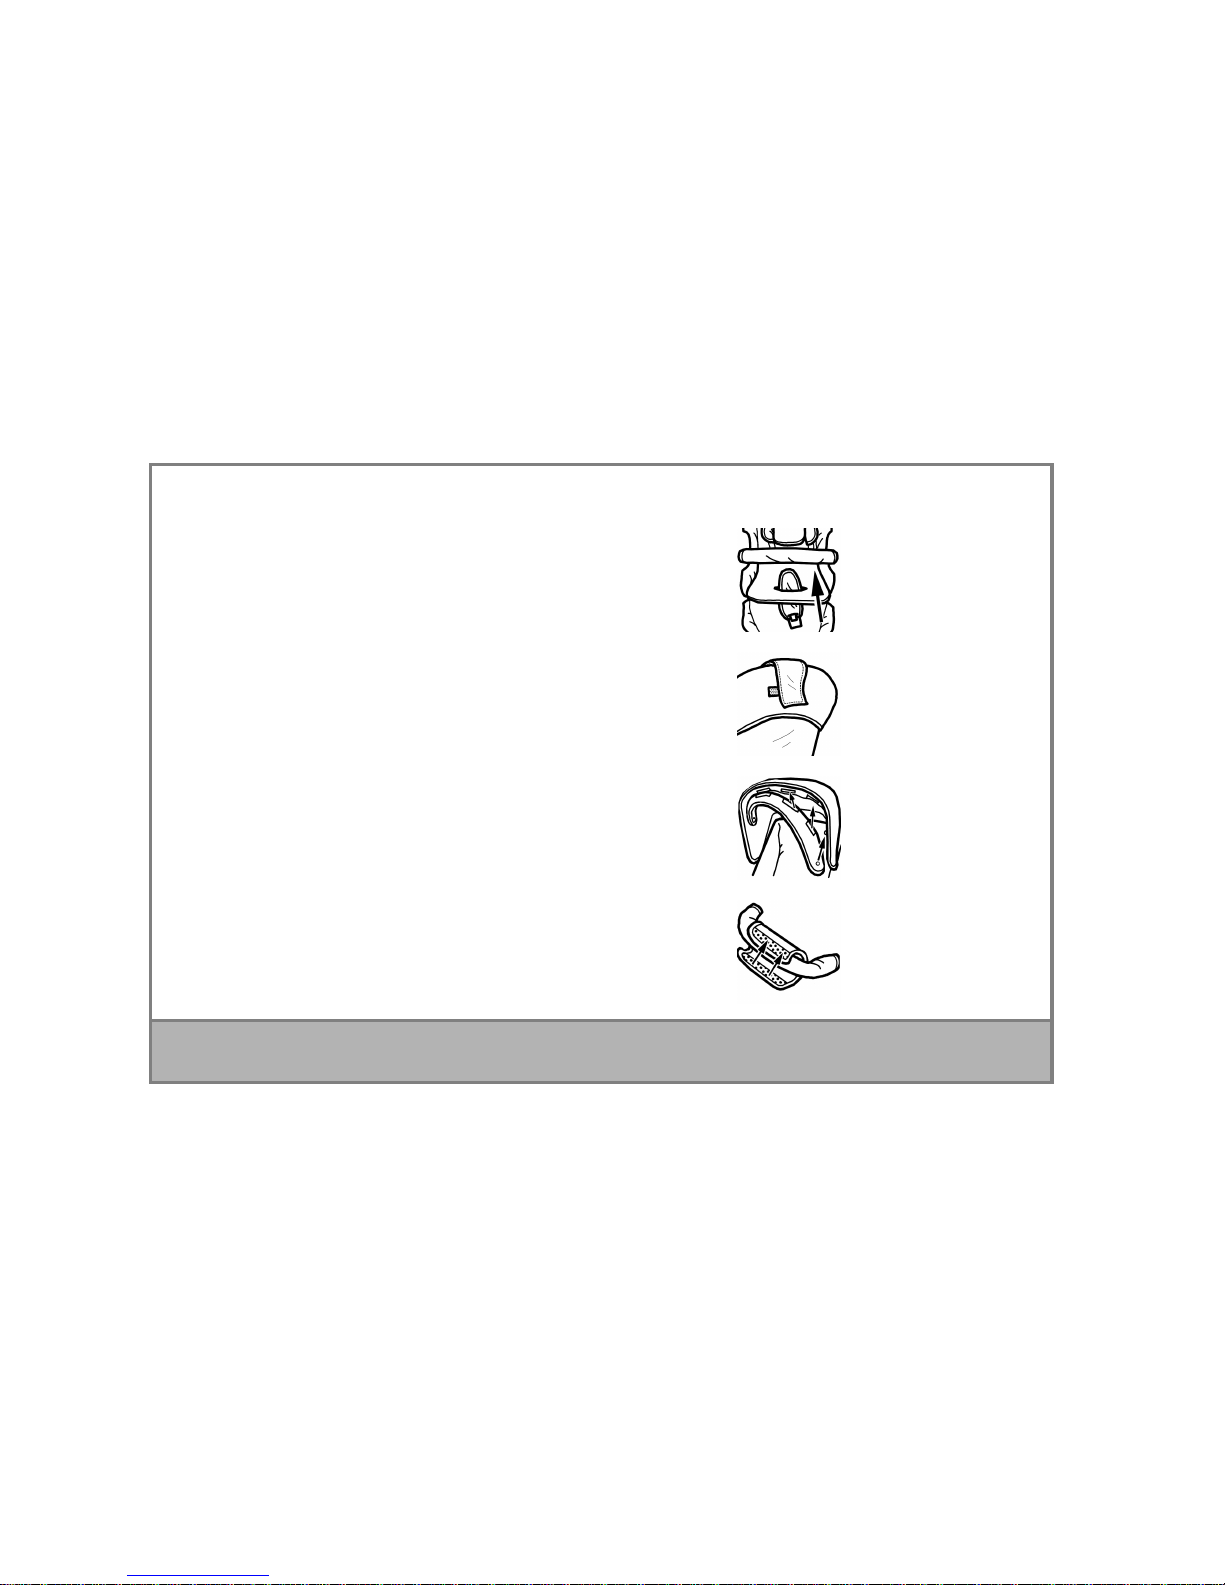
7. Fitting and changing the Comfort Set
Seat liner:
Undo the strap. For more information, follow the instructions in section 9.
Then pull the crotch belt through the opening in the seat liner.
Fix the tab on the head end of the seat liner with the Velcro fastening on the
backrest.
Sun vizor:
There are three Velcro fastenings and two snap fasteners on the sun vizor
and cover.
Fasten them together.
Guard rail cover:
Fit the cover around the guard rail and secure it in place with the Velcro
fastening.
6
8. Fitting and removing the guard rail
Fit the guard rail by inserting it in the plastic mounts on both sides.
To remove the guard rail from the pushchair, press in the buttons on both
sides and pull the guard rail off away from the pushchair.
9. djusting the leg rest
To adjust the leg rest, press in the buttons on both sides and then adjust the
height.
Let go of the buttons again so that the leg rest clicks into place.
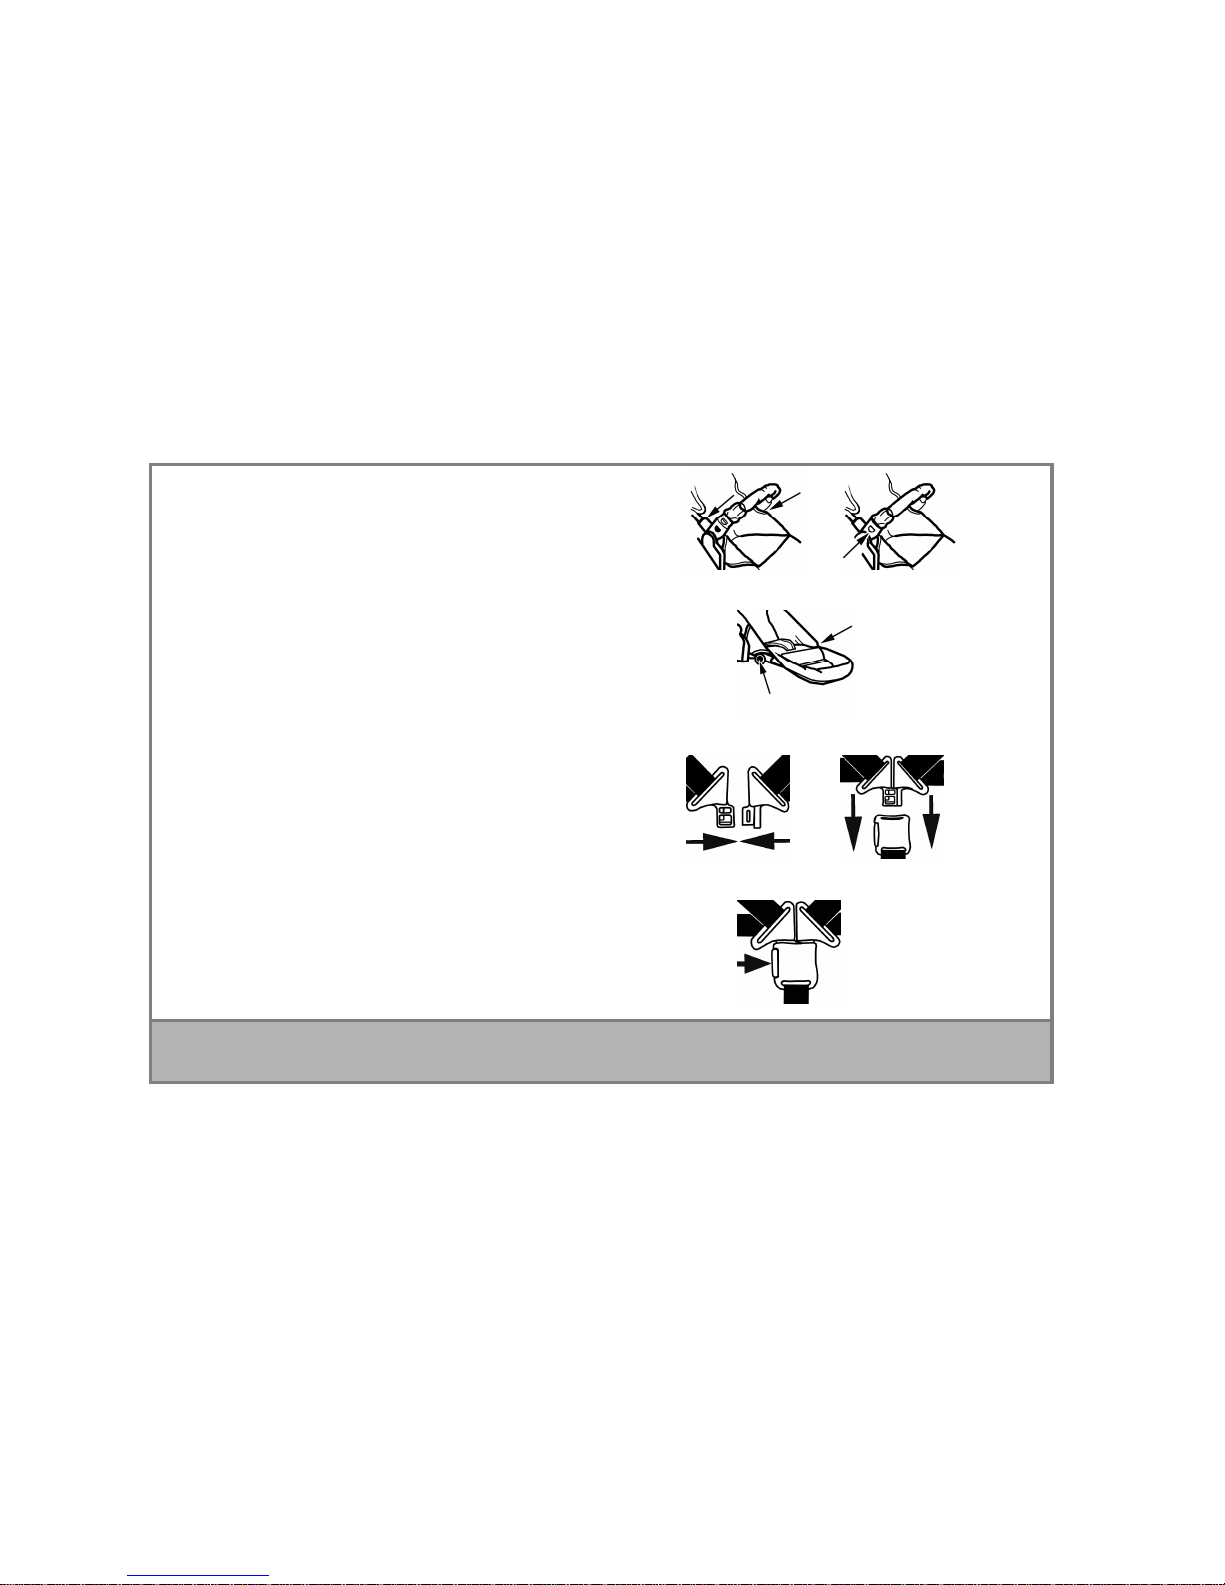
10. Fastening the harness
To fasten the harness, bring the top two plastic catches together and
interlock them.
Then insert the interlocked catches into the bottom part of the fastening.
Adjust the harness to a setting where the baby is held in the correct position.
11. Unfastening the harness
To open the harness, press the button on the side.
C UTION: Always use the shoulder harness and lap belt together.
7
12. djusting the seat unit
To adjust the seat unit, press and hold down the catches on both sides of the
seat unit and adjust the height of the seat. When you have reached the
required position, let go of the catches to allow the seat to remain in that
position.
13. djusting the handle
ush the button upwards to adjust the height of the handle.
When the handle is at the required height, let go of the button again so that
the handle will remain locked in this position.
14. Folding the pushchair
NB: Remove the seat unit or carrycot before attempting to fold the
pushchair.
ull the two release catches on the left and right sides of the handlebar up.
Now use your foot to release the second catch which is on the left-hand rear
wheel.
You can now fold down the push-bar.
Note: To unfold the pushchair, follow the instructions in point 1 “Opening the
pushchair”.
8
Table of contents
Other OBaby Car Seat manuals


