18 19
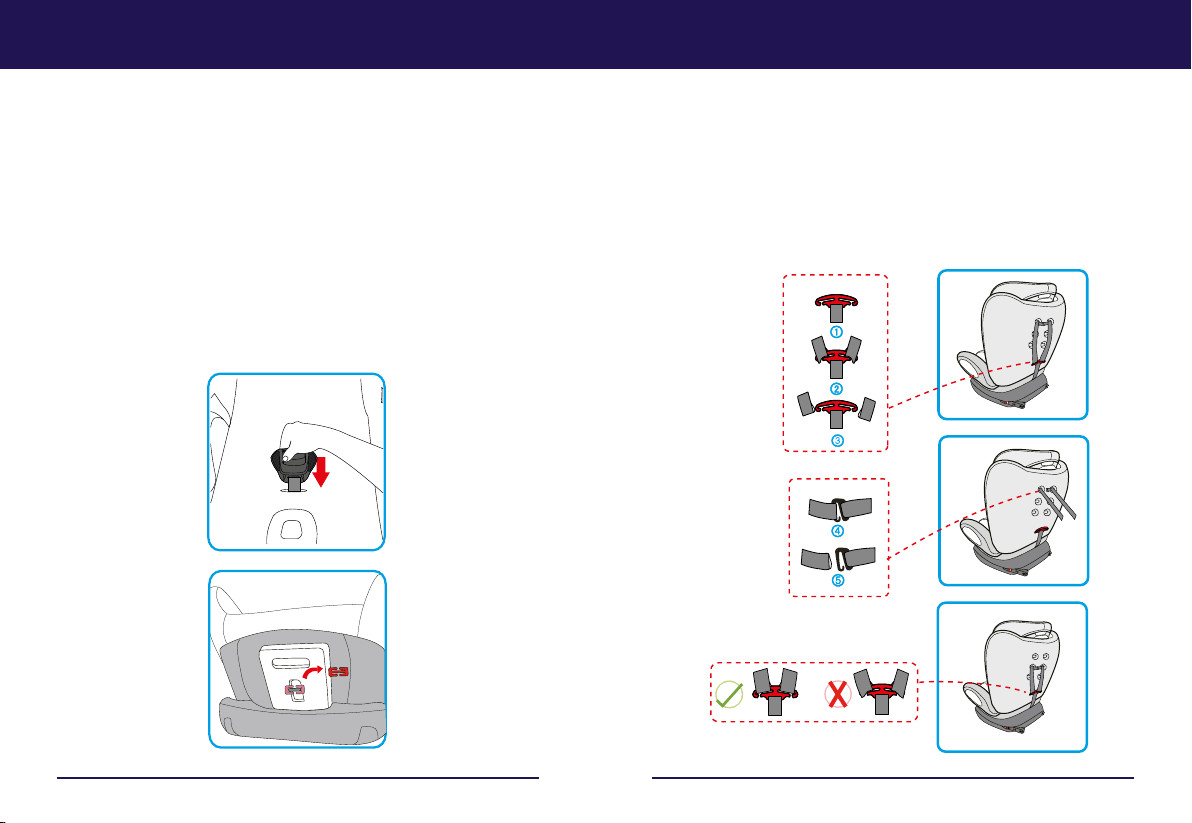
6.9 Ustawianie wysokości pasów
Prawidłowo dopasowane pasy gwarantują optymalne ułożenie pasa piersiowego
i zapewniają Twojemu dziecku najwyższą ochronę.
Pasy powinny być dopasowane w taki sposób, aby pomiędzy pasem a ciałem
dziecka mieściły się dwa palce.
Aby dopasować wysokość pasów do ciała Twojego dziecka:
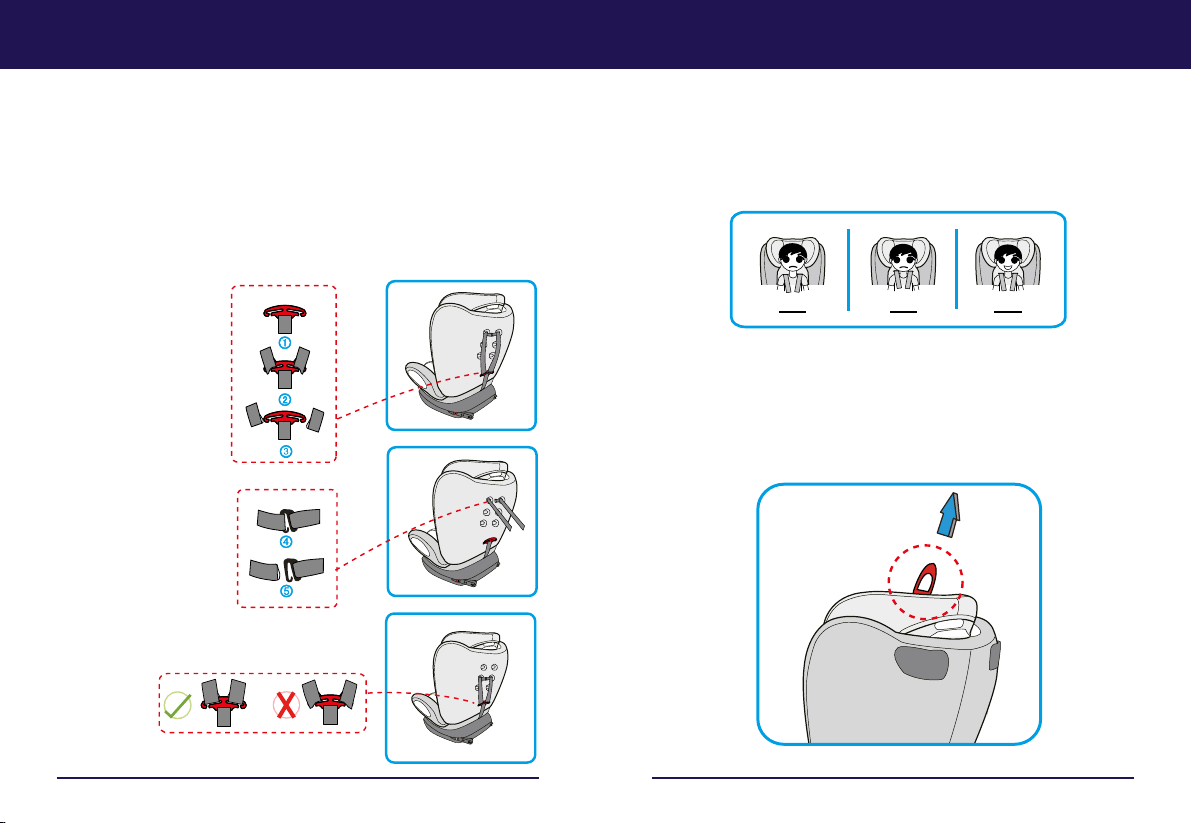
6.9.1 Poluzuj pasy naramienne, aby uzyskać dostęp do metalowej kotwicy i łącznika
z tyłu fotelika.
6.9.2 Wyciągnij pas
z łącznika, a następnie
wysuń go z metalowej
kotwicy (patrz rysunki (1)
(2)(3),(4)(5)).
6.9.3 Ponownie przełóż
pasy piersiowe przez
odpowiednie otwory
z przodu fotelika. Upewnij
się, że oba pasy przechodzą
przez otwory na tej samej
wysokości.
6.9.4 Ponownie połącz ze
sobą oba pasy piersiowe
za pomocą łącznika
i metalowej kotwicy (patrz
rysunki (3)(2)(1),(5)(4)
instruction instruction
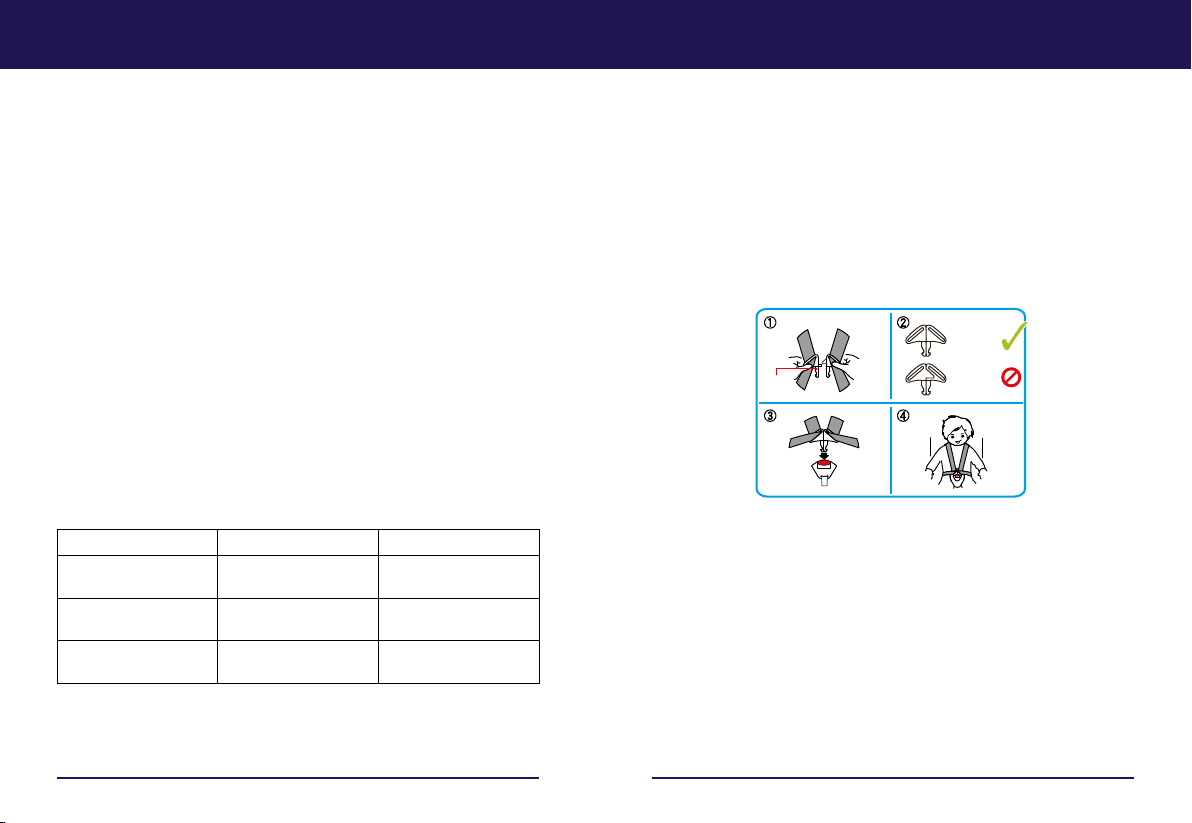
6.8 Adjust the length of harness
In order to protect your child much
better,after fix him/her in the child restraint
system and lock the buckle,you should tighten
the harness so they are snug and flat against
the child’s body,they should never be
twisted or loose.
6.8.1 To tighter the harness,pull the shoulder
belt upwards to remove the slack from the lap
sections of the harness,at the same time to
pull the adjuster crotch belt coming from the
lock by your another hand.
6.8.2 To lengthen the harness,press the button
on lock between the child’s two leg,then pull
the two shoulder belt simultaneously in your
direction, please note while you are doing this
hold the harness,not the harness cover.
CAUTION! Check that the harness straps are
not twisted and that they have been correctly
inserted in the belt slots on the cover.
0-36kg
6.9 Adjust the height of harness
A correctly adjusted harness ensures that the
diagonal seat belt section is optimally
positioned, and gives your child the optimal
protection.
The harness must be adjusted to that there is
a space two fingers wide between the harness
and your child’s body.
To adjust the height of the harness to fit your
child:
6.9.1Loosening the shoulder belt in order to
access the metal link and connector at the
back of the child seat.
6.9.2 Remove the belt from connector, then
remove the shoulder belt from the metal
link,follow step①②③,④⑤
6.9.3 From the front of the child seat,
re-thread shoulder belt through the desired
slots.Make sure both of the belts go through
the slots at the same height.
6.9.4 Connector both shoulder belt to the
connector and metal link again.Follow step
③②①,④⑤
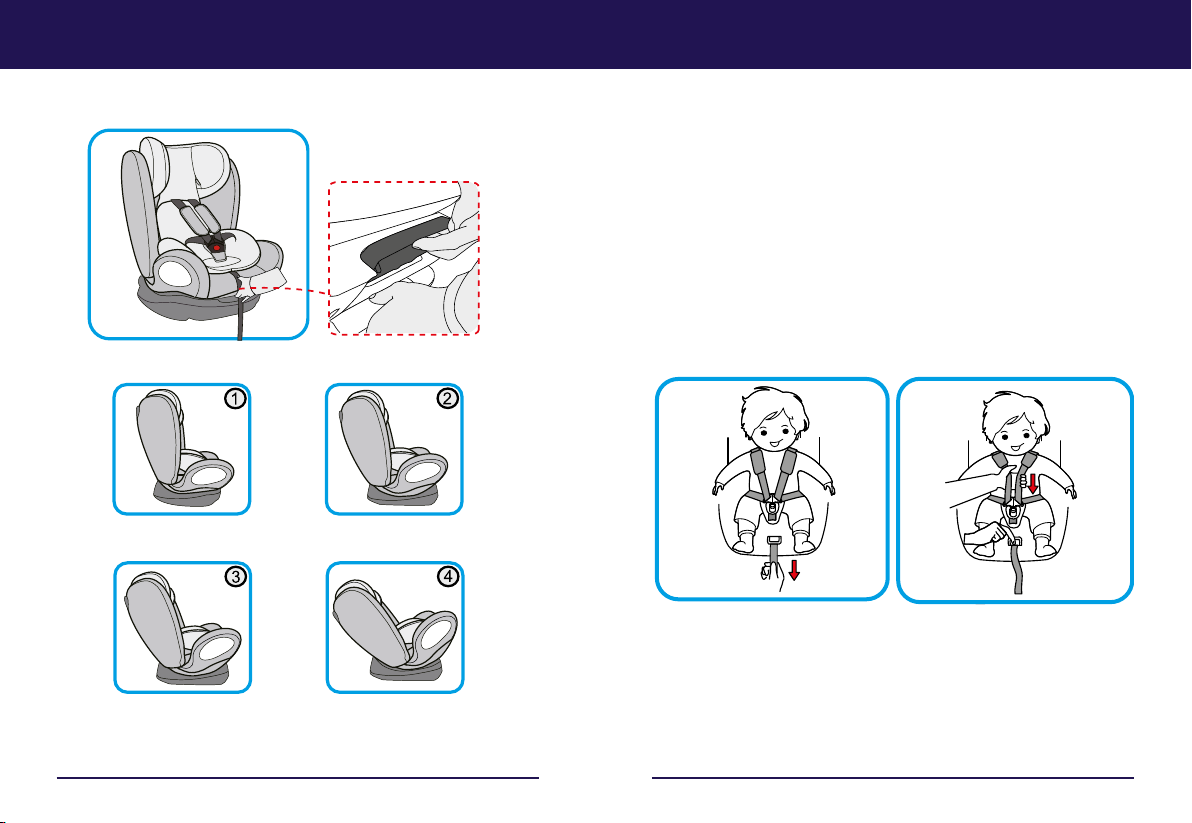
6.10 Ustawianie zagłówka gdy używamy 5 punktowych pasów
Odpowiednio ustawiony zagłówek gwarantuje optymalną ochronę Twojego
dziecka w foteliku.
Zagłówek musi być ustawiony tak, aby pasy naramienne były na tej samej wysokości
co ramiona dziecka.
UWAGA! Pasy naramienne nie mogą znajdować się za plecami dziecka , na
wysokości jego uszu lub nad nimi.
Aby dopasować pasy naramienne:
6.10.1 Maksymalnie poluzuj pas naramienny fotelika (patrz 6.8.2)
6.10.2 Jednocześnie pociągnij regulator wysokości zagłówka i pociągnij za
zagłówek, wybierz odpowiednią wysokość pasów naramiennych i ustaw pasy w tej
pozycji, puszczając regulator.
instruction
instruction
6.10 Adjusting the headrest in 5-point harness
installation
A correctly adjusted headrest ensures optimal
protection for your child in the safety seat:
The headrest must be adjusted so that the
shoulder belts are at the same level as your
child’s shoulders.
0-36kg
CAUTION! The shoulder belts must not run
behind the back of the child or at ear height or
above the ears.
The shoulder belts are adjusted as follows:
6.10.1 Loosen the shoulder belt of the child
seat as much as possible see 6.8.2
6.10.2 Pull the headrest height adjuster and
headrest at same time, select the correct
height of the shoulder belts and engage it in
the position that fits for your child by releasing
the adjuster.
6.11 Adjusting the headrest in Vehicle belt
installation
A correctly adjusted headrest ensures that the
diagonal seat belt section is optimally
positioned, and gives your child the optimal
protection. The headrest must be adjusted so
that there is a space two fingers wide between
the headrest and your child’s shoulders.
To adjust the height of the headrest to fit your
child:
6.11.1 Pull the headrest height adjuster and
headrest at same time.This unlocks the
headrest.
6.11.2 You can now move the unlocked
headrest to the desired height. As soon as you
release the adjustment ,the headrest will lock
into place.
6.11.3 Place the child seat on the vehicle seat.
6.11.4 Have your child sit down in the child
seat and check the height. Repeat this process
until the headrest is at the optimal height. If in
the lowest position the headrest is still too
za nisko za wysoko prawidłowo
instruction
instruction
6.10 Adjusting the headrest in 5-point harness
installation
A correctly adjusted headrest ensures optimal
protection for your child in the safety seat:
The headrest must be adjusted so that the
shoulder belts are at the same level as your
child’s shoulders.
0-36kg
CAUTION! The shoulder belts must not run
behind the back of the child or at ear height or
above the ears.
The shoulder belts are adjusted as follows:
6.10.1 Loosen the shoulder belt of the child
seat as much as possible see 6.8.2
6.10.2 Pull the headrest height adjuster and
headrest at same time, select the correct
height of the shoulder belts and engage it in
the position that fits for your child by releasing
the adjuster.
6.11 Adjusting the headrest in Vehicle belt
installation
A correctly adjusted headrest ensures that the
diagonal seat belt section is optimally
positioned, and gives your child the optimal
protection. The headrest must be adjusted so
that there is a space two fingers wide between
the headrest and your child’s shoulders.
To adjust the height of the headrest to fit your
child:
6.11.1 Pull the headrest height adjuster and
headrest at same time.This unlocks the
headrest.
6.11.2 You can now move the unlocked
headrest to the desired height. As soon as you
release the adjustment ,the headrest will lock
into place.
6.11.3 Place the child seat on the vehicle seat.
6.11.4 Have your child sit down in the child
seat and check the height. Repeat this process
until the headrest is at the optimal height. If in
the lowest position the headrest is still too
za nisko za wysoko prawidłowo