Obel Mito ON DEMAND 64 Specification sheet

INSTALLATION
USE
MAINTENANCE
COFFEEGRINDER
MITO ONDEMAND
ENGLISH
Rev. 18/04

INSTALLATION
USE
MAINTENANCE
3
Contents
Foreword and general instructions
3
Rules for installation, use and cleaning
3-4
Technical data
5
Installation
6
Commissioning
6
Use of the coffee grinder
6
Starting up the machine
7
Grinding cycle
7
User level programming mode
7-8
Technician reading and programming mode
8-9-10
Data preset
10
Maintenance
10-11
Troubleshooting
11
Wiring diagram
12
Wiring diagram PERFORMANCE
13
Instructions on disposal
14
Read carefully the advice in this handbook as it provides important indications regarding safety
during installation, use and maintenance.
Make sure to store this handbook for future reference.
This appliance has to be exclusively for the use it has been designed for: ANY OTHER USE IS TO
BE CONSIDERED INAPPPROPRIATE AND THEREFORE DANGEROUS.
The manufacturer shall not be considered as responsible for any damages deriving from
inappropriate, wrong and unreasonable use.
Operating any electrical appliances requires some fundamental rules to be carefully observed, i.e.:
•Do not touch the appliance with wet hands or feet
•Do not use the appliance with bare feet
•Do not pull the power cord to unplug the appliance from the socket
•Do not expose the appliance to atmospheric agents
•Children should be supervised to ensure that they do not play with the appliance
•This appliance can be used by children aged from 8 years and above and persons with
reduced physical, sensory or mental capabilities or lack of experience or knowledge if they
have been given supervision or instruction concerning use of the appliance in a safe way
and understand the hazards involved.
•Cleaning and user maintenance shall not be made by children
Before performing any cleaning or maintenance, unplug the appliance, either by removing the plug
from the socket or disconnecting the main electrical supply.
In case of failure or malfunctioning, turn the appliance off and avoid fixing it directly. For any
maintenance operations please exclusively address an authorized OBEL SRL technical center
Foreword and general instructions

INSTALLATION
USE
MAINTENANCE
4
requesting exclusively original spare parts to be used.
Failure to comply to what stated above may result in lower safety levels and loss of warranty
coverage. If this appliance will no longer be used, we recommend making it inactive by unplugging
the power cord.
Before performing any cleaning or maintenance, unplug the appliance, either by removing the plug
from the socket or disconnecting the main electrical supply.
Installation must be performed in accordance to the indications provided by the Manufacturer. A
wrong installation may lead to damages or injuries to people, animals and objects, which the
Manufacturer shall not be considered as responsible for.
Once the packaging has been removed, please make sure that the appliance is intact. In case of
doubt do not use the appliance and address an authorized OBEL SRL technical center.
Packaging parts (plastic bags, foam, nails, etc…) must not be left within children’s reach as they
might be hazardous and bust not be disposed of.
Before plugging in the appliance make sure that its technical features are suitable for the electrical
system it is going to be used on. If the socket and the plug (if fitted) are not compatible please have
the socket replaced with a suitable one, making sure that the diameter of the cord is suitable to the
appliance power absorption. In case of cord replacement it is compulsory to use a H07RN-F
compliant cord.
Make sure that the power supply matches the one the appliance has been designed for and that the
existing wiring can bear the absorption of the newly installed appliance, as well as of the existing
devices. After installing a circuit-breaker with fuses, connect the cord wires of the appliance to the
circuit breaker in accordance with the related schematics.
The Manufacturer advises against using adaptors, multiple sockets and cord extensions. If
necessary, use simple or multiple adaptors only and extensions in compliance with the safety laws
and regulations, making sure not to exceed power loads, indicated on simple adaptors or cord
extensions and maximum load indicated on multiple adaptors.
The electrical safety of this appliance is guaranteed only if it is properly connected to an earth socket,
as per the most up to date electrical safety laws and regulations. Please have this relevant safety
feature carefully checked and, in case of doubt, please have qualified personnel checking the
existing power wiring.
The Manufacturer shall not be considered as responsible for any damages occurring when the
appliance is not properly earthed.
To avoid dangerous overheating, we recommend fully unwinding the power cord. The user must not
replace the power cord. If the cord is damaged, or have to be replaced, address an authorized OBEL
SRL technical service.
Make sure the appliance is unplugged when not in use. Open the circuit breaker the appliance is
connected to, when not in use. Do not close or block vents or heat dispersion slits. Keep the
appliance away from walls and other objects.
Care is need when handling burrs during cleaning or during other maintenance operations.
CLEANING OF THE APPLIANCE
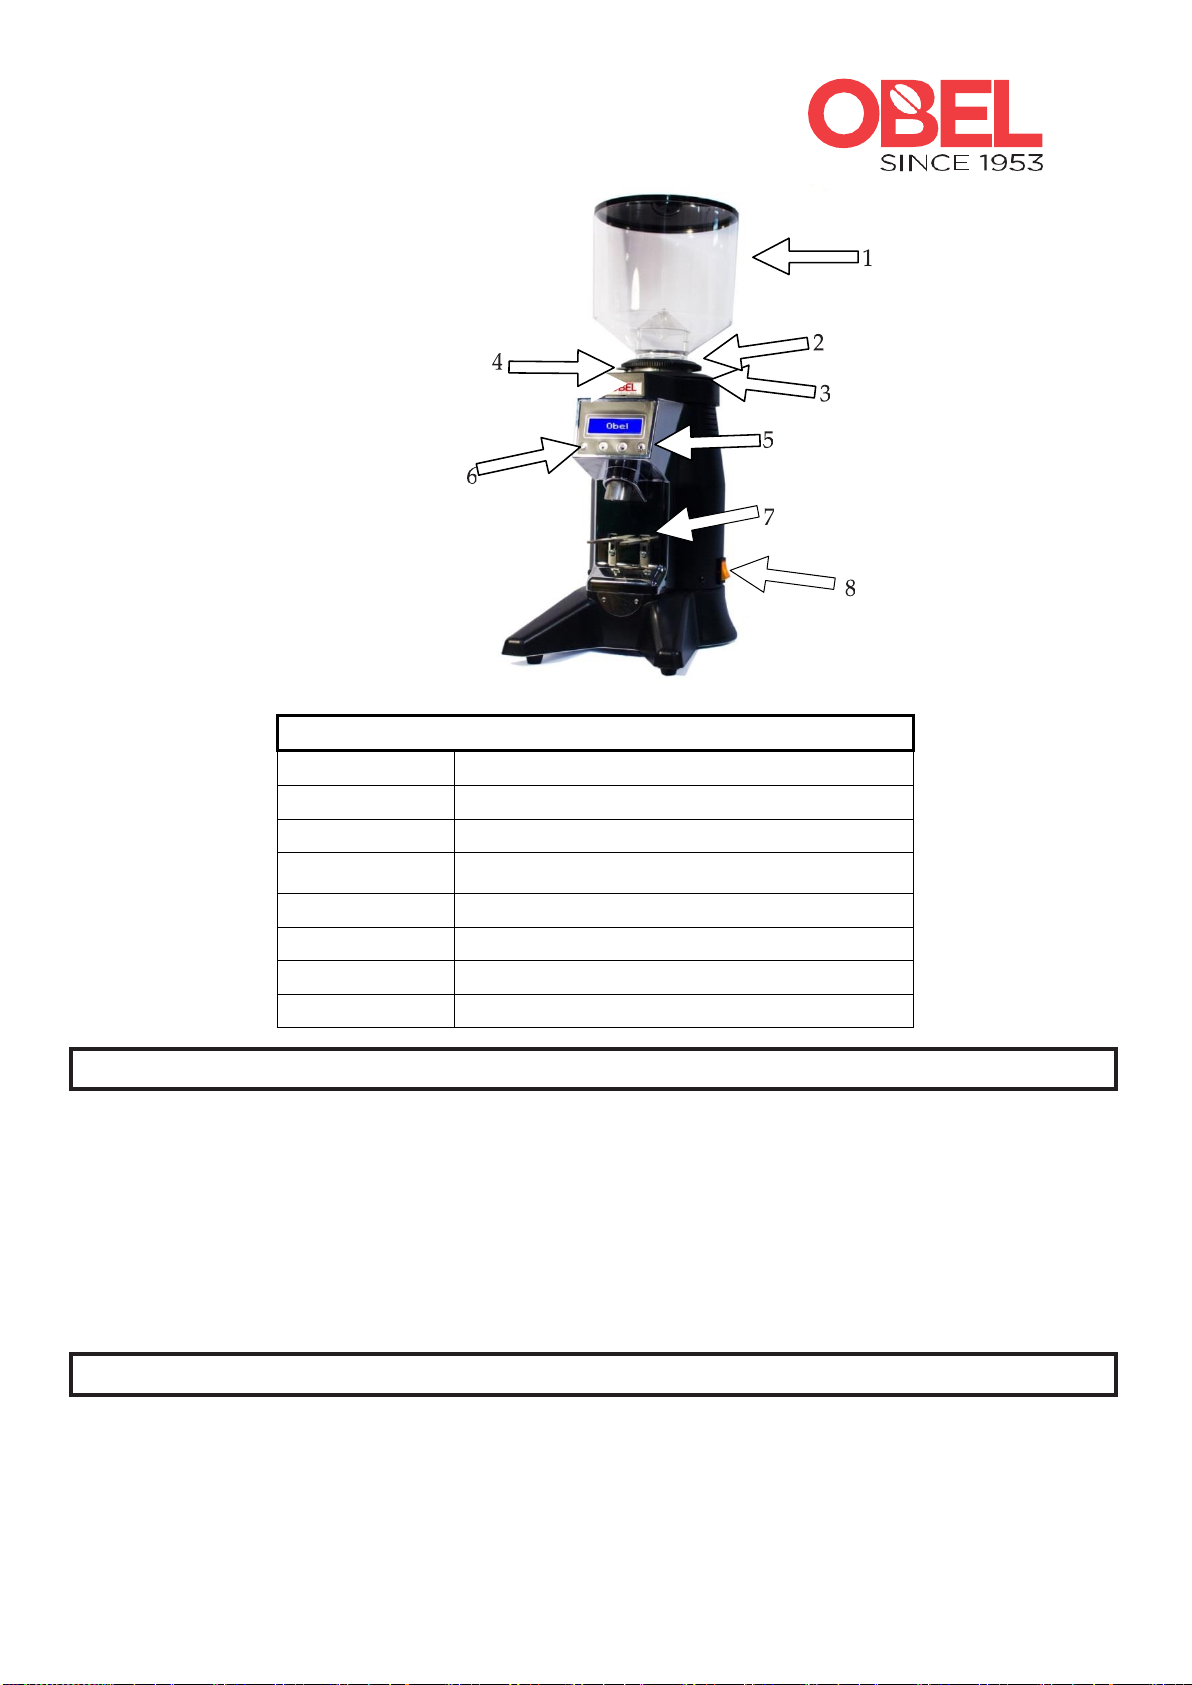
HOPPER:
Close the hopper slide gate, remove the hopper and empty it from the remaining coffee beans.
Clean the hopper with a moist soft cloth or with a small amount of water and soap to eliminate
any oily residue.
GRINDING CHAMBER:
Rules for installation, use and cleaning

INSTALLATION
USE
MAINTENANCE
5
Close the hopper slide gate, remove it and grind the remaining coffee in the grinding chamber.
Remove any remaining coffee bean from the bean hopper. Put the recommended grinder
cleaning product into the bean hopper, put the hopper at its place and open the slide gate in
order to allow the product to enter the grinding chamber. Grind all the cleaning product at a
medium coarse grind setting until nothing remains in the grind chamber.
Clean the hopper and refill it with coffee beans.
Discard the first 2-3 doses of coffee to assure that no residual clearing product remains into
the grind chamber.
EXTERNAL BODY:
Wipe with a dry or slightly damp soft cloth.
DO NOT SUBMERGE THE GRINDER IN WATER OR USE POWER WHASHING DEVICES
DO NOT CLEAN THE APPLIANCE WITH A WATER JET.
ENVIRONMENTAL CONDITIONS FOR AN APPROPRIATE APPLIANCE USE
Room temperature : 5 - 45° C
Maximum humidity : 80% relative humidity
For a correct functioning please carefully follow the instructions provided, having qualified
personnel perform a regular operation and safety check.
Do not use the device without coffee.
Do not leave the appliance where temperature goes below zero.
Mito ON DEMAND 64
Mito ON DEMAND 75
Volt –230 single phase
50/60 Hz
50/60 Hz
1 Amp.
1.8 Amp
Watts: 425
Watts: 570
Operating cycle:
5 sec.ON/30 sec.OFF
Operating cycle:
5 sec ON/30 sec OFF
Motor RPM 1400 max
Motor RPM 1400 max
Burrs ø 64 mm
Burrs ø 75 mm
Hopper capacity 1.5 Kg
Tecnical Data

INSTALLATION
USE
MAINTENANCE
6
Legenda
1
Hopper
2
Slide gate
3
Grinding adjustment gear
4
Grinding adjustment blocking pin
5
LCD
6
Keyboard
7
Filter holder fork
8
Main switch
The appliance has to be installed by qualified personnel in accordance with the below instructions:
•Make sure that the power supply is adequate to the appliance’s power rating and voltage;
Make sure that the socket is properly earthed;
•Insert the bean hopper (1) into the adjusting gear and lock it with the screws (supplied);
•Make sure that the light switch is off (8) and that the plug is properly inserted into the socket.
•For versions equipped with filterholder clip set the right space between the clip and the fork
depending on the height of the filterholder. In addition, set the best distance of the fork (7)
and the coffee outlet in order to optimize the output of the ground coffee.
•Remove the hopper cover, put your coffee beans in the hopper (1) and open the slide gate
(2).
•Start grinding as instructed in the Chapter “Use of the coffee grinder”
•To adjust grinding, press the locking pin (4) and turn the adjusting gear clockwise to bring the
burrs closer for finer grinding.
INSTALLATION
INSTALLATION

INSTALLATION
USE
MAINTENANCE
7
•Turn it anti-clockwise to move the burrs further apart for coarser grinding.
WARNING
The coffee grinder is equipped with a safety device preventing the motor from overheating. Should
the safety device set in, wait for the system to cool down and make sure that the overheating is not
caused by external sources.
The PERFORMANCE version is equipped with a cooling fan managed by a temperature probe in
order to avoid overheating.
The cooling fan will start working when the temperature of 40°C is reached. The said temperature
fixed can be modified by the programming menu.
Grinding grade adjustment is to be performed while burrs are running
.
KEY
FUNCTION
PROGRAMMING FUNCTION
USER and TECHNICIAN
programming mode
Selection and edit data
ON / OFF appliance
Exit programming mode
Start single dose grinding
Decrease value (-)
Start double dose grinding
Increase value (+)
Starting up the machine
Press the main switch (8) to start up the system.
The machine turns on or off depending on its status at the time the main switch is pressed.
The machine is not ready when it is off (connected to the mains but OFF).
You need to press to turn ON the machine and start grinding. When the machine is ON this
appears on the display:
To turn the machine off (OFF- STAND-BY) simply press .
Grinding cycle:
Press to start a single dose grinding cycle. Press to start a double dose grinding cycle.
When the timer ends, the motor is deactivated and you can start a new grinding cycle. You can
USE OF THE COFFEE GRINDER

INSTALLATION
USE
MAINTENANCE
8
stop a grinding cycle in progress before the timer has ended by pressing the dose key of the
relative cycle or the key.
You can start continuous grinding by pressing and holding and at the same time for about 3
seconds. Press the key to stop grinding.
User level programming mode
The machine needs to be ON for entering user level programming mode.
Press and hold the key for about 5 seconds until this message appears:
Press the key to enable editing the grinding time for dose 1 (single dose). The second line of
text on the display starts blinking.
Push the key to decrease the set value, or the key to increase it.
Press and hold the or keys to decrease or increase the value more quickly. Once you
have set the required value, press the key to save it in the memory. The new value is shown on
the display (no longer blinking). For example:
Press or to select the menu for editing dose 2 (double dose). This appears on the screen:
Press the key to enable editing of the grinding time for dose 2 (double dose). The second line
of text of the screen starts blinking.
Press the key to decrease the set value, or the key to increase it.
Press and hold the or key to decrease or increase the value more quickly. Once you have

INSTALLATION
USE
MAINTENANCE
9
set the required value, press the key to save it in the memory. The new value is shown on the
display (no longer blinking). For example:
Range of programmable value (for both “single” dose 1 and “double” dose 2):
min: 0 seconds max: 50 seconds step: 0, 1 seconds
Please note: setting the value at “0” disables the grinding cycle for the relative dose.
Once entering the USER programming mode and do not press any of the keys within 60
consecutive seconds, the system automatically exits the programming mode.
You can, however, press the key to exit programming more before the 60 seconds have
elapsed.
Technician reading and programming note
Please note: in TECHNICIAN mode, you can set the language of the text on the display and refer
to the total and
partial counters ofthe grinding cycles for both dose 1 (single) and dose 2
(double).
To enter into the TECHNICIAN level reading/programming mode turn the machine off (OFF-
STAND-BY) by pressinng . This appears on the display:
Press and hold the key for about five seconds until the TOTAL number of cycles for dose 1
appears on the screen, for example:
This parameter identifies the TOTAL number of dose grinding cycles completed by the
machine. This value is not resettable.
You can press the key to switch to the PARTIAL number of dose 1 cycles, for example:
This parameter identifies the PARTIAL number of dose 1 grinding cycles completed by the
machine since the counter was last reset. To reset the partial counter, press and hold the key
for about 5 seconds until this appears:
This procedure works only on PCB versions from 2.0 to 2.5. For previous versions see page 11.

INSTALLATION
USE
MAINTENANCE
10
This procedure reset both single dose and double dose partial counters.
You can then press the key to switch to the TOTAL number of dose 2 cycles, for example:
This parameter identifies the TOTAL number of dose 2 grinding cycles completed by the machine.
This value is not resettable. You can press the to switch to the PARTIAL number of dose 2
cycles, for example:
This parameter identifies the PARTIAL number of dose 2 grinding cycles completed by the
machine since the counter was last reset. To reset the partial counter, press and hold the key
for about 5 seconds until this appears:
This procedure works only on PCB from 2.0 to 2.4. For previous versions read page 11. This
procedure reset both single dose and double dose partial counters.
Press the key to switch to programming of the language of the text shown on the display. For
example, this appears on the display:
Press the key to select another language. The second line of text starts blinking.
Press the or key to scroll through the available languages.
Available options: Italian, French, German, English and Spanish.
Once you have selected a language, press the KPROG key to save it in the memory. The new
language appears on the screen, for example
:
If you enter TECHNICIAN programming mode and do not press any of the keys within 60
consecutive seconds, the system automatically exits the programming mode.

INSTALLATION
USE
MAINTENANCE
11
You can however press the key to exit programming mode before the 60 second have
elapsed
.
SET TO ZERO THE PARTIAL COUNTERS ON PCB RELEASES FROM 1.5 TO 1.10
PCB from 1.5 to 1.10
Turn off the grinder using the main switch (8).
Turn on again the grinder while pressing and at the same time until display shows :
This procedure set to zero the partial counters only (not the total counters) but reset the eventual
indication of BURRS REPLACEMENT.
For other versions (da 2. A 2.4) look at pages 9 and 10.
Data preset
The PRESET function is for setting the timers configured in USER mode and the language set in
TECHNICIAN mode back in their factory (default) values.
To perform the PRESET function, turn on the system using the main switch (8) while pressing and
holding both the and the keys.
This appears on the display:
Turn the system off and then on again at the main switch to restore correct use of the machine.
PRESET (default) DATA:
Duration of grinding for dose 1 (single): 2,5 seconds
Duration of grinding for dose 2 (double): 4,0 seconds
Language used: ITALIAN
Please note: the PRESET function does not reset either the TOTAL or the PARTIAL counters of
doses 1 and 2.
Clean the hopper on a weekly basis.
The only parts to be replaced are burrs: check if they wore out and replace both at the same time
as described here below.
WARNING:
Before performing any maintenance operation, make sure that the coffee grinder is unplugged.
Always replace both burrs.
Burrs replacement :
•Set in the hopper closure
MAINTENANCE
RESET PARZIALI

INSTALLATION
USE
MAINTENANCE
12
•Activate the grinder until no more powder will be dispensed
•Turn off and unplug the grinder
•Remove the hopper by unscrewing it
•Unscrew the lock screw from the grinding adjustment gear.
•Press down the docking rod with one hand and with the other unscrew the burrs housing gear
by turning it anti-clockwise
•Unscrew the 3 burrs docking screws then remove the burrs; make sure to remove any trace
of coffee powder from the burrs housing
•Place and lock a new set of burrs in the housing
•Screw the adjustment gear on the grinder’s body until the burrs touch
•Unscrew the adjustment gear by 5 –10 steps
•Insert and lock the beans hopper
•Plug in the grinder and turn it on
•Open the hopper closure and set up the grinding grade while the grinder is running
Cause
Solution
1. The coffee grinder
does not turn on
1. Plug not in the socket
2. Faulty electronic
control unit
1. Check that the plug is inserted in
the power socket. Inspect the
electric cable.
2. Contact the technical assistance
service
1. The motor does not
run
1. Foreign body between
the burrs
2. Overheating
3. Broken capacitor
1- Unplug the coffee grinder and
unscrew the adjusting screw to
remove the foreign body.
2- Wait for the grinder to cool
down.
3- Contact the tecnical assistance
service
1. Coffee powder
mixed in with larger
fragments
1. Worn burrs
2. Not perfectly flat burrs
1. Replace the burrs
A message automatically appears on the screen when the burrs need to be replaced.
You are advised to contact the assistance service as soon as possible to have the burrs
replaced.
To erase the burrs replacement alert, follow the partial counter procedure depending on the PCB
Version mounted.
MAINTENANCE

INSTALLATION
USE
MAINTENANCE
13
WIRING DIAGRAM

INSTALLATION
USE
MAINTENANCE
14
ItalianoQuesto prodotto è conforme alla Direttivo EU 2002/96/EC.Il simbolo apposto sull apparecchiatura o
sulla confezione indica che I’apparecchiatura, alla fine della propria vita utile, non deve essere trattata
come un rifiuto domestico generico ma deve essere portata in un centro di raccolta differenziata per
apparecchiature elettriche o elettroniche approntato dalla Pubblica amministrazione. Oppure può
essere consegnata al rivenditore al momento dell’acquisto di un’ apparecchiatura nuova equivalente.
l’utente è responsabile del conferimento dell’apparecchio a fine vita alle appropriate strutture diraccolta, pena
le sanzioni previste dalle vigente legislazione sui rifiuti. L’adeguata raccolta differenziata per l’avvio
successivo dell’apparecchio dismesso al riciclaggio, al trattamento e allo smaltimento ambientalmente
compatibile contribuisce ad evitare possibili effetti negativi sull’ambiente e sul- la salute umana e favorisce il
riciclo deimateriali di cui è compostoil prodotto.Per informazioni più dettagliate Inerenti isistemi di raccolta
disponibili, rivolgersi al ser- vizio locale di smaltimento rifiuti, o al rivenditore in cui è stato effettuato l’acquisto.
Il produttore e/o l’importato- re ottemperano alla propria responsabilità per il riciclo, il trattamento e lo
smaltimento ambientalmente compatibile sia individualmente sia partecipando a sistemi collettivi.
Istruzioni per il trattamento a fine vita
WIRING DIAGRAM-PERFORMANCE

INSTALLATION
USE
MAINTENANCE
15
English This product complies with EU Directive 2002/96/ EC.
The symbol on the product or on its packaging indicates that this product may not be treated as
household waste. Instead it shall be handed over to the applicable collection point for the recycling
of electrical and electronic equipment. By ensuring this product is disposed of correctly, you will help
prevent potential negative consequences for the environment and human health, which could
otherwise be caused by inappropriate waste handling of this product. For more detailed information about
recycling of this product, please contact your local city office, your household waste disposal service or the
shop where you purchased the product.
Deutsch
Dieses Produkt entspricht der EU-Richtlinie 2002/ 96/ EG.
Das Symbol auf dem Produkt oder seiner Verpackung weist darauf hin, dass das Produkt nicht als
normaler Haushaltsabfall zu behandeln ist, sondern an einem Sammelpunkt für das Recycling von
elektrischen und elektronischen Geräten abgegeben werden muss. Durch Ihren Beitrag zum
korrekten Entsorgen dieses Produkts schützen Sie die Umwelt und die Gesundheit Ihrer Mitmenschen.
Umwelt und Gesundheit werden durch falsches Entsorgen gefährdet. Weitere Informationen über das
Recycling dieses Produkts erhalten Sie von Ihrer Gemeinde, der Müllabfuhr oder dem Geschäft, in dem Sie
das Produkt gekauft haben.
Français
L’ appareil est conçu et fabriqué pour faciliter sa valorisation, son recyclage ou sa réutilisation
conformément à la directive européenne 2002/96/CEE relative aux appareils électriques et
électroniques usagés (WEEE). Le logo ci-contre apposé sur l’appareil indique que ce pro- duit ne
peut pas être éliminé avec les déchets ménagers non tries. Lorsque vous aurez décidé de vous en
séparer définitivement, il convient de faire procéder à la collecte sélective de cet appareil en vous conformant
au mode de reprise mis en place dans votre commune (collecte ponctuelle des encombrants, déchèterie), ou
en faisant appel au service de reprise proposé par votre distributeur, ou bien, en le confiant à des
organisations caritatives et des associations à but non lucratif.
En vous assurant que ce produit est éliminé correctment, vous favorisez la prévention des conséquences
négatives pour l’environnement et la santé humaine.
Português
Este produto està conforme a directiva EU 2002/ 96/ EC.
O símbolo impresso no produto ou na sua embalagem indica que este produto nao se pode tratar
como lixo doméstico normal. Este produto deve ser entregue num ponto de recolha de
equipamentos eléctricos o electrónicas para reciclagem. Ao assegurarse que este produto è
eliminado correctamente, estarà a ajudar a evitar possíveis consecuencias negativas para a ambiente o
saúde pública que resultaríam se este produto nao fosse manipulado de forma adequada. Para obtener
informaciones mais detalhadas sobre a reciclagem deste produto, por favor contacte o gabinete da camara
municipal da sua cidade ou a Ioia onde comprou o produto.
Español
Este producto está fabricado conforme a la Directiva EU 2002/96/EC. El símbolo colocado en el
aparato o en el embalaje indica que el equipamiento, al fin de su vida útil, no debe ser tratado como
un rechazo doméstico genérico y que debe ser llevado a un centro de recogida selectiva para
aparatos eléctricos o electrónicos de la Administración Pública. También puede ser entregado al
vendedor en el momento de la adquisición de un equipamiento nuevo de características similares. El usuario
es responsable de la entrega del aparato al final de su vida mediante las estructuras de recogida adecuadas,
exponiéndose en caso de incumplimiento a las sanciones previstas en la legislación vigente sobre residuos.
La adecuada recogida selectiva en la posterior expedición del aparato para su reciclaje, su tratamiento y
eliminación, realizado con respeto con el medio ambiente, contribuye a evitar posibles efectos negativos
sobre el medio ambiente y la salud humana y favorece el reciclaje de los materiales de los que está hecho
el producto. Para informaciones con más detalle referentes a los sistemas de recogidas disponibles, pueden
dirigirse al servicio local de tratamiento de residuos, o al vendedor al cual harealizado la compra. El productor
y el importador deberán cumplir sus responsabilidades para el reciclaje, el tratamiento y la eliminación
ambientalmente sostenible bien de forma individual o bien participando de un sistema colectivo de
tratamiento de residuos.
This manual suits for next models
2
Table of contents
Other Obel Coffee Grinder manuals