Oce TDS300 User manual

Océ TDS300
User Manual

Copyright
© 2003 Océ-Technologies B.V. Venlo, The Netherlands
All rights reserved. No part of this work may be reproduced, copied, adapted,
or transmitted in any form or by any means without written permission from
Océ.
Océ-Technologies B.V. makes no representation or warranties with respect to
the contents hereof and specifically disclaims any implied warranties of
merchantability or fitness for any particular purpose.
Further, Océ-Technologies B.V. reserves the right to revise this publication and
to make changes from time to time in the content hereof without obligation to
notify any person of such revision or changes.
Edition 11-2003
Océ-Technologies B.V.
US
This manual contains a functional and task oriented description of the Océ
TDS300 multifunctional digital system release 1.0
Trademarks
Products in this manual are referred to by their trade names. In most, if not all
cases, these designations are claimed as trademarks or registered trademarks of
their respective companies.
Safety information
This manual contains the following safety information:
■Appendix B lists ‘Instructions for safe use’. You are advised to read this
information before you start to use the system. Appendix B includes
technical safety information like safety data sheets.
■Where applicable, cautions and warnings are used throughout this manual to
draw your attention to safety precautions to be taken.
Internet
Check Océ on the internet at www.oce.com for:
■the latest drivers
■product development

3
Contents
Chapter 1
Introduction
The Océ TDS300 8
The Océ TDS300 concept and components 9
The Océ TDS300 printer 9
The Océ TDS300 scanner 9
The Océ Power Logic® controller 10
Océ TDS300 options 10
Océ TDS300 users 12
User interaction 12
The data flow to the Océ TDS300 14
How to turn on and turn off the Océ TDS300 16
Chapter 2
Use the Océ TDS300 to print
Printer operator panel 20
Display 20
Menu level indicator 20
Keys 21
How to turn on and turn off the Océ TDS300 printer 22
Cancel a print 22
Menu structure 23
Media type and size on the printer 23
Manual feed 24
Cut media 25
Print info 27
Print the configuration report 27
Print the menu card 27
Print the demo print 27
Configuration 29
Select a language 29
Network settings 29
Paper series 32
Clear set memory 32
Diagnostic mode 32
Status messages 33
Error messages 34

4 Océ TDS300 User Manual
Menu structure of the printer 36
Chapter 3
Use the Océ TDS300 to copy
Scanner operator panel 38
The keys 39
The display 40
Menu level indicator 41
Copy jobs 42
Turn on and turn off the Océ TDS300 scanner 43
Start the copy process 43
Make copies 44
Number of copies 45
Select the use of roll 1 or roll 2 or manual feed 45
Specify the zoom factor 46
The exposure settings 46
Deliver originals after scanning 48
Enable automatic feed of the original 48
Define settings for the next original 49
Copy on pre-cut sheets 49
Stop a copy job 52
Set synchro or standard cut 52
Adjust the leading or the trailing strip 53
Mirror-image copies 55
Menu structure of the scanner 56
Chapter 4
Install and start Océ Remote Logic® on a workstation
Introduction 58
Installation procedure for MS Windows® systems 59
Installation procedure for Unix systems 61
IBM AIX 62
HP-UX 62
Linux 62
Installation procedure for Other systems 63
Start Océ Remote Logic® on your system 64
Command line parameters 64

5
Chapter 5
Océ Power Logic®: The Settings Editor
Introduction 68
How to start the Océ Settings Editor 69
How to connect to a controller 70
An overview of the Océ Settings Editor 71
General structure 72
Menu bar 73
Top toolbar 73
Left toolbar 75
Settings area 75
Status bar 77
Use the Océ Settings Editor 78
User modes 79
Log on 80
Log off 80
To change the password 81
Automatic logon 81
Language 82
Help 82
How to perform actions from the Océ Settings Editor 82
Key Operator settings 84
System Administrator settings 85
Chapter 6
Printer supplies and maintenance
Media 88
The paper rolls 88
Reload paper 89
How to program media settings 93
How to refill toner 95
Clean the glass platen and the reference roller of the scanner 98
Appendix A
Summary and tables
The Océ TDS300 102
Printer operator panel 103
Scanner operator panel 104
Product specifications Océ TDS300 105
List of available material types and sizes 109

6 Océ TDS300 User Manual
Material types 109
Automatic format selection 111
Summary of standard zoom formats 112
Appendix B
Safety information
General safety information 116
Radio interference 116
Symbols 116
Instructions for safe use 117
Safety data sheet for the Océ TDS300 119
Safety data sheet Océ TDS300 printer 120
Safety data sheet Océ TDS300 printer and scanner 121
EPA Energy Star® 122
Appendix C
Miscellaneous
How to read this manual 124
User survey 125
Addresses of local Océ organizations 127
Index 129

7
Océ TDS300
User Manual
Chapter 1
Introduction
This chapter describes the main features, the options and
the software applications provided with the Océ TDS300
system.

8 Océ TDS300 User Manual
The Océ TDS300
The Océ TDS300 is a wide format, black and white, multifunctional system.
The Océ TDS300 offers a range of print and copy functionality. The system
includes a printer (1 or 2 rolls) a controller and an optional scanner.
[1] Océ TDS300

Introduction 9
The Océ TDS300 concept and components
The Océ TDS300 printer
The Océ TDS300 printer is available with an automatic 1- or 2-roll unit and
manual feed. Use manual feed when you want to print a job on a media type or
size that is not available on one of the paper rolls.
Note: The manual feed is a special slot just above the paper drawers on the
printer. You can insert cut sheet material in this slot, one sheet at a time.Refer
to ‘Copy on pre-cut sheets’ on page 49 on how to copy on pre-cut sheets.
Note: Only use material as specified in ‘List of available material types and
sizes’ on page 109.
The Océ TDS300 printer is a LED printer with a resolution of 600 DPI and a
printing speed of 1.8 A0 or 3 meters per minute.
You can perform a number of activities at the Océ TDS300 printer. You can set
the media type and size, stop a print job or select your preferred language from
the printer operator panel (see chapter 2, ‘Use the Océ TDS300 to print’ on
page 19 for more details).
The Océ TDS300 is delivered with drivers to enable you to print from
AutoCAD®, Windows®or Macintosh®applications.
The Océ TDS300 scanner
The Océ TDS300 scanner supports a wide range of copy activities. It provides
a large number of functions for defining original and copy related settings. You
can specify particular media, feeding and quality enhancement options from
the scanner operator panel. In combination with the Océ TDS300 printer it
forms a powerful productivity tool.
The scanner has different quality modes which are provided by Océ Image
Logic®.
■Green key principle

10 Océ TDS300 User Manual
The Océ TDS300 is easy to use. Press the green key on the scanner operator
panel to start the basic copy jobs. If you have difficult copy jobs, you change
the default copy settings with the help of the other settings on the scanner
operator panel.
The Océ Power Logic®controller
The Océ TDS300 is equipped with a controller to process the print jobs and the
copy jobs. With Océ Remote Logic®you can connect to the controller to define
the default settings for the system.
The Océ Power Logic®controller processes the print jobs and the copy jobs.
■Spool memory
The Océ TDS300 has a spool memory which provides a queuing system for
files you want to print. The spool memory allows many users to send the print
jobs to the Océ TDS300 at the same time. The print jobs are put in the print
queue where they wait to be printed. The job that is put first into the queue is
printed first.
■Network connectivity
The Océ TDS300 controls a number of common network protocols. The Océ
TDS300 can be used in many networks like TCP/IP and Novell®.
Océ Remote Logic®enables you to connect to the Océ Power Logic®
Controller from a remote workstation.
Océ Settings Editor The Océ Settings Editor allows you to set the default
settings of the Océ TDS300 according to your companies requirements.
Refer to ‘Océ Power Logic®: The Settings Editor’ on page 67, for complete
information about the Océ Settings Editor application.
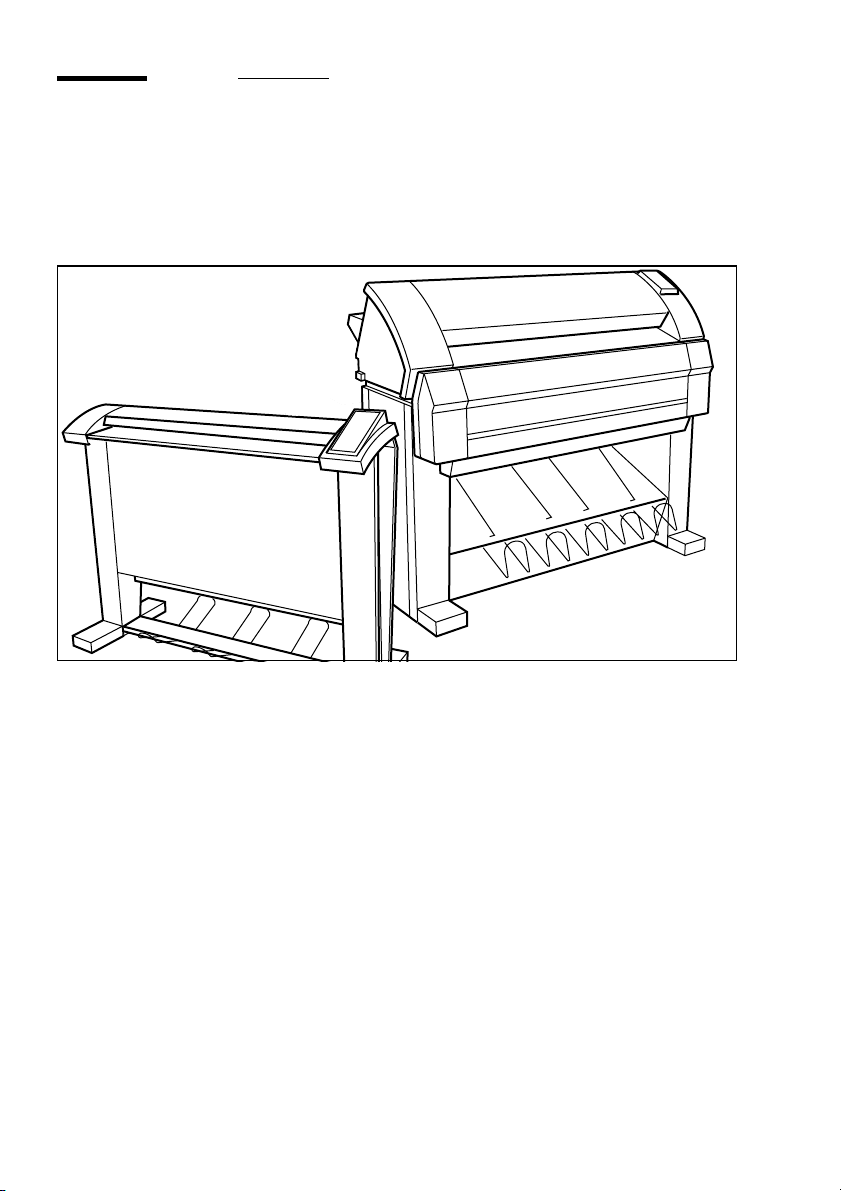
Océ TDS300 options
By default, the Océ TDS300 has an automatic 1 roll unit and is equipped with
a receiving tray as the output delivery device. The receiving tray is the rack on
the bottom of the printer (see figure 1 on page 12).
Automatic 2-roll unit The Océ TDS300 is available with an automatic 2-roll
unit. Each of the rolls can be loaded with print material of a different size or

Introduction 11
type. The size and type of the available media are indicated on the operating
panel.
Adobe®PostScript®3/PDF The Océ TDS300 fully supports Adobe®
PostScript®3 for all supported languages.
Océ Print ExecTM LT Océ Print ExecTM LT is optional software to create and
submit your print jobs.

12 Océ TDS300 User Manual
Océ TDS300 users
The Océ TDS300 has the following user types:
System administrator The Océ TDS300 system administrator installs and
makes the configuration for Océ TDS300. The system administrator defines
the printer-language settings, pen settings and Automatic Language Sensing
(ALS) settings. The system administrator can help the users who need to install
the printer drivers on their workstations. See chapter 6, ‘Printer supplies and
maintenance’ on page 87 for complete information. The configuration
information is in the Océ TDS300 Connectivity Manual provided with the Océ
TDS300.
Key operator The Océ TDS300 key operator is responsible for the daily
maintenance of the Océ TDS300. The key operator replenishes toner when
necessary, loads media as needed and defines the default printer settings for
recurring print jobs. Also, the key operator defines all time settings, such as
panel time out and sleep mode time out. See ‘Océ Power Logic®: The Settings
Editor’ on page 67 for more information.
Repro operator The repro operator is responsible for the daily operations on
the Océ TDS300. The Repro Operator has no rights to change settings in the Océ
Settings Editor.
Anonymous user Typically, an anonymous user on the Océ TDS300 can be
either a PC user who has remote access to the system through one or more
drivers (Windows®driver, AutoCAD®HDI or PostScript®), through Océ
Remote Logic®, or through job submission applications. It can also be a user
performing a copy job at the scanner.
User interaction
You can operate the Océ TDS300 from different locations: local and remote:
■Operator panels
The Océ TDS300 has two operator panels to make the settings for the print
jobs and the copy jobs. See ‘Printer operator panel’ on page 20 and ‘Scanner
operator panel’ on page 38 for complete information.

Introduction 13
■Océ Remote Logic®
Use the Océ Remote Logic®to make the default key operator and system
administrator settings (Océ Settings Editor).
■Printer drivers
With the Océ TDS300 one or more printer drivers can be used, including,
Windows®raster driver for Microsoft Windows®95/98, Windows®printer
driver for Microsoft Windows® 2000®XP, and NT 4.0®, AutoCAD®HDI
driver and Adobe®PostScript®3TM driver. With this software PC users can
access the Océ TDS300 remotely from their applications, to print their files.
More information about installing, configuring and use of the drivers can be
found in the documentation provided with the drivers. All Océ drivers
(except Postscript) can be freely downloaded from the Web at www.oce.com.

14 Océ TDS300 User Manual
The data flow to the Océ TDS300
Connect the Océ TDS300 to a workstation connected to a network. It accepts
different standard format vector and raster data files from the host environment
and converts these into high quality prints (see figure 2).
[2] Data flow to the Océ TDS300
When an Océ TDS300 receives vector, raster, Adobe®PostScript®or PDF
(optional, Adobe®PostScript®3™) data it will generate a print with the
settings as specified in the Océ Settings Editor.
Each print job has remote control commands to indicate the settings for a job.
This so called header contains the job and the file defined settings in Océ Job
Ticket (OJT). The OJT settings overwrite the settings defined in the Océ
Settings Editor. Except for pen settings and job management which have
priority over the Océ Job Ticket settings.
Application
Software
Océ TDS300
Printfile Print
Job
Settings
Print
File

Introduction 15
To compose such a header, you can:
■Compose the header within your application. Please refer to the Océ Job
Ticket (OJT) manual.
■Use a Windows®or AutoCAD®HDI driver to generate both a printable file
(e.g. HP-RTL, HP-GL/2) and the appropriate header with RCF-commands.
Please refer to the Windows®/ AutoCAD®Driver documentation.
■Use the Océ job submission software like Océ Print ExecTM to compose jobs
of printable files in a flexible and user friendly way. Please consult the
on-line help on the Océ Print ExecTM application for detailed information.

16 Océ TDS300 User Manual
How to turn on and turn off the Océ
TDS300
To turn on the system:
■turn on the printer.
■turn on the scanner (see page 43).
■turn on the controller (see page 17)
When you turn on the system, it is ready for operation.
If the system is not in use for more than 90 seconds, the operator panel returns
automatically to the stand-by mode. The operator panel of the scanner is
activated in the following conditions:
■you feed an original
■a key on the operator panel is pressed
▼Turn on the printer
1Set the ON/OFF switch at the rear of the printer to position ‘1’ (see figure 3).
[3] On/off switch of the printer
Note: When ‘Ready’ is displayed on the operator panel, the printer is ready for
use.
1Set the ON/OFF switch at the rear of the printer to position ‘0’ (see figure 3).
2If you switch off the printer during a print job, it is possible that you lose
information or that a paper jam occurs.

Introduction 17
▼Turn on the Océ Power Logic®Controller
1Press the button on the front of the controller, to turn on the controller.
▼Turn off the Océ Power Logic®Controller
1Press the button on the front of the controller, to turn off the controller.

18 Océ TDS300 User Manual

19
Océ TDS300
User Manual
Chapter 2
Use the Océ TDS300 to print
This chapter explains how to print with the Océ TDS300.

20 Océ TDS300 User Manual
Printer operator panel
The operator panel on the right hand side is easy to use (see figure 4). The
panel has keys and a display.
[4] Printer operator panel
Display
The display shows the feedback about print job status and error messages see
page 33 and page 34 in normal mode. In off-line mode it shows the ‘off-line’
menu (see figure on page 36).
Menu level indicator
The menu level indicator indicates the current position in the menu. Press the
Previous key to scroll through the menu.
nästa/välj
föregående
on-line stopp
Stop key
On-line
key
Browse
keys
Next/select
key
Previous
key
Alphanumeric display
Table of contents