manuals.online logo
Brands
  1. Home
  2. •
  3. Brands
  4. •
  5. Ocean Digital
  6. •
  7. Speakers System
  8. •
  9. Ocean Digital ZENO User manual

Ocean Digital ZENO User manual

Bluetooth Home Theatre
Sound System
1 - 15
English
USER MANUAL
ZENO
CONTENTS
1
1.
Contents
...................................................................................................................
1
2.
Getting Started
.......................................................................................................
2
3.
Safety
I
n
s
t
r
u
c
t
i
o
n
s
..............................................................................................
4.
Remote-Control-Buttons and functions
.........................................
5
5.
Front and Back Panel-
Control
and Function .
...............................
.................
..
6.
How and When to Change Batteries
............................................................
8
7.
Operating
I
n
s
t
r
u
c
t
i
o
n
s
......................................................................
............
.
8.
Specifications
......................................................................................................
14
3-4
6-7
9-13
Description:
The ZENO is a compact table top 3.1 speaker systems with wireless
Bluetooth connectivity and surround processing. The superior surround
technology is accomplished using a proprietary analog signal processing
chip operating with a special algorithm based on Natural Audio Processing
which preserves all the directionality and clarity of the original audio
source while creating an incredible, immersive sound environment
that envelops the listener without adding any artificial artifacts or unnatural,
over-processed effects. The surround performance adapts to
any audio
content, whether pure stereo or surround encoded recording, and works
equally well for any media, including music, movies, and TV.
Any Bluetooth enabled portable device can easily be connected wirelessly
to the ZENO, which also includes an Auxiliary stereo input for all other
sources, including MP3 players, DVD players, set top boxes, TV audio
outputs, laptops, or anything with line level or headphone audio output.
KEY FEATURES
Integrated Analog Audio Processor which
faithfully reproduces the soundstage intended in the original
recordings.
3 listening modes: Music, Movies and News.
Wireless Bluetooth connectivity
3.1 channel system with independent subwoofer volume control
40 W RMS total music power
Small, easy to use remote control
Front panel control buttons
Multicolor RGB LED indicators on front panel
Attractive piano-black glossy finish.
GETTING STARTED
Before attempting to connect, operate or adjust this product,
please read these instructions carefully, and keep this manual for
future reference!
2
SPECIFICATIONS
As
part
of
our policy
of
continuous improvements, we reserve the right
to
make
design
and
specification changes for product improvement without prior notice. The
performance specification figures indicated are nominal values for production units. There
may be some deviations from these values in individual
units.
WARNING: TO REDUCE THE RISK OF FIRE OR ELECTRIC
SHOCK, DO NOT EXPOSE THIS APPLIANCE TO RAIN OR
MOISTURE
1.Caution: To reduce the risk of
electric shock, do not remove cover (or
back). No user-serviceable parts inside.
Refer servicing to qualified personnel.
2. Do not install the equipment in a place
exposed to direct sunlight.
The exclamation mark inside an equilateral triangle is
intended
to alert the user to the presence of
important
operating
and
maintenance
(servicing) instructions in
the
literature
accompanying
the
product.
314
Power Adaptor
100-240V 50/60 Hz
Audio Power 40 W of music power
20 W Internal Subwoofer
Inputs 1 x 3.5 mm auxiliary input
1 x DC input jack 15V
Outputs 1 x USB 5V 1A (Charger only)
Sound Stages Music, Movie, News
Front Panel Power On / Off
Volume +/-
Bluetooth Pairing
Remote Control Power On/Off
Input Select (Bluetooth/AUX)
Sound Stage Select (Music, Movie, News )
Master Volume (+/-)
Subwoofer Level (+/-)
Mute
Construction Plastic and wood with cloth grill
Dimensions 12" x 8.5" x 7" (W x D x H)
(305 x 216 x 178 mm)
Weight
8.4 Lbs (3.8 Kgs)
The lightning flash with arrowhead symbol inside
an
equilateral triangle is
intended
to alert the user to the
presence of
uninsulated
within
the
enclosure, which may be of sufficient
magnitude
to
induce a
risk
of electric shock to
persons.
SAFETY INFORMATION
SAFETY INFORMATION
OPERATING INSTRUCTIONS
1)Sound Stage Settings
The settings are selected using the remote and is indicated the Sound
Stage LED#2.
a) If the selected setting is MOVIE mode, the LED color is Green . This
creates wide sound stage which is ideal for action movies.
b) If the selected setting is MUSIC Mode, the LED color is Yellow. This
creates a Narrow sound stage which is ideal for listening to Music and
watching TV drama.
c) If the selected setting is NEWS Mode, the LED is Off. This setting is good
for listening to News or Dialog
2)Speaker Placement
Do not place objects on either side of the speaker.
3)System Connections
3. Do not install the equipment in a dusty, damp
or poorly ventilated place.
4. To prevent damage to the equipment, please
unplug from the power outlet if not in use.
5. To unplug the equipment, always handle the
power cord using the plug. Do not pull out the
plug by tugging the cord.
6. Place the equipment on the stable surface and
avoid placing other objects on top.
7. Cleaning care: Use a soft, dry cloth for
cleaning. For stubborn dirt, soak the cloth in a
weak detergent solution; wring well and wipe to
remove the dirt. Do not use volatile agents such
as benzene or paint thinner, as they may damage
the surface finish of the equipment.
134
12 5
OPERATING INSTRUCTIONS REMOTE CONTROL - CONTROLS AND FUNCTIONS
Location of controls
Charging Mobile Phone
Power saving mode
Cleaning
Troubleshooting
The USB connector on the rear of the speaker is only for charging battery of
Mobile phone.
It will not play audio from any audio device.
Plug in the USB cable into the USB connector, and the mobile phone / device
will start charging.
If the music is stopped on ZENO and remain for 30 minutes with no music
playing, the ZENO will automatically go into Standby mode to save power.
To clean the exterior surface of your product, you can wipe it using a soft,
dry cloth.
Do not use solvents, chemicals, or sprays
Do not allow liquids to spill or objects to drop into any openings.
The Paired Bluetooth device will not connect
1. Turn the ZENO off and back on.
2. Remove the “ZENO” from the pairing list on your Bluetooth device.
Then pair the device and the ZENO again.
Cannot pair the ZENO with my Bluetooth device
1. Make sure ZENO is discoverable. Press and hold the Pairing button
until the Bluetooth indicator, LED #3, slowly flashes.
2. Make sure the Bluetooth is enabled on your Bluetooth device.
3. Your Bluetooth device may be out of range – make sure the distance is
within 10 meters.
4. If there are many Bluetooth devices on your list of your device, please
try removing some of the devices and pair with ZENO again.
5. Turn the ZENO off and back on
1. Power
2. Mute
3. BT - Bluetooth mode
4. Music,Movie,News
5. Aux-in
6. Bass - / Bass+ - Adjusting the bass level
7. Volume - / Volume+ - Adjusting volume level
Aux-in
Bass-
V- V+
Bass+
MovieMusic News
12
3
5
4
6
7
FRONT & BACK PANEL CONTROLS AND FUNCTIONS
1. Speaker 9. Speaker
2. LED indicator
3. Standby
4. Pairing 12. DC Socket
5. Volume 13. USB 5V OUT for charging
6. Volume +
7. Speaker
8. Remote sensor
OPERATING INSTRUCTIONS
116
To pair additional devices
Adding another source AUX IN
To add a source
Volume Level
Bass Level
With the Bluetooth device and the ZENO speaker both turned On, press the
Pairing button once to disconnect your paired Bluetooth device. The blue
LED #3 will turn off, then press the Pairing button until LED #3 flashes Blue,
and is ready to be discoverable again. Follow the steps above "To Begin
pairing with a Bluetooth device".
You can connect the ZENO with your other audio device, such as a portable
digital music player. This requires an audio cable with a 3.5mm plug to
connect with the AUX input on the ZENO. For audio devices with dual
stereo RCA connectors, use an adapter that converts from RCA to 3.5mm.
Plug in the 3.5 mm Line In cable to the audio device and the other end to the
AUX connector at the back of ZENO.
Press the AUX-IN button on the remote control, and LED #1 on the unit will
change to Purple color.The AUX IN mode is now ready. You can play the music
from the external audio device.
Adjust the master volume level by pressing the Volume Up (V+) or the Volume
Down (V-) button on the unit or remote control.
Similarly adjust the bass level by pressing the Bass+ - or Bass - button on the
remote control.
Note: Holding the Level buttons will continuously adjust the level, until the
minimum or maximum range is reached.
11. Aux-in
10. Power ON/OFF
14. Speaker
15. Sub Woofer
OPERATING INSTRUCTIONS FRONT AND BACK PANEL - CONTROLS AND FUNCTIONS
To Begin pairing with a Bluetooth device
1. Press the Power on/off switch at the rear side of the Zeno to power it on,
then press the Standby button to turn on the ZENO.
The LED will change to Blue.
2. Hold and press the button on the unit until the LED #3
starts flashing in Blue. You will hear a beeping tone. It is now
ready for Bluetooth connection.
3. Make sure your Bluetooth device has the Bluetooth enabled. After
scanning starts, select the name on the list of discoverable devices.
4. When the Bluetooth is connected, it will show next to
the name ZENOof on the list and you will hear a beep.
The LED #3 on ZENO will light up in Blue and remain steady On.
5. If your Bluetooth device asks for a passkey, enter digits 0000 (four
zeros) or 1234 and press OK. Some devices may ask you to accept
the connection.
6. Your Bluetooth device indicates when pairing is complete, and you
will hear a tone from the ZENO speaker. The LED #3 turns to
Blue and remain steady On while connected.
To connect a previously paired device
Normally, a previously paired device will automatically connect
when ZENO is turned On. Otherwise, simply select
"ZENO" on the list of the Bluetooth devices to connect. When
the ZENO speaker is connected with the Bluetooth device, the
LED #3 will be illuminated in steady Blue.
Note: The ZENO can only connect with ONE Bluetooth device
at one time. Please always disconnect with the existing Bluetooth
device before connecting to another one.
10 7
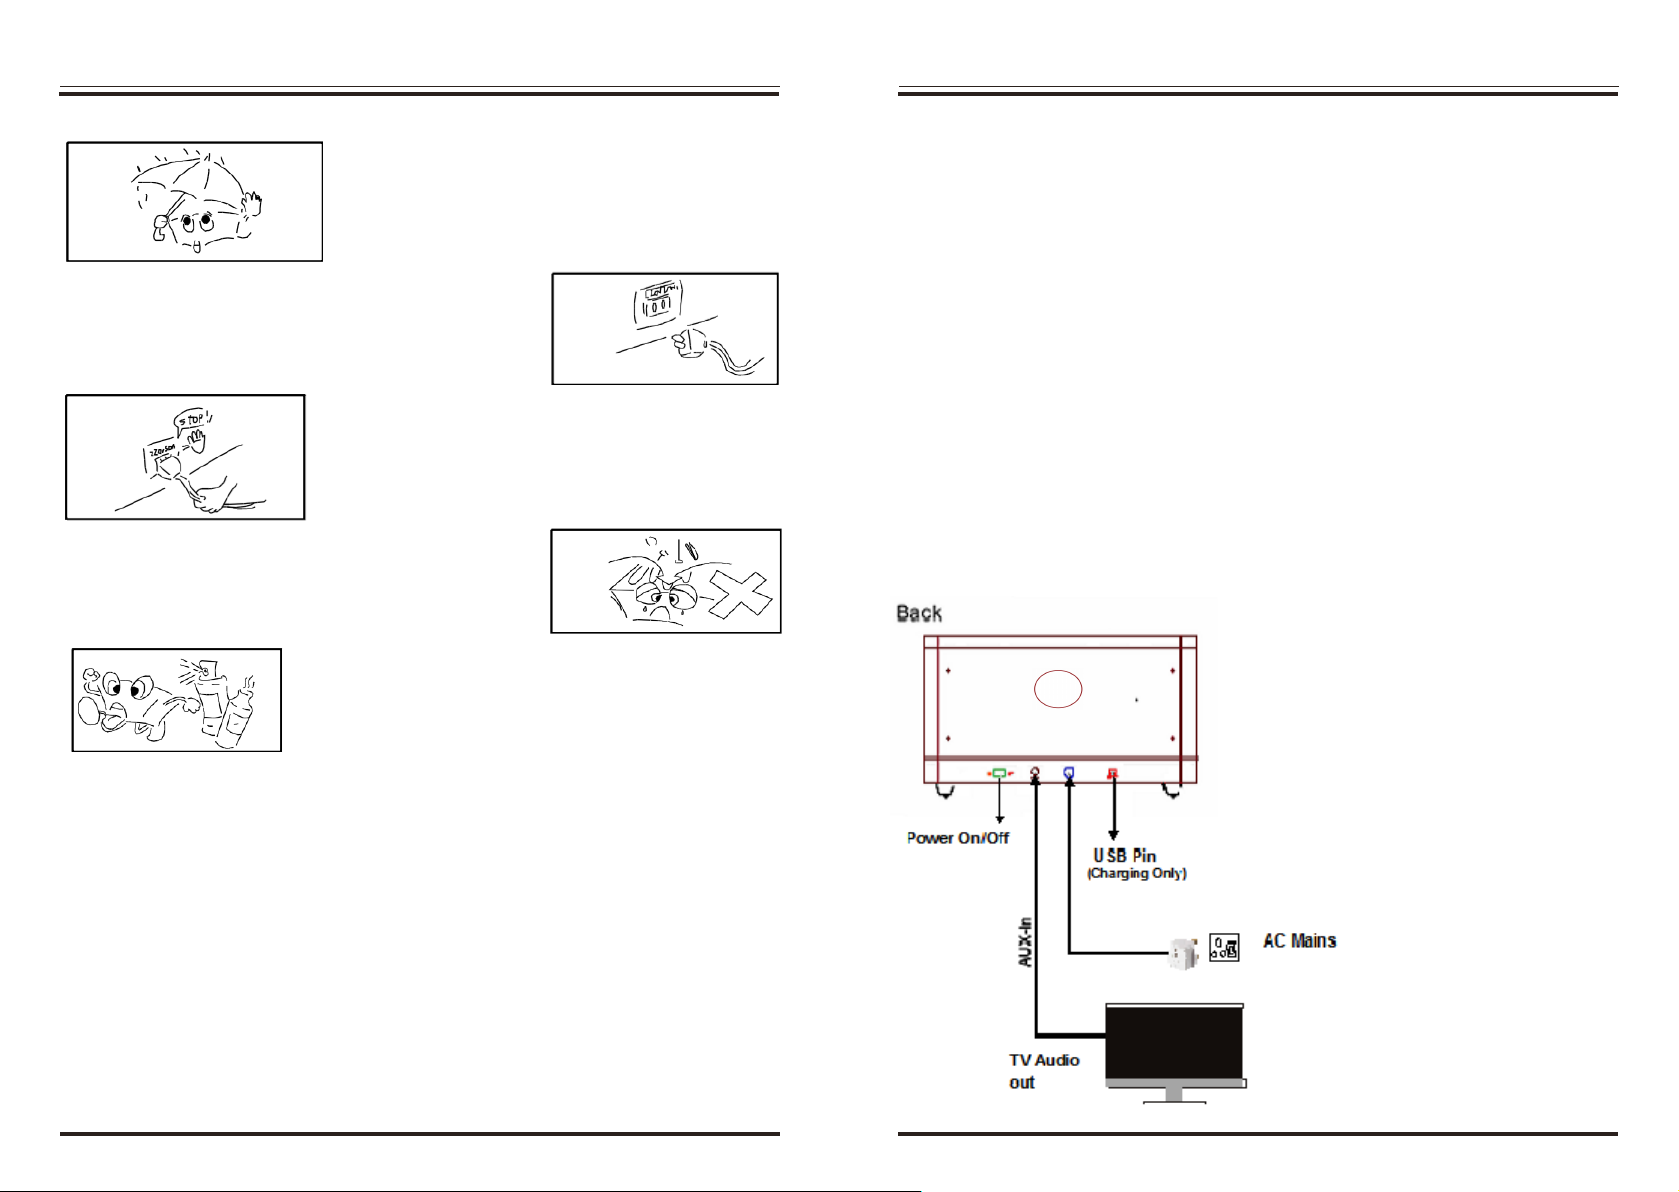
A. Connecting to AC power
To use the ZENO, connect the external AC power adaptor.
1. Connect one end of the AC adaptor pin to the DC jack on the rear
panel. Plug the other end of the AC power plug into the wall socket.
2. Switch the Power to ON using the ON/OFF switch on the rear panel.
LED #1 will illuminates in Red and the ZENO will be in Standby
mode.
3. Press the Standby button on the front panel or the Power button on
the remote control. LED #1 will change from Red to Blue and
LED #2 will be Yellow, and LED #3 will be off.
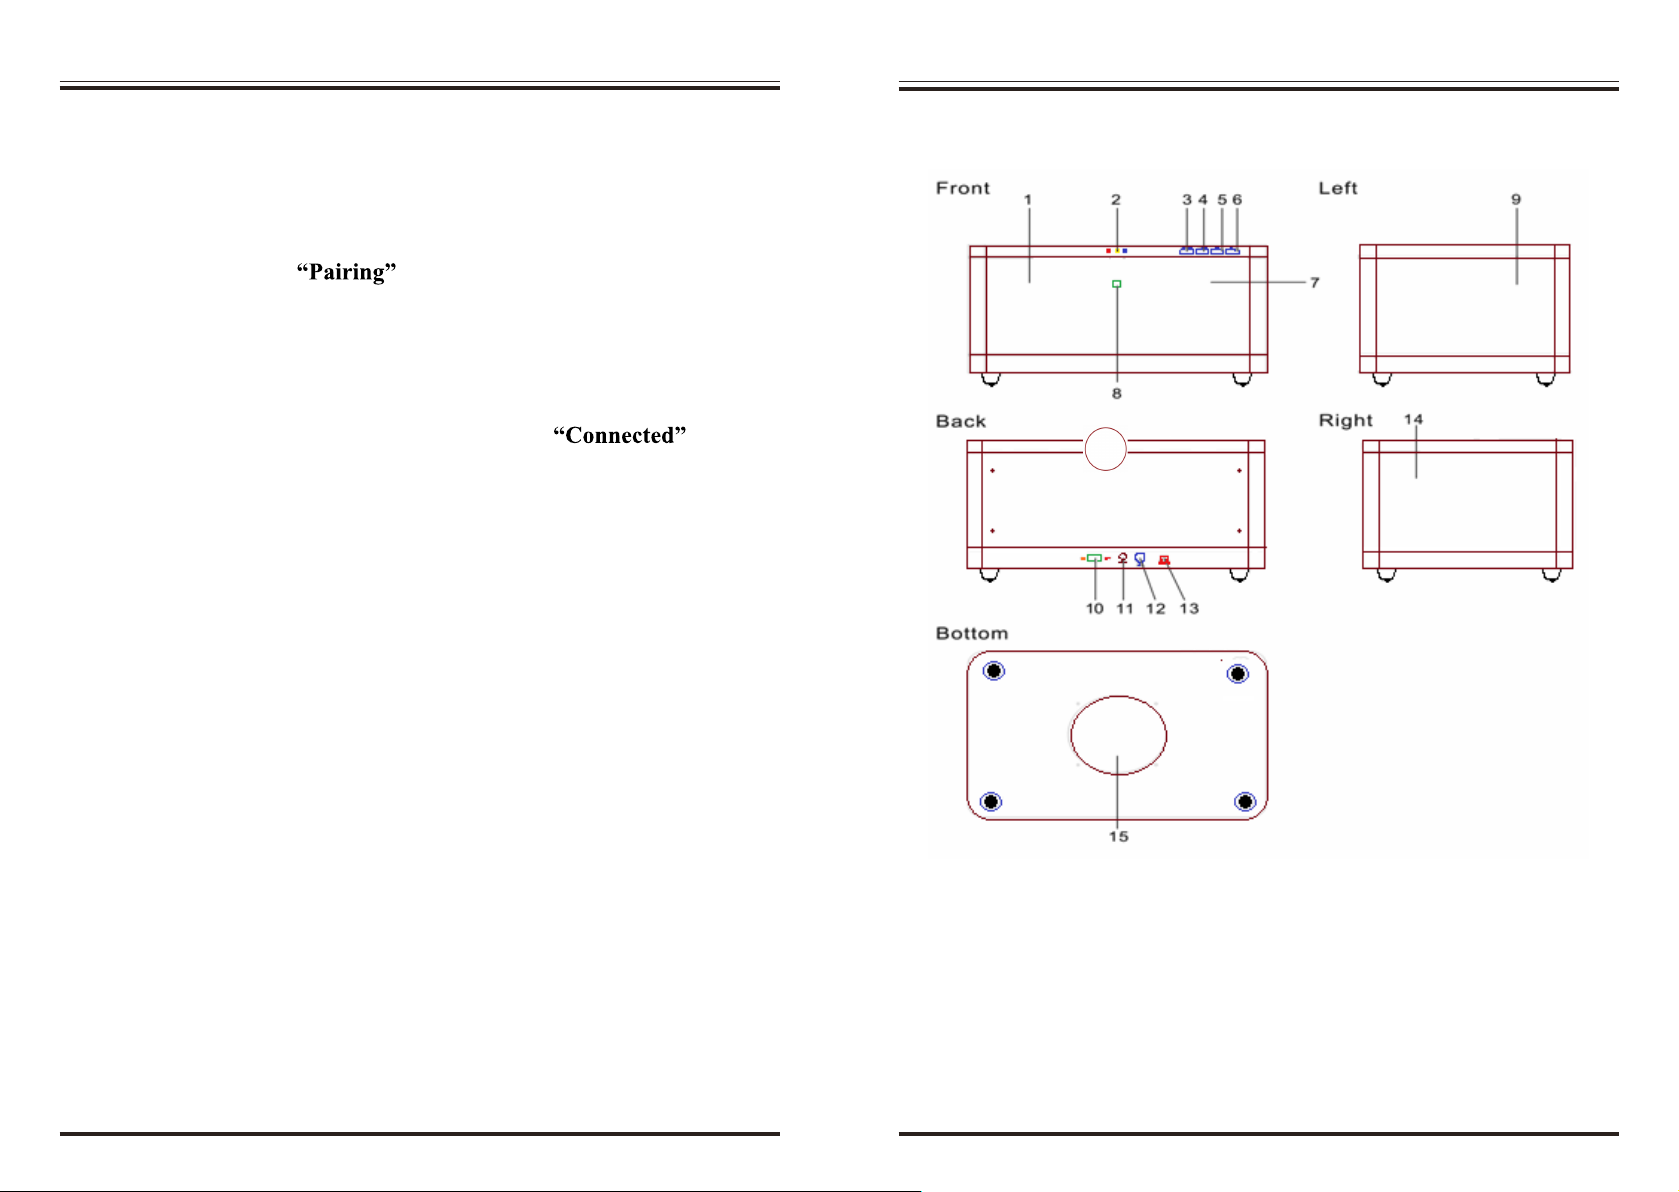
B. LED STATUS INDICATOR
The LED indicators, located at the centre of the top cover will illuminate
to indicate when a source is activated.
8 9
HOW AND WHEN TO CHANGE BATTERIES OPERATING INSTRUCTIONS
1. Insert Batteries:
2. When to change the batteries:
Insert one CR2025 Lithium button cell battery into the battery compartment.
Make sure the battery is inserted with the “+” side facing down.
Notice: Do not throw the remote control down on the ground or tread on it.
Remove the battery from the remote control when it’s not in use for an
extended period or during Shipment.
The remote control has an operating range of up to 7 meters and effective
left or right operating angle of 30 degrees away from the system. If the
remote does not work within these specifications, make sure that nothing is
blocking the line of sight between the remote and the remote sensor. If the
line of sight is clear yet the remote does not function properly, change the
battery.
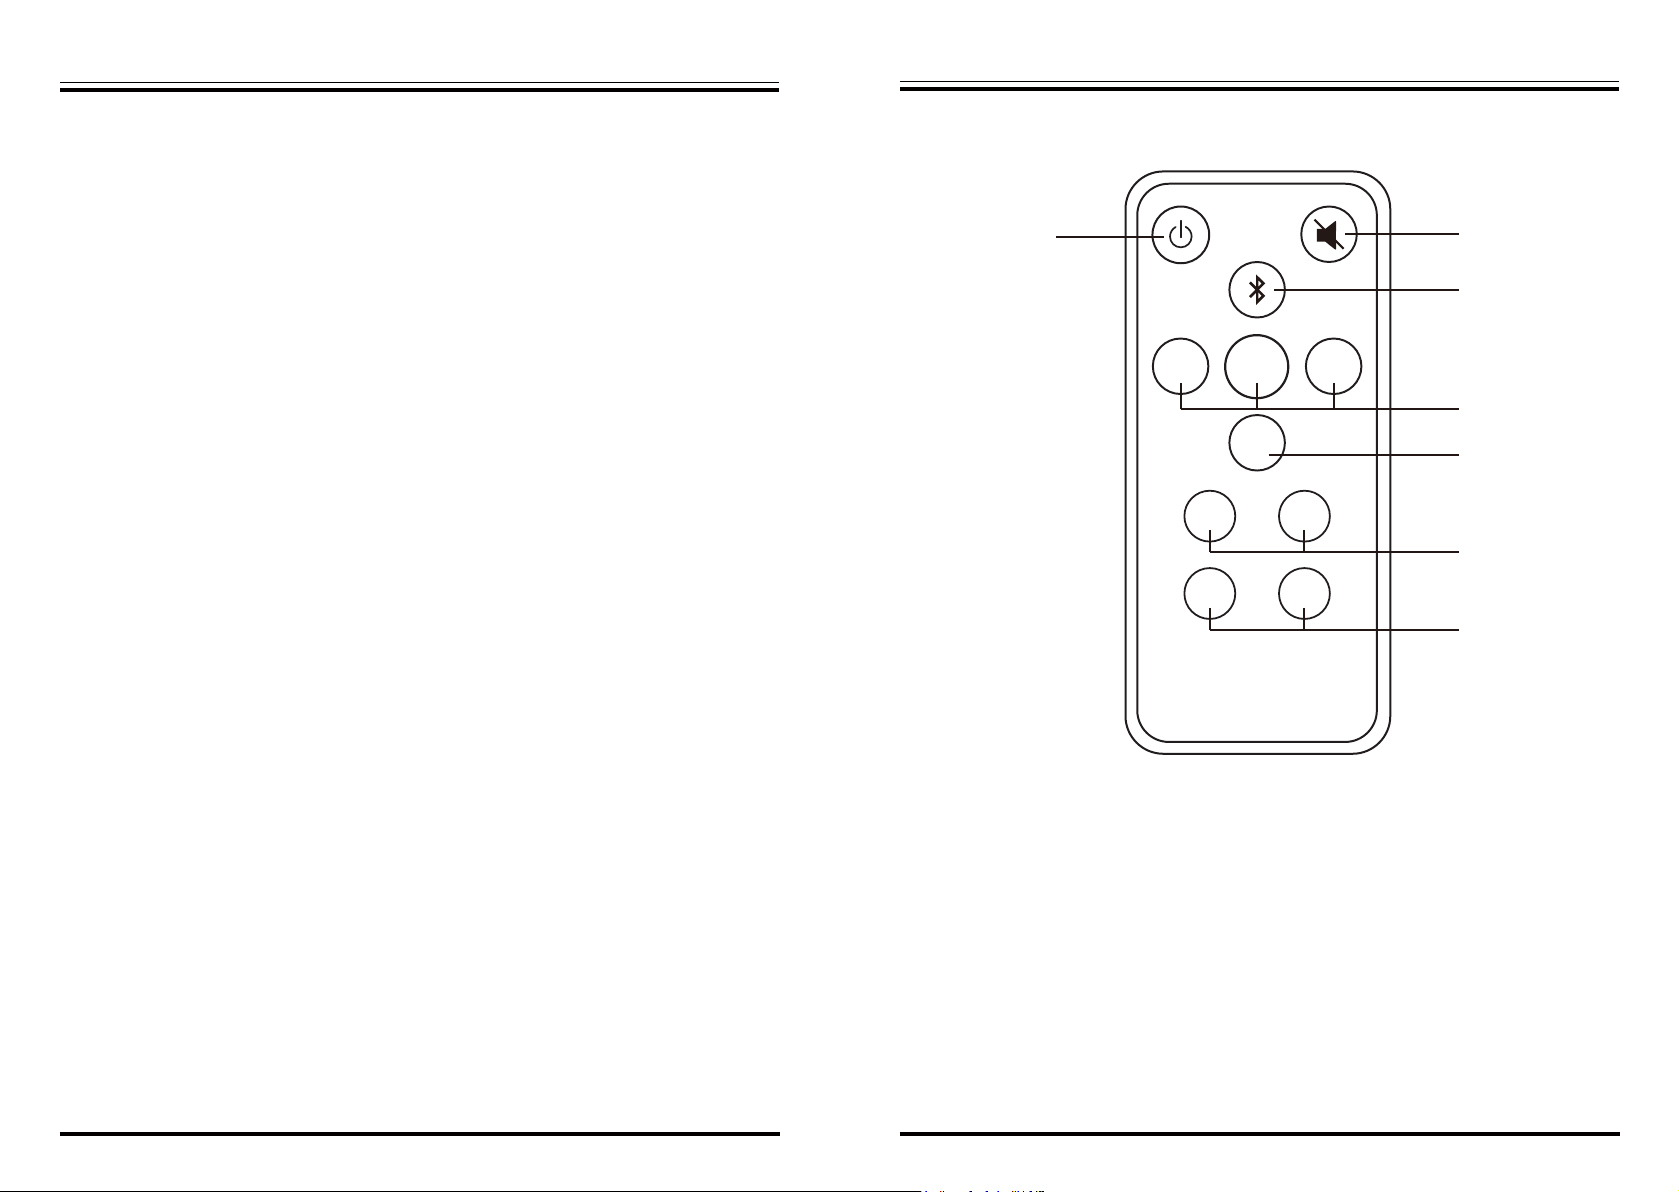
Zeno Front Panel Multi-color LED’s
1. LED #1 (left) shows the operating mode
RED : Standby
Blue : Bluetooth selected
Purple : AUX IN selected
2. LED #2 (center) shows the Sound Stage mode
Green : Movie Mode ( maximum )
Yellow : Music Mode ( Normal )
Off : News Mode ( Off )
3. LED #3 (right) indicates Bluetooth function
Steady Blue : Bluetooth Connected
Flashing Blue : Bluetooth pairing
Off : Disconnected

Popular Speakers System manuals by other brands

Atlas LED ALA10T installation instructions

Atlas LED

Atlas LED ALA10T installation instructions

iLive ITB283B user guide

iLive

iLive ITB283B user guide

Philips 8000 Series user manual

Philips

Philips 8000 Series user manual

iHome iHome iDL48 Operation instructions

iHome

iHome iHome iDL48 Operation instructions

Kogan KASBRBT21A quick start guide

Kogan

Kogan KASBRBT21A quick start guide

Kenwood AS-5 instruction manual

Kenwood

Kenwood AS-5 instruction manual

Yamaha NS-B20 owner's manual

Yamaha

Yamaha NS-B20 owner's manual

Pheanoo D2 manual

Pheanoo

Pheanoo D2 manual

LG SoundPlate LAP340 owner's manual

LG

LG SoundPlate LAP340 owner's manual

Samsung HW-R450 user manual

Samsung

Samsung HW-R450 user manual

Behringer Eurolive B1220DSP user manual

Behringer

Behringer Eurolive B1220DSP user manual

MEREDO D47CH-6 user manual

MEREDO

MEREDO D47CH-6 user manual

Electro-Voice DeltaMax DMC-1122A owner's manual

Electro-Voice

Electro-Voice DeltaMax DMC-1122A owner's manual

LG SoundPlate LAP250H Service manual

LG

LG SoundPlate LAP250H Service manual

Sanyo DC-DA380 Service manual supplement

Sanyo

Sanyo DC-DA380 Service manual supplement

Pioneer S-RS55TB operating instructions

Pioneer

Pioneer S-RS55TB operating instructions

Bose 201 Series owner's guide

Bose

Bose 201 Series owner's guide

LG QP5W Simple manual

LG

LG QP5W Simple manual

manuals.online logo
manuals.online logoBrands
  • About & Mission
  • Contact us
  • Privacy Policy
  • Terms and Conditions

Copyright 2025 Manuals.Online. All Rights Reserved.