Warning: DO NOT PUT anything such as SANITARY NAPKINS, WET TISSUES, COTTON WOOL, CIGA-
RETTES, MATCHES, CHEWING GUM OR ANY SOLID OBJECT, PETROL, DIESEL, OIL AND SOLVENTS INTO
THE BOWL
3. CLEANING A regular flushing with clean sea-water represents one of the most effective methods to keep the
toilet clean and sweet smelling. - To clean the bowl, use any liquid or cream ceramic cleaner - To clean the rest
of the toilet, including seat and lid, use a non-abrasive liquid cleaner. Then polish with a dry cloth only. Cau-
tion: DO NOT USE ABRASIVE PADS ON ANY PART OF THE TOILET AND DO NOT USE CREAM CLEANERS
EXCEPT FOR THE BOWL
- To disinfect the toilet, use a liquid disinfectant diluted in accordance with the Manufacturer's instructions. It
is possible to apply it to all parts of the toilet using a sponge or a soft brush Caution: DO NOT USE THICK
LIQUID TOILET CLEANERS OR NEAT BLEACH because they might damage the valves, gaskets and seals. - After
applying any cleaning or disinfecting agent, always flush well Caution: DO NOT ALLOW THESE AGENTS TO
STAND IN THE SYSTEM. - THROUGH-HULL FITTINGS You will need a 19 mm. (3/4“) bore seacock for the flush-
ing water inlet and, if you are discharging overboard, a 38 mm. (1 1/2") bore seacock for the waste outlet.
- Keep to the seacock manufacturer's ' instructions concerning materials and methods of installation Ensure that
the inlet seacock is positioned where it will be below the waterline at all times when the craft is under way and
also ensure that any outlet seacock is both aft of, and higher than the inlet seacock
4. PIPEWORK - selection of the correct method: You must select the correct installation method for the inlet
pipework from 2 possibilities and for the outlet pipework from 4 possibilities, according to whether the toilet
is above or below the waterline and to whether it discharges the waste overboard or into an onboard holding
tank.
4.1 General instructions for all Possibilities You will need a spiral reinforced smooth bore flexible hose for both
the 19 mm. (3/4“) internal diameter inlet and the 38 mm. (1 1/2") internal diameter outlet hose and a stainless
steel hose clip.
- secure the hose runs so that the hoses cannot move, nor exert any leverage action on the hose tail fittings to
which they are connected, as this may cause adjacent joints to leak - avoid sharp bends in the hoses since this
might cause them to become kinked - keep all pipework lengths as short as possible while you are carrying out
these operations - unnecessary inlet or outlet hose lengths just make the toilet harder to pump - should it be diffi-
cult to fit the hose onto the hose tails of the toilet or the seacocks, soften the hose by dipping its end in hot water
Caution: DO NOT APPLY FLAME TO HOSES DO NOT APPLY FLAME OR HEAT TO THE PLASTIC HOSE TAILS
OF THE TOILET DO NOT APPLY SEALING COMPOUNDS TO ANY HOSE CONNECTION
- Secure all hose ends to the hose tails with stainless steel clips, ensuring that all inlet connections are airtight
and that all outlet connections are watertight - The discharge elbow may be rotated 360 deg. to suit your instal-
lation. Always slacken the 2 securing screws, adjust the discharge elbow to the required position and retighten
the 2 securing screws before connecting the hose to it Caution: FAILURE TO FOLLOW THIS PROCEDURE MAY
CAUSE LEAKS BETWEEN THE ELBOW AND THE PUMP CYLINDER
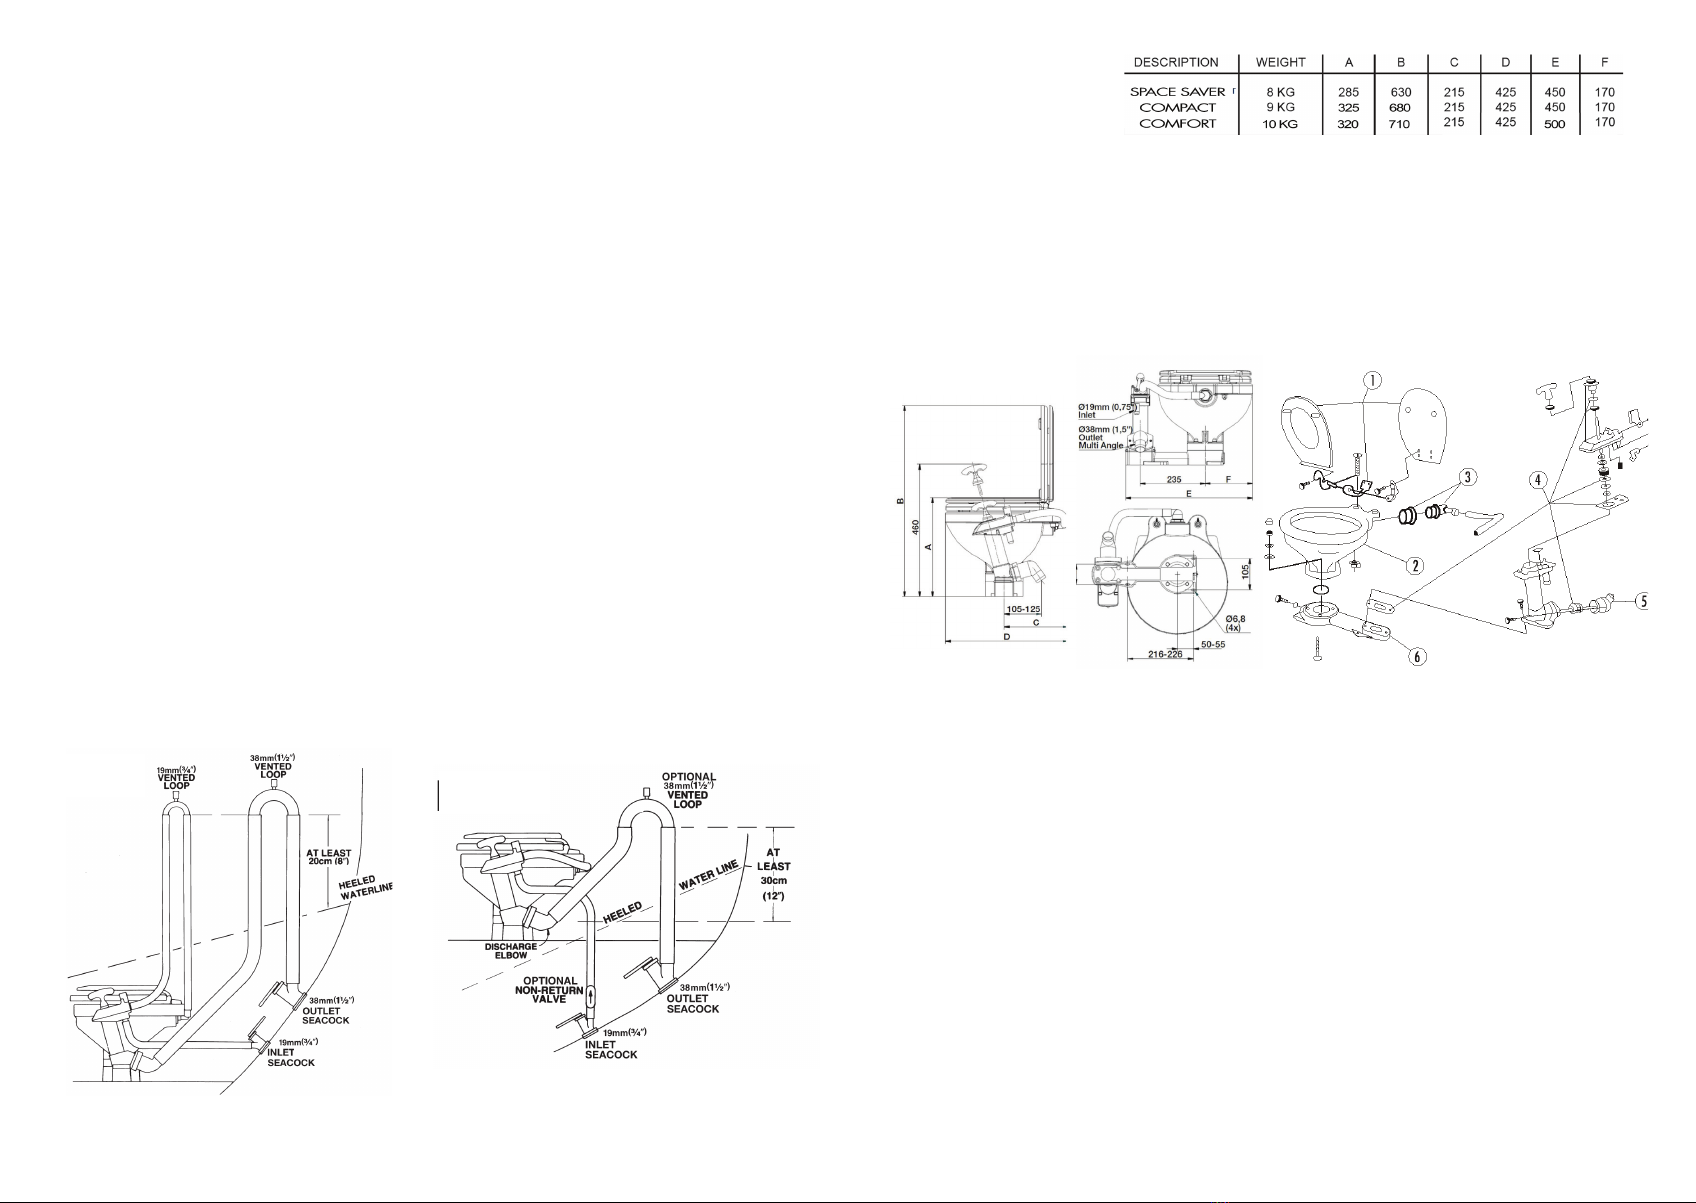
4.2 Toilet below the waterline: You will need a 19 mm. (3/4“) Vented Loop fitting.
- run the inlet hose by the most direct way from the inlet seacock to the flushing pumpt inlet tail - remove the
white hose supplied with the toilet which connects the flushing pump outlet tail to the bowl elbow - using a
spanner, rotate the intake seal so that the elbow points upwards - replace the white hose with a longer length of
19 mm. internal diameter hose and position it in a way that its point is at least 20 cm. (8“) above the highest
possible waterline and fit the vented loop at that highest point. Caution: DO NOT POSITION THE VENTED
LOOP BETWEEN THE INLET SEACOCK AND THE FLUSHING PUMP INLET, as it will make the flushing pump
difficult or harder to prime, and could prevent it from working at all. Toilet above the waterline: You may need a
19 mm. (3/4“) non-return valve - run the inlet hose by the most direct route from the inlet seacock to the flushing
pump inlet tail - for your maximum convenience of use, install an in-line non-return valve next to the inlet seacock
which will ensure that the pump stays primed in between usages - the toilet flushing pump will self-prime up to 1
metre (3‘) above the outside water level. If there is any possibility that the toilet flushing pump inlet may be more
that 1 metre (3‘) above the actual waterline when the craft is underway, a non-return valve is to be installed next
to the seacock to maintain the pump in a primed condition
4.3 Toilet below the waterline and discharging overboard: You will need a 38 mm. (1 1/2") Vented Loop fitting
- Arrange the outlet hose,so that its highest point is is at least 20cm.(8')above the waterline, and fit the Vented
Loop in that point
4.4 Toilet above the waterline and discharging overboard: You may need a 38 mm. (1 1/2") Vented Loop
fitting - Run the outlet hose up from the discharge elbow, at least 30 cm. (12') above the discharge elbow. Then
fit a Vented Loop on top of the hose, ensuring in this way to keep some water in the base of the toilet without
risk of it being siphoned away.
4.5 Toilet waste discharging into holding tank. Discharge elbow below top of holding tank at any time: You will
need a 38 mm. (1 1/2") Vented Loop fitting - if the discharge elbow is placed less than 203 mm. (8") above
the top of the holding tank when the craft is at rest, or if there is any possibility that the discharge elbow may be
below the top of the tank at any time, a vented loop must be fitted in the outlet pipework - Place the outlet hose
point at least 203 mm. (8') above the highest level that the top of the tank may reach and install the Vented
Loop fitting on this highest point
4.6 Toilet waste discharging into holding tank, discharge elbow always above top of the holding tank: You may
need a 38 mm. (1 1/2") Vented Loop fitting - Run the inlet hose upwards from the discharge elbow, to form a
loop at least 30 cm. (12") higher than the discharge elbow - By fitting a Vented Loop on top of the hose loop,
you will ensure to keep some water in the base of the toilet without risk of it being syphoned away.
5. TESTING: Refer to the operating instructions and follow the procedures for normal use. In case the flushing
pump is hard to prime, half-fill the bowl with fresh water
6. SAFETY: Ensure that these instructions reach the owner, the skipper or the operator of the craft, as it contains
important safety information. ON COMPLETION OF INSTALLATION: SHUT THE FLUSH CONTROL! CLOSE BOTH
SEACOCKS!
INSTALLATION INSTRUCTIONS
Introduction: If the installation of the toilet results in being connected to any through-hull fitting that may possibly
be below the waterline whether when the craft is at rest or underway or heeling, rolling or pitching, you must in-
stall the toilet in accordance with the present installation instructions. Failure to follow such instructions may cause
water to flood in, which may result in loss of life
ACCIDENTAL DAMAGE: If the toilet is connected to any through-hull fitting and if the toilet or the pipework are
da aged, water may flood in, causing the craft to sink with a consequent possible loss of life. For this reason, if
you are making connections between the toilet and any through-hull fitting that may be
possibly situated below the waterline, fullbore seacocks must be fitted to such hull-fittings, to allow them to be
shut off. The seacocks must also be positioned where they are easily accessible to all users of the toilet. If, for any
reason, it is not possible to do it, then secondary full-bore marine quality valves must be fitted to the hoses where
they are easily accessible. USE SEACOCKS! Caution: USE LEVER OPERATED, FULL-BORE MARINE SEACOCKS
AND VALVES. THE USE OF SCREW-DOWN GATE VALVES IS NOT RECOMMENDED.
PIPEWORK LOOSING: All pipeworks must be fastened both in the gate side and in the remaining ones with a
stainless steel hose clamp. Please keep in mind that an eventual leak might cause the craft to sink, with conse-
quent loss of life. USE HOSE CLAMPS! BOWL RIM BELOW THE WATERLINE: If the toilet is connected to any
through-hull fitting and if the rim of the bowl falls below the waterline, water may flood in, causing the craft to
sink, which may result in loss of life. Therefore, if the rim of the toilet is less than 20 cm. (8“) above the waterline
when the craft is at
rest, or if there is any possibility that the rim of the bowl may be below the waterline at any time, a vented loop
must be fitted in any pipework connected to a through-hull fitting, irrespective of whether inlet or outlet. USE
VENTED LOOPS! Special notes: The smaller bore inlet pipework is more dangerous than the larger outlet one.
Unless there is a ventilated anti-syphon loop in the inlet pipework, water will flow into the bowl whenever both
the inlet seacock is opened and the rim of the bowl is below the actual waterline. Although moving the flush con-
trol lever to the "Shut” position will restrict the flow, this lever cannot be relied upon as a safety device. To make a
loop in the hose without
mounting a vent may be as hazardous as no loop at all, because water will syphon over the loop.
IN FACT, IT IS THE VENT THAT ACTUALLY PREVENTS THE SYPHON
1. LOCATION: The toilet is NOT supplied assembled for a right handed operation. If you wish, both standard
and large bowl models may be reassembled with the pump positioned on the left hand side. ISTRUCTIONS ARE
ON SCREW KIT BAG.
- choose a location which will give enough clearance all around and above the toilet. Ensure that there is room to
operate the pump and that there is access to the drain plug at the end of the base. - the mounting surface must be
flat, rigid, and strong enough to support a man's weight and should be at least 50 mm. (2") wider and 50 mm.
(2") deeper than the base of the toilet. - you will need sufficient clearance below the mounting surface to be able
to secure the mounting bolts. - the seat and the lid should be able to swing open at least 110 degrees, in order
they will not fall forward when the craft heels or pitches. When they are swung open, they must be supported so
that the hinges are not strained.
2. MOUNTING: You will need 4 x 8 mm. (5/16") diameter bolts of length to suit the thickness of the mounting
surface, 4 nuts, preferably self-locking, 8 large washers not more than 21 mm (13/16") diameter, all in marine
grade stainless steel or bronze, and a small tube of silicone sealant. If you do not use selflocking nuts, you will
need some nut-locking compound. - Offer up the toilet in the selected position and, using the holes in the base as
a guide, mark the position for the 4 bolt holes on the mounting surface, remove the toilet and drill 4 vertical holes
of 9 mm. diameter through the mounting surface - Apply a bead of silicone sealant to the outer rim of the base
bottom
- Bolt down the toilet and tighten fastenings securely. If you are not using self-locking nuts, apply a nut-locking
compound to the bolts ( picture 2 and 3)
MAINTENANCE INSTRUCTIONS
INTRODUCTION: Our manual toilets normally do not require maintenance during the season, provided that they
are winterised in the autumn and overhauled in the spring : However, any toilet will benefit from: thorough flush-
ing ( refer to the operating instructions for normal use. Regular use) if not regularly used, lubrication is beneficial (
refer to the operating instructions for the first use)
HAZARD RISK: LEAKS :If the toilet is connected to any through-hull fittings, and if the toilet or the pipework devel-
ops a minor leak, this leak can suddenly become a bigger leak which will allow water to flood in, causing the
craft to sink, with subsequent loss of property and life. So, IN CASE ANY LEAK DEVELOPS, REPAIR IT IMMEDI-
ATELY! MOREOVER, REGULARLY INSPECT ALL FASTENINGS TO CHECK TIGHTNESS AND LEAKS.
1. SERVICING: Preparation. Our manual toilets are user serviceable and no special skills or tools are required to
employ them. - Flush the toilet according to the operating instructions for normal use and particularly ensure that
all waste has left the discharge pipework, that the bowl is empty and that both seacocks are closed (even though
secondary valves are fitted) - Mop-up any water which might come out of the system