Ogo CT-25E User manual


Table of Contents
Table of Contents.............................................................................2
Welcome!..........................................................................................4
Getting to Know Your Ogo..............................................................5
External Parts.................................................................................5
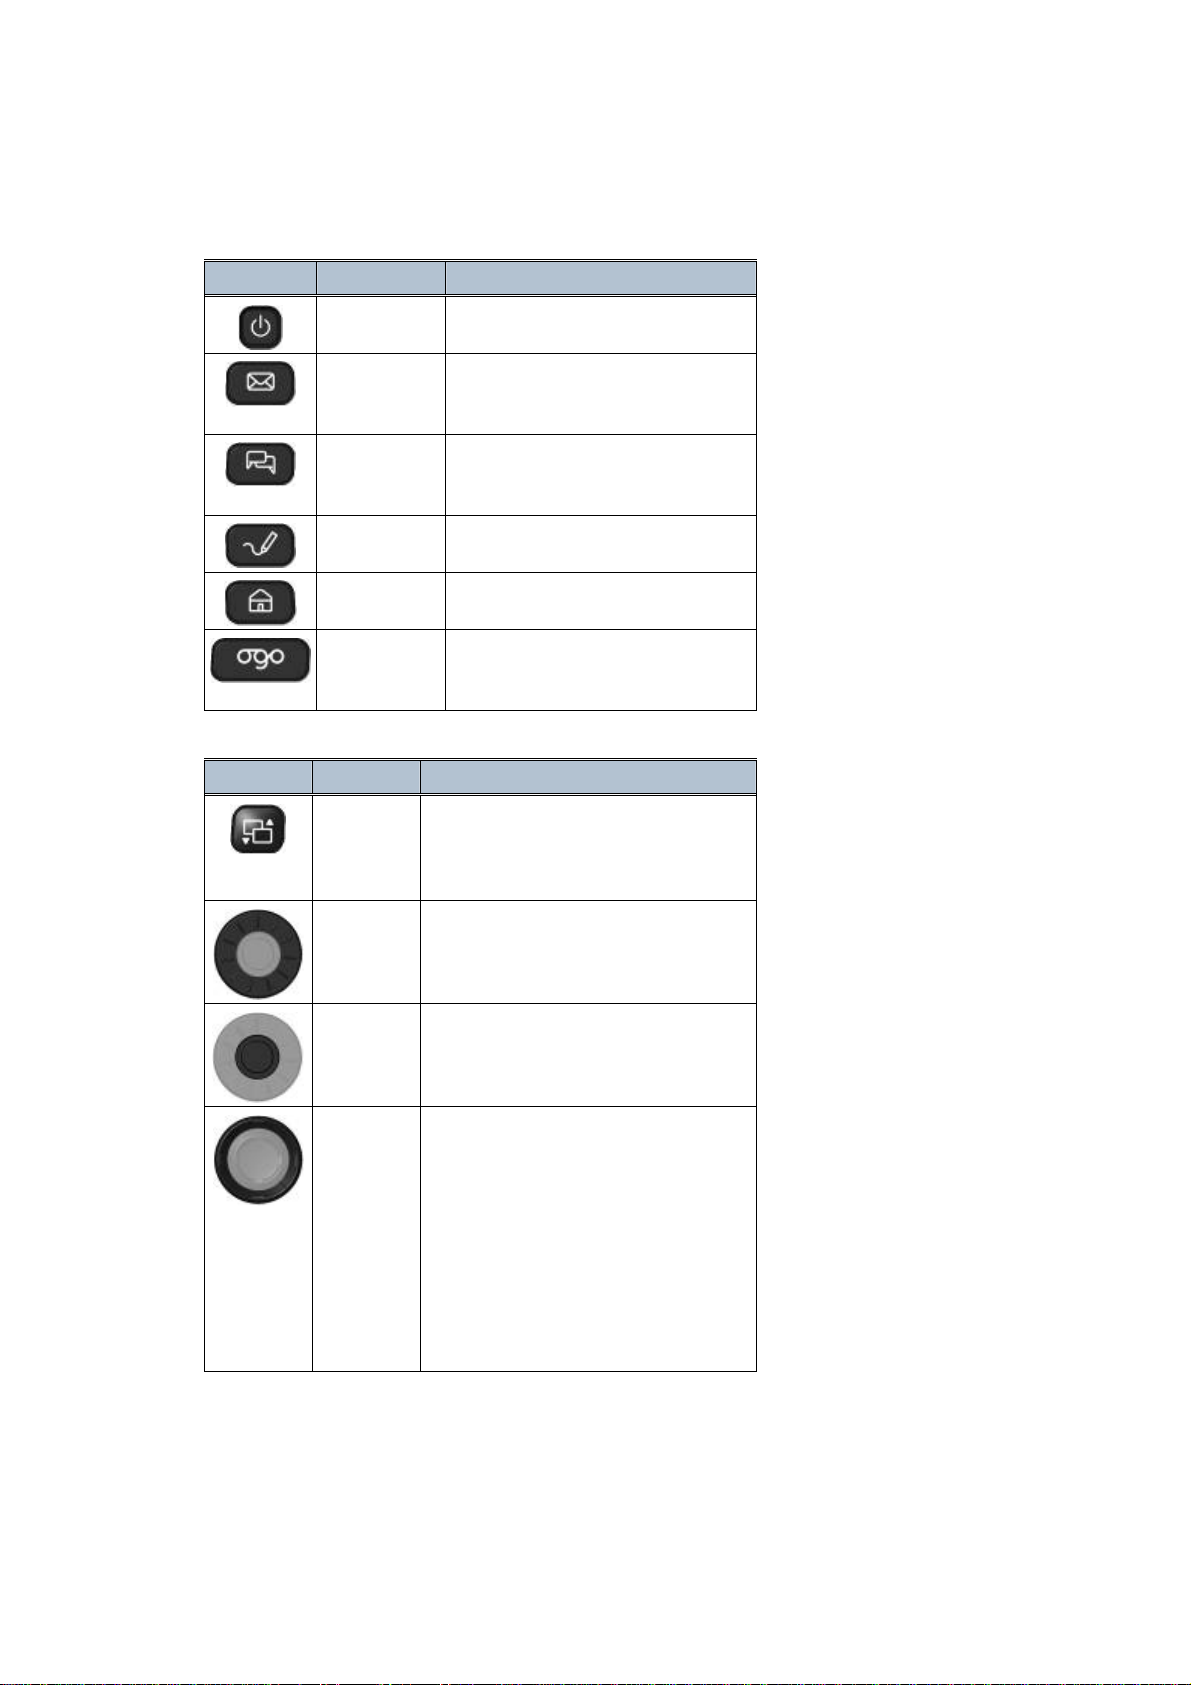
External Keys.................................................................................6
Identifying the Keyboard Functions...............................................7
Shortcut Keys.................................................................................8
Navigation Keys.............................................................................8
Text Keys.......................................................................................9
Getting Started...............................................................................10
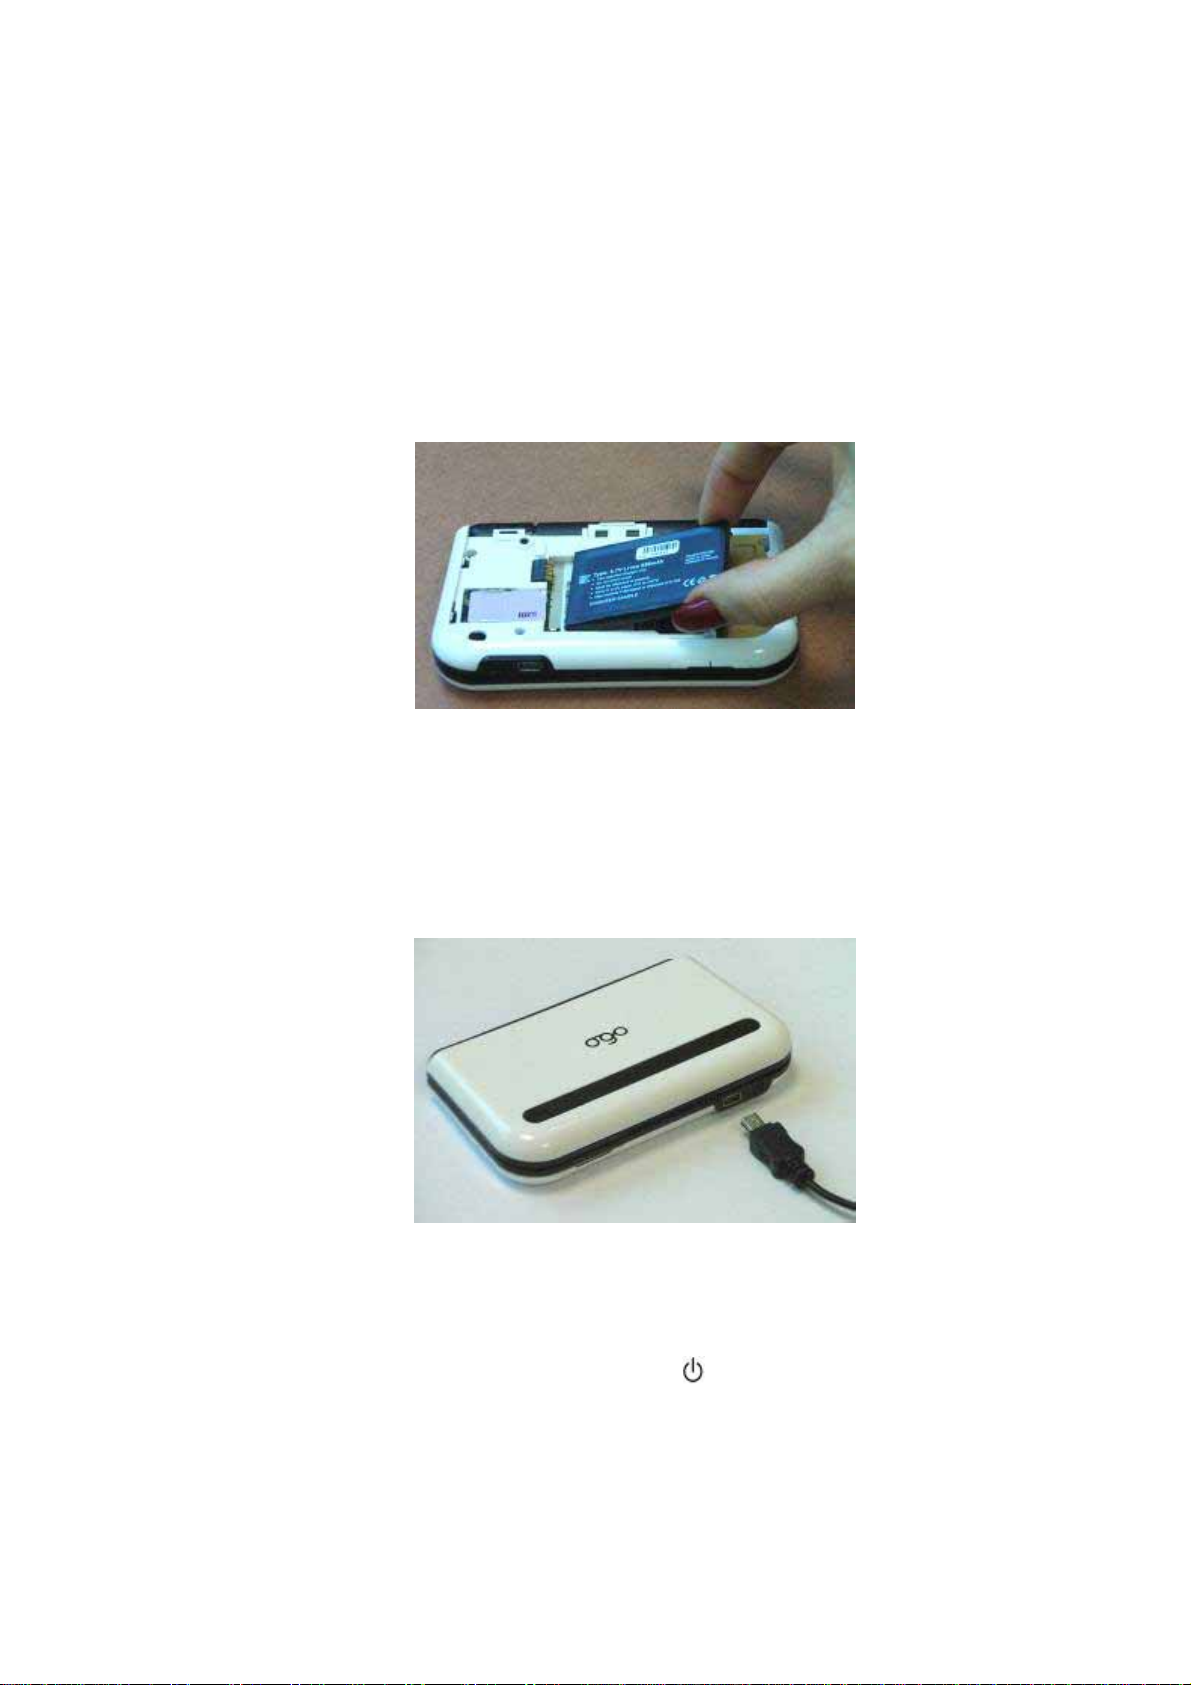
Installing the Battery.....................................................................10
Charging the Battery....................................................................10
Powering On Your Ogo................................................................10
Using the Messaging Wizard........................................................11
Using the Home Screen...............................................................11
Using the Application Selector .....................................................12
Using the Ogo as a Phone...........................................................12
Bluetooth Pairing instructions.......................................................12
Data Sheet.......................................................................................13
Using the Mailbox ..........................................................................15
Accessing the Mailbox..................................................................15
Using the Compose Screen .........................................................15
Saving a Draft of a Message........................................................18
Deleting the Draft of a Message...................................................19
Instant Messaging (IM)...................................................................20
Accessing the IM Screen..............................................................20
Identifying IM Contacts Status Icons............................................21
Reading and Composing IM Chat Messages...............................21
Using the Phone.............................................................................24
Accessing the Phone Screen.......................................................24
Receiving an Incoming Phone Call ..............................................25

Ending a Phone Call ....................................................................26
Muting a Phone Call.....................................................................26
Dialing an Outgoing Phone Call...................................................27
Using the My Status Screen..........................................................29
Accessing the My Status Screen..................................................29
Logging On/Off or Signing In/Out.................................................29
Changing Your IM Status.............................................................30
Adding a New IM Account or E-mail Account...............................30
Removing an E-mail Account.......................................................31
Using the News Screen..................................................................33
Adding News Feeds.....................................................................33
Accessing News Feeds................................................................34
Using the Extras Screen................................................................36
Viewing Games............................................................................36
Viewing Technical Support Information........................................37
Setting Your Preferences ..............................................................39
Accessing the Settings Screen.....................................................39
Setting Phone Preferences ..........................................................40
Setting IM Preferences.................................................................41
Setting E-mail Preferences...........................................................41
Setting Device Preferences..........................................................42
Setting Sounds.............................................................................45
Setting the Time and Date............................................................46
Setting Network Preferences........................................................47
Setting System Preferences.........................................................48

Welcome!
Thank you for joining the Ogo community!
Ogo is all about connecting, creating and sharing with anyone, from anywhere, all the time. You can flirt,
chat, rant or sweet-talk from the bus, the bar or a park bench.
Read on to see how to get started!
For all things Ogo and staying in touch with other Ogolovers, go to http://www.ogo.com.

Getting to Know Your Ogo
Interchangeable Ogo Clip
Volume Keys
External Speaker
External LCD
Earpiece and Microphone
Flip Cover
Main Screen
Call
Key USB Charger
Socket
End
Key
Stereo Speakers
Headphone Socket
External Parts
Part Description
External LCD Displays time, messages and status
information when the flip cover is closed.
Earpiece and
Microphone Lets you conduct a phone call when the flip
cover is closed.
Ogo Clip Can be replaced by any of the Ogo Clip
accessories.
USB Charger Socket Connects to the provided USB cable for
charging the device.
Headphone Socket Connects to the provided headphones

External Keys
Key Name Description
Call Press this key to accept an incoming call
or to switch between the active call and
the call on hold. When no call is active,
press this key to see the list of dialed
calls, or to initiate a call to the highlighted
item.
End Press this key to hang up the active call
or to reject the incoming call.
Vol +
Vol -
Use these keys to adjust the speaker or
headphone volume during a call or to
adjust the ringer volume when no call is
active. You can silence the Ogo by
pressing and holding the Vol - key

Identifying the Keyboard Functions
Figure 1: Ogo Keyboard
Ogo
Options
Application
Selecto
r
Scroll
Wheel
Scroll
Wheel
Button
ALT CAP
Clear
EnterEmoticons
Mailbox Compose Back
Power
On/Off
Instant
Messaging Home
8-way
Key

Shortcut Keys
Key Name Description
Power On/Off Powers your Ogo on and off.
Mailbox Shortcut to your Inbox, where you
can see incoming email and text
messages.
Instant
Messaging Shortcut to the Instant Messaging
screen where you can chat with your
contacts.
Compose For writing a new email or text
message.
Home Returns to the Home screen.
Ogo Displays a list of current chats,
unread and draft email and text
messages.
Navigation Keys
Key Name Description
Applicatio
n Selector Press this key to display the Application
Selector, which enables you to navigate
to any application, from anywhere in the
Ogo.
Scroll
Wheel Rotate the Scroll Wheel in either
direction to change the selection or to
move the text cursor when editing text.
Scroll
Wheel
Button
Press the button in the center of the
Scroll Wheel to select the highlighted
item.
Outer
Arrows Press the:
•Left and right arrows to move
between tabs.
•Up and down arrows to scroll one
page at a time (page up/down).
In a text message, press the:
•Left and right arrows to move to the
beginning and end of a line of text.
•Up and down arrows to move to the
beginning and end of a message.

Key Name Description
Inner
Arrows Press the:
•Left and right arrows to scroll left and
right within a screen or a line of text.
•Up and down arrows to move
between lines in a screen or the lines
of text in a message.
Enter Press this key to activate the highlighted
item on the screen.
Back Press this key to go to the previous
screen. Pressing this key also closes
any element open on top of the main
screen, such as a menu or a pop-up
window.
Options Opens the Options menu for the current
screen, if available.
Text Keys
Key Name Description
Letter
Keys Inserts letters, numbers and other
symbols. A long press on an accented
letter key opens a palette with the
available accented options, such as:
“Ã Ä À”.
Capitalize Shifts the letter keys to capitals. For
example, press CAP and then the A key
to type an uppercase "A". Pressing the
A key without CAP types a lowercase
"a".
Alternate Shifts the letter keys to the symbol
located above the letter on the key.
For example, press the ALT key and
then the A key to insert “&”.
ALT +
Spacebar Pressing ALT together with the
spacebar opens a symbol palette that
enables you to insert special characters
into your email or text messages.
Emoticons Opens an emoticon palette that enables
you to insert emoticons into your text
messages.
Clear Deletes the highlighted item in a list.
Deletes the last character or emoticon
inserted in a text field.

Getting Started
Installing the Battery
1Turn your Ogo over and remove the back cover.
2With the battery label facing up, match the battery contacts with the contacts in the battery slot. Push
the battery in, with the contacts side down first, as shown below:
Figure 2: Installing the Battery
3Push the other side down to slide the battery into place.
4Replace the back cover.
Charging the Battery
Connect the charger's power plug to the charging socket on the front of your Ogo (Figure 3). Charge your
Ogo for 12 hours.
Figure 3: Connecting the Charger
Note: Make sure that the battery has been properly installed before charging or powering on your Ogo.
Powering On Your Ogo
After your Ogo is fully charged, press the Power On/Off key until the startup animation appears on the
screen.

Using the Messaging Wizard
Once your device is powered on for the first time, the Messaging Wizard screen appears. Follow the
instructions displayed by the Messaging Wizard to set up your Instant Messaging and email accounts.
Using the Home Screen
Once you have configured your Ogo with your instant messaging and email accounts, the Home screen
(Figure 4) appears. This is the screen that is displayed each time you power on.
Figure 4: Home Screen
Each icon represents one of the Ogo's applications. Use the arrow keys or the Scroll Wheel to highlight the
desired icon. The name of the application is shown at the bottom of the screen.
Press to open the selected application. You can always return to the Home screen by pressing
Back key ( ) several times.
Tip: To initiate a call, you can start dialing from the Home screen.
The following describes the Ogo applications:
Application Enables you to…
Status bar (top
of screen) See current application and message indications
and device status.
Mailbox Read, write and manage email and text messages.
Compose Write and send email and text messages.
Instant
Messaging (IM) Chat with your IM contacts.
Browser Surf the Web. The Homepage provides useful
Internet functions and services.
News Read latest news via RSS feeds.
Calendar Manage your appointments from a daily, weekly or
monthly view.
Contacts Manage your contacts and to store contacts’
phone numbers, email and other addresses.
Phone Make phone calls, view missed calls and
previously dialed and received calls.

Application Enables you to…
Extras Play games and find contact information to Ogo’s
technical support.
Settings Choose a ring tone, set the date and time and
configure all of the Ogo options according to your
preferences.
Using the Application Selector
From any application you can quickly navigate to another application by pressing the Application Selector
key. A list of applications is then displayed, as shown below:
Figure 5: Application Selector
Use the Scroll Wheel to highlight the desired application and then press the Scroll Wheel's button (or press
) to go there. You can also press the Application Selector key again, to navigate into the sub-menus
of the highlighted application.
Using the Ogo as a Phone
You have several options for using the Ogo as a phone:
•When the flip is closed, hold the device so that the earpiece is next to your ear and the
microphone is placed near your mouth. Accept or Reject incoming calls using the external
keys.
•When the flip cover is open and no headset is connected, your Ogo is in speakerphone mode.
Use the navigation keys to access all phone options.
•Alternatively, you can use the wired headset provided in the package or use any Bluetooth
headset, after pairing it with the Ogo, as described below.
Bluetooth Pairing instructions
To pair a Bluetooth device with your Ogo, navigate to Settings (marked by ), and navigate to the Device
tab. Scroll to the bottom of the tab and press when the item Bluetooth settings is highlighted. In the
displayed window, select Search for devices, after turning on your Bluetooth device. Ogo will scan for
Bluetooth devices and offer you the option to pair after it detects your device.

Data Sheet
QVGA display, stereo speakers & QWERTY keyboard
• Instant Messaging with MSN & ICQ
• Push Email
• Integrated phone
• Multimedia player with removable microSD memory
• HTML Web Browser
• RSS reader
• CDMA2000 1xEV-DO(Rel.0), Dual band, Bluetooth 2.0, optional WiFi(will be tested later not now)
• Contact & Calendar—synchronized OTA, Bluetooth
or USB
• And…OgoClips, keep expanding your Ogo…
IM—MSN and ICQ built–in; other communities can easily
be supported
• Email—push Email supporting POP3, IMAP4, SSL, MS
Exchange server, and MSN Hotmail—supports multiple
Email accounts simultaneously
• Phone application—fully integrated and with speakerphone
• Multimedia—video, music, ring tones and DRM
• Email attachments—Images, PDF, DOC, TXT, PPT and
more, with data traffic optimization
• Java—full support of Java applications
• SMS—fully integrated with Email application
• Browser—HTML and WAP
• RSS—dedicated reader with configurable channels
• Calendar and Contacts
• Synchronization—Over–the–Air, Bluetooth or USB
Size [mm] 118 (L) x 72.5 (W) x 21 (H)
Weight [g] 150
Keyboard 5 row QWERTY or QWERTZ

Navigation 8–way navigation, menu selection
wheel, application hard
keys, talk/end & volume
Display QVGA 320x240 TFT 262k colors
Sub display 132x32 pixels, mono STN
Memory 64MB RAM, 128MB Flash
Connectivity Bluetooth 2.0, GPS, optional WiFi
(802.11 B/G) on OGO2.0
Wireless CDMA2000 1xEV-DO(Rel.0) Dual band
Cellular bands/PCS bands
Battery life 2hr talk time, 160hr standby time
Removable memory microSD
Connectors Mini-USB (charging and synchronization),
stereo 2.5mm
headset connector

Using the Mailbox
The Mailbox screen lets you see and manage your e-mail and SMS/text messages. If you see a number
displayed in the Mailbox icon (錯誤! 找不到參照來源。), you have new or unread e-mail or SMS/text
messages.
Before you can send an e-mail message, you must first set up an e-mail account with a portal provider. If
you have not set up an e-mail account during registration, you see “SMS Only” in the From field on the
Compose screen.
For information about setting up an e-mail account, see
錯誤
!
找不到參照來源。
on page 錯誤! 尚未定義書
籤。.
E-mail messages can contain up to 4000 characters, including spaces. SMS/text messages are limited to
600 characters, including spaces.
Note: SMS messages may be referred to as Text messages; your SMS number may also be referred to as
your Text number.
Accessing the Mailbox
You can access the Mailbox screen in two ways:
•From the Home screen, select the Mailbox icon and press ENTER.
•Press the Mailbox key.
The Mailbox screen (錯誤! 找不到參照來源。) displays four default tabs and in addition, a tab for each e-
mail account you add. The Inbox tab is selected by default. Each of the other tabs displays a single category
of messages – all messages for a single e-mail provider, all SMS/text messages, all outgoing messages, etc.
Using the Compose Screen
Accessing the Compose Screen
You can access the Compose screen in two ways:
•Press the Compose key.
•From the Contacts screen, in the following manner:
1. From the Home screen, select the Contacts icon (Figure 6) and press ENTER to display the Contacts
screen.

Contacts
icon
Figure 6: Identifying the Contacts icon
2. Scroll to highlight the contact you wish to send an e-mail to and press the Options key; an Options pop-
up window will appear (錯誤! 找不到參照來源。).
3. Make sure that Compose is highlighted and press ENTER; a blank Compose screen with that
contact's e-mail address already inserted into the To field will appear.

Sending an E-mail or SMS/Text Message
1. Access the Compose screen (錯誤! 找不到參照來源。) as described on page 15.
2. Add an address to the To field; do one of the following:
•Type the e-mail or SMS/text address in the To field.
•With the cursor in the To field, long press ENTERand then select the desired contact and
address from your contact list.
Notes:
•If you accessed the Compose screen through Contacts, the recipient's e-mail address will already
appear in the To field.
•You can send the same message to both e-mail and SMS/text addresses.
3. Use the inner ring of the 8-Way Navigation key to move to the Subject field and then type the subject of
your message.
4. Scroll to the message text box and type your message.
Note: E-mail messages can contain up to 4000 characters, including spaces. SMS/text
messages have a limit of 600 characters (up to 4 concatenated messages), including spaces.
Optional: You can also use accented Latin characters commonly used in European languages with your
Ogo’s Extended Character palette. For more information, see
錯誤
!
找不到參照來源。
on page 錯誤! 尚未定
義書籤。.
5. Scroll to select Send and press ENTER.
Note: You can also press the Options key, select Send (
錯誤
!
找不到參照來源。
), and press ENTER to
send your message.
For more information on addressing e-mail or SMS/text messages, see
錯誤
!
找不到參照來源。
on page 錯
誤! 尚未定義書籤。.
Note: An e-mail message can include up to 4000 characters. E-mail messages that exceed this limit trigger
the following pop-up window: “This message exceeds the maximum allowed text limit and will be trimmed
accordingly.”

Choosing an E-mail Address in the From Field
If you have more than one e-mail account, you can choose the address from which you want to send your
message.
1. On the Compose screen, select the From field and press ENTER.
2. Select the e-mail address for the message and press ENTER; your message now reflects the new
address in the From field.
Changing Your Default E-mail Address for
Sending Messages
When composing an e-mail message, your default e-mail address (in the From field) is the address of the
first (or the only) e-mail account you originally set up on your Ogo.
If you have more than one e-mail account and want to change your default e-mail address:
1. From the Home screen, select Settings and press ENTER.
2. Select the E-mail tab.
3. Select the name of the e-mail account you want to make your default account and press ENTER.
4. In the Mailbox Settings screen scroll down to select the Default Account checkbox.
5. Press ENTER to select the checkbox.
6. Scroll down to select Done and press ENTER; your Compose E-mail screen now lists the new
default address in the From field.
Sending SMS/Text Messages
If all of the recipient addresses for your message are mobile phone numbers, your message is sent as an
SMS/text. The From address that the recipients see is your SMS/text (also called MSISDN) number. The
From address you see when sending the message from your Ogo is your default e-mail address.
Saving a Draft of a Message
After composing a message, if you want to save it as a draft; press the Options key, select Save as draft
and press ENTER.
You can find your draft later by pressing the Mailbox key.
In the Inbox message list, drafts are indicated by the draft icon:
Note: You can also quickly save your draft while in the Compose screen by pressing the Up key. The Save
draft? pop-up window appears asking you if you want to save changes to the draft (
錯誤
!
找不到參照來源。
);
select Yes to save.

Deleting the Draft of a Message
If you decide not to keep a draft message, perform one of the following operations:
•While composing a message, press the Options key and select Delete this message. Press
ENTER to delete; a pop-up window appears asking you to confirm that you want to delete the
message.
•From the Mailbox screen, select the message and press the Options key. Select Delete this
Message and press ENTER.
•Press the Ogo key, select the draft message to be deleted, and press CLR.

Instant Messaging (IM)
The IM screen allows you to chat with your IM contacts in MSN. The number displayed in the IM icon
indicates the number of open chat sessions (read and unread).
Accessing the IM Screen
You can access the IM screen in two ways:
•From the Home screen, select the IM icon and press ENTER.
•Press the Instant Messaging key.
Note: You may be prompted to log on; sign in if you have not already done so.
Your IM contacts are displayed in the IM screen (錯誤! 找不到參照來源。). Each line shows the contact’s
alert icon (if applicable), contact’s screen name, and IM status (Away, Online, etc.).
You can IM chat with an IM contact by pressing ENTERwhen an IM contact’s name is selected.
Note: The maximum number of active IM chats is 20.
When one of your contacts sends you an instant message, you receive an IM Chat alert next to that
contact’s online status indicator. IM Chat alerts are animated if the IM chat message is unread.
This manual suits for next models
1
Table of contents
Other Ogo Cell Phone manuals