OHM BootiQue Active System User manual

BootiQue
Active System
USER MANUAL

Contents Important Information...................................... 3-4
Introduction
Unpacking
Mounting
Environment
Precautions
Operating Instructions...................................... 5-7
Amplifier
Front LED Panel
Remote Controlled Wall Panel
Remote Contro
Operating Diagram.............................................. 8
Specifications..................................................... 9
Notes............................................................... 10
2

BootiQue Active System
USER MANUAL
BootiQue Active System
The information contained within this manual does not include all of the details of design, production
or variations of the equipment. Nor does it cover every possible situation that may arise during
installation, operation or maintenance. If you need particular assistance beyond the scope of this
manual please contact our technical staff.
Magnetic Field - Caution
If an equipment rack is to be used, we would recommend
mounting the amplifiers in the bottom of the rack and
mounting pre-amplifier and other sensitive equipment
such as the Oyster at the top of the rack.
Do not locate sensitive high-gain equipment such as
pre-amplifier or tape decks directly above or below
amplifiers.
Because amplifiers have a high power density there
is a strong magnetic field which can induce hum into
unshielded devices that are located nearby. The field is
strongest just above and below the unit.
CAUTION
RISK OF ELECTRIC SHOCK
DO NOT OPEN
The lightning bolt triangle is used to alert
the user to the presence of uninsulated
“dangerous voltage” within the unit that may
constitute a risk of electric shock.
Wellington Close • Parkgate • Knutsford
Cheshire • WA16 8XL • England
Tel: +44 (0)1565 654641 • Fax: +44 (0)1565 755641
The exclamation mark triangle is used to
alert the user to important operating or
maintenance instructions in the literature
accompanying the product.
CE Conformity
This equipment has been tested and found to conform
to the requirements of the EMC Directive 89/336/EEC,
the requirements of the Low Voltage Directive
73/23/EEC, amended by 93/68/EEC and to the
following standards:
EMC Emission EN55103-1 (1996)
EMC Immunity EN55103-2 (1996)
Electrical Safety EN60065 (1998)
Features
• iPod Input
• Phono Input
• USB Input
• RJ45 Input
• Binding Post Output
• Fire Alarm Muting
• Will take up 8 satellite speakers
• Remote control
• Left and Right and Subwoofer Level Indicators
• Auto Power off
• Attractive styling
WARNING! RISK OF HAZARDOUS ENERGY!
TO REDUCE RISK OF ELECTRIC SHOCK OR FIRE DO
NOT EXPOSE TO RAIN OR MOISTURE.
NO USER SERVICEABLE PARTS INSIDE.REFER
SERVICING TO QUALIFIED SERVICE PERSONNEL.
UNIT MUST BE EARTHED AND CORRECTLY FUSED.
3

Introduction
Congratulations on having purchased an OHM BootiQue Active System
Please read this manual and familiarise yourself with the operation of your OHM BootiQue Active
System before you attempt to power up this unit. For your own safety we recommend you take the
time to read all the warnings and precautions on the page opposite and study the connection details
to ensure correct usage and avoid any misuse which may invalidate your warranty.
Record the model and serial number, found on the back of the unit, in the spaces designated on the
warranty card and in the space provided below. Refer to the model and serial number whenever you
call upon your dealer for information or service on this product.
Model Serial Number
Unpacking
Carefully open the shipping carton and check for any noticeable damage. Verify that all the items listed
below are included, please contact your dealer if any parts are missing.
Every OHM BootiQue Active System has been rigorously tested and inspected before being carefully
packaged, prior to shipping. If any damage has occurred to the packaging or the unit during transit,
please notify the delivery company as soon as possible. Only the consignee can file a claim against
the carrier for shipping damage. Be sure to save the carton and all packing materials for the carriers
inspection.
We recommend that you retain the original carton and packing materials for use should you transport
or ship the unit in future.
Packing List
1x OHM BootiQue Active System, 1x Wall Plate, 1x Remote control.
1x Power Cable.
1x Manual and Warranty card.
NB: Satellite speakers are packed seperately. please check amount matches order.
Precautions
• Retain this manual for future reference.
• Always check that the correctly rated power is supplied to your unit.
• Adequate ventilation should be provided.
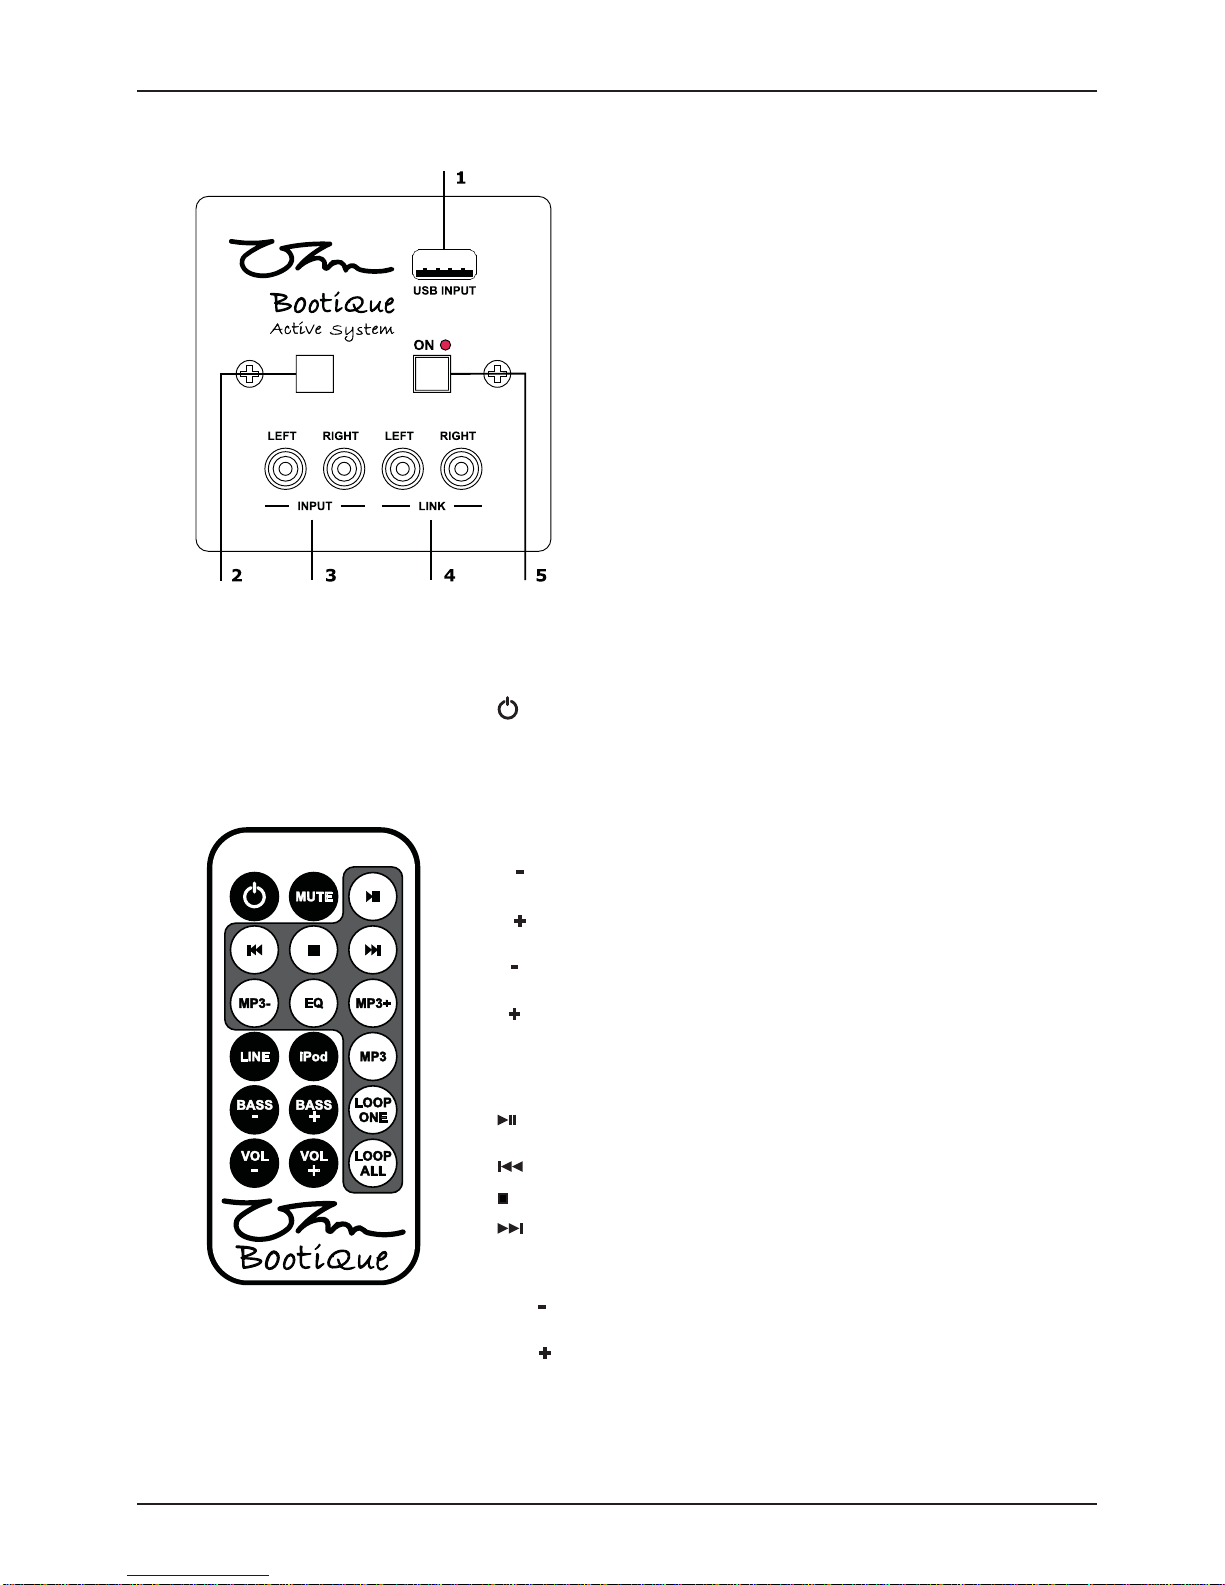
• Pay attention to the information on the rear of the unit, particularly note the inputs and outputs of
the unit and always ensure device used as sound source is connected to input and and speakers
are connected to output.
• Ensure the mode switches (Ground lift, Phase Rev, Input Gain, Auto Power Switch and Bass/Sat
EQ ) are in the correct position for the required operating mode and all necessary input and output
connections are made before switching on your unit.
• Under no circumstances should you connect the speaker outputs to the input or output stages of
any other unit.
• Never short the “live” inputs or outputs to ground.
• Avoid direct contact of your unit with water or other liquids. Do not operate while standing in liquid.
• When cleaning the unit wipe with a soft, dry cloth. If more heavy duty cleaning is required
disconnect from the mains and use a damp cloth, ensuring that the unit is completely dry before
reconnecting to the mains.
• Do not use solvents or chemicals on the exterior of the unit as they may cause the surface to
discolour and peel.
• Do not use this unit if the power cord is frayed or broken.
• If you experience continuous problems, disconnect from the mains and refer to a qualified service
engineer.
4
Mounting
Enclosure should be positioned far enough away from a wall so as not to impede airflow. Auto power
selected means that the unit reverts to a standby mode if a signal in not detected after a few minutes,
likewise the unit ‘wakes up’ when a signal is present.

BootiQue Active System
OPERATING INSTRUCTIONS
5
AMP PANEL
1 Master Gain
Adjusts the output volume level of the system.
2 Mid-Hi Gain
Adjusts the volume level of the left and right
satellite outputs.
3 Bass Gain
Adjusts the volume level of the subwoofer.
left and right input signals are summed as a
mono signal.
4 Input Sensitivity / Gain Selector
Three position sensitivity switch
• Full output power for an input level of 0.775V.
• Standard 26dB Gain.
• Full output power for an input level of 1.1V.
5 Ground Lift Selector
Setting this switch from GROUND to LIFT
separates the signal ground from the chassis
ground, thus breaking the “Ground Loop”
between adjacent chassis grounds in the signal
path.
6 Phase Reverse Selector
0° - 180° Reverses the phase of the sub.
7 B/Sat EQ Selector
Setting the on/off selector to on will engage
the default EQ setting for the system this will
flatten the response .
Remote EQ
The system has seven preset EQ settings for
the MP3, which are accessed via the remote
control. Pressing the EQ button scrolls through
the presets in the following order:
1, Normal
2, Rock
3, Pop
4, Classical
5, Soft
6, Jazz
7, Heavy Bass
The remote control EQ only works for the
device plugged in via the USB and has no effect
on the overall EQ which is controlled by the B/
Sat selector.

AMP PANEL Continued
6
14 Fire Alarm Muting
Allows the unit to be installed in a location
covered by a voice alarm fire system with a
choice of voltage on or voltage muting.
15 & 16 Speaker Outputs Right/Left
On Binding Posts accepts up to 4mm heavy duty
wire or Pomona plug, wired as follows: Stereo
use:
Channel A, Red = Positive, Black = Negative
Channel B, Red = Positive, Black = Negative
17 IEC Fused Mains Inlet (230V)
A heavy duty lead is provided. If the panel
fuse fails always replace with a correctly rated
substitute.
18 On/Off Switch
Turns the unit on and off completely.
Note:
If powered off the whilst using MP3 playback,
the MP3 will require some time to reset. It is
recommended that you wait for approximately 7
seconds after power down before switching the
amplifier back on.
8 Auto Power Switch
Senses if signal is present and switches on or
off accordingly. Unit remains in standby mode
until a power source is detected.
9 iPod Input
Allows the connection of an iPod or other mp3
player or auxiliary music source.
10 Phono Input
Use standard RCA plugs wired as follows:
Sleeve = Ground, Tip = Live
12 USB Input Socket
USB socket to take USB peripherals such as
mp3 players and Flash Drives with MP3 tracks
on. When used with a flash drive the remote
control is used to control track selection and
navigation.
10 Phono Link
Use standard RCA plugs wired as follows:
Sleeve = Ground, Tip = Live
13 RJ45 Input
Connects the BootiQue system to the wall
mounted remote control panel. Via CAT5
network ethernet cable maximum length 5m.
FRONT LED PANEL
1 Left Signal level Indicator
Indicates the dB level set by the gain control.
2 Sub Signal level Indicator
Indicates the dB level set by the Bass Gain
control.
3 Right Signal level Indicator
Indicates the dB level set by the gain control.
4 Stand LED (Yellow)
When lit indicates that the unit is in standby.
5 Power LED (Blue)
When lit indicates that the unit has power.

BootiQue Active System
7
WALL PANEL
REMOTE CONTROL OPERATION
1 USB Input Socket
USB socket to take USB peripherals such as
mp3 players and Flash Drives with MP3 tracks
on. When used with a flash drive the remote
control is used to control track selection and
navigation.
5 Push Button On/Off Switch
Switches the BootiQue System on and off.
3 Phono Input
Use standard RCA plugs wired as follows:
Sleeve = Ground, Tip = Live
4 Phono Link
Use standard RCA plugs wired as follows:
Sleeve = Ground, Tip = Live
2 Remote Control Sensor
Allows remote control to work the BootiQue’s
controls via the wall panel.
Forward
MP3 vol down
MP3 vol up
EQ
Loop one
Loop all
MP3 Controls this will only control a flash drive or device
plugged into the USB Input with MP3 tracks on.
Goes forward one track.
Lowers the volume of the MP3 device
plugged in via the USB input.
Raises the volume of the MP3 device
plugged in via the USB input.
Scrolls through the seven pre set
system EQ’s.
Continuously plays one track.
Continuously plays all tracks.
Power on/off Puts the Unit in and out of standby.
Mute Turns the volume off and on.
MUTE
Line in Switches unit to any device plugged in
via the Phono inputs.
LINE
iPod in Switches unit to any iPod or mp3 device
plugged in via the iPod input.
iPod
Vol down Lowers the volume of the BootiQue
system.
VOL
Bass vol down Lowers the volume of the BootiQue
subwoofer.
BASS
Bass vol up Raises the volume of the BootiQue
subwoofer.
BASS
Vol up Raises the volume of the BootiQue
system.
Play/Pause Switches between play and pause on
the MP3 memory stick.
Back Goes back one track.
Stop Stops the MP3 playback.
MP3 in Switches unit to any device plugged in
via the USB Input.
MP3
MP3
EQ
LOOP
ONE
LOOP
ALL
VOL
MP3

BootiQue Subwoofer Cabinet
iPod/M3 Player,
connect to BootiQue
Via the iPod input or
wall panel via the
phono inputs
Flash drive with music,
connect to BootiQue or
wall panel via the USB
input
Wall Panel
Remote control.
Controls the BootQue
system via the wall panel
Right
Satellite speakers up to 4 per side
wired in parallel to create 4 ohm.
Connect to BootiQue via speaker
out binding posts.
Left
Computer, connect
to BootiQue or wall
panel via phono
inputs.
Television, connect
to BootiQue or wall
panel via phono
inputs
Satellite system,
connect to BootiQue
or wall panel via
phono inputs
DVD/CD player,
connect to BootiQue
or wall panel via the
phono inputs
OPERATING DIAGRAM
8

BootiQue Active System
Output 8 Ohms 1kHz
THD<0.1% Stereo Mode
Bass Subwoofer 130 Watts
Bass sat 2x60 Watts
Output 4 Ohms 1kHz
THD<0.1% Stereo Mode
Bass Subwoofer 180 Watts
Bass sat 2x85 Watts
Frequency Response
@ 1 Watt Into 8 Ohm
20Hz-130Hz -3dB
Input Sensitivity 0.775V/1.1V/26dB
THD+N <0.02%@1kHz
Damping Factor
@ 400Hz into 8 Ohm
>250
IMD into 8 Ohm Unbalanced <0.08%@100W
Crosstalk at rated
Output 8 Ohms 1kHz
>60dB
Input Impedance >4.7 kΩ
Signal/Noise (A-Weighted) >92dB
Class AB
RCA Phono, Stereo Mini Jack, RJ45, USB,
Barrier Strip for Fire Alarm Muting
Input and Link Connectors
Output Connectors Neutrik Speakon® connectors
Indicators Signal, Peak, Clip, Protect
Protection Short Circuit, DC Voltage, Turn On/Off Transient, Thermal, Limiter
Master Gain, Bass Gain, Mid-Hi Gain, 0°/180° Phase Switch,
Auto Power Switch, Mains Switch, Led Ladders, Remote Control,
Volume On/Off, Bass Satellite EQ, GND Lift0
Controls
Power Supply AC 230V 50Hz / iPod output 5 volts
Dimensions (mm) (H x W x D 336 x 300 x 500
Weight (kgs) 24.5
Impedance (ohms) 16
Power handling RMS Watts 50
Programme Watts 100
SPL 1W/1M (dB) 91.5
MAX @ 1M (dB) 110.5
Frequency response (-3dB) 38Hz-20kHz
Active Crossover 100Hz
Dispersion (H x V) 90
Dimensions H x W x D (mm) 140 x 140 x 132
Weight (kgs) 1.75
SPECIFICATIONS
BootiQue Subwoofer
BootiQue Satellite
As part of our continuous R & D programme reserve the right to change specifications without prior notice
E&O.E
9

Dealer Stamp
Table of contents
Other OHM Speakers System manuals