OHTAKE FM-36 Series User manual

FM–36
Automatic Volumetric Screw Feeder
ORK Feeder
InstructionManual
Please read this manual before usingthe product.
FMMAE01

– 2 –

Contents
1. Introduction ......................................... 3
2. Operating Tips..................................... 3 6. Maintenance ............................................................................. 15
Precautions in Ejecting Screws ..........5 7. Replacing Parts ....................................................................... 16
3. Component Nomenclature ................ 6 8. Points to Check Before Requesting Repair Services........... 18
4. Identifying the Unit Type ..................... 7 9. Principal Specifications ........................................................... 23
5. Getting the Feeder into Motion........... 8 10. Warranty Terms ........................................................................ 24
1. Introduction
Thank you very much for purchasing our automatic volumetric screw feeder, ORK Feeder FM-36.
Please check up the accessories supplied with it before using it.
Accessories
Instruction manual: 1 copy
AC adapter: 1 pc
Allen wrench: 1 pc
Screwdriver: 1 pc
Before using your product, please read this manual carefully to get the bets out of the product.
2. Operating Tips
Installation Location
Install the feeder in a level, stable place.
If the feeder is installed in an unstable place, it could fall down, resulting in physical injury.
Do not use the product in a combustible gas, explosive gas or damp atmosphere.
Use of the feeder in such an atmosphere would be most hazardous.
When Shutting Down or Before Leaving the Feeder Out of Service for Long
When shutting down the feeder at the end of each day’s work or before leaving it out of service for extended
periods of time, disconnect the AC adapter from the plug outlet.
Caution
Caution
Caution
– 3 –

– 4 –
Caution
Caution
Caution
Caution
Caution
Caution
Caution
AC Adapter
Do not use any AC adapter other than the one that is supplied with the product.
Rail
Do not scratch the rail. Do not apply fats and oils to the rail.
Kinds of Screws That Must Not Be used
Do not use screws of any nonstandard mark or screws with fats and oils or dust adhering to their surfaces.
Precaution in Unloading Screws
Do not give undue force or impact to screws when unloading them.
Foreign Matters
Do not insert fingertips or foreign matters into the scoop chamber, clearance and hole while the feeder is in
operation. You might suffer physical injury.
Do not put any screws other than those used and foreign matters into the feeder.
UnusualOperating Noises
If unusual noises are heard from the feeder while it is in operation, turn off the power switch and disconnect
the AC adapter from the plug outlet.
If you continue using the feeder without correcting the unusual noises, fires, electrical shocks or physical injury
could result.
Do Not Repair, Overhaul or Tamper the Feeder
Please consult your dealer for repair services.

Precautions in Ejecting Screws
Use maximum care in ejecting screws from the scooping chamber for changing screw types, replacing the rail and so forth.
◎Screws could fall into the inside of the feeder if their ejection is mishandled.
◎If the feeder is tilted or turned back with screws being accumulated at the unloading port or left on the rail, screws could fall
into the inside of the feeder.
◎Unload screws from the unloading port and move all screws from the rail to the scooping chamber, ejecting them from the
chamber.
◎See the illustrations below in ejecting screws. Use maximum care in ejecting screws from the scooping chamber not to let
them fall into the inside of the feeder.
①Turn off the power switch.
②Unload screws from the unloading port.
③Move all the screws from the rail to the scooping chamber.
Check that no screws are left at the unloading port and on the rail before
ejecting screws from the scooping chamber.
④Eject the screws from the scooping chamber.
– 5 –
①
③
④
②

3. Component Nomenclature
– 6 –
Rail longitudinal
position setscrew
Power switch
LCD panel
Retaining plate
(Screw guide 1)
Unloading lever
Scooping chamber
Scooping chamber cover
Pit guide assembly
Rail
assembly
Cutting disc
Front cover
Shutter (installed in front
of the passage plate)
Scooping
plate
Brush
Timer trimmer
DC jack
Scooping
plate
Scooping
chamber
Passage plate
Passage window (screw passage
window in the passage plate)
Passage plate
setscrew
External output
signal line
takeout hole

4. Identifying the Unit Type
Before using the feeder, check to make sure that the nominal diameter of the working screw meets the unit type.
To identify the unit type, remove the front cover and the rail assembly and look at the labels affixed to the rail assembly and the
cutting disc assembly.
This feeder can be customized to screws of different sizes by replacing the rail assembly and the cutting disc assembly.
– 7 –
This feeder ships factory-adjusted to handle pan-head screws.
If the feeder requires adjustment to meet the kind of screw to use, make
the following checks and adjustments beforehand:
Brush check and adjustment
Passage plate check and adjustment
Retaining plate check and adjustment
Rail assembly and cutting disc assembly check and adjustment
Identification seal
Identification
seal
FM-36 FM-3630 3.0 FR30 F30 W3630
FM-3635 3.5 FR35 F35 W3635
FM-3640 4.0 FR40 F40 W3640
FM-3650 5.0 FR50 F50 W3650
FM-3660 6.0 FR60 F60 W3660
Unit
model Unit type
Screw
nominal
diameter Rail model
number
Cutting disc
model
number
Passage
plate model
number

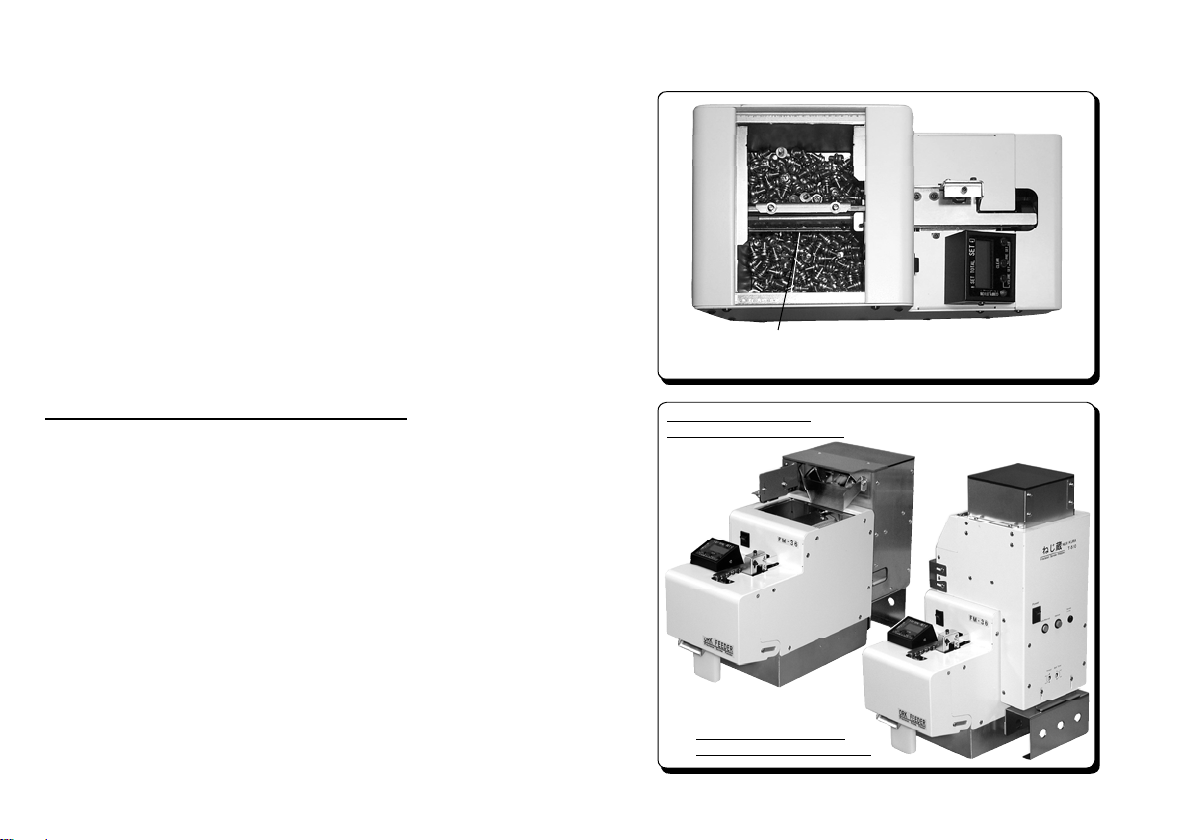
Unit with the floor-type
(NJ-80) NEJIKURA installed
Unit with the tower-type
(T-510) NEJIKURA installed
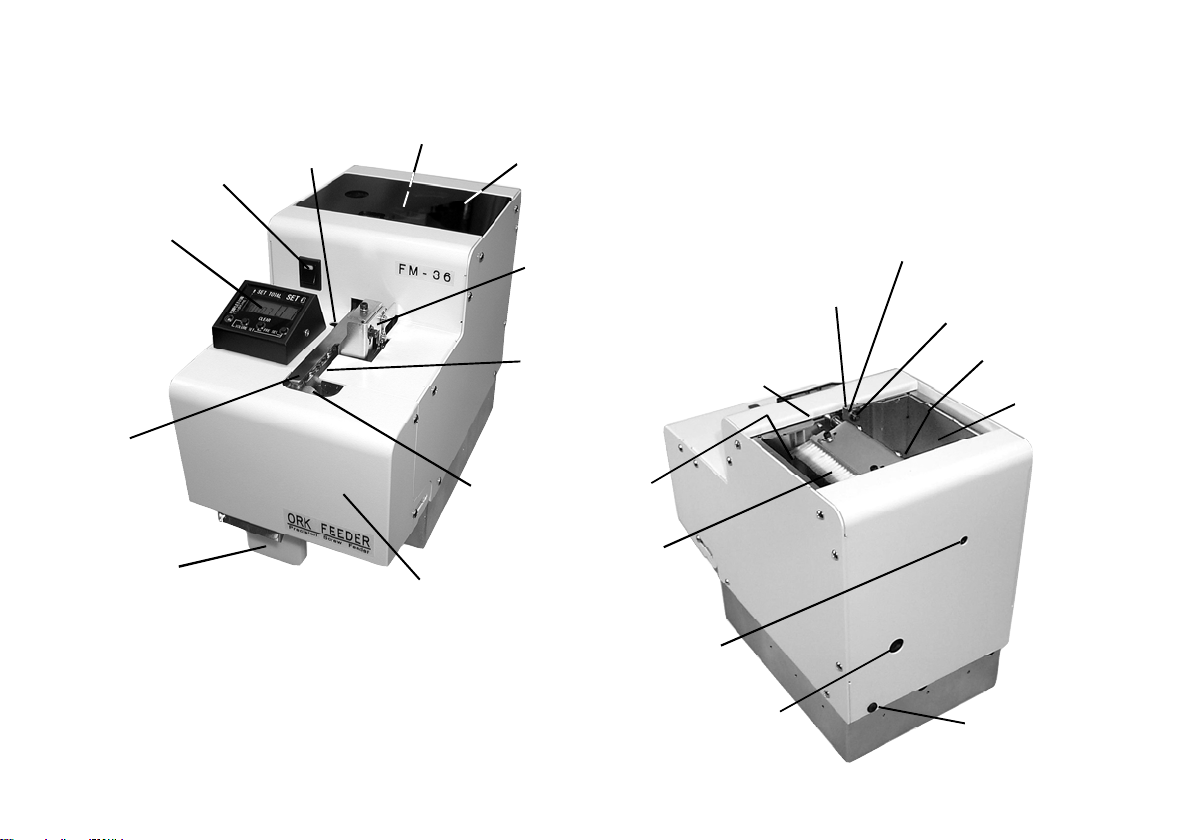
Do not allow screws hide the top surface of the rail groove.
(The screws must be positioned about 2 to 3 mm lower than
the top surface of the groove.)
5. Getting the Feeder into Motion
5.1 Supply of Screws
Loading the feeder with too many screws could adversely affect their
alignment and transfer.
The approximate maximum supply of screws is illustrated in the figure
at right. Consult this figure in loading screws.
• Turn the power switch on, then off to move the scooping plate to the
lower limit position.
• Load screws to a position about 2 to 3 mm lower than the top surface
of the rail groove. Check to make sure that the top surface of the rail
groove is not hidden by the screws.
• Adjust the supply of screws by observing the behavior of the feeder in
operation.
This feeder comes with an overload protection circuit.
The protection circuit trips when the moving parts of the feeder are
overloaded, as by screws being stuck in the moving parts or too many
screws being put in the scooping chamber.
Actuation of the overload protection circuit
If the moving parts of the feeder are overloaded, the drive motor
reverses for a predetermined period of time and then returns to
forwarding. When the overload imposed on the moving parts of the
feeder no longer exists during reversing, the drive motor returns to
normal forwarding. If the overload imposed on the moving parts of the
feeder persists during reversing, the drive motor reruns the sequence
of reversing, forwarding, reversing, forwarding and so forth for a
predetermined period of time before it is powered off. The cutting disc
continues operating, though.
Thus explained, if the drive motor is powered off, turn off the power
switch and remove the overload imposed on the moving parts of the
feeder. For example, if you have put too many screws in the scooping
chamber, correct the supply of screws. If screws or any other objects
are stuck in the moving parts of the feeder, remove them.
After the overload has been removed, turn on the power switch to put
the feeder back into operation (power-on reset).
• A screw stock option, NEJIKURA is available which loads screws
automatically to maintain a metered count of screws to be loaded.
Please check us if you need this option. – 8 –

While the LCD panel LED is on, push the unloading lever
forward until it hits the stopper.
Screws will drop onto your palm at the same time.
The feeder, when just powered on, behaves differently
depending on the state in which it had been powered off.
The feeder won’t start unless you manipulate the unloading
lever.
Return your hand to front with care not to drop the screws off
your palm.
The LCD panel LED goes out and the feeder restarts.
– 9 –
5.2 Unloading Screws
This feeder ships factory-adjusted to handle pan-head screws. The
feeder should require the following checks and adjustments depending
on the kind of screw to use:
LCD panel setting change
Brush check and adjustment
Passage plate check and adjustment
Retaining plate check and adjustment
Rail assembly and cutting disc assembly check and adjustment
• When the power switch is turned on, the scooping plate moves up
and down for a predetermined period of time and then stops.
• Manipulate the unloading lever to start the feeder.
• When a preset count of screws has accumulated at the unloading
port, the LED lights up, the buzzer sounds, and the feeder halts with a
certain delay.
• Manipulate the unloading lever to unload the preset (metered) count
of screws and the LED goes out, with the feeder restarting.
• If you manipulate the unloading lever before a preset count of screws
is stored, the LED blinks and the buzzer continues sounding. The
feeder then starts recounting the preset count of screws after a
predetermined period of time.
• The LCD panel indicators and settings are backed up by batteries in
times of power outages or when the power switch is turned off.
Even in times of power outages, the operations described above will
take place in the regular sequence.
• Push the unloading lever forward until it hits the stopper. The LCD
panel LED does not go out and the feeder does not restart unless the
unloading lever is in contact with the stopper.

Preset total indicator Preset count indicator
LED indicator Setup buttons
– 10 –
5.3 LCD Panel Indicators and Settings
◎LCD Panel Indicators
<Preset count indicator>
• Shows a preset count of screws.
• Decrements each time a screw is unloaded at the unloading port.
• Is reset to the preset count when the preset count of screws has
accumulated at the unloading port.
• Blinks while changes are being made to the preset count.
• Each time the preset count of screws has accumulated at the
unloading port, the feeder stops. When the screws are unloaded
from the unloading port, the feeder restarts.
<Preset total indicator>
• Shows the total of preset counts of screws.
• Increments each time a preset count of screws are accumulated at
the unloading port.
• Each time the count of screws has accumulated at the unloading
port, the feeder stops. When the screws are unloaded from the
unloading port, the feeder restarts.
<LEDindicator>
• Lights up each time a preset count of screws has accumulated at the unloading port.
• Blinks when the unloading lever is manipulated while unloading a preset count of screws.
• Blinks while changes are being made to the sound volume.
<Setup buttons>
• Make changes to settings.
• The LCD panel indicators and settings are backed up by batteries in times of power outages or when the power switch is
turned off. When the power is restored, however, you need to manipulate the unloading lever to start the feeder.

<<CLEAR>>
<<PRE SET>>
<<VOLUMESET>>
Resets the preset total
to “0000.”
Sets a preset count.
Sets a sound volume.
– 11 –
◎LCD Panel Settings
LCD panel settings can be changed while the feeder is shut down after
it has been powered on.
<Clearing the preset total indicator CLEAR>
• Press the CLEAR button for about 2 seconds, and the buzzer sounds
and you can reset the preset total indicator to “0000.”
<Changing a preset count PRE SET>
• A preset count can be changed by resetting the preset total indicator to
“0000.”
• Press the right-side PRE SET button to change the first digit.
Press the left-side PRE SET button to change the second digit.
• Continue pressing a PRE SET button and the buzzer sounds about 2
seconds later and, another 2 seconds later, the buzzer sounds again
with the corresponding digit in the preset count indicator blinking.
• Press the PRE SET button once momentarily while the digit is blinking
to change that digit.
• If you do not press the PRE SET button while the digit is blinking, that
digit is set. The digit is also set if you press the other PRE SET button
while the digit is blinking.
• Cancel screws left at the unloading port after a setting change has
been made and return them to the scooping chamber.
<Changing the sound volume VOLUME SET>
• Press the VOLUME SET buttons for about 4 seconds at the same time
and the LED blinks and you can change the sound volume.
• While the LED is blinking, press the right-side button once
momentarily and the sound volume changes from medium, through
high, no tone, and low, back to medium and so forth.
• If you do not operate the buttons, the LED stops blinking and the
sound volume then in effect is set.

Check that the passage window is adjusted at such height that
allows the working screw to pass barely.
Working screw
Passage plate
mounting screw
Passagewindow
(notch in the
passage plate)
Passage plate
Vertical adjustment
Turn the power switch on, then off to keep the brush roughly level.
Brush
Brush height
adjustment screws
Moving the brush by hand, check that the tip of the brush rubs
on the head of the working screw placed in the rail groove.
Brush
Passage
plate Brush height
adjustment
screws
Brush assembly
mounting screw
Working screw
5.4 Brush Check and Adjustment
Turn off the power switch before performing check
and adjustment work.
Put a screw to use in the scooping chamber and turn the power switch
on, then off to place the screw into the rail groove.
• Turn the power switch on, then off to keep the brush roughly level as
shown at right.
• Check that the tip of the brush rubs on the head of the working screw
placed in the rail groove.
• The alignment and transfer of screws would be adversely affected if
the brush is positioned too high or too low.
• If the brush requires adjustment, loose the brush height adjustment
screws.
• If the front of the plastic part of the brush hits the passage plate,
loosen the brush assembly mounting screw and adjust its
longitudinal position.
• Run the feeder to check that the brush works correctly.
5.5 Passage Plate Check and Adjustment
Turn off the power switch before performing check
and adjustment work.
• Check that the passage window is adjusted at such height that
allows the working screw to pass barely.
• Too low a passage window would not allow screws to pass, and too
high a passage window would make screws more liable to sticking.
• If the passage pate requires adjustment, loose the passage plate
mounting screw.
• When the adjustment is complete, verify correct operations.
Caution
– 12 –
Caution

Working screw
Bit guide assembly vertical adjustment screw
Retaining plate
Bit guide assembly setscrew
0 to 1mm
Short
Long
– 13 –
5.6 Retaining Plate Check and Adjustment
Check the retaining plate position.
• Check that there is a clearance of about 0 to 1 mm between the head
of the working screw in the rail groove and the retaining plate.
• Without a clearance, screws could be stuck. Too large a clearance
could cause screws to overlap or cause them to pop out.
• If the retaining plate requires adjustment, adjust it.
• Loosen the bit guide assembly setscrew and turn the bit guide
assembly vertical adjustment screw counterclockwise with an Allen
wrench to move up the retaining plate or clockwise to move it down.
Make adjustments for a clearance of about 0 to 1 mm between the
head of the working screw.
• In clamping the bit guide assembly setscrew following the completion
of the adjustment, do so to maintain a parallel clearance between the
retaining plate and the rail.
Ensure that the clearance in the rear of the feeder is not smaller than
that in the front of the feeder.
• When the adjustment is complete, verify correct operations.
5.7 Timer Check and Adjustment
The working screw transfer speed varies depending on the screw type.
A longer timer interval setting is recommended for screws with a lower
transfer speed, and a shorter timer interval setting is recommended for
screws with a faster transfer speed.
• This feeder is designed to halt screw transfer with a certain delay after
a certain count of screws has accumulated at the unloading port. This
delay can be adjusted with the timer.
• A timer trimmer is found in the rear of the feeder as shown at right.
• Turn the trimmer clockwise when the feeder is viewed from the rear to
decrease the interval or counterclockwise to lengthen the interval.
• Adjust the trimmer within the range of its rotation, without using undue
force.
• Use the provided screwdriver for adjusting the timmer.
• Set an appropriate timer interval by verifying a correct feeder operation
on working screws.

5.8 External Output Signal Line
This feeder has an external output signal line, allowing for external
generation of a signal synchronized with the timing at which the LCD
panel LED lights up, as an open collector output. Use this output to
connect an indicator, buzzer or the like externally.
The signal line is housed inside the feeder. To use the signal line, lead
it outside through the grommet in the rear of the cover.
Purple line ---> Signal line (conducting when the LED lights up)
Gray line ---> Common line
– 14 –
Signal
line
Cover rear
Grommet
Signal line
Grommet
Give one or more turns to the signal
line around the coaching clip so it
can be safely pulled from outside.
Mountingscrew
(M2.6) Total four screws,
includingscrews on
the opposite side
Feeder board External
Purple
Gray
Grommet

6. Maintenance
Turn off the power switch before performing check
and adjustment work.
Eject all working screws from within the feeder before
proceeding with maintenance work.
A dirty rail groove could slow down the working screw transfer speed. If
the rail groove is found noticeably soiled, wipe it off with a thin cloth
impregnated with alcohol.
If the rail groove is difficult to clean, the rail can be detached from the
feeder for cleaning. Before detaching the rail from the feeder, turn off the
power switch and remove the screws from the scooping chamber (to
prevent screws from falling out).
Remove two front cover mounting screws and move the front cover.
Remove the cutting disc assembly mounting screw and then detach the
cutting disc.
(See 7.3, “Replacing the Cutting Disc Assembly.”
Then, loosen the rail longitudinal position setscrew and pull out the rail
assembly to front.
The rail should require replacement if its rail groove is soiled or flawed to
impair its successful use.
If the rail assembly has been removed from the feeder, it is necessary to
make positional adjustments with the tip of the rail and the cutting disc.
• Align the groove rail and the groove in the cutting disc with each other.
• Mount the cutting disc assembly to keep the top surface of the groove
in the cutting disc lower than the top surface of the rail groove.
• Turn on the feeder and then make adjustments with the longitudinal
position of the rail so its tip will not hit the cutting disc when the rail
vibrates.
– 15 –
Caution
Frontcover
Removetwofrontcovermountingscrews,
includingoneontheoppositeside
Loosentheraillongitudinal position
setscrew andpull outtherail.
Cleanthe rail groove
Cuttingdisc
assembly
mountingscrews
Cuttingdisc
assembly
Adjustthepositionsoftherail
grooveandthecuttingdisc
groove.
Inthephoto,theretainingplate
isremoved,butadjustments
mayalso becarriedoutwith
theretainingplatebeingmoved
upward.

Brushassembly
mountingscrew
Brushassembly
Brushbracket2
Brush Brushbracket1
Hexagonsocketheadsetscrew
M2.610
Plainwasher Springwasher
Mustnothit
Passageplate
Passageplatesetscrew
– 16 –
7. Replacing Parts
7.1 Replacing the Brush
Turn off the power switch before performing check
and adjustment work.
If the tip of the brush has worn to such degree that the brush can no
longer brush away screws in an abnormal posture, replace with a new
brush.
• Turn the feeder power switch on, then off to position the brush as
shown at right and then remove the brush assembly. (Have the brush
assembly positioned to ease the work of removing the mounting
screw.)
• The brush assembly can be disassembled as shown at right.
• To reassemble the brush assembly, reverse the removal procedure.
• When the reassembly is completed, check to make sure that the front
of the plastic part of the brush won’t the passage plate when the
brush assembly operates. A clearance of 0 is ideally recommended.
• For adjustment instructions, see 5.4, “Brush Check and Adjustment.”
7.2 Replacing the Passage Plate
Turn off the power switch before performing check
and adjustment work.
When using screws of different nominal diameters, replace the
passage pates for both the rail assembly and the cutting disc assembly.
• Remove the passage plate setscrew and then remove the passage
plate.
• Keep the setscrew in a safe place.
• Install the passage plate in position with reference to the drafts on its
both sides.
• After the adjustment, the passage pate requires adjustment to meet
the kind of screw to use.
For adjustment instructions, see 5.5, “Passage Plate Check and
Adjustment.”
Caution
Caution

– 17 –
7.3 Replacing the Cutting Disc Assembly
Turn off the power switch before performing check and
adjustment work.
When using screws of different nominal diameters,
replace the passage pates for both the rail assembly
and the cutting disc assembly.
• Remove two front cover mounting screws.
• Slide the front cover along the skewed groove on the side to a front
slantwise position. Then, turn the front cover downward.
• Remove the motor connector and the sensor connector.
• Remove the cutting disc assembly mounting screw and then remove
the cutting disc assembly.
• To reassemble the cutting disc assembly, reverse the removal
procedure.
• The cutting disc assembly requires positional adjustments in relation
to the rail groove. See the instructions below.
7.4 Replacing the Rail Assembly
Turn off the power switch before performing check and
adjustment work.
Eject all working screws from within the feeder before
proceeding with replacement work.
The rail assembly in this feeder is easy to replace. The rail should
require replacement if its rail groove is soiled or flawed to impair its
successful use.
When using screws of different nominal diameters, replace the passage
pates for both the rail assembly and the cutting disc assembly.
The rail assembly can be removed after the cutting disc assembly has
been removed.
• Loosen the rail longitudinal position setscrew and pull out the rail
assembly to front.
• At reassembly, it is necessary to make positional adjustments with the
tip of the rail and the cutting disc.
• Align the groove rail and the groove in the cutting disc with each other.
• Mount the cutting disc assembly to keep the top surface of the groove
in the cutting disc lower than the top surface of the rail groove.
• Turn on the feeder and then make adjustments with the longitudinal
position of the rail so its tip will not hit the cutting disc when the rail
vibrates.
Caution
Caution
Adjustthepositionsof therailgroove
andthecuttingdiscgroove.
Inthephoto,theretainingplateis
removed,butadjustmentsmayalso
becarriedoutwiththeretainingplate
beingmovedupward.
Removetwomounting
screws,includingoneonthe
oppositeside
Removethecutting
discassembly
mountingscrews
Slidethefrontcovertoa front
slantwisepositionandthenit
downward
Removethemotor
connector
Removethesensor
connector
Loosentheraillongitudinal
positionsetscrewandpull
outtherail

– 18 –
8. Points to Check Before Requesting Repair Services
Turn the power switch off before troubleshooting the feeder.
Caution
Symptom Cause Action
8-1
The feeder won’t start when the
power switch is turned on
8-2
Screws won’t come flowing
• Power is not available.
• Screws that have accumulated at the
unloading port have not been unloaded for a
certain period of time.
• The unloading lever has not been pressed
firmly.
• Too many screws have been put in the
scooping chamber (overload protective circuit
tripped).
• Foreign matters (such as screws) have
entered the inside of the feeder (overload
protective circuit tripped).
• AC adapter failure
• Screws having a larger nominal diameter than
specified have been loaded, or screws of
different nominal diameters were present.
• The supply of screws in the scooping
chamber has diminished.
• Check that AC adapter power connection.
• Manipulate the unloading lever to unload screws
from the unloading port.
• Press the unloading lever firmly until it hits the
stopper (LCD panelLED going out).
• Adjustthetimertrimmer.
• Correct the supply of screws in the scooping
chamber.
• Remove the foreign matters.
• Let our service handle the problem.
• Use screws of the specified nominal diameter.
• Remove the screws of the different nominal
diameters.
• Correct the supply of screws in the scooping
chamber.
• Useof theNEJIKURA option is recommended.

– 19 –
Symptom Cause Action
8-2
Screws won’t come flowing • The brush cannot brush away screws in an
abnormalposture.
• The shank of a screw has entered the
passage window.
• Screws have been arrested in an unusual
posture halfway in the rail.
• The rail won’t move longitudinally (due to
screws stuck in clearances, for example).
• Improperly adjusted timer trimmer
• Adjust the brush.
Adjust the passage plate.
Putting an appropriate supply of screws in the
scooping chamber could fixthe problem.
• Remove unusual screws and then adjust the
passage plate.
• Remove the screws in an unusual posture.
Follow the instruction given below to remove
screws. In so doing, be careful not to scratch the
rail groove and other components.
Loosen the bit guide assembly setscrew.
Move up the retaining plate.
Remove the screws in an unusual posture.
Then, adjust the retaining plate position.
• Remove the screws stuck in clearances.
If no screws are stuck in clearance , let our
service force the problem.
• Adjustthetimer trimmer.

– 20 –
Symptom Cause Action
8-3
Screws have fallen into the rail
groove
8-4
Screws won’t transfer smoothly
on the rail
8-5
Screws in an unusual posture
easily get through the passage
window.
Shanks easily enter the passage
window.
• Screws having a smaller nominal diameter
than specified have been loaded.
• Screws having a shorter overall length than
specified have been loaded.
• Narrow clearance between the retaining plate
and the working screw head
• Screws with a spring washer one level
smaller than the specified nominal diameter of
the rail have been loaded.
• Dust and oils have attached tothe rail.
• The rail is not vibrating (due to screws stuck
in clearances, for example).
• Exhausted motor
• Poorly adjusted passage plate
• Too many screws have been put in the
scoopingchamber.
• Load screws of the specified nominal diameter.
• Uncorrectable.
• Consultation available on demand.
• Adjust the vertical position of the retaining plate.
• Replace with a rail matched to the thread size.
Replace with a cutting disc matched to the thread
size.
• Clean the rail.
• Remove the screws stuck in clearances.
If no screws are stuck in clearance , let our
service handlethe problem.
• Replacethemotor.
• Adjust the passage plate.
• Correct the supply of screws in the scooping
chamber.
Other manuals for FM-36 Series
1
This manual suits for next models
1
Table of contents
Other OHTAKE Wire Feeder manuals
Popular Wire Feeder manuals by other brands

Hakko Electronics
Hakko Electronics 375 instruction manual

Förster-Technik
Förster-Technik TAK5-CH2-25 Original operating instructions

Lincoln Electric
Lincoln Electric PWF-2 Operator's manual

Cumberland
Cumberland PNEG-499 Installation and operation manual

Petoneer
Petoneer PF005 user manual

EWM
EWM Drive 4 Basic S D200 operating instructions