The following is a summary of some display messages and symbols. These messages
help to identify certain problems but do not appear in all cases when a problem has
occurred.
Improper use may cause an inaccurate result without producing an error message.
In the event of a problem, refer to information under ‘‘action to take’’
DISPLAY DESCRIPTION ACTION TO TAKE
Code
Display check
If some parts of the display are not
working. Contact your local distributor
for help.
Display check Meter is in the program check, wait to
next meter display.
Display temperature Appears current ambient temperature.
Blinking Strip The meter is waiting for test strip be
insert.
Blinking Blood The meter is ready for blood applying
into test strip.
Display Messages And Problem-Solving Guide
System Specifications
Model Name OK-1N
Assay Method Electrochemical biosensor
Test Sample Capillary Whole Blood
Test Result Referenced to plasma glucose value
Alternative Site Testing YES (palm, forearm, upper arm, calf, or thigh)
Sample Size 0.7 μL
Measuring Time 6 seconds
Measuring Range 20 – 600 mg/dL (1.1 – 33.3 mmol/L)
Acceptable Hematocrit Range 20~60%
Operating Condition 10°C~40°C(50°F~104°F), between 10-85% R. H.
Storage/Transportation Condition
4°C~40°C(39°F~104°F), between 10-85% R. H.
Memory Capacity 180 test results with time and date
Average Calculation 7, 14, 21,and 28 days
Power Supply 1.5-volt AAA Battery x 2
Battery Life Approximately 1,000 tests
Automatic shut-off In 3 minutes
Dimensions 107 x 50 x 19 mm
Weight Approximate 75 g (with battery)
Memory Recall
The OKmeter Direct automatically stores 180 test results, letting you review them
in order from the most recent to the oldest. The meter also calculates and displays
7, 14, 21, and 28-day averages. You can review the individual or average test result
by entering the memory mode.
STEP 1. Enter the Memory Mode
While the meter is turned off, press M BUTTON for twice to
enter memory mode.
STEP 2. Recalling Average Test Results
When entering the memory mode, the 7-day average will
appear. If you continue to press the M BUTTON, the 14-day,
the 21-day, and the 28-day averages will display in order.
STEP 3. Recalling Individual Test Results
After 28-day average, the most recent test result with date
and time will be shown. Press M BUTTON once and the next
most recent test result will appear. Each time you press and
release the M BUTTON, the meter will recall up to your last
180 test results in order. When the memory is full, the oldest
result is dropped as the newest is added.
STEP 4. Exit the Memory Mode
After reaching the last set of result, the meter will turn Off.
Anytime in the memory mode, you can press and hold M
BUTTON for three (3) seconds to turn off the meter.
NOTE :
1.The control solution results are NOT stored in the memory if you preset the
control test correctly. (Please refer to the “CONTROL SOLUTION TEST”
Section for details). The list of past results and the result average are for blood
glucose results only.
2.When using the meter for the rst time, ‘‘----‘’ is displayed. When you recall the
test results or review the average result, it means that there is no test result in
memory.
3.The averages are calculated from your latest result obtained during the last 7,
14, 21, and 28 days.
4. Anytime in memory mode, you can press M BUTTON for 3 seconds to exit the
memory mode.
5. While in the memory mode, if you leave the meter alone without any action for
one (1) minute, the meter will turn off automatically.
Understanding Your Test Result
The normal blood glucose range is below 100 mg/dL (5.6 mmol/L) for a fasting,
non-diabetic adult, but less than 140 mg/dL (7.8 mmol/L) two hours after meals.*
Consult your healthcare professional to nd out your target blood glucose value.
If your blood glucose result seems unusually high or low, or inconsistent with your
previous results, check the following:
1. Was the blood sample applied immediately to the test strip after removing it from
the vial?
2. Was the volume of the blood sample sufcient?
3. Was the test strip vial cap tightly sealed?
4. Was the test strip used before the expiration date?
5. Were the test strips stored away from extreme temperatures in very cold or hot
weather or from areas of high humidity?
Then run a control test with OKmeter control solution. If the control test result
is within the acceptable range, review testing procedure and repeat your blood
glucose test with a new test strip. If your blood glucose value is still inconsistent
with your previous results, glucose trend, or how you feel, contact your doctor
immediately for help.
*American Diabetes Association
(http://www.diabetes.org/diabetes-basics/prevention/pre-diabetes/diagnosis.html)
Test result with a sign. Appears when result falls in
70-120 mg/dL (3.9-6.7 mmol/L).
Test Result with low and
sign.
Appears when result is lower than
70 mg/dL (3.9 mmol/L).
Test Result with high and
sign.
Appears when result is higher than
120 mg/dL (6.7 mmol/L).
Test Result with high,
and KETONE? sign.
Appears when result is higher than
240 mg/dL (13.3 mmol/L). This is to
remind Type 1 Diabetic that the glucose
value is high and there is a risk of
ketosis. Please call medical assistance
immediately.
Test result is lower than 20
mg/dL (1.1 mmol/L).
High or low blood glucose levels can
indicate a possibly serious medical
condition. If this is not confirmed by
the way you feel, review proper testing
procedure and perform a control test.
Repeat blood test, if the display still
appears, please call medical assistance
immediately. .
Test result is higher than
600 mg/dL (33.3 mmol/L).
No memory There is no memory in the meter.
Battery is dead Replace battery now.
Maybe:
1. Used strip or moistened
strip
2. Defective meter.
You have to:
1. Repeat test with a new test strip.
2. Contact your local distributor for
help.
Temperature is out of the
operating range.
The meter is not working. Move to an
area with temperature between 10ºC to
40ºC (50ºF - 104ºF) and wait at least 30
minutes. Do not artificially heat or cool
the meter.
The test strip was removed
when meter is counting
from 06 to 01.
Repeat test with a new test strip.
No responses
when test strip
is inserted into
the meter.
There are multiple potential
causes :
1. Battery is dead.
2. Wrong strip was inserted.
3. Meter is defective.
Depending on the cause, please take
these given actions :
1. Replace the battery.
2. Insert the test strip correctly.
3. Contact us for help.
No responses
when blood
sample is
applied to the
test strip.
Maybe:
1. Blood sample is not
sufcient.
2. Meter is defective.
Please repeat the test with sufficient
blood volume. If you still see the same
results, please contact us for help.
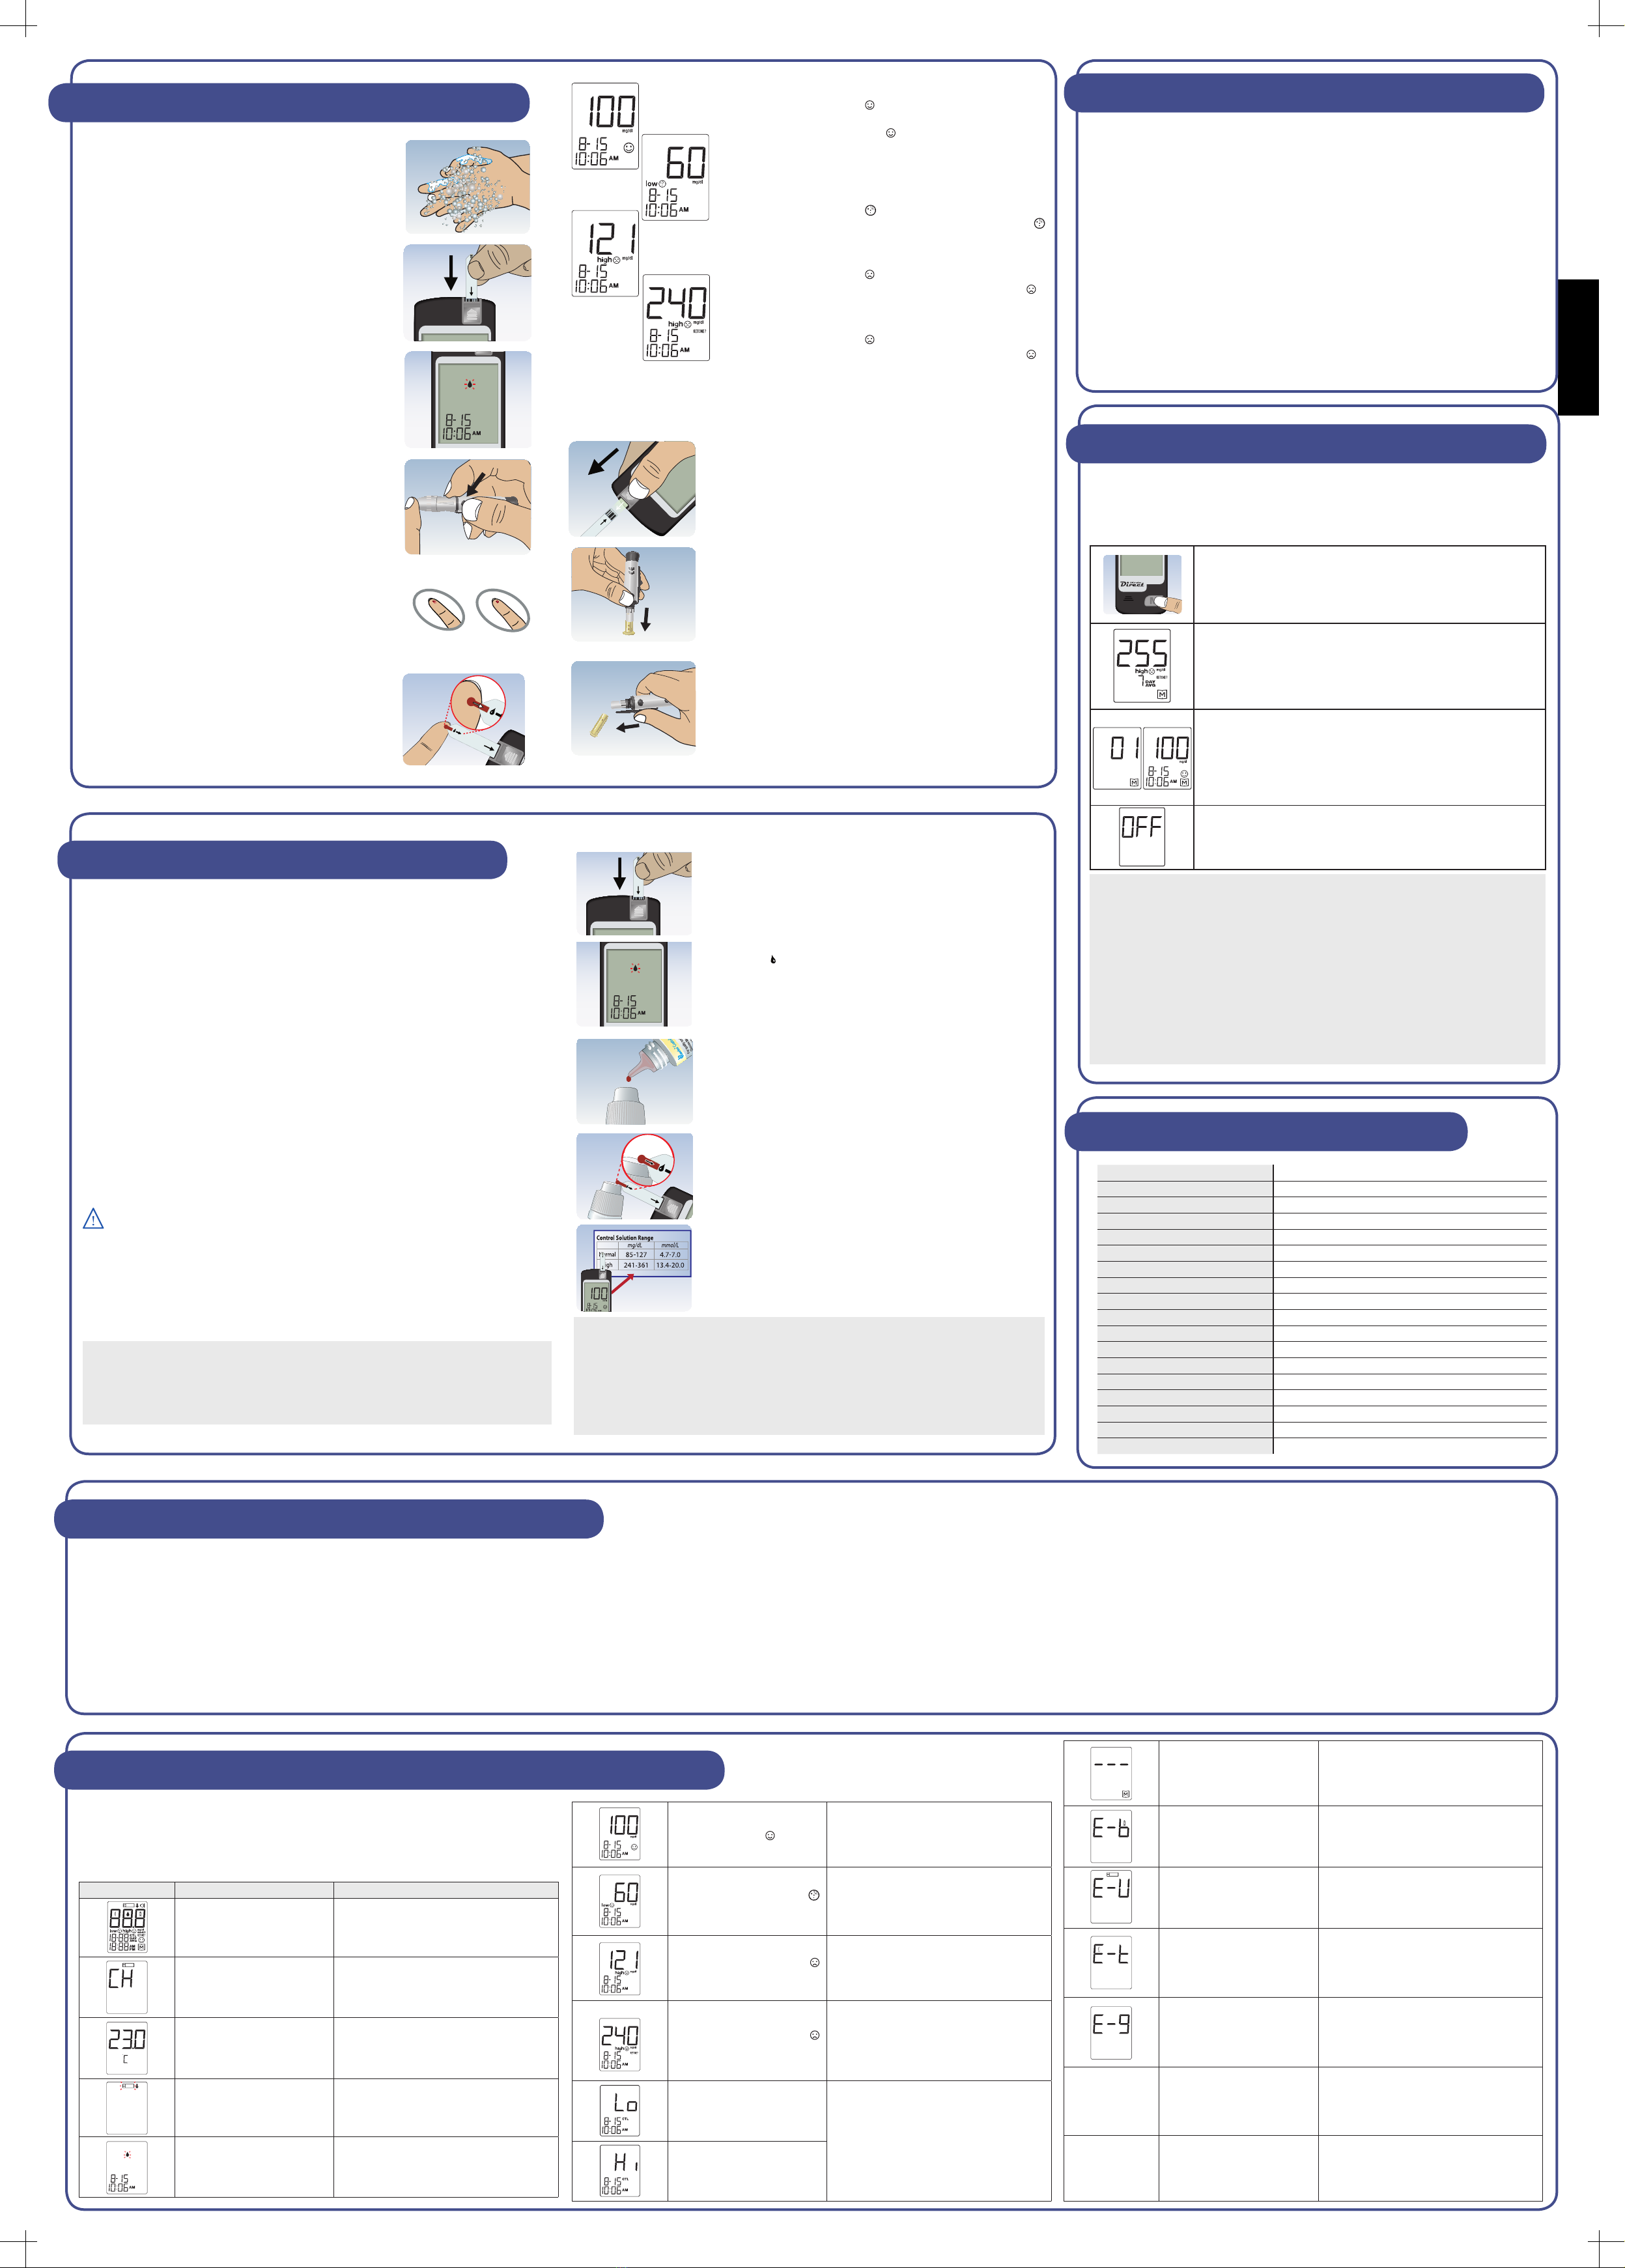
Performing Blood Test
1. Wash Your Hands and the Puncture Site : Wash your
hands in warm, soapy water. Rinse and dry completely.
Warm your ngers to increase blood ow.
2. Insert Test Strip : Remove a new test strip from vial. Be
sure to tightly replace vial cap after removing test strips.
Insert test strip immediately into strip slot as illustrated.
The meter turns on automatically. When the blood
symbol blinking, you are ready to perform a test.
3. Wait for blood symbol blinking : When the blood
symbol blinks, you are ready to perform a test.
4. Select and Lance a Puncture Site
Hold the prepared lancing device rmly against the side
of your ngertip. Press release button.
5. Obtain a Blood Sample : Gently massage your nger
or puncture site to obtain the required blood volume.
To perform the test, you need only 0.7 μL of blood
sample. Do not smear the blood sample. To obtain
best accurate result, wipe off the rst drop of blood and
gently squeeze another drop of blood.
6. Apply Blood Sample : Apply the blood sample to the
opening of absorbent channel of test strip until the
confirmation window is fully covered with blood. Then
the meter begins to count down and displays the test
result in 6 seconds.
7. Read Your Result :
*blood glucose value with sign
Test result will be displayed after meter counts down from 6
to 1. The meter will display a sign if the result falls in the
range of 70-120 mg/dL (3.9-6.7 mmol/L). See Figure 1.
The default value is only for your reference, please
consults your health care professional to find out your
target blood glucose value.
*blood glucose value with and low sign.
The meter will display your blood glucose value with a
and low sign if your test result is lower than 70 mg/dL
(3.9 mmol/L). See Figure 2.
*blood glucose value with and high sign
The meter will display your blood glucose value with a
and high sign if your test result is higher than 120 mg/dL
(6.7 mmol/L). See Figure 3.
*blood glucose value with , high and Ketone? sign.
The meter will display your blood glucose value with a
high and Ketone? sign if your test result is higher than
240 mg/dL (13.3 mmol/L). See Figure 4.
This is to remind Type 1 Diabetic that the glucose value
is high and there is a risk of ketosis. Please call medical
assistance immediately
8. Slide Forward Ejector : To discard the test strip, turn the
meter upside down, and Strip Ejector forward.
9. Remove the Lancing Device Cap when finished. Put
the Protective Cap back onto the exposed needle of the
lancet.
10.Direct the lancing device away from you and slide
the Lancet Ejector in a forward motion, disposing the
lancet in an approved container.
Fig.1
Caring For Your Meter And Test Strip
Do not use organic solvents to clean the meter. Your meter is a precision
instrument. Please handle it with care.
Storage
1. Meter Storage
* Storage condition: -20ºC~50ºC (-4ºF~122ºF), below 90% relative humidity.
* Avoid dropping and strong impact.
* Avoid direct sunlight and humidity.
2. Strip Storage
* Storage condition: 4ºC~40ºC (39ºF~104ºF), and 10~85% relative humidity. Do not refrigerate.
* Store your test strips in their original vial only. Do not transfer to other container.
* Store test strip packages in a cool and dry place. Keep away from direct sunlight and heat.
* After removing a test strip from the vial, immediately replace the vial cap and close it tightly.
* You may touch the test strip anywhere with clean, dry hands when removing it from the vial or
inserting it into the meter.
* Use each test strip immediately after removing it from the vial.
* Do not bend, cut, or alter a test strip in any way.
* Keep the strip vial away from children since the cap and the test strip can be a potential
choking hazard. If swallowed, please seek medical assistance immediately.
3. Control solution storage
* Storage condition: Store the control solution tightly closed at temperatures below 86ºC (30ºC).
* Do not refrigerate.
Fig.2
Fig.3
Fig.4
To avoid the meter and test strips getting dirt, dust or other contaminants, please
wash and dry your hands thoroughly before use.
Cleaning
Your meter does not require special maintenance. As long as no blood or control
solution comes in direct contact with the meter, there is no special cleaning
required.
To clean the meter exterior, wipe with a cloth moistened with tap water or a mild
cleaning agent, then dry the device with a soft and dry cloth. Do not flush with
water.
Control Solution Testing
OKmeter control solutions contain a known amount of glucose that reacts with
OKmeter test strips. By testing your control solution and comparing the test results
with the expected range printed on the test strip vial label, you can make sure that
the meter and the test strips are working properly together as a system and that you
are performing the test correctly. It is very important that you do this simple check
routinely to make sure you get accurate results.
Why perform a control solution test?
1. To ensure that your meter and test strip are working properly together.
2. To allow you to practice testing without using your own blood.
When should the control solution test be performed?
1. When you rst get your OKmeter Direct meter. Before use this system to test your
blood, you can practice the procedure by using control solution. When you can do
three tests in a row that are within the expected range, you are ready to test your
blood.
2. Once a week (to make sure that you continue to get accurate results)
3. When you begin using a new vial of test strips.
4. Whenever you suspect that the meter or test strips are not working properly.
5. When your blood glucose test results are not consistent with how you feel, or
when you think your results are not accurate.
6. When test strips are exposed to extreme environmental conditions.
7. If you drop the meter.
Important Control Solution Information
1. Check the expiration date on the control solution bottle. Do not use if expired.
2. Control solution, meter, and test strips should come to room temperature (68-
77 ºF/20-25ºC) before testing.
3. Shake the bottle before use, discard the first drop of control solution after
squeezing, wipes off the dispenser tip to avoid contaminations. These steps
ensure you will get a good sample and an accurate result.
4. Record the discard date on the bottle when you open a new bottle of control
solution.
NOTE : 1. There are two levels of control solution (normal and high) available to
purchase. Please contact with your local distributor when required.
2. The control solution range printed on the test strip vial is for OKmeter
Control Solution only. It is used to test meter and strip performance. It is
not recommended range for your blood glucose level.
How to Perform a Control Test
NOTE : 1. Be sure that you are in Control Solution Mode so that the test result will
not be stored in themeter memory.
2. DO NOT APPLY THE CONTROL SOLUTION DIRECTLY TO THE TEST
STRIP! Overdosed solution may give inaccurate result.
3. Repeat test if test result falls outside the control range stated on the test
strip label. If subsequent test remains to produce unacceptable result,
the meter or test strip may be faulty. DO NOT use the system. Contact
us or your local distributor for help.
1. Insert Test Strip : Insert a new test strip into the strip slot,
the meter will activate.
2. Mark as a Control Solution Test : After the blood
symbol( ) appears, press M BUTTON and "CTL" appears
on the display indicating you are in the Control Solution
Mode. The meter will not store your test result in the
memory when you preset the test as a control solution
test. If you decide not to perform a control solution test,
press M BUTTON again and the"CTL" will disappear.
3. Squeeze a drop of Control Solution : Shake control
solution bottle well. Remove the cap. Squeeze bottle,
discard the rst drop and wipe off the dispenser tip with
a clean tissue paper or cotton swab. Squeeze a drop on
clean bottle cap/ngertip /non-absorbent surface.
4. Apply Control Solution : Apply the drop to the opening
of the strip absorbent channel until the confirmation
window is lled. The meter begins to count down.
5. Check if the test result is in range: After the meter
counts down from 6 to 1, the test result shows up.
Compare the test result with the range printed on the test
strip vial. The result should fall within the printed range.


