OKP K7 User manual

Robotic Vacuum Cleaner K7
User Manual
Applicable for K7 Series
Instruction Manual

Congratulations on the purchase of your OKP ROBOTICS!
We hope it brings you many years of satisfaction. We trust the purchase of
your new robot will help keep your home clean and provide you more quality
time to do other things.
Wisdom Inspired Freedom
Should you encounter situations that have not been properly addressed in
this Instruction Manual, please contact our Customer Service Center where
a technician can address your specifi c problem or question.
For more information, please visit the OKP ROBOTICS offi cial website:
www. okptlife. com or send email to support@ okplife. com
The Company reserves the right to make technological and/ or design changes
to this product for continuous Improvement.

4.Maintance
15
Remove dust filter. HEPA is not recommended for
Pat the High Eff iciency Filter clean.
and unplug the Charging dock.
4.1 Dust Bin and Filters
When cleaning and maintaining the robot and its accessories, turn off the robot
1Remove the dustbin, open the dustbin cover,
and empty the Dust Bin.
Flush the Dustbin and
the filter net.
washing.
Dry the Sponge filter, Dust Bin
and Filter Net completely
before reinstalling.
4
3
2

16
4.2 Roller Brush and Side Brushes
1Cleaning Roller Brush
Turn the robot over. Push both buttons on the Roller Brush Cover and remove it.
Remove the Roller Brush. Use the Multi- Function Cleaning Tool to cut off and
remove any hair tangled around the Roller Brush.
Cleaning the Side Brushes
Remove the Side Brushes. Wipe
the Side Brushes and their slots
with a dry cloth.
4.Maintance
2
4Clean the driving wheel to maintain
it's effectiveness.
3Use the Multi-Function
Cleaning Tool to cut off
and remove any hair tangled
around the Universal Wheel.

* If you do not use this product for a long time, please take out the battery and keep it properly.
If the battery leaks, remove the battery, And wipe the battery cell clean. This product has a
Long life battery and does not need to be replaced frequently. If you need to replace it, you can
contact our after- sales service for replacement.
17
4.Maintance
4.3 Other Components
■Wipe the Charging Contacts and Charging Dock Pins with the brush of the
Multi-Function Cleaning Tool or a dry clean cloth to maintain their effectiveness.
■Clean the anti-collision sensor
panel.
■Wipe the Anti-Drop Sensors with
the brush or the felt side of the Multi-
Function Cleaning Tool to maintain
their effectiveness.

18
5.Indicator Light
1Lighting Effects
Master Status
AUTO Display Status
WiFi Display Status
Charging
pink light / blue light breathing
As per current networking status
Finished Charging
Blue lights goes off
As per current networking status
When the machine fails
Red light flashes or lights up
As per current networking status
Low Battery
Red light is always on
As per current networking status
Cleaning Mode
Blue light is always on
As per current networking status
Before starting distribution network
Blue light is always on
Blue light flashes
Distribution process/
Loss of signal reconnection
Blue light is always on
Exit the distribution network after 5
minutes, the blue light is off
Connect to Wi- Fi
Blue light is always on
2Common alarm tips
When the robot failure, the Start/Pause button light flashes in red and the buzzer sounds of different
lengths will be emitted. Refer to the following table to check the cause of the fault:
Glows a continuous Red
No.
Cause of Issue
Beep
Solutions
1
Drive wheel
1 beep
3 times
The drive wheel is abnormal. Please check if the
drive wheel is entangled and clean it.
2
Side Brushes
2 beep
3 times
If the side brushes are abnormal, please check if the
side brush is entangled and clean the side brushes.
3
Fan abnormal
3 beep
3 times
The fan is abnormal, please clean the dustbin and air
duct outlet.
4
Roller brush
4 beep
3 times
The roller brush is abnormal. Please check if the
roller brush is entangled and clean the roller brush.

19
Flashes Red
No.
Cause of Issue
Beep
Solutions
1
Front infrared
Anti- collision bumper
1 beep
3 times
The bumper is abnormal. Please check if the
infrared buff er bumper is stuck.
2
Anti- Drop sensor
2 beep
3 times
The ROBOT is suspended, please move to
the ground
3
Out of Trouble
3 beep
3 times
the ROBOT fail to get out of trouble, please
move to the open space
4
Low battery
4 beep
3 times
the battery is too low, please charge
5
Adapter Exception
5 beep
3 times
the charging voltage is abnormal, please replace
the adapter.
6
Abnormal charging
status
6 beep
3 times
Charging is abnormal, please check if the switch
is turned on.
Tips
if the above method does not solve the problem, please try the following:
re- open the power switch on the side of the robot to restart the machine.
6.Troubleshooting
Please use this chart to troubleshoot common problems using robot.
NO
Malfunction
Possible Causes
Solutions
01
Can not
connect to
WIFI.
Incorrect WIFI name or Password.
Please make sure the WIFI name and the
password are entered correctly.
Make sure the robot is less than
5 feet(0.5 meter)away from the
router and your phone - the
closer the better!
Ensure the robot is under WIFI signal coverage.
Robot isn' t in network pairing mode.
Make sure the robot is in the network pairing mode.
Didn't connect to 2.4 G Wi-Fi signal.
The robot doesn't connect compatible with 5G WiFi
signal, Please connect to 2.4G WiFi signal.
Download the incorrect APP
Please scan the QR code in the user manual or
search “ OKP life" on google play or app store.
02
The robot
is too noisy.
Side brush, rolling brush,entangled,
dustbin Filter material blocked, etc.
It is recommended to clean and maintain the
brush, roller brush,dustbin and filters regularly.
The robot is in MAX suction
power mode.
Change the suction power mode to Medium or Low.

20
NO
Malfunction
Possible Causes
Solutions
03
Robot will
not Charge.
Robot has not made a connection
with the Charging Dock.
Be sure that robot’s Charging Contacts have made
a connection with the Charging Dock Pins.
Charging Dock is unplugged
while robot is powered ON,
which causes battery.
consumption.
Plug in the Charging Dock and ensure robot is
powered ON. Keep robot on the Charging Dock to
make sure it has a full battery to work at any time.
04
Robot gets
into trouble
while working
and stops.
The robot is entangled or
obstructed by scattered wires on the
ground, drape curtains or carpet edges.
Robot will try various ways to get itself out of trouble.
If it is unsuccessful, manually remove the obstacles and
restart.
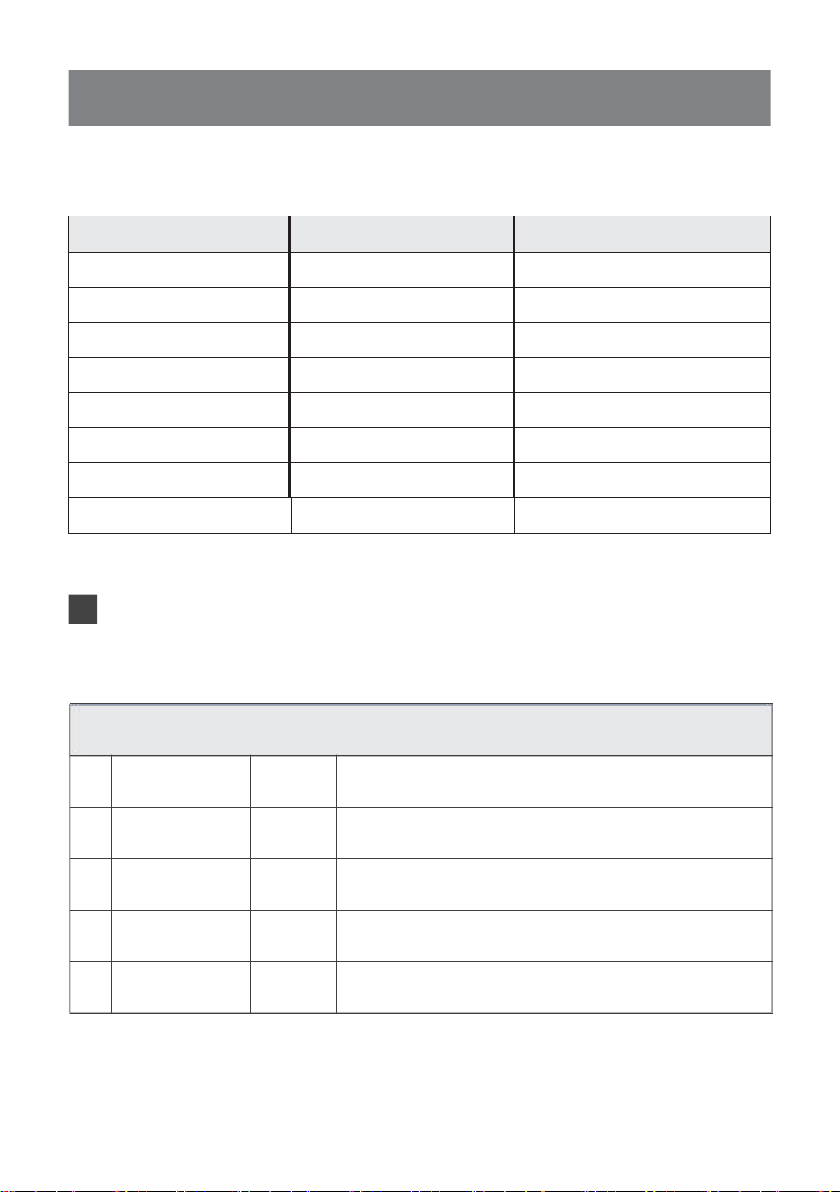
Side Brush is stuck or the rotation
speed of the Side Brush decreases.
Remove the debris tangled around the Side Brush. If the
Side Brush still rotates slowly, contact Customer Service.
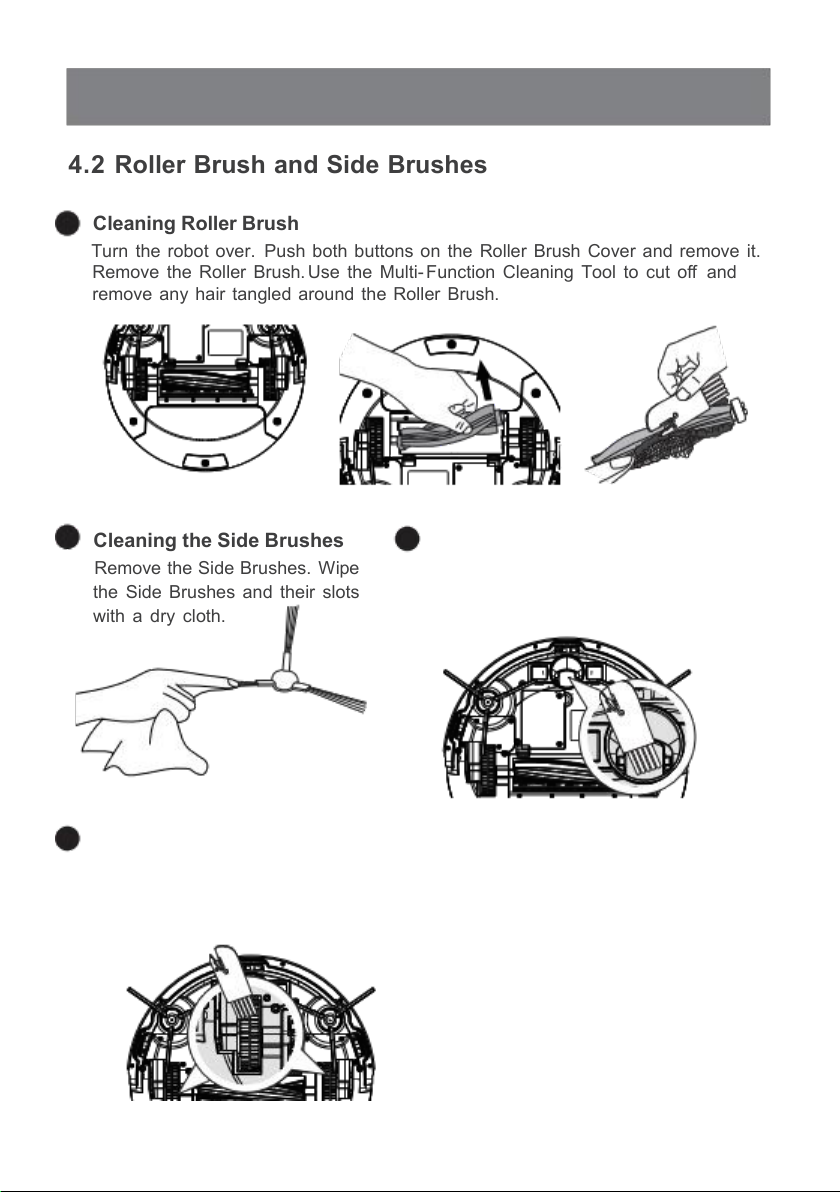
Roller Brush is stuck or the rotation
speed of the Roller brush decreases.
Remove the debris tangled around the roller Brush with the
provided Multi-Function Cleaning Tool. If the Roller Brush
still rotates slowly, contact Customer Service.
05
Robot returns to
the Charging
Dock before it
finishes cleaning.
When battery power gets low, robot
automatically switches to Return to
Charger Mode and returns to the
Charging Dock to recharge itself.
This is normal. No solution necessary.
Working time varies according to floor
surface,room complexity and the selected
Cleaning Mode.
This is normal. No solution necessary.
06
Robot will not
clean
automatically at
scheduled time.
Time Scheduling function is cancelled.
Turn on the power switch of the robot, reconnect the
network and use the APP to check the scheduled settings.
Robot is powered OFF(once the robot
is power off , the time scheduling
settings via remote control will be
removed).
Power on the robot and make the schedule using the
remote control over again.
The robot’ s battery is low.
Keep robot powered ON and on the Charging Dock to
make sure it has a full battery to work at any time.
The robot’ s components are tangled
with debris.
Power OFF robot, clean the Dust Bin, and invert the
robot. Clean Side Brushes and the Roller Brush as
described in section 4.
07
Remote Control
failure(effective
control range of
Remote Control
is 5m (16’).
The batteries in the Remote Control
need to be replaced.
Replace the battery with a new one and install it properly.
Robot is powered OFF or robot’s
battery is low.
Make sure robot is powered ON and fully charged.
The infrared signal cannot be
transmitted because the Infrared
Emitter on the Remote Control or
robot’ s Infrared Receiver on robot is
dirty.
Use a dry cloth or the Multi-Function Cleaning Tool to
wipe the Infrared Emitter on Remote Control and the
Infrared Receiver on robot.
There is other equipment interfering
with the infrared signal to robot.
Avoid using the Remote Control near other equipment
using infrared signals.
If the trouble cannot be eliminated according to the above operation,
Please contact support@okplife.com
The images are only for reference, please refer to the actual item as the standard.
OKP reserves the right to update products without prior notice.

21
Product Model
K7
Vacuum Cleaner Rating
19V,0.6A
Changing Dock Rating
19V,0.6A
AC adapter model
AD-0121900060US
AC adapter rating
lnput:100-240V~50-60Hz;0,5A
Output:DC 19V;0,6A;Class II;
Other manuals for K7
1
This manual suits for next models
1
Table of contents
Other OKP Vacuum Cleaner manuals