Okto Research dac8 Stereo User manual

dac8 Stereo
Highest performance, streaming-enabled stereo D/A converter
Owner’s Manual

2 |dac8 Stereo Owner’s Manual | okto research
Contents
Specifications ................................................................................................................................................3
Mechanical drawings...................................................................................................................................5
Back panel overview....................................................................................................................................6
Package contents.........................................................................................................................................6
Setting up......................................................................................................................................................7
USB .............................................................................................................................................................7
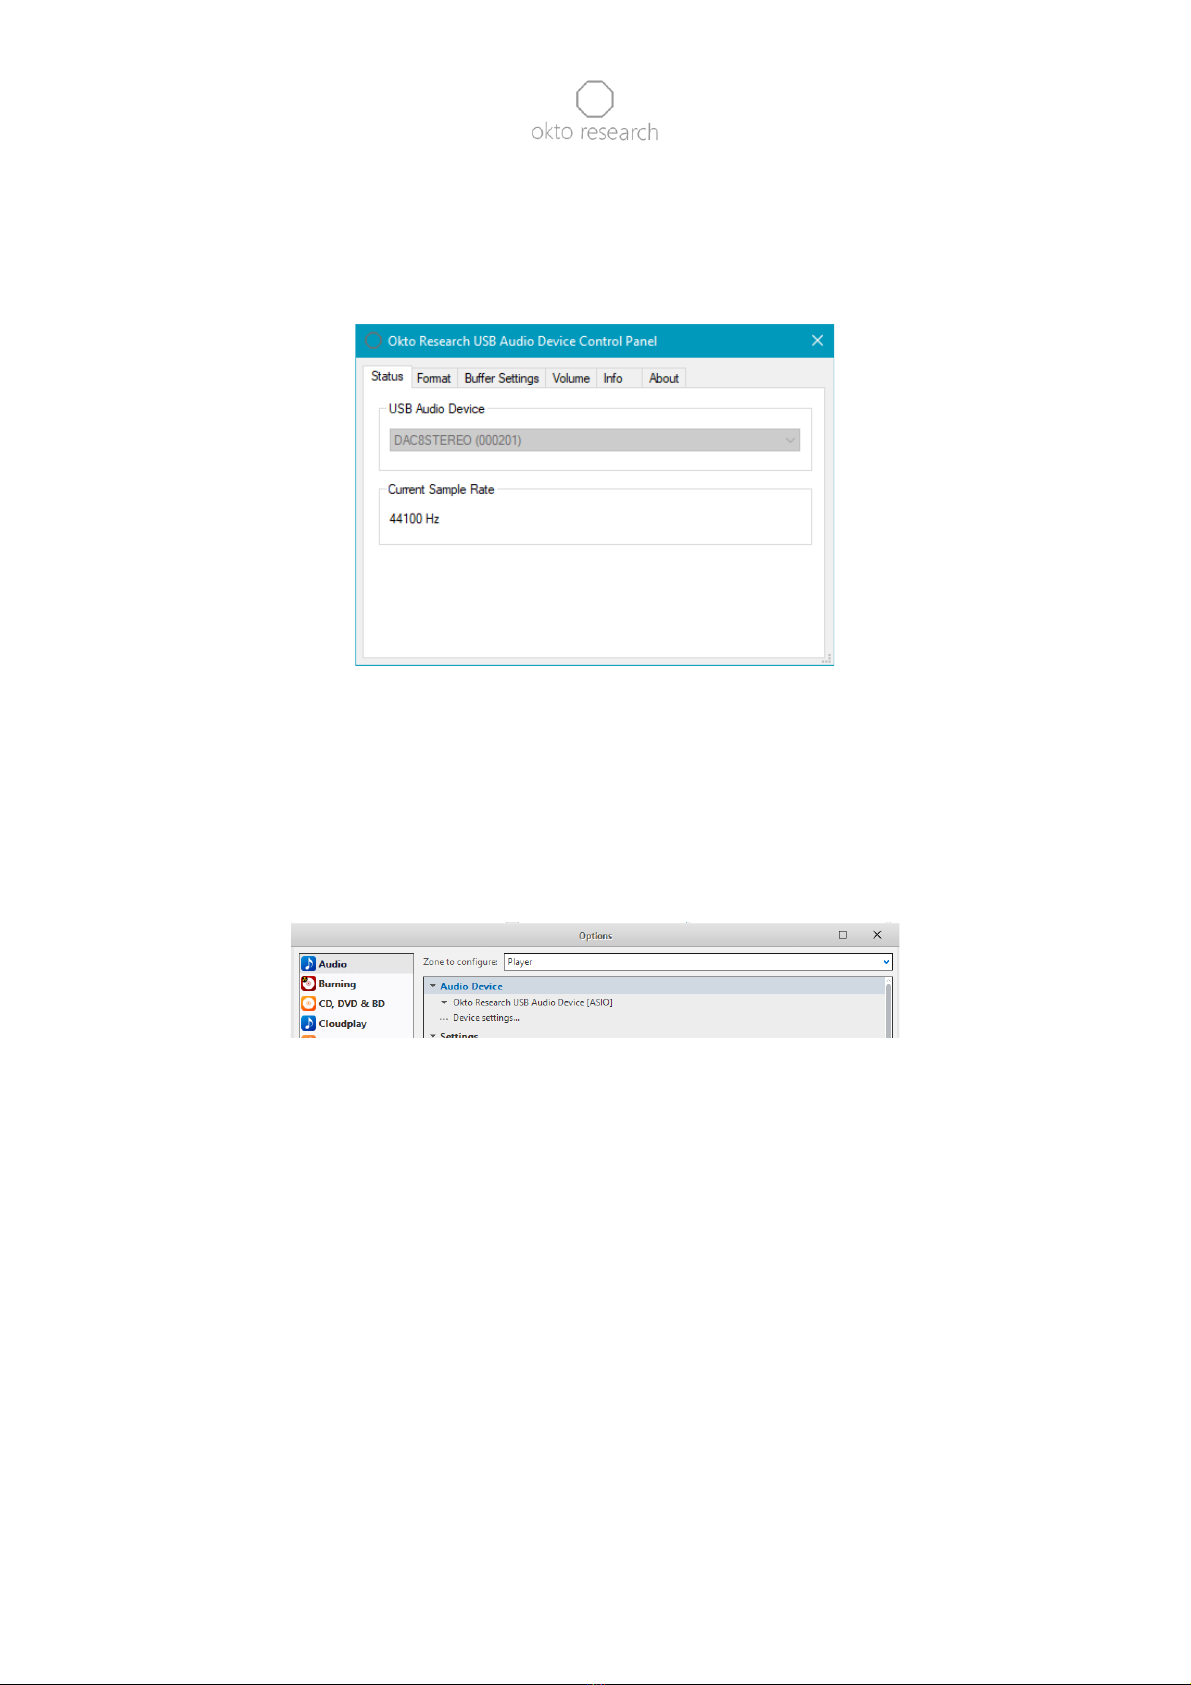
Drivers..................................................................................................................................................7
Analog Connections....................................................................................................................................9
Main outputs.............................................................................................................................................9
Driving power amplifiers directly.................................................................................................. 10
Volume operation ........................................................................................................................... 10
Interfacing with legacy devices with single-ended inputs only .............................................. 10
Headphone output.................................................................................................................................11
Controls ....................................................................................................................................................... 12
Rotary control......................................................................................................................................... 12
Remote control ...................................................................................................................................... 12
User interface and menu system ............................................................................................................ 13
Main screen, left..................................................................................................................................... 13
Main screen, right..................................................................................................................................14
Main menu..............................................................................................................................................14
Volume submenu .................................................................................................................................. 15
Inputs submenu ..................................................................................................................................... 15
Outputs submenu.................................................................................................................................. 16
System submenu.................................................................................................................................... 16
Displays submenu.................................................................................................................................. 17
Filters submenu...................................................................................................................................... 17
Status submenu...................................................................................................................................... 21
Advanced submenu .............................................................................................................................. 21
Using dac8 Stereo streaming capabilities .............................................................................................22
Converting non-streaming unit into a streaming one....................................................................23
Mains voltage selection ........................................................................................................................... 24
Troubleshooting........................................................................................................................................ 24
Issue 1: USB input not recognized..................................................................................................... 24
Issue 2: Dropouts during AES/EBU playback....................................................................................25
Service and warranty.................................................................................................................................25
Manual revisions ........................................................................................................................................26

3 |dac8 Stereo Owner’s Manual | okto research
Specifications
Digital connections
-Inputs
-USB (asynchronous, UAC2.0 compliant), up to 384 kHz / 32-bit PCM, DSD256
or DoP128
-2x Optical (Toslink)
-2x Coaxial (SPDIF)
-AES/EBU (SPDIF voltage level compatible)
-Ethernet (through Raspberry Pi)
-Wi-Fi (through Raspberry Pi)
Analog connections
-Main outputs (back side)
-2x XLR balanced, 2 connectors per channel
-4.2V RMS full-scale
-output impedance: 50 Ohms
-Headphone output (front side)
-6.3 mm (1/4”) TRS connector
-Output level: 4.2 V RMS full-scale
-120 mA linear output current
-Output impedance <100 mOhm
Analog performance
-0.00003 % / -130 dB full-scale THD (Total Harmonic Distortion) or better
-0.0001 % / 120 dB full-scale SINAD or better
-131 dB dynamic range
-0.00022 % / -113 dB THD+N @ 100 mW into 32 Ohms headphone output
Additional features
-Designed to directly interface to amplifiers
-Per-channel volume
-Choice between 7 PCM reconstruction FIR filters
-Configurable auto on / auto off

4 |dac8 Stereo Owner’s Manual | okto research
-Configurable display timer for auto dim/off
-Remote control learning
-Adjustable 2nd and 3rd order THD compensation
-Trigger output
-5 V voltage level
-short-circuit proof with 15 mA maximum current
-pulse or continuous
-Full control with either rotary or remote control
Dimensions
-446 x 183 x 50 mm, (17.56 x 7.2 x 1.97 in), excluding removable feet
-Weight: 4.5 kg (10 lbs)
Power
-Mains voltage: 120 V AC or 230 V AC, according to the mains voltage of the country
from which the order was placed, unless requested otherwise
-Power rating: 15 W

5 |dac8 Stereo Owner’s Manual | okto research
Mechanical drawings

6 |dac8 Stereo Owner’s Manual | okto research
Back panel overview
Package contents
-dac8 Stereo (silver or black depending on your choice, 120 V or 230 V version depending
on the country of order)
Additionally, for the streaming version:
-Wi-Fi USB adapter with antenna
-USB interconnect
-blank 16 GB microSDHC memory card (inserted in the Raspberry Pi’s slot)
Optional accessories:
-Apple Remote (optional accessory)
In an effort to reduce electronic waste, we've decided not to include the standard disposable
USB and power cables in the package. We understand that audio enthusiasts often already
own their preferred cables.

7 |dac8 Stereo Owner’s Manual | okto research
Setting up
USB
The dac8 Stereo is compliant with USB Audio Class 2 (UAC2), a widely used digital audio
interface standard that enables asynchronous operation. This feature allows the DAC to
control data flow according to its own high-precision oscillator, bypassing any requirements
for the precision of the clock in the source device or cables.
Drivers
The UAC2 standard also enables operation with Mac OS and Linux without the need for
installing additional drivers. The dac8 Stereo will be recognized as a 2-channel playback
device and a 2-channel recording device. The only action required by the user is to select
the dac8 Stereo in your operating system's audio control panel.
This also applies to Windows 10 and newer; however, we strongly recommend installing the
Okto Research ASIO driver to bypass the Windows sound mixer and enable exclusive access
to the device for bit-perfect, low-latency operation. The driver can be downloaded from the
following link:
https://oktoresearch.com/assets/OktoResearchUsbDriver.zip
To install it, extract the executable file from the archive, run it and go through the steps.

8 |dac8 Stereo Owner’s Manual | okto research
After a successful installation, the Okto Research icon will appear in your system tray. If the
unit is connected to the computer, it will be recognized by the driver, as shown in the
following image.
Please note: this driver will only work with units running firmware 1.2 and newer. Units with
older firmware have different USB identifiers and will not be recognized. Please contact us
to receive an ASIO driver compatible with older firmware versions.
Once the installation is complete, the "Okto Research USB device" will become available in
any ASIO-capable playback software. The following image shows the output device setting
in JRiver:
To reduce latency, navigate to the USB driver's control panel, select the "Buffer Settings"
tab, and change the buffer size in the dropdown menu. The dac8 Stereo is tested to work
with 1.5 ms output latency for playback and 1.67 ms for recording; however, the host
computer must be able to provide data in a timely manner to avoid buffer underruns and
dropouts during playback.

9 |dac8 Stereo Owner’s Manual | okto research
Warning: The USB input of the dac8 Stereo may not work correctly when connected to a
USB hub or a legacy USB 1.0 port. Be sure to use a USB 2.0 (or newer) port when connecting
the unit.
Analog Connections
Main outputs
The main analog outputs provide 2 channels that represent signals from the selected digital
input, converted to the analog domain with extremely high precision. The back plate of the
dac8 Stereo features two output XLR connectors per channel. They are connected together
internally, allowing for simultaneous connection of two devices, such as a power amplifier
for main speakers and an active subwoofer, or a pair of active speakers located in different
rooms.
The main outputs are not muted when the headphone jack is plugged in. The reason for
this is that the operational amplifiers driving the main outputs are also responsible for driving
the headphone amplifier.

10 |dac8 Stereo Owner’s Manual | okto research
Driving power amplifiers directly
Low output impedance allows the unit to directly drive inputs of power amplifiers without
the need for a pre-amplifier. In such a setup, the full-scale output voltage of the DAC, which
is 4.2 V RMS in the case of the dac8, and the input sensitivity (voltage required for full power)
of the power amplifier should ideally match to optimally utilize the dynamic range of the
devices. Below are two examples of how the dynamic range can be negatively impacted if
there is a significant difference between the two values:
Scenario 1: Consider a power amplifier with 1 V RMS input sensitivity. The limitation might
occur in the power amplifier if the dac8 Stereo volume is set to -12 dB or higher.
Consequently, the upper 12 dB of the dac8 Stereo's output would remain unused. By
lowering the output voltage of the dac8 Stereo to 1 V, its noise floor could be reduced by
12 dB, preserving the dynamic range.
Scenario 2: Consider a power amplifier with 8 V RMS input sensitivity. In this case, the dac8
Stereo wouldn't be able to utilize the full power of the amplifier, resulting in a loss of 6 dB
in attainable sound pressure level. Elevating the dac8 Stereo 's output voltage to 8 V RMS
would enable it to harness the full power of the amplifier, optimizing the dynamic range of
the setup.
The custom output voltage is available as an optional feature at an additional cost. This
value, determined by a significant number of small surface-mount resistors, cannot be
adjusted by users. The selectable range lies between 1 V RMS and 10 V RMS.
The outputs are protected against long-term short circuit for the default or lower output
voltage. However, we advise against stressing the outputs with a long-term short circuit.
Volume operation
The volume control consists of a master volume (displayed on the right screen) and per-
channel volume, accessible in Menu > Volume. The resulting value for each channel can be
calculated by adding the two values. To bypass the volume control completely, simply set
all the values to 0 dB.
Interfacing with legacy devices with single-ended inputs only
We highly recommend using balanced cabling between analog audio components
whenever possible. The main reason is that, due to the different reference, ground is not a
part of the balanced signal path. This makes equalizing currents created by ground loops

11 |dac8 Stereo Owner’s Manual | okto research
and electromagnetic interference, which would otherwise be injected into the signal,
harmless.
If you need to interface the dac8 with a legacy pre-amplifier or a power amplifier that has
single-ended inputs only, there are three methods to do so:
1) A solid-state conversion circuit, for example the Neurochrome Universal Buffer
2) Audio transformers like Lundahl LL1584-3FXPHM
3) A special adapter cable with floating pin 3, like “Benchmark XLRF to RCA cable for analog
audio with pin 3 floating”. The cable does not perform actual signal conversion; instead,
it only uses one half of the balanced output from the dac8 without shorting the other
half to ground. This method will result in a loss of performance, but it is recommended
as a cost-effective way to connect subwoofers.
Warning: We strongly discourage the use of balanced-to-unbalanced cables and
converters. Doing so will result in significantly decreased analog performance due to the
short they present to the output of the dac8 Stereo's analog stage, potentially overloading
it and risking damage after long-term use with high signal levels. Warranty does not apply
to units with analog circuitry damaged by using XLR to RCA cables and converters.
Headphone output
The headphone analog output, available on the front panel via a 6.3 mm (1/4") TRS
connector, provides a 4.2 V RMS full-scale voltage level, up to 120 mA linear current, and
less than 100 mOhm output impedance.
It is suitable for a majority of headphones and earphones, ranging from 16 Ohm IEMs to
large 600 Ohm open-back headphones. As mentioned in a previous chapter, plugging in
the headphone jack does not mute the main outputs.

12 |dac8 Stereo Owner’s Manual | okto research
Controls
The dac8 Stereo can be operated using either an integrated push-on switch rotary control
or an IR remote. Thanks to the 'Learn Remote' menu function, it can pair with any IR remote
with a minimum of seven buttons. For the best user experience, we recommend using the
Apple Remote or a similar substitute.
Rotary control
Device state
Off
Main screen
Menu
Menu,
selected
Input
Left/right turn
-
Volume
control
Navigation
Modify
Push
Turn on
Enter menu
Select
Confirm
Long push
Turn on
Turn off
Back
Confirm
The navigation direction is intentionally different for the left and right screens with respect
to the movement direction of the cursor.
Remote control
The dac8 Stereo can be paired with any remote that has a minimum of seven buttons. For
a detailed description of the pairing process, please refer to the “System submenu” section.
The image below illustrates button functionality as demonstrated with the Apple Remote

13 |dac8 Stereo Owner’s Manual | okto research
Short press: turn on, mute
Long press: turn off
(or three subsequent presses in case of
some remotes that don’t use the NEC
protocol)
Enter menu, exit
menu
Select, confirm
User interface and menu system
Warning: All changes made in the device menu will be saved at the moment the device is
turned off using the central control knob or infrared remote control. The changes will not
be saved if the device is turned off by disconnecting from the power supply. This is to protect
the flash memory from unnecessary writes, which increases its lifespan.
Main screen, left
-Play / pause icon: indicates incoming data
-Input mode indicator: shows selected input
-Audio data information: displays sample rate, bit depth and data format (relevant to
the current input)
USB 1
192kHz 32bit PCM
Volume- / Menu
down
Volume+ / Menu
up
Input change / Menu
back

14 |dac8 Stereo Owner’s Manual | okto research
dB
max
Main screen, right
-Master volume: controls volume of all analog outputs. The displayed value is in dB,
relative to the nominal full-scale output.
-range: 0 to -99 dB (default: -50 dB)
-Mute icon: appears when mute is enabled
-Min / max indicator: only appears if the volume reaches upper limit (set in the Menu >
Volume > Lim) or minimum value (-99 dB)
Main menu
The main menu will appear on the left screen upon pressing the knob, or by pressing the
Menu button on the remote control.
-32
Volume
Inputs
Outputs
System
Displays
Filters
Status
Advanced

15 |dac8 Stereo Owner’s Manual | okto research
Volume submenu
-Mute: mutes all the analog outputs (default: off)
-USB sync: allows the USB driver of the host device to control master volume of the
dac8 Stereo (default: off)
-Limit: sets the maximum allowed volume
-0 to -50 dB (default: 0 dB)
-Balance: adds additional attenuation relative to the master volume to control
volume balance between the left and right channel (default: L = R)
Inputs submenu
-Selected: shows active (selected) input
-Use USB1 / USB2 / Coax1 / Coax2 / Opt1 / Opt2 / AES/EBU: Allows or disallows the
respective input to be selected
-Names: changes displayed name of the two USB inputs
-USB / Stream
-USB1 / USB2 (default)
Mute
USB sync off
Limit 0 dB
Balance L=R
Selected USB
Use USB
Use Stream
Use Coax1
Use Coax2
Use Opt1
Use Opt2
Use AES/EBU
Names USB/Stream

16 |dac8 Stereo Owner’s Manual | okto research
Outputs submenu
-L-out src: selects signal source for the left output
-Left (default)
-Right
-R-out src: selects signal source for the right output
-Left
-Right (default)
System submenu
-Trigger: sets trigger output as continuous or 10 ms pulse during turn on and off
-cont. (default)
-pulse
-Auto ON: turns on the unit when incoming signal of non-zero value is detected
-Auto OFF: turns off the unit after a time period without input signal
-never
-10 min
-30 min
-2 hrs (default)
Auto on
Auto off 2hrs
Trigger cont.
Learn remote
Load defaults
L-out src Left
R-out src Right

17 |dac8 Stereo Owner’s Manual | okto research
•Learn remote: pairs the unit with any IR remote. After activating the function, you will
be asked to press 7 buttons in a sequence: Up, Down, Left, Right, Enter, Menu and
On/Off/Mute. To cancel the procedure, simply press and hold the rotary control.
•Load defaults: loads factory defaults
Displays submenu
-Brightness: sets the display brightness in 6 steps (default: 6)
-Timer: sets a timer to dim or turn off the displays
-off (default)
-10 s
-60 s
-5 min
-After timer: sets display action after the selected timer value expires
-off
-dim (default)
-Menu return: sets the time for an automatic return from the menu to the main screen
-off (default)
-10 s
-60 s
-5 min
Brightness 6
Timer off
After timer dim
Menu return 60s

18 |dac8 Stereo Owner’s Manual | okto research
Filters submenu
-PCM filter: selects FIR filter type for interpolation of PCM-encoded signal
-FRLP (fast roll-off, linear phase):
-SRLP (slow roll-off, linear phase):
PCM filter FRMP
DSD filter auto

19 |dac8 Stereo Owner’s Manual | okto research
-FRMP (fast roll-off, minimum phase) (default):
-SRMP (slow roll-off, minimum phase):
-AFRLP (apodizing, fast roll-off, linear phase):
-HFRMP (hybrid, fast roll-off, minimum phase):

20 |dac8 Stereo Owner’s Manual | okto research
-BW (brickwall):
-DSD filter - sets the cut-off frequency of the low-pass filter for DSD playback
-auto (default)
-50 kHz
-60 kHz
-70 kHz
Other manuals for dac8 Stereo
1
Table of contents
Other Okto Research Media Converter manuals
Popular Media Converter manuals by other brands

PCB Piezotronics
PCB Piezotronics 422E35 Installation and operating manual

Crestron
Crestron ZUM ZUMLINK-SPLTR-RJ45 quick start guide

KTI Networks
KTI Networks KS-220F/T installation guide

GRASS VALLEY
GRASS VALLEY 8964ENC datasheet

TR-Electronic
TR-Electronic Profibus 582 Series user manual

Linear
Linear LT1317B Demo Manual