olympia electronics BS-477/SL User manual
BS-477 BS-477/SL
Page 1 of 5
GENERAL
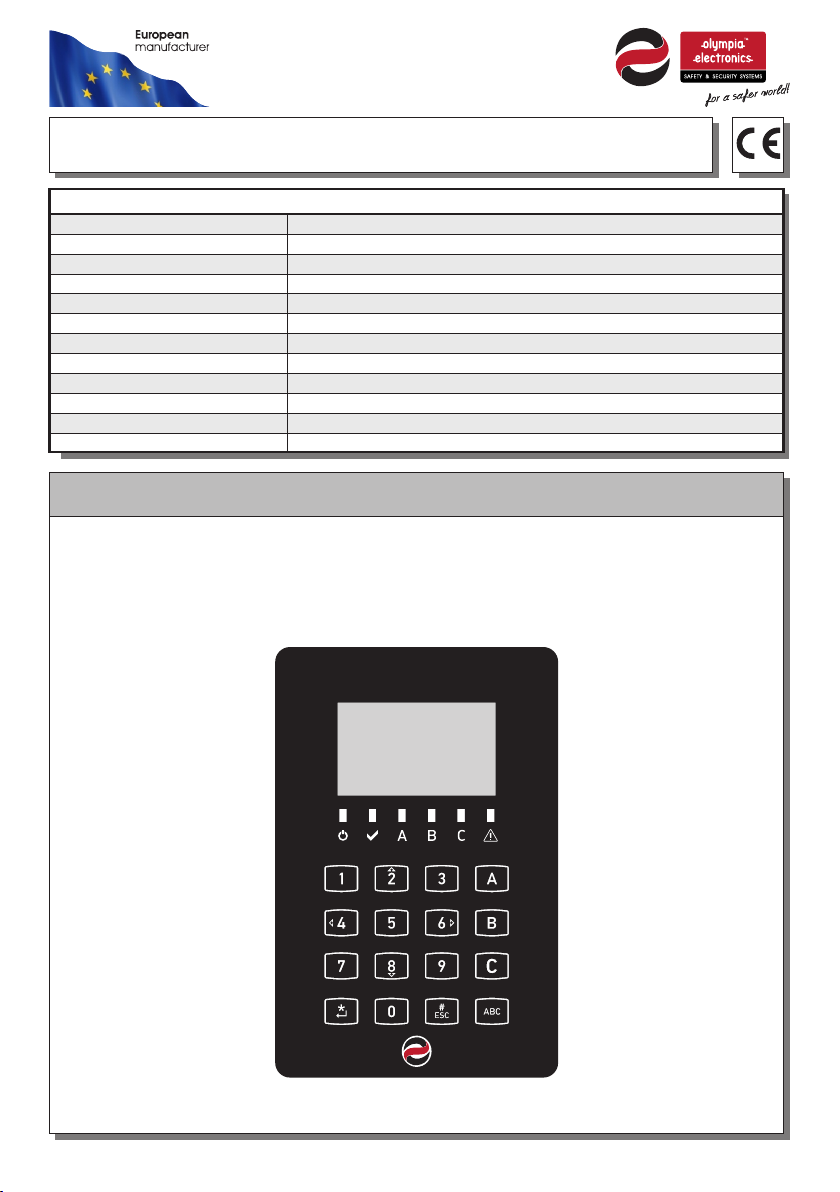
The BS-477 (White) or BS-477/SL (Silver) is a device of the alarm system BS-
468/A. The menu is similar to the BS-466/A (wired keypad). It has a graphic display
and touch keys (Figure 1).
921477000_09_005
TECHNICAL SPECIFICATIONS
POWER SUPPLY
BATTERY LIFE 1 year (1 minute activation per day)
2x lithium Battery type CR-123a battery (6V nominal voltage)
DEGREES OF COVER PROTECTION
PRODUCED IN ACCORDANCE WITH
COMPLIES WITH
OPERATION TEMPERATURE RANGE
CONSTRUCTION MATERIALS
DEVICE DIMENSIONS (LxWxH)
TYPICAL WEIGHT
GUARANTEE 2 years
ο
-10 to +40 C
COMMUNICATION FREQUENCY
COMMUNICATION RANGE
868 MHz
About 200m (open area)
ABS/PC
205gr.
150.6 x 100.6 x 30.6 mm.
EN 50131-1, CLC/TS 50131-2-2, EN 50131-5-3 classification: grade 2
ETSI EN 300220, EN 50130-4, EN 55022, EN 60950-1 ERC REC 70-03
IP20
Figure 1
Front view of the wireless keyboard
Thank you for your trust in our products
Olympia Electronics - European manufacturer
WIRELESS KEYBOARD
FOR TYPE BS-468/A

Page 2 of 5921477000_09_005
The device can be connected to external magnetic contacts via the CN1 terminal
block (Figure 3). If a magnetic contact is connected to this input, the device will send
a signal to the panel everytime the magnetic contact is triggered.If the contact is not
connected to an external device, at the cable terminal of the CN1, then
manufacturer’s cable must remain.
Note: The maximum distance of the external sensor cable is 3 meters !!!
Installation should only be carried out by quilified technicians, provided that
the entire technical manual has been read.
To install, follow the procedure below:
1. Remove the front cover of the device with a wide screwdriver.
2. Mount the rear plastic to the wall, with the supplied mounting materials, to the
points shown in Figure 2. When an external input connection is required, connect
to the terminal block of the base.
3. Insert the batteries into the device and re-install the front cover, that was removed
in step 1.
4. The device is ready to operate.
NOTE!!Reverse battery protection is provided.
INSTALLATION
INSTALLATION
CONNECTION WITH EXTERNAL MAGNETIC CONTACT
CONNECTION WITH EXTERNAL MAGNETIC CONTACT
CN1
Figure 3.
Example of a wireless keyboard connection with
BS-477
Figure 2.
Wireless keyboard base
Mounting points
Mounting points Mounting points
Mounting points

The cases that the LCD screen remains ON are:
a) In the technician and user menu.
b) If countdown is in progress (entrance or exit time).
c) If siren sound is on, it will remain active so long as the siren sounds.
d)When a key is pressed, the time until device deactivation is reset.
e) When a human palm is detected close to the screen even if no button is pressed.
f ) When an arm - disarm code or code to enter menu is entered.
LED INDICATIONS
LED INDICATIONS
CONTROL KEYS
CONTROL KEYS
DEVICE ACTIVATION
DEVICE ACTIVATION
Power supply ok
System ready to arm
Sector A armed
Sector B armed
Sector C armed
When LED is on, means that there is fault.
When blinking means that alarm is activated.
Note: During exit countdown Sectors indicators blink by default.
B
C
A
0-9 Entry numbers
“ ” Menu entry (Enter)
“ ” Cancel key (ESC)
A,B,C,ABC Keys for instant
arm without code
“ ” With a prolong press for 5 sec.
it sends a panic alarm to the panel
*
Page 3 of 5921477000_09_005
#
2 (Up)
8 (Down)
6 (Right)
4 (Left)
#

Page 4 of 5921477000_09_005
KEYS UNLOCK AFTER DEVICE ACTIVATION
KEYS UNLOCK AFTER DEVICE ACTIVATION
EXAMPLE OF ENTRANCE CODE (SYSTEM DISARM)
EXAMPLE OF ENTRANCE CODE (SYSTEM DISARM)
Assuming the disarming code is 1234, then to disarm the system, just touch with
your palm the keys and once the keys are illuminated, press "*" then "1234".
Communication error: If the message "COMMUNICATION ERROR WITH THE
PANEL" is printed at startup, this means either the keyboard is not connected to
any network, or it cannot communicate with the control panel for some reason.
AUTOMATIC ADJUSTMENT OF SENSITIVITY LEVEL
AUTOMATIC ADJUSTMENT OF SENSITIVITY LEVEL
DEVICE DEACTIVATION
DEVICE DEACTIVATION
If the keyboard does not detect a human palm, it will power down after 10
seconds in order to save power. In this state only the following functions are
active:
a) tamper detection
b) external contact detection
c) detection of the human palm near the keys.
The reasons which cause the device to remain activated for more than 10
seconds are described in the “Device Activation” paragraph.
Energy saving: If the keyboard does not detect the human palm over the keys
for 10 seconds, it turns off the LCD backlight of the screen and the keys, even if
it remains on, so it saves energy.
When the device is deactivated, a touch to the buttons with the palm of the hand
for 1 second is needed in order to activate the device. As soon as the device is
activated, the LCD screen and the backlight of the keys are lighting. At this
stage, the keys are locked, and every three seconds a message appears
prompting the user to press the “*” key so as to unlock the keypad. Until this
button is pressed, no other button will be activated even if it is pressed, and the
buzzer will not sound when the buttons are pressed. As soon as we press “*”,
the keypad is unlocked and the buzzer will now sound when a key is pressed.
When the keypad unlocks, the symbol (✔) on the screen briefly shows that the
keypad has been unlocked.
IMPORTANT : The panic key is detected even if the keyboard is locked. So
the user will not have to push the “*” key, instead can directly push the “#”
key for 5 sec. after device activation, in order to send the panic alarm.
Once the batteries are installed, the device detects the surrounding area and
gradually adjusts the sensitivity of the keys. In this case, after installing the
batteries, it is likely that the device will remain activated for more than 10
seconds. Also in the event of a significant change, such as being removed from
the wall and held in the user's hand, the automatic adjustment process is
intensified and the device is likely to remain activated for more than 10 seconds.
Due to the above, it is suggested during the installation process that the user
should hold in his/her hand the complete device (the keyboard mounted on the
base). Over time the surface of the device will cause any accumulation of dust or
moisture. The process of automatic sensitivity adjustment is quite important
because the device will cope as well as possible with these changes.

Page 5 of 5921477000_09_005
Olympia Electronics guarantees the quality, condition and operation of the
goods. The period of warranty is specified in the official catalogue of Olympia
Electronics and also in the technical leaflet, which accompanies each product.
This warranty ceases to exist if the buyer does not follow the technical
instructions included in official documents given by Olympia Electronics or if the
buyer modifies the goods provided or has any repairs or re-setting done by a
third party, unless Olympia Electronics has fully agreed to them in writing.
Products that have been damaged can be returned to the premises of our
company for repair or replacement, as long as the warranty period is valid.
Olympia Electronics reserves the right to repair or to replace the returned goods
and to or not charge the buyer depending on the reason of defection. Olympia
Electronics reserves the right to charge or not the buyer the transportation cost.
HEAD OFFICE
72nd km. O.N.R. Thessaloniki-Katerini
P.C. 60300 P.O. Box 06 Εginio Pierias Greece
www.olympia-electronics.gr
WARRANTY
WARRANTY
The wireless keyboard checks its battery voltage and transmits the information to
the control panel. When the control panel displays a low battery indicator, the
detector will continue to operate for at least 2 weeks. Nevertheless it is
recommended to replace the battery as soon as possible. This must be done by a
qualified technician and the control panel must be in service mode.
t i
in battery recycling points. Do not incinerate.
Is not allowed to discard batteries in to common trash bins, they must
be discarded only
BATTERY REPLACEMENT
BATTERY REPLACEMENT
This manual suits for next models
1
Table of contents
Popular Controllers manuals by other brands

Digiplex
Digiplex DGP-848 Programming guide

YASKAWA
YASKAWA SGM series user manual

Sinope
Sinope Calypso RM3500ZB installation guide

Isimet
Isimet DLA Series Style 2 Installation, Operations, Start-up and Maintenance Instructions

LSIS
LSIS sv-ip5a user manual

Rockwell Automation
Rockwell Automation 1769-L31 installation instructions


