manuals.online logo
Brands
  1. Home
  2. •
  3. Brands
  4. •
  5. Olympia
  6. •
  7. Smoke Alarm
  8. •
  9. Olympia GS506 User manual

Olympia GS506 User manual

Version:B
-1-
Smoke
Smoke
Smoke
Smoke Alarm
Alarm
Alarm
Alarm User
User
User
User Manual
Manual
Manual
Manual
Model
Model
Model
Model number:
number:
number:
number: GS50
GS50
GS50
GS506
6
6
6Ref
Ref
Ref
Ref:ST506
ST506
ST506
ST506
Thank you for purchasing our smokealarm. Please take a
few minutes to read the user
’
s manual thoroughly and
familiarize yourself and your family withits operation. And
save it for future reference.
Product
Product
Product
Product Specifications:
Specifications:
Specifications:
Specifications:
P
P
P
POWER
OWER
OWER
OWER
: DC9V(Carbon-Zink Type:GOLITE #G6F22,
1604D)
OPERATION
OPERATION
OPERATION
OPERATION CURRENT
CURRENT
CURRENT
CURRENT
:
:
:
:<10uA (standby), <30mA (alarm)
A
A
A
ALARM
LARM
LARM
LARM VOLUME
VOLUME
VOLUME
VOLUME
: >85dB(A) at 3 meters.
ALARM
ALARM
ALARM
ALARM S
S
S
SENSITIVITY
ENSITIVITY
ENSITIVITY
ENSITIVITY
: 0.10-0.19dB/m.
Description:
Description:
Description:
Description:
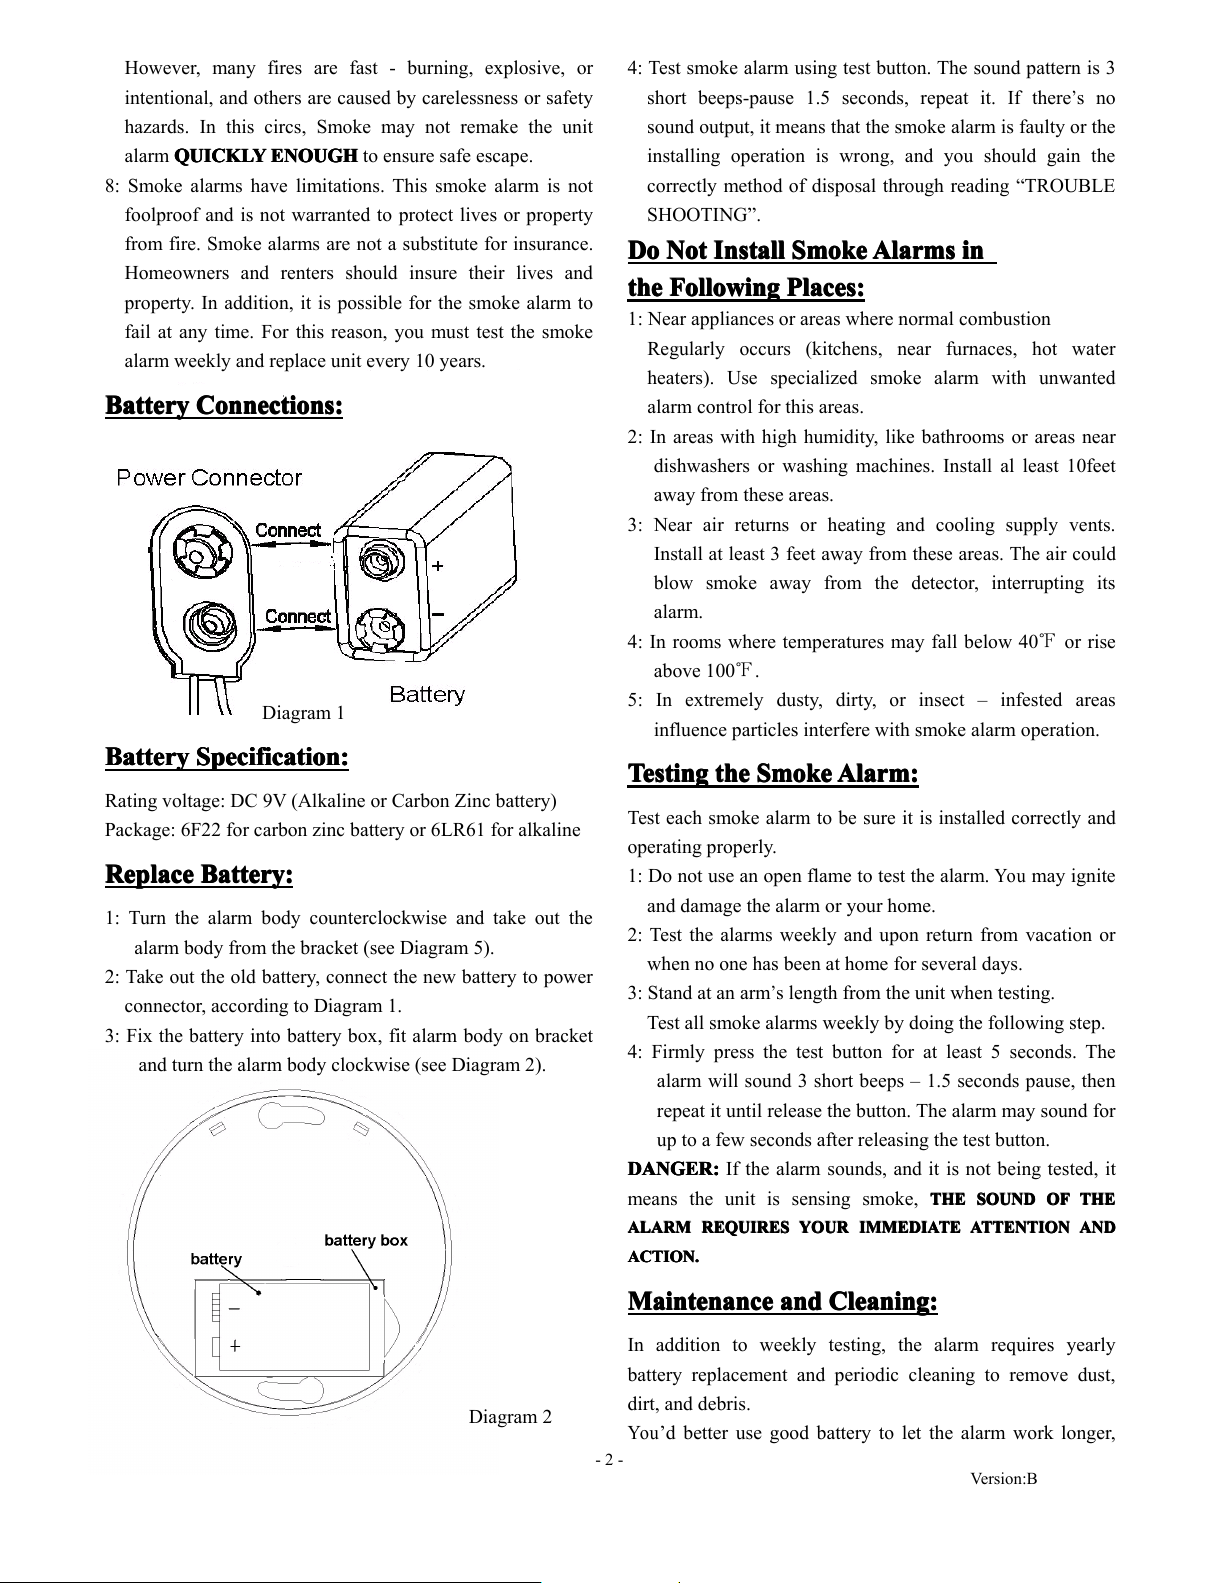
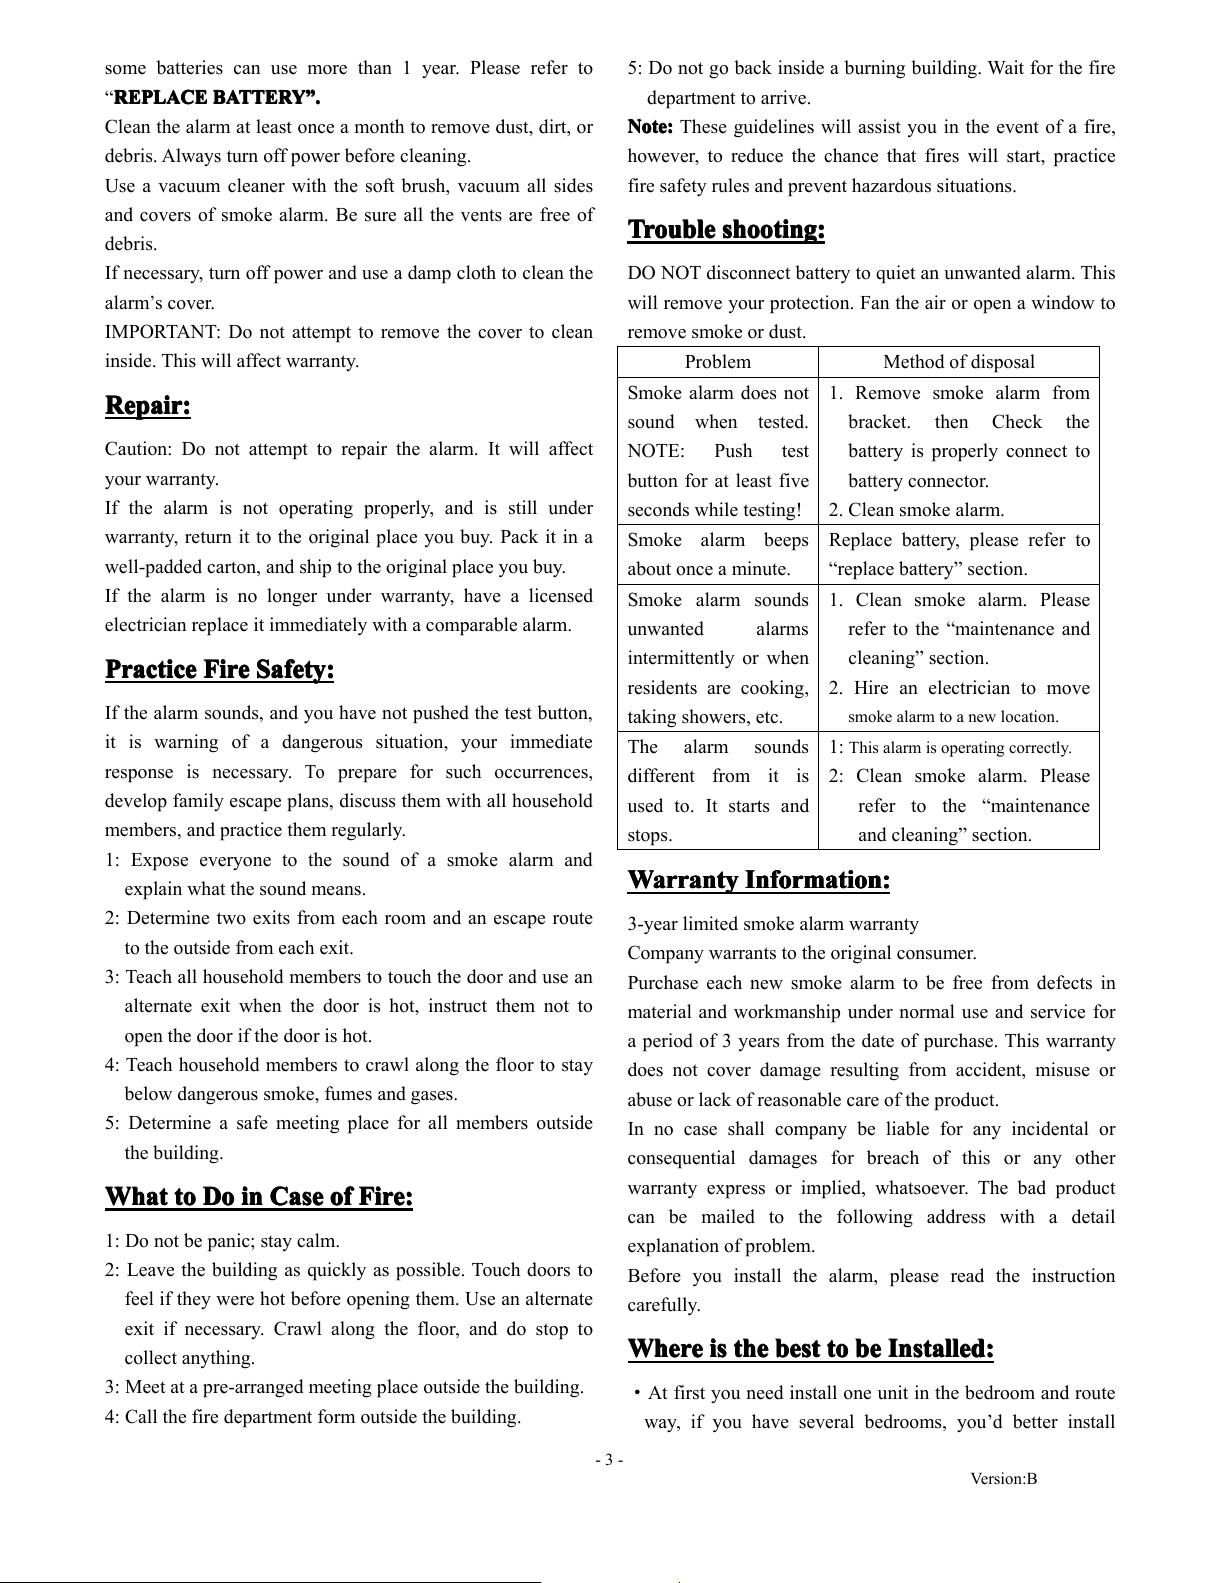
The unit is a photoelectric 9V DC smokealarm. It is operated
by 9v battery (6LR61 or 6F22), battery life 1 year minimum.
With the photoelectric technology, it is more sensitive to
detecting slow smolder fires which general thick, black
smoke, little heat and may smolder for hours before bursting
into flames. The smokealarm do not contain the radioactive
material which is harmless to the environment.
The smokealarm should be installed in every room (except
the bathroom), and every other area of the home, making sure
the people in the home will be able to hear and respond to the
alarm sound. For minimum protection you should fit an
alarm in the hallway between the living areas and sleeping
areas. Place the unit near to the living areas as possible and
ensure the alarm is audible when the bedrooms are occupied.
Typical single storey dwelling with recommended:
Install a smokealarm on the ceiling or wall inside each
bedroom and in the hallway outside each separate sleeping
area. If a bedroom area hallway is more than 30 feet long,
install a smoke alarm at each end. If there is a basement:
install a smokealarm on the basement ceiling at the bottom
of the stairwell.
Typical multi-storey dwelling with recommended protection.
Install a smokealarm on the ceiling of wall inside each
bedroom and in the hallway outside each separate sleeping
area. If a bedroom area hallway is more than 30 feet long,
install a smokealarm at each end install a smokealarm at the
top of a first – to- second floor stairwell.
Important
Important
Important
Important Safety
Safety
Safety
Safety Information:
Information:
Information:
Information:
1: The test button accurately tests smokealarm functions. Do
not use any other test method. Test smokealarm weekly to
ensure proper operation.
2: Do not remove or disconnect battery. This willtake out
your protection. Open windows or fan the air around
smoke alarm for silence it.
3: This smokealarm should be installed only by a licensed,
qualifiedelectrician. Observe and follow all local and
national electrical and building codes for installation.
4: This smoke alarm is designed to be used inside a single
family only. In multifamily buildings, each individual
living unit should have its own smoke alarms. Do not
install in non-residential buildings. And this smokealarm
is not a substitute for a complete alarm system.
5: Install a smokealarm in every room and on every level of
the home. Smoke may not reach the smokealarm for
many reasons. For example, if a fire starts in a remote
part of the home, on another level, in a chimney, wall,
roof, or on the other side of a closed door, smoke may not
reach the smokealarm in time to alert household
members.
A
smokealarm will not promptly detect a fire
except in the area or room in which it is installed.
6: Smokealarm may not alert every household member every
time. The alarm horn is loud in order to alert individuals
to a potential danger. However, there may be some
circumstances where a household member may not hear
the alarm (i.e. outdoor or indoor noise, sound sleepers,
drug or alcohol usage, the hard of hearing, etc.). If you
suspect that this smokealarm may not alert a household
member, install and maintain specialty smokealarms.
Household member must hear the alarm
’
s warning sound
and quickly respond to it to reduce the risk of damage,
injury, or death that may result from fire, If a household
member is hard of hearing, install special smokealarms
withlights or vibrating devices to alert occupants.
7: Smokealarms can only sound their alarms when they
detect smoke or detect combustion particles in the air.
They do not sense heat, flame, or gas. This smokealarm is
designed to give audible warning of a developing fire.
EN14604:2005
All manuals and user guides at all-guides.com
all-guides.com
Version: B
- 2 -
However, many fires are fast - burning, explosive, or
intentional, and others are caused by carelessness or safety
hazards. In this circs, Smoke may not remake the unit
alarm QUICKLY
QUICKLY
QUICKLY
QUICKLY ENOUGH
ENOUGH
ENOUGH
ENOUGH to ensure safe escape.
8 : Smoke alarms have limitations. This smoke alarm is not
foolproof and is not warranted to protect lives or property
from fire. Smoke alarms are not a substitute for insurance.
Homeowners and renters should insure their lives and
property. In addition, it is possible for the smoke alarm to
fail at any time. For this reason, you must test the smoke
alarm weekly and replace unit every 10 years.
Battery
Battery
Battery
Battery Connections:
Connections:
Connections:
Connections:
Diagram 1
Battery
Battery
Battery
Battery Specification:
Specification:
Specification:
Specification:
Rating voltage: DC 9V ( Alkaline or Carbon Zinc battery )
Package: 6F22 for carbon zinc battery or 6LR61 for alkaline
Replace
Replace
Replace
Replace Battery:
Battery:
Battery:
Battery:
1: Turn the alarm body counterclockwise and take out the
alarm body from the bracket (see Diagram 5) .
2: Take out the old battery, c onnect the new battery to power
connector , according to Diagram 1.
3: Fix the battery into battery box , fit alarm body on bracket
and turn the alarm body clockwise (see Diagram 2).
Diagram 2
4: Test smoke alarm using test button. The sound pattern is 3
short beeps -pause 1.5 seconds, repeat it. I f there
’
s no
sound output, it means that the smoke alarm is faulty or the
installing operation is wrong, and you should gain the
correctly method of disposal through reading “ TROUBLE
SHOOTING ” .
Do
Do
Do
Do Not
Not
Not
Not Install
Install
Install
Install Smoke
Smoke
Smoke
Smoke Alarms
Alarms
Alarms
Alarms in
in
in
in
the
the
the
the Following
Following
Following
Following Places
Places
Places
Places :
:
:
:
1 : Near appliances or areas where normal combustion
Regularly oc curs (kitchens, near furnaces, hot water
heaters). Use specialized smoke alarm with unwanted
alarm control for this areas.
2 : In areas with high humidity, like bathrooms or areas near
dishwashers or washing machines. Install al least 10feet
away from these areas.
3 : Near air returns or heating and cooling supply vents.
Install at least 3 feet away from these areas. The air could
blow smoke away from the detector, interrupting its
alarm.
4 : In rooms where temperatures may fall below 40 ℉or rise
above 100 ℉.
5 : In extremely dusty, dirty, or insect – infested areas
influence particles interfere with smoke alarm operation.
Testing
Testing
Testing
Testing the
the
the
the Smoke
Smoke
Smoke
Smoke Alarm:
Alarm:
Alarm:
Alarm:
Test each smoke alarm to be sure it is installed correctly and
operating properly.
1: Do not use an open flame to test th e alarm.
You
may ignite
and damage the alarm or your home.
2: Test the alarms weekly and upon return from vacation or
when no one has been at home for several days.
3: Stand at an arm
’
s length from the unit when testing.
Test all smoke alarms weekly by doing the following step .
4: Firmly press the test button for at least 5 seconds. The
alarm will sound 3 short beeps – 1.5 second s pause , then
repeat it until release the button . The alarm may sound for
up to a few seconds after releasing the test button.
DANGER:
DANGER:
DANGER:
DANGER: If the alarm sounds , and it is not being tested, it
means the unit is sensing smoke, THE
THE
THE
THE SOUND
SOUND
SOUND
SOUND OF
OF
OF
OF THE
THE
THE
THE
ALARM
ALARM
ALARM
ALARM REQUIRES
REQUIRES
REQUIRES
REQUIRES YOUR
YOUR
YOUR
YOUR IMMEDIATE
IMMEDIATE
IMMEDIATE
IMMEDIATE ATTENTION
ATTENTION
ATTENTION
ATTENTION AND
AND
AND
AND
ACTION.
ACTION.
ACTION.
ACTION.
Maintenance
Maintenance
Maintenance
Maintenance a
a
a
a nd
nd
nd
nd Cleaning:
Cleaning:
Cleaning:
Cleaning:
In addition to weekly testing, th e alarm requires yearly
battery replacement and periodic cleaning to remove dust,
dirt, and debris.
You
’ d b e tter use good battery to let the alarm work long er ,
All manuals and user guides at all-guides.com
Version: B
- 3 -
some batteries can use more than 1 year. Please refer to
“REPLACE
REPLACE
REPLACE
REPLACE BATTERY
BATTERY
BATTERY
BATTERY ”
”
”
” .
.
.
.
Clean the alarm at least once a month to remove dust, dirt, or
debris. Always turn off power before cleaning.
Us e a vacuum cleaner with the soft brush , vacuum all sides
and cover s of smoke alarm. Be sure all the vents are free of
debris.
If necessary, turn off power and use a damp cloth to clean the
alarm
’
s cover.
IMPORTANT: Do not attempt to remove the cover to clean
inside. This will affect warranty.
R
R
R
R epair:
epair:
epair:
epair:
Caution: Do not attempt to repair th e alarm. It will affect
your warranty.
If the alarm is not operating properly, and is still under
warranty, return it to the original place you buy . Pack it in a
well-padded carton, and ship to the original place you buy.
If the alarm is no longer under warranty, have a licensed
electrician replace it immediately with a comparable alarm.
Practice
Practice
Practice
Practice Fire
Fire
Fire
Fire Safety:
Safety:
Safety:
Safety:
If the alarm sounds, and you have not pushed the test button,
it is warning of a dangerous situation, y our immediate
response is necessary.
To
prepare for such occurrences,
develop family escape plans, discuss them with all household
members, and practice them regularly.
1: Expose everyone to the sound of a smoke alarm and
explain what the sound means.
2: Determine two exits from each room and an escape route
to the outside from each exit.
3: Teach all household members to touch the door and use an
alternate exit when the door is hot, i nstruct them not to
open the door if the door is hot .
4: Teach household members to crawl along the floor to stay
below dangerous smoke, fumes and gases.
5: Determine a safe meeting place for all members outside
the building.
What
What
What
What to
to
to
to Do
Do
Do
Do in
in
in
in Case
Case
Case
Case of
of
of
of Fire:
Fire:
Fire:
Fire:
1: Do not be panic; stay calm.
2: Leave the building as quickly as possible. Touch doors to
feel if they were hot before opening them. Use an alternate
exit if necessary. Crawl along the floor, and do stop to
collect anything.
3: Meet at a pre-arranged meeting place outside the building.
4: Call the fire department form outside the building.
5: Do not go back inside a burning building. Wait for the fire
department to arrive.
Note:
Note:
Note:
Note: These guidelines will assist you in the event of a fire,
h owever, to reduce the chance that fires will start, practice
fire safety rules and prevent hazardous situations.
Trouble
Trouble
Trouble
Trouble s
s
s
s hooting:
hooting:
hooting:
hooting:
DO NOT disconnect battery to quiet an unwanted alarm. This
will remove your protection. Fan the air or open a window to
remove smoke or dust.
P roblem Method of disposal
Smoke alarm does not
sound when tested.
NOTE: Push test
button for at least five
seconds while testing!
1 . Remove smoke alarm from
bracket. then Check th e
battery is properly connect to
battery connector.
2 . Clean smoke alarm.
Smoke alarm beeps
about once a minute.
R eplace battery , please refer to
“ replace battery ” section.
Smoke alarm sounds
unwanted alarms
intermittently or when
residents are cooking,
taking showers, etc.
1. Clean smoke alarm. Please
refer to the “ maintenance and
cleaning ” section.
2. Hire an electrician to move
smoke alarm to a new location.
The alarm sounds
different from it is
used to. It starts and
stops.
1: This alarm is operating correctly.
2: Clean smoke alarm. Please
refer to the “ maintenance
and cleaning ” section.
Warranty
Warranty
Warranty
Warranty Information:
Information:
Information:
Information:
3 -year limited smoke alarm warranty
Company warrants to the original consumer.
Purchase each new smoke alarm to be free from defects in
material and workmanship under normal use and service for
a period of 3 years from the date of purchase. This warranty
does not cover damage resulting from accident, misuse or
abuse or lack of reasonable care of the product.
In no case shall company be liable for any incidental or
consequential damages for breach of this or any other
warranty express or implied, whatsoever. The bad product
can be mailed to the following address with a detail
explanation of problem.
Before you install the alarm, please read the instruction
carefully.
Where
Where
Where
Where is
is
is
is the
the
the
the best
best
best
best to
to
to
to be
be
be
be I
I
I
I nstall
nstall
nstall
nstall ed
ed
ed
ed :
:
:
:
·At first you need install one unit in the bedroom and route
way, if you have several bedrooms , you ’ d better install
All manuals and user guides at all-guides.com
Version: B
- 4 -
bracket
each alarm in every room.
·Install it in the stairway and in every floor.
·Smoke, heat and burning things will spread horizontally
after rising to the ceiling, so install the alarm on middle of
the ceiling of ordinary structure house .let the alarm induce
every corner.
·If alarm couldn ’ t be installed in the middle of the ceiling
for some reasons, the distance which the alarm away form
the wall corner should be beyond 10cm.
·If installed the alarm on the wall, it should be 10cm below
the ceiling (see the diagram 3).
·If the length of the room or the hall is beyond 30 foot , you
need install several alarms in the hall.
·When the wall or ceiling is slanting, the alarm needs to be
installed 4 foot away from the highest wall or ceiling point
in the room (see the diagram 4).
Diagram 3
Diagram 4
Installation
Installation
Installation
Installation :
:
:
:
·Turn the alarm body counterclockwise and take off the
bracket .
·Press the bracket on the installation position , mark
installation hole of the bracket with pencil.
·Bore two installation hole on the sign with electric drill.
M ake diameter of holes is 5mm, Strike the two plastic
plugs into holes with hammer .
·Attach the bracket to the plastic plugs and fix tightly the
screws into the plastic plugs. (refer to Diagram 5 ).
·Connect the battery to power connector.
·Fix the battery into battery box .
·Fit the alarm on the bracket and turn the alarm body
clockwise, until matching well on the bracket.
·Test smoke alarm using test button. The alarm will sound 3
short beeps – 1.5 second s pause , then repeat it until release
the button.
Diagram 5
WARNING:
WARNING:
WARNING:
WARNING:
To prevent injury, this unit must be securely attached to the
wall or ceiling in accordance with the installation instructions.
Manufacturer
Manufacturer
Manufacturer
Manufacturer :
:
:
:
NINGBO
NINGBO
NINGBO
NINGBO SITERWELL
SITERWELL
SITERWELL
SITERWELL ELECTRONICS
ELECTRONICS
ELECTRONICS
ELECTRONICS CO.,
CO.,
CO.,
CO., LTD
LTD
LTD
LTD
ADDRESS:
ADDRESS:
ADDRESS:
ADDRESS: NO.76
NO.76
NO.76
NO.76 HAICHUAN
HAICHUAN
HAICHUAN
HAICHUAN ROAD,CHUANGYE
ROAD,CHUANGYE
ROAD,CHUANGYE
ROAD,CHUANGYE
ZONE
ZONE
ZONE
ZONE B,JIANGBEI,NINGBO,CHINA
B,JIANGBEI,NINGBO,CHINA
TEL:0086-574-83076656
FAX:0086-574-83076652
E-MAIL:Sales@china-siter.com
H oles of ceiling or wall
two screws
bracket
plastic plugs
A larm body
All manuals and user guides at all-guides.com

Other Olympia Smoke Alarm manuals

Olympia RM 30 User manual

Olympia

Olympia RM 30 User manual

Olympia BS-506/WL User manual

Olympia

Olympia BS-506/WL User manual

Olympia BS-506/WL User manual

Olympia

Olympia BS-506/WL User manual

Olympia SI 300 User manual

Olympia

Olympia SI 300 User manual

Olympia GS506 User manual

Olympia

Olympia GS506 User manual

Olympia RTX 200 User manual

Olympia

Olympia RTX 200 User manual

Popular Smoke Alarm manuals by other brands

Linear DX DXT-72 installation instructions

Linear

Linear DX DXT-72 installation instructions

Cavius 2106-003 user guide

Cavius

Cavius 2106-003 user guide

ecoey GS558D-H04 user manual

ecoey

ecoey GS558D-H04 user manual

Teletek electronics SensoIRIS M140 Installation instruction

Teletek electronics

Teletek electronics SensoIRIS M140 Installation instruction

Siterwell GS517 user manual

Siterwell

Siterwell GS517 user manual

First Alert 9120 Series user manual

First Alert

First Alert 9120 Series user manual

x-sense XP01 user manual

x-sense

x-sense XP01 user manual

Edwards Signaling SuperDuct ESD-2W manual

Edwards Signaling

Edwards Signaling SuperDuct ESD-2W manual

Great Outdoors 3405BG Assembly & owners manual

Great Outdoors

Great Outdoors 3405BG Assembly & owners manual

Mercury 350.127UK user manual

Mercury

Mercury 350.127UK user manual

Honeywell DFS8MS manual

Honeywell

Honeywell DFS8MS manual

Lexing LX-SO-918 Instruction

Lexing

Lexing LX-SO-918 Instruction

Panasonic 6362 Specification sheet

Panasonic

Panasonic 6362 Specification sheet

System Sensor OSI-RE-SS quick start guide

System Sensor

System Sensor OSI-RE-SS quick start guide

VESDA VESDA-E VEA installation instructions

VESDA

VESDA VESDA-E VEA installation instructions

FireAngel Thermoptek ST-622 manual

FireAngel

FireAngel Thermoptek ST-622 manual

Kidde KIR-PHD Installation sheet

Kidde

Kidde KIR-PHD Installation sheet

BASETech KD-133A operating instructions

BASETech

BASETech KD-133A operating instructions

manuals.online logo
manuals.online logoBrands
  • About & Mission
  • Contact us
  • Privacy Policy
  • Terms and Conditions

Copyright 2025 Manuals.Online. All Rights Reserved.