OmniTurn GT-75 Installation guide

1
OmniTurn
Training Manual
Phone (631) 694-9400 Fax (631) 694-9415

2

3
OmniTurn Control
Welcome to our world
This manual will guide first time users to startup, home, enter, edit, and
run programs. First we will discuss the control layout. On the upper left-
hand side of the control you will see a large red button called emergency
stop. (1). Twist and pull, button should snap out. Next check the other E
stop located on the palm box make sure this is also disengaged. (2). Now
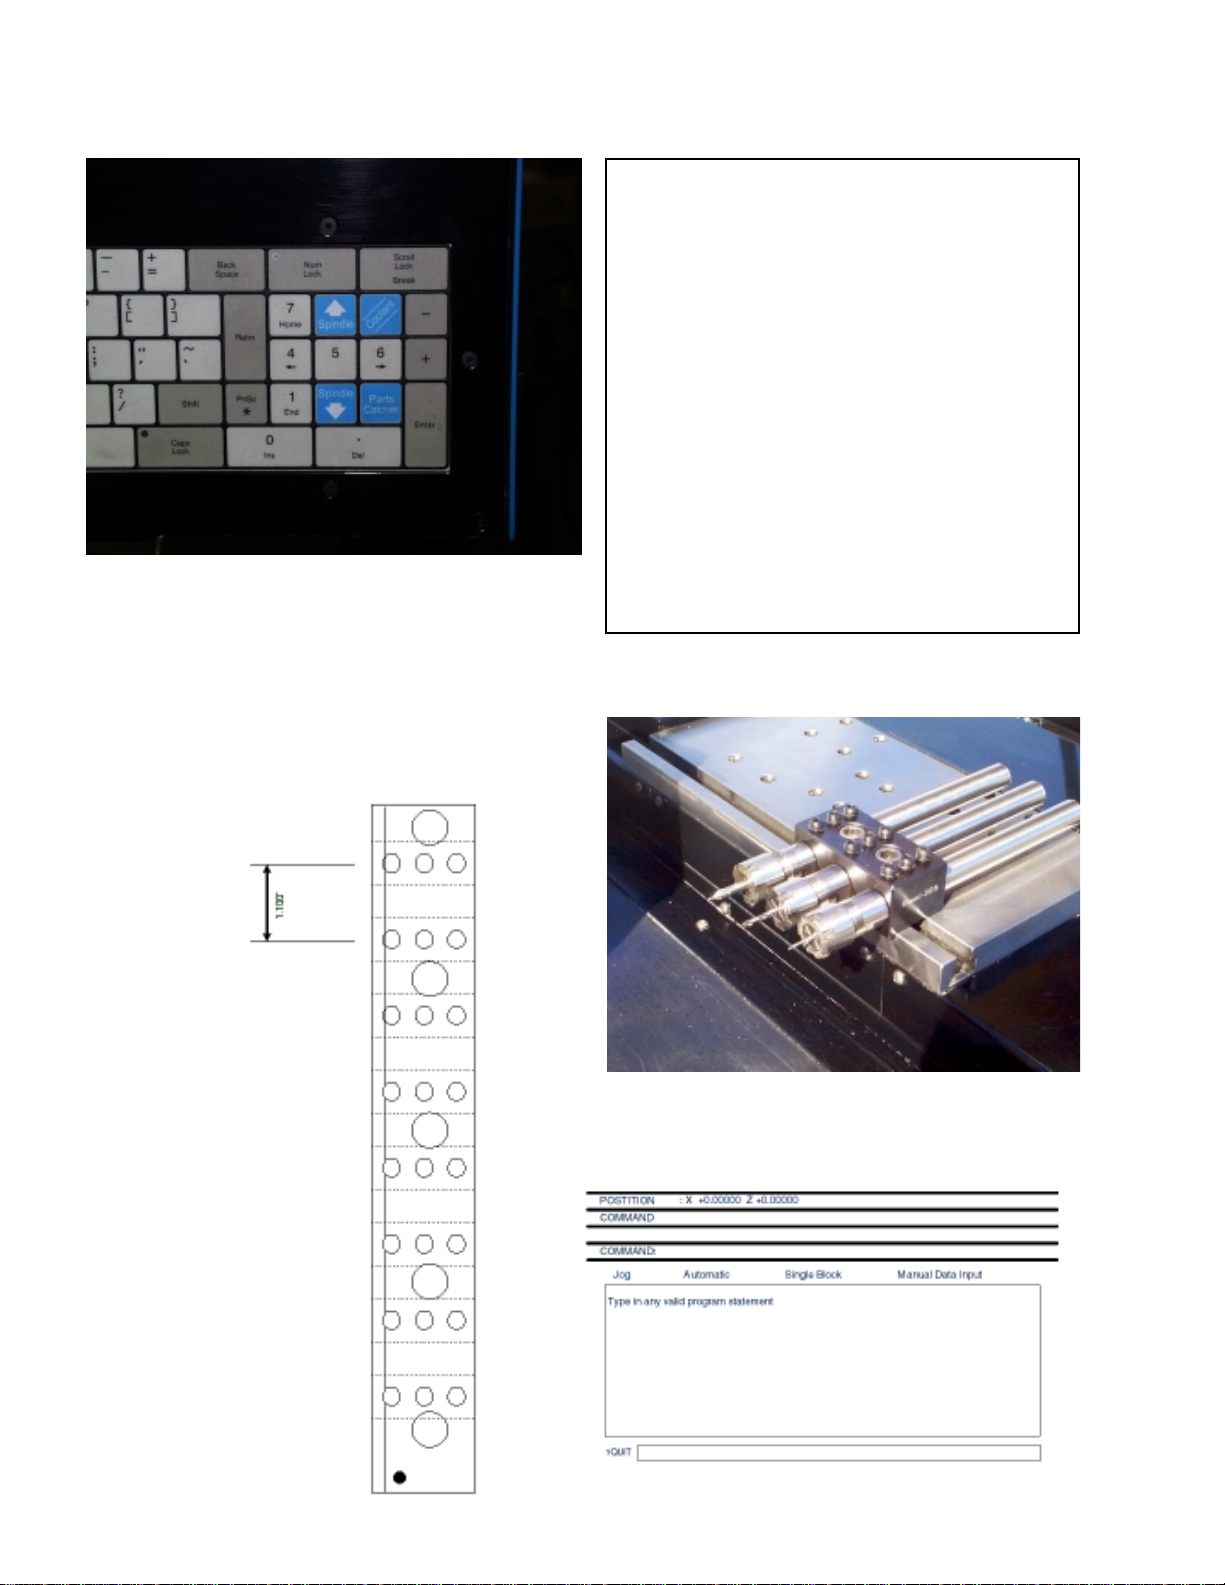
you are ready to press the yellow control on button. (3). The first screen
that comes up will ask you if you want to back up your files on a disc.
Press the letter Y for yes or N for no on the keyboard. The next screen
will prompt turn servos on. The blue button in figure (4) is the servo on
button, press this now. This brings you to the Jog menu screen with a
prompt “HOME MUST BE ESTABLISHED”.
See page 5.
There are two other buttons on the control a green button (5) which is
cycle start and a small red button (6) that is motion stop. Note: The cycle
startbuttononthecontrolisonlyactiveonretrofitswithouttheACspindle
drives option. Otherwise the two black palm buttons on the operator sta-
tion activate cycle start fig (7). The motion stop button is used to stop
slide motion while running a program in the automatic mode. Below the
emergency stop button is the spindle speed pot. This will adjust the speed
of the spindle. Note: This only works with the AC spindle drive option.
Under the speed pot is the spindle on / off switch (8). This is used to
manually stop the spindle.
Jog Menu
[Chapter 1, Page 1.3 - 1.7 in OmniTurn Programming Manual]
The jog menu allows the operator to perform several functions. 1.Estab-
lishing home. 2. Move slide manually either incrementally or continu-
ously. 3.Set tool offsets
The first three choices on the menu are continuous jog moves made in
Inches per minute feed rates 1: slow 1 IPM 2: medium 10 IPM 3: 100
IPM.
To activate these moves select 1, 2, and 3, on the main keypad. The
joystick on the control will move the slides in one of four directions: X +,
X- Z+ or Z-. Choose speed number 2:10 IPM. Then point the joystick
(9) down in the X+ direction and hold. The slide will move toward you at
10 IPM until you release it. Now push the joystick to the left in the Z-
direction. Try the different speeds and get comfortable with this mode.
Use caution when jogging in the fast mode, and be careful not to over
travel the axis’s. Also if there are tools mounted on the slide be aware of
their position in relationship to the spindle or work piece.
( 1 ) ( 2 )
( 3 ) ( 4 )
( 5 ) ( 6 )
( 7 ) ( 8 )
( 9 )

4
Picture or graphic of slides at home position

5
Jog Menu
Incremental Jog selections
[Chapter 1, Page 1.5 in OmniTurn Programming Manual]
There are five incremental jog selections numbered four through
eight.
•4. = .00005
•5.= .001
•6.= .010
•7.= .100
•8.= 1.000
Selecting an increment by pressing the appropriate number on the key-
pad, and moving the joystick in one of the four directions will move the
slide one increment at a time. It does not matter how long you hold it.
The slide will move only one increment each time you move the joy-
stick. Note: Selection becomes highlighted on menu screen see Fig 1.
9. Establishing Home [Chapter 1, Pages 1.8-1.10]
The OmniTurn slides must be homed before a program may be entered.
To home the slides you must select a continuous jog speed, usually this
is the medium jog speed number 2 on the keypad. After selecting me-
dium jog hold the joystick in the X+ direction until you have traveled at
least 2 marks on the X-axis scale. Then jog back between the first mark
and zero. Repeat this process for the Z axis traveling in the Z- direction
then back between the first mark and zero. Your pointer should look
like the pictures to the right for both X & Z-axis’s. When your slides are
in position press the number 9 key and the cycle start palm buttons. The
slides move to the zero mark on the scale. Home has been established.
S. Set Zero [Chapter 1]
Pressing the S key on the control then pressing the X key and the Z key
will zero the position numbers for the slide at whatever position they
are at. This is useful if you are cutting a collet or soft chuck jaws. Set-
ting zero does not effect the Home position.
H. Go Home [Chapter 1]
At any time when you are in the jog menu, and you want to return the
slides home you may press the H key. The prompt on the screen will
say “DEPRESS X TO HOME X AND Z TO HOME Z”. Always press
Z first to clear the tools away from the spindle then X.
T. Set Tool [Chapter 1]
Selecting the T key from the menu will allow you to enter tool offsets in
the computer for your program. This will be discussed later.
EXIT
To exit jog menu press the escape key on the upper left hand corner of
the Keypad.

6

7
The main menu screen will allow you four choices: Jog, Automatic,
Single Block, and Manual Data Input.
Automatic Mode
The automatic mode allows you to run programs. There are ten F func-
tion keys in this mode:
!F1: Quit Automatic mode return to main menu.
!F2. Tool Offset screen. This is where your primary tool offsets are
saved and adjusted.
!F3. Editor: This function is used for creating and editing programs.
!F4. Verification: Allows you to run your program graphically on
screen and verify tool path.
!F5. New File: Enter or remove a program.
!F6. Search: This function allows the operator to run a tool without
starting at the beginning of the program.
!F7. Programming system.
!F8. Disc operations: This mode allows you to erase programs, copy
user files back and forth between hard drive and disc. Communicate
to another computer via RS232 cable.
!F9. Secondary Compensation: Tool nose radius comp and secondary
offsets are stored here.
!F10. Special Functions: Parts counter, saving and loading offsets,
cycle repeat counter, preset feed rates and continuous cycle count-
down.
Active Keys in the Automatic mode
There are many keys that remain active in the Automatic mode. When in
this mode you will see on screen the letter C for Continuous operation of
a program. To make it active you press C on the keypad, to deactivate it
press C again. This is used primarily in bar feed applications.
The letter O is an optional stop. To use this feature you must have the
M01 code in your program where you want it stop. This also activates
and deactivates by pressing O on the keypad.
The front slash key / activates and deactivates the block delete function,
any line of program that you do not choose to run must start with this /.
The S key changes the automatic mode to Single Block allowing each
program line to be executed one at a time, every time the cycle start is
pressed. Pressing A key returns the program back to automatic. Allow-
ing the program to run from start to finish with one press of the cycle
start.
The Main Menu
[Chapter 5 in OmniTurn Programming Manual]

8
Picture or graphic of T1 at
X0Z0

9
More Hot keys
"Feedrate override: While running a program in the Automatic mode.
Youmay slow down the feed rate inten- percent increments by press-
ing the F1 through F10.
"Located on the right side of the keyboard you will notice several
blue keys. These keys activate their printed functions. Fig 1. Press-
ing the key once turns the function on. Press the key again turns it
off.
Manual Data Input Mode
Pressing the M key while in the Main Menu accesses this mode. You are
now able to type in a command, enter it and execute it. Note: The term
hit cycle start means press and release the palm buttons on the operator
station.
Examples:
!Type: M03 s1000. Press the return key and hit cycle start palm but-
tons. The spindle will start clockwise and run 1000 rpms.
!Type: M05. Press the return key and hit cycle start palm buttons.
The spindle will stop.
Example of moves after tool offsets are entered:
!Type:T1Press the return keyandhitthe cycle start palmbuttons
!Type:X0.Press the return keyandhitthecycle start palm buttons.
!Type:Z1.Press the return keyandhitcycle start palm buttons.
The above to examples are a typical MDI statement. If T1 was a drill it
would be located 1 inch from the face of the work piece and on center
X0.
If using a OmniTool holder such as an 800 bar. Each of the 5/8" dia
holes are located on 1.100 centers. Say you already know the location
of your center drill T4 and want to add a drill and a tap. You can go to
MDIandtype:T4pressenter,then X0pressreturnhitcyclestartandyour
centerdrillwillmove to X0. Then press F1 togotomainmenupress J to
enterjogmenu. Then press 8keyfora 1.00 inchincrementmoveclickthe
joystickinthe direction of thenextholeonthe 800 bar whereyouwant
yourdrill.Then press 7 keyfora.100 inch move clickthejoystickoncein
thesamedirection,now you are atthecenterofthenext hole in thetoolbar.
EntertheXoffsetfor T5 drill, then set Z offset. Repeat processfortap.
The Main Menu
[Chapter 5 in OmniTurn Programming Manual]

10

11
Single Block
The single block mode will allow the operator to execute a single line of
program code with each press of the palm buttons. This is very useful
for dry running a program and accident prevention
You may initiate the single block mode while on the automatic screen
by pressing the S key. Note: Make sure all your tool offsets are entered
first. After Pressing the Skey press the palm buttons. Look at the screen
the first line of your program will be displayed after the prompt NEXT:
G90G94F300G72.
Hit the palm buttons again and G90G94F300G72 jumps up to the COM-
MAND line. The NEXT prompt will say T1. Hit the palm buttons again
and T1jumps to the COMMAND line and X0 Z0 appears on the NEXT
line.
- NOTE 1: When you run the program for the first time pay CARE-
FUL attention to the NEXT prompt to see were your tools are going.
This will help in preventing a smash up.
- NOTE 2: Use the training program included in this.
Manual to practice setting up and running this procedure.
The Main Menu
[Chapter 5, Page 2 of OmniTurn Programming Manual]

12

13
In the following exercise we will type the training program into the
computer and enter it.
!1. Start up computer and Home the slides.
{See page 3: Number 9. Establish home - see page 5}
!2. Press escape key to main menu.
!3. Press A for Automatic mode.
!4. Type: TRAIN1 press return key.
!5. If this is a new file screen prompts: Train1 not found.
!6. Press the F3 (editor) 2 times.
!7. Press F1 to create.
Now the cursor drops down to the screen and you are ready to type in
the program. Type program in then proceed to page 19.
NOTE:Whenwriting programs the following rules for formatting must
apply:
!1.The first G code of any program must be either G90 absolute or
G91 incremental.
!2.The Omniturn control when powered up and homed automati-
cally defaults to G73 radius mode.
!3. To program in the diameter mode you must also include G72 on
the first line of your progam.
!4. The first line of most programs will be G90G94F300G72
!5. Blank lines are not allowed however spaces are ok.
!6. After a tool call on the very next line you must have a X Z
move. Example: T1
X.525 Z1
!7. Number lines are not allowed.
!8. Text may be put in Parentheses (left hand turning tool) Do not
use periods or commas or any of these symbols
!@#$%^&*?><:”{},.
!9. Trailing zeros are not necessary whole numbers are permitted.
!10. Must include G95 before running canned cycles with F value.
Example:G95
G75 I .05 U.01 f.005
G95
G83Z-1 K.25 F.003 L 200 R.05 C.03.
Train1
G90G94F300G72
T1 (WORKSTOP)
X0 Z.02
M00
Z1
M08
M03S2500
T2 (LEFTHAND TURN TOOL)
X.525 Z1
Z0
G95F.0035 X-.01
S2800
G00 Z.03
X.525
G95
G75 I.05 U.008 F.005
X0 Z0
X.125 R.0625
Z-.250
X.187C.025
Z-.6R.02
X.227
Z-.75X.312
Z-.875
X.485 C.025
Z-1
X.525
RF
G00 X-.01
G95F.002 Z0
X.125 R.0625
Z-.250
X.187 C.025
Z-.6 R.02
X.227
Z-.750X.312
Z-.875
X.485 C.025
Z-1
X.525
G00 Z1
T3 (THREADING TOOL)
X-.187Z1
Z-.15
G33 X-.1517 Z-.55 I .015 K .03125 C
G00
T0
M30
Entering a Program

14
eniL emaNmargorP 1niarT noitanalpxE
127G003F49G09Gedomretemaid/mpi003dipar/edometulosba09G
2)potskrow(1Tsesehtneraptxetnipotskrow/llaclooT
320.Z0X uoy,llaclootaretfA:etoN.potsdnaotevomlliw1lootnoitisoP enilemasehtnoevomZ&Xnaevahtsum
400M esolcpotsotkcotslluptellocnepo/tlahaotemocsedils/potsnoitoM telloc
eunitnocottratSelcyCsserP
51Zdiparnikrowmorf"1puskcabpotskroW
680MpmuptnaloocstratS
70052S30Msmpr0052taesiwkcolceldnipsstrats30M
8)lootgninrutdednahtfel(2Tsesehtnerapnitxet/llaclooT
91Z525.Xdiparni1Zdna525.xotsevomlooT
010Ztucecafrofnoitisopotdiparni0ZotsevomlooT
1110.-X5300.F59G10.-Xotetardeefrpi5300.F59G
210082Sesiwkcolcllitseldnips0082otsmpR
31050.Z00G50.Zotmpi003tadipar00G
41525.X 050.Z525.Xmorfgnihguortratslliw2looT/525.otXdipaR
5159Getardeefnoituloverrepsehcniotnruter59G
61500.F800.U50.I57G
tnuomasi800.U/tucfotnemercni50.I/elcycruotnochguorxob57G etardeefnoituloverrepsehcni500.F/ssaphsinifehtroftfellairetamfo margorpehT.050.Z525.XmorftratslliwelcycsihT.gnihguorrof trapsihtfoyrtemoegtcaxeehtotnettirweblliwnotniopsihtmorf tisetaitinielcycehtnehW.FRnignidnedna0Z0Xhtiwgnitrats nehwelcycsihT.0Z0XotkcabgnihguorstratsdnaFRotskool lliwewerehmorF.50.Z525.Xfotniopehtotnruterlliwetelpmoc )82enil(10.-Xotdipar
710Z0X
815260.R521.X
91052.-Z
02520.C781.X
1220.R6.-Z
22722.X
32213.X57.-Z
42578.-Z

15
eniL emaNmargorP 1niarT noitanalpxE
52520.C584.X
62.1-Z
72525.X
82FR
9210.-X00G50.Z525.Xmorf10.XotevomdipaR
030Z200.F59G0Zot200.foetardeefssaphsiniF
135260.R521.X5260.fosuidarllufahtiw521.otX
2352.-Z52.otnruT
33520.C781.Xrefmahceerged-54520.htiw781.XotnruT
4320.R6.-Zsuidaredisni20.ahtiw006.-ZotnruT
53213.X57.-Zemitemasehtta213.Xdna57.-ZotnruT
63578.-Z578.-ZotnruT
73520.C584.X refmahceerged-54520.ahtiw584.XotnruT
83.1-Z.1-ZotnruT
93525.X525.XotlootraelC
041Z00G1Zotetunimrepsehcni003dipaR
14)lootgnidaerht(3TsesehtnerapnitxethtiwllaclooT
241Z781.-X1Z781.-XotdiparsevomlooT
3451.-Z051.-ZotsdiparlooT
44C52130.K510.I55.-Z7151.-X33G
htped=Z.daerhtforetemaidronim=7151.-XelcycgnidaerhT33G elgnadeefniCdaelrohctip=K.tucfotnemercni=I.daerhtfo .trapehtfoedissunimXehtnotuceblliwdaerhtsihT.seerged92 Xllangissunimevomer,trapehtfoedissulpXehtnotucoT:etoN tadneyllacitamotualliwelcycsihT.44dna,34,14senilnosevom lootehtraelclliwmargorpsihtfosenilowttxenehT.tniopgnitratssti
542-X00Gsehcni2-XotkcabdipaR
642Z trapdehsiniffoecafmorfsehcni2ZotkcabdipaR
7403M .tratsehtotmargorpselcycerdnasedocMevitcallaslecnac03M 1eniL

16

17
.250
.600
.750
.875
.
1.00
.125.187.312.485 .227
.020 radius
.025 chamfer 10-32 by .550 long
Full Radiu
s
In this exercise I would like you to use the following tools and procedur
e
T1: workstop
T2: Left hand turning tool
T3: Threading X value = -.1517
K value = .03215
Face off
G75 roughing cycle
Threading: note threading to be do
n
negative side
Program Name Train1

18

19
Saving the program
[Chapter 5 in OmniTurn Programming Manual]
After the program is typed on the screen. The following steps must
be taken to save it to either the hard drive or user disc in drive B.
•1. Press F1 for help.
•2. Press F3 to save.
Now the program has been saved.
•3. Press F1 for help.
•4. Press F2 to exit.
Note:If there are errors in your program they will be posted on screen
now. These errors, if any are easily corrected by returning to the edi-
tor. To return to the editor the procedure is as follows.
•1.Press the escape key to return to the Automatic mode some-
times this key has to be pressed twice.
•2. Press the editor key F3.
•3. Press the escape key for no back up.
Using the arrow keys cursor down to the line to be corrected. Make
your corrections then press F1 then F2 to exit.
Verify
[Chapter 5, Page 11 in OmniTurn Programming Manual]
Be sure to verify your program before setting up tools and running.
•1. Press the F4 key now.
•2. Now you are looking at an estimated cycle time press any key to
continue.
•3. Select tool for verification you may use the arrow keys up or down
to highlight your choice then press enter.
•4. Select speed for plotting tools. Use arrow keys up or down to select
and press enter.
a. Single block will show one move each time a key is pressed.
b. Slow motion will plot each tool one at a time.
c. Full speed will create an instant graphic.
Note: Pressing the Z key will pop up a window on screen. Move win-
dow around by pressing arrow keys. Position window over area of
part you wish to Zoom in on then press enter. Repeat this process to
enlarge further.

20
Other manuals for GT-75
3
Table of contents
Other OmniTurn Lathe manuals
Popular Lathe manuals by other brands

Silca
Silca DUO POWER operating manual

Jean Lebeniste
Jean Lebeniste MC1100B instruction manual

Woodstar
Woodstar wl 05 Translation from the original instruction manual

Sharp
Sharp LMV Series Operations & parts manual

Triton
Triton TPT 125 Operating/safety instructions

Jet
Jet BDB-919 Operating instructions and parts manual