One Remote DVB-T2 IV User manual

OneRemote - www.oneremote.dk
1
OneRemote DVB-T2 IV
Digital TV tuner for terrestrial broadcasts
For Bang & Olufsen TVs with SCART connection only
User Guide
30012727u1uk

OneRemote - www.oneremote.dk
2
Daily Operation with Beo4, Beo5, Beo6 or BeoOne
With the tuner installed without a recording unit connected below keys are the most commonly used ones.
Combined with arrows and numerical keys they offer complete control possibilities.
With a recording unit connected or if advanced control is desired, use the complete set of options shown on
page 4.
OO OK
Q*1 EPG
E*1 Previous Channel
e Exit
*1 As the coloured function keys
have been assigned to other
functions, they have to be preceded
with Oto retrieve their original
coloured functions.
OQGreen function
OERed function
OWYellow function
ORBlue function

OneRemote - www.oneremote.dk
3
Content
Daily Operation with Beo4, Beo5, Beo6 or BeoOne...........................................................................................2
Advanced Controls .............................................................................................................................................4
Time Shift ............................................................................................................................................... 4
Recording on and Playing from Connected USB-Device.......................................................................4
Other Functions .....................................................................................................................................4
Special or Alternative Functions ............................................................................................................ 4
Control with BeoLink 1000.....................................................................................................................4
Introduction........................................................................................................................................................5
Installation - Quick Start ....................................................................................................................................5
OneRemote’s INT Converter System.................................................................................................................5
Option Programming..........................................................................................................................................6
Menu Key Option...................................................................................................................................6
The Stand by Option ..............................................................................................................................6
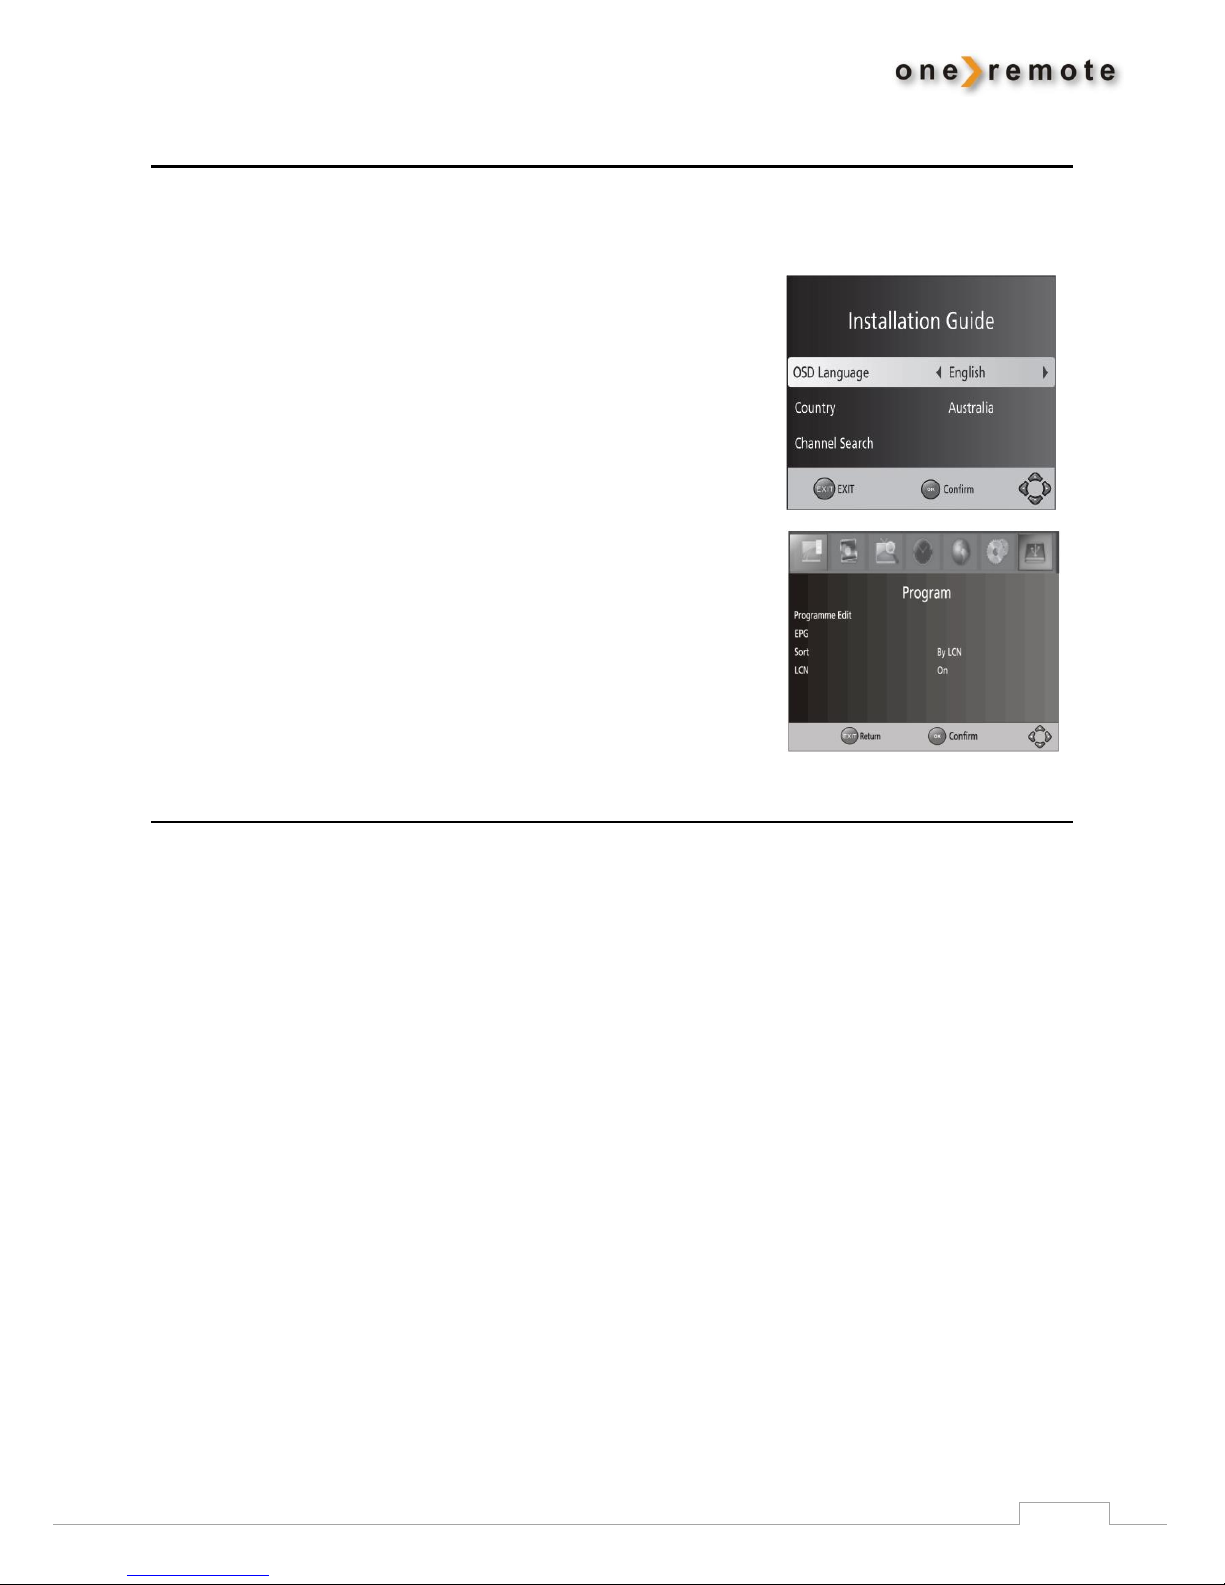
Initial Installation................................................................................................................................................7
Basic Control.......................................................................................................................................................7
Channel ..................................................................................................................................................7
Channel Editing ...................................................................................................................................... 7
List of Favorites...................................................................................................................................... 7
Watch a Favorite Channel...................................................................................................................... 8
Delete a Channel from the TV/Radio List .............................................................................................. 8
Skip a TV or Radio Program ................................................................................................................... 8
Move a TV or Radio Channel.................................................................................................................. 8
Channel Lock.......................................................................................................................................... 8
EPG (Electronic Program Guide).........................................................................................................................9
Sorting....................................................................................................................................................9
Picture ................................................................................................................................................................9
Channel Search................................................................................................................................................ 10
Selection .......................................................................................................................................................... 11
System ............................................................................................................................................................. 11
USB Recording and Replay .............................................................................................................................. 12
Edit Recordings ......................................................................................................................................13

OneRemote - www.oneremote.dk
4
Advanced Controls
Time Shift
Oq Pause live TV
O0 Resume
Recording on and Playing from
Connected USB-Device
o Play/ pause press 1 sec.
o0 Play/ pause alternative
qq Stop playing
oq Pause
oAS Fast forward and rewind
oDF Previous/next chapter
o8 Start recording directly
o3 List of recordings
Q Timer menu.
Other Functions
o1 TV/ radio
o2 List of favorites
o4 Text TV in tuner
o6 Info
A Vol -
S Vol +
m Menu
Special or Alternative Functions
o5 Menu alternative
o7 Sound
o9 Power manual
oe Subtitles
Control with BeoLink 1000
Control is easiest with a Beo4, Beo5 or a Beo6 remote
control terminal, all having coloured function keys.
But the tuner may also be controlled with a BeoLink
1000 with certain limitations.
The key sequences for BeoLink 1000 control are:
P equalsOon newer B&O remotes.
g Back
x Exit
Px Search
hZ Green
hX Yellow
hC Blue
hV Red

OneRemote - www.oneremote.dk
5
Introduction
This OneRemote DVB-T2 IV tuner receives digital TV broadcasts via a regular TV antenna installation, and it
has been modified for operation in a Bang & Olufsen remote control system allowing full control with a Bang
& Olufsen remote control terminal via connection to a Bang & Olufsen TV.
Installation - Quick Start
This OneRemote DVB-T2 IV tuner connected correctly to power, antenna and a Bang & Olufsen TV is ready
to be used. The TV connection is carried out with a regular SCART cable.
The TV’s SCART socket MUST have linkdata connection, and the TV should be programmed as specified in its
user or set up manual.
IF the TV’s SCART socket can be set up as DVD, VMEM, VAUX, SAT,
VTAPE or DTV, linkdata is available. The ’Decoder’ choice does not contain linkdata.
Read more about it in the TV’s user manual.
The OneRemote DVB-T2 IV tuner is automatically turned on by selection of its input on the TV, and it needs
no programming, but when initially installed channel scanning has to be performed.
Special functions may be incorporated using option programming. Read more about that on page 5.
OneRemote’s INT Converter System
OneRemote equipment that may be controlled with a standard Bang & Olufsen remote control terminal
either directly or via a Bang & Olufsen master has a built in OneRemote INT converter.
When B&O control is directed to a SCART connection on a Bang & Olufsen TV, this TV transmits remote
control data to the SCART connected piece of equipment. With a OneRemote INT converter built into the TV,
this control data is converted to data understood by the connected piece of equipment.
Thus the OneRemote DVB-T2 IV tuner can only be controlled when connected to a Bang & Olufsen TV.
If the B&O TV is equipped with HDMI or DVI input sockets, digital picture quality may be achieved by an
additional connection of the OneRemote DVB-T2 tuner to the TV via a HDMI cable. The SCART connection is
transmitting control data –and analog picture and sound –and the HDMI/DVI cable digital picture and
sound.
Read more about HDMI or DVI connections in the TV’s user guide.
If the OneRemote DVB-T2 tuner is connected to a TV that is part of a Bang & Olufsen linksystem in a main
room with one or more linkrooms connected, complete control is possible from all linkrooms. Linkroom
programming is described in the TV’s user guide.

OneRemote - www.oneremote.dk
6
Option Programming
OneRemote INT converters are pre-programmed with various options offering different levels of
functionality.
Options are typically selected by the initial installation and not changed by daily use. One or more options
might be selected, and the converter remembers these options even after a power loss.
An option is selected by keying in an 8-key sequence that does not occur during normal operation. Each key
in the sequence has to be pressed within 3 secs from the prior, or the sequence is ignored completely.
Menu Key Option
The B&O remote’s mkey may be used directly as a menu key for the connected piece of equipment,
but for some Bang & Olufsen TVs an operational conflict may occur as the TV’s menu opens up at the same
time.
This option allows for the de-activation of the mkey. An alternative key may be used, see page 1.
0qqqqq 80 De-activates the menu key
0qqqqq 81 Activates the menu key
The Stand by Option
The connected equipment is normally powered down along with the TV, but in some set ups this behavior is
a disadvantage. An example could be a recorder operating. The stand by option allows for de-activation of
automatic power down.
The connected equipment is ALWAYS powered up when selecting its TV input socket.
0qqqqq 70 De-activates auto stand by
0qqqqq 71 Activates auto stand by

OneRemote - www.oneremote.dk
7
Initial Installation
When installed initially or re-installed after re-setting the OneRemote DVB-T2 tuner’s installation guide is
shown on the TV screen.
1. Select OSD Language and use maneuver arrows to pick the
language.
2. Select Country and use maneuver arrows to pick the country.
3. Select Channel Search and press Sor ooto
start the automatic channel search.
4. When the channel search has been completed, the tuner
automatically shows the first channel in the TV list.
Basic Control
Channel
Press o5 and select channel. This menu allows for change of the channels. Select the function
needing change and press OO or Sto carry out the change. Press eto exit the menu.
Channel Editing
To edit the channels and give them different preferences (lock, skip, favorite, move or delete) the channel
editing menu has to be used. A password has to be entered to get into this menu.
The standard pass word is ‘000000’.
List of Favorites
A list of favorite channels is easily made:
1. Select the desired channel and press o2.
A heart indicates that the channel has been added to the list of favorites.
2. Repeat this procedure for each addition of a favorite to the list.
3. To confirm the list and exit the menu press e.
Remove a favorite from the list: o2

OneRemote - www.oneremote.dk
8
Watch a Favorite Channel
1. Press o2to watch the list of favorites
2. Press Dor Fto select a favorite.
3. Press OO, and the selected channel is received.
Delete a Channel from the TV/Radio List
1. Select the channel to be deleted and press OR
2. Press OO do delete.
3. Repeat this sequence to delete more channels.
Skip a TV or Radio Program
1. Select the channel to be skipped and pressOQ.
A blue SKIP is shown next to the selected channel.
2. Repeat this procedure to select more channels.
3. To confirm the selection of channels and leave the menu press e.
4. Re-activate a skipped channel by pressing oQand the blue SKIP disappears.
Move a TV or Radio Channel
1. Select the channel to be moved and press OE.
A “moving” symbol is shown next to the selected channel.
2. Press Dor Fto move the channel.
3. Press OEto confirm.
4. Repeat this sequence to move more channels.
5. Press eto leave the menu.
Channel Lock
Any channel might be password protected, i.e. unlocking requires a password. Lock a TV or radio channel:
1. Select the channel to be locked and press OW.
A padlock symbol is shown next to the channel, and the channel is locked.
2. Repeat this procedure to lock more channels
3. Press eto leave the menu.
4. Press OWto unlock the channel again.
5. A password has to be entered to open a locked channel. Enter the standard password ‘000000’ or
your own password created in the menu under ‘system’.

OneRemote - www.oneremote.dk
9
EPG (Electronic Program Guide)
EPG is a TV guide with the next 7 days’ programs for each channel. Press Qfor info about the programs
on the selected channel.Dand Fare used to scroll. With more than one page of info use R
or Wfor page down and up.
Sorting
Channel sorting is carried out in the menu ”Channel” under “Sorting”. Channels may be sorted as follows:
LCN, “Logical Channel Numbers”, the provider determines which. Channel name sorting alphabetically based
on channel ID. ONID, sorting following the original network IDs.
Picture
Press o5and select [Picture]. Picture settings may be adjusted here. Press Dor Fto
select the setting to be changed and press Sor Ato change the setting. Press eto leave the
menu.
Aspect Ratio
Various ratios may be selected : 4:3 Full, 4:3 Pan & Scan, 4:3 Letter Box, 16:9, 16:9 Pillar Box, 16:9 Pan &
Scan or ”Automatic” for self- adjustment.
Resolution
If the picture is unclear, the resolution may be adjusted, but only for HDMI connection : [480i] NTSC system
TV. [480P] NTSC system TV. [576i] PAL system TV. [576P] PAL system TV. [720P] NTSC or PAL system TV.
[1080I] NTSC, PAL system TV. [1080P] 50 Hz
TV Format
PAL, which is the preferred format across most of Europe, is set as default. NTSC is primarily used in
America.
Video Output
This selection is only relevant for a SCART connection. RGB provides the most detailed picture.

OneRemote - www.oneremote.dk
10
Channel Search
Press o5[and select [Channel Search]. Various ways of
searching are listed as described below. Press eto leave the menu.
Automatic Search
Channels are searched and installed automatically. All previous listed
channels are deleted.
1. Select [Auto Search] and press ooor DFto
start the search.
2. To stop the search press e.
Manual Search
Channels are searched and installed manually. New channels are added without deleting any channel
already listed.
1. Select [Manual Search] and press OO or SAChannel search is shown.
2. Press SAto select channel number and frequency.
3. Press OO to start the search. Channels found will be store and added to the list of channels.
If no channels are found the search may be stopped by pressing e.
Country
Select the correct country. (This selection is influencing the search).
Antenna Power
Select ”ON” if an active antenna is powered with 5 V from the tuner. .
Time
Press o5 and select [Time].Settings for time are adjustable.
Press DFto select what needs to be changed and press SAfor changes. Press
eto leave the menu.
Timeshift
Select automatic or manual (related to GMT).Vælg automatisk eller manuelt (mht. GMT tidszone).
Region
Is pre-programmed to Copenhagen, Denmark.
Timezone
Select timezone, if [Timeshift] is set fo Manual.
Automatic Standby
Select automatic standby to adjust the period for automatic stand by. The default setting is 3 hours.

OneRemote - www.oneremote.dk
11
Selection
Presso5 to get to [Select]. This menu enables the selection of language for OSD (On Screen
Display), subtitles and audio language. Select the variable and adjust by pressing AS.
Press eto leave the menu.
OSD Language
Select an OSD language.
Subtitle Language
Select the preferred language. (The selected language will show when available).
Audio Language
Select the preferred audio language. (The selected language will be used when available).
Digital Audio
The Digital Audio outlet is selected.
System
Press o5 and select [System]. System settings may be changed. Press DFto select
the variable and press SAto change the setting. Press eto leave the menu.
Parental Lock
Access requires a password. Default password is ’000000’. It is possible to lock channels that are restricted
for kids. Select an age group 04, 05, 06, 07, 08, 09, 10, 11, 12, 13, 14, 15, 16, 17 og 18 and only channels that
are available for the chosen group may be watched.
Select the Password
The default password (’000000’) may be changed. Enter the valid password. Now enter a new password and
confirm it by re-entering. Press eto leave the menu.
Re-enter Factory Settings
This is allowed but be aware that all user settings will be deleted, inclusive of channel lists.
Select ”Factory Settings” in the main menu and press OO or Sfor selection. Confirm that the
change is desired by entering the valid password.
Press OO to confirm. This procedure deletes all customer settings and channels.
Information
See tuner hardware details and software version.

OneRemote - www.oneremote.dk
12
USB Recording and Replay
Press o5 and select USB.
Multimedia
Select USB mode and install a USB stick to check store files.
Photo Configure
Settings for picture viewing may be changed here.
PVR Configure
With a USB media installed the PVR function is active and
shown in the USB menu. Presso3to see the PVR
list with all recordings stored. The recordings may be edited
on the PVR list.
How to Record ?
Check that a USB media is installed.
Direct Recording:
Press o8. The recording is started as soon as the message ’STARTER RECORDING’ disappears.
Stop the recording by pressing q. Confirm by pressing oo.
Be aware that while recording EPG, menus, list of recordings etc. are NOT accessible
Channel change, TEXT TV and list of favorites are still possible..
Timer Recording from the EPG:
Enter the EPG by pressing Qon the remote.
Select a channel/program by using DFand reserve the recording by pressingOO .
Timer details are shown in a special window. Editing the timer settings is possible here. Options like an only
once recording, once a day or a weekly one are indicated. ‘Function’ allows for selection of view
only/recording or strictly recording on the USB media of the selected program.
Playback
Press o3to see a list of the recordings. Select the desired recording and press OO. The
recording is shown in a little window.Press OEfor full screen viewing.

OneRemote - www.oneremote.dk
13
Edit Recordings
Rename Files
Press OQand enter a new file name.
Erase a Recording
Press OWto mark what needs to be erased. Confirm erasure by pressing OO twice.
Time Shift
Time shift requires a USB media to be installed.
To initiate time shift of a broadcast pressoq. To resume playback of the time shifted broadcast
press O0. The time shifted program may be run fast forward or rewound by pressing
oS or oA .
The time shift procedure can be stopped by pressing qresulting in the return to the actual broadcast in
real time.
Table of contents