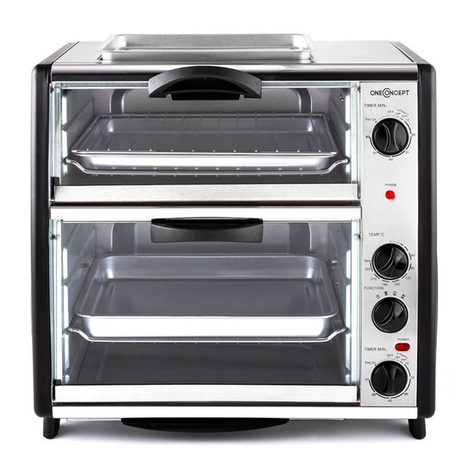
oneConcept All-You-Can-Eat User manual

All-You-Can-Eat
Mini-Backofen
Mini oven
Mini horno
Mini four
Mini forno
Mini oven
10026452


3
DE
English 9
Español 15
Français 21
Italiano 27
Nederlands 33
Sehr geehrter Kunde,
wir gratulieren Ihnen zum Erwerb Ihres Gerätes. Lesen
Sie die folgenden Hinweise sorgfältig durch und befolgen
Sie diese, um möglichen Schäden vorzubeugen. Für
Schäden, die durch Missachtung der Hinweise und
unsachgemäßen Gebrauch entstehen, übernehmen wir
keine Haftung. Scannen Sie den QR-Code, um Zugriff
auf die aktuellste Bedienungsanleitung und weitere
Informationen rund um das Produkt zu erhalten.
INHALTSVERZEICHNIS
Sicherheitshinweise 4
Bedienfeld 5
Inbetriebnahme und Bedienung 6
Reinigung und Pege 7
Hinweise zur Entsorgung 7
Hersteller 7
TECHNISCHE DATEN
Artikelnummer 10026452
Stromversorgung 220-240 V ~ 50/60 Hz
Fassungsvermögen Garraum 14/28 L
Abmessungen 49 x 46 x 36 cm (B x H x T)

4
DE
SICHERHEITSHINWEISE
• Lesen Sie sich alle Hinweise durch und bewahren Sie die Anleitung zum
Nachschlagen gut auf.
• Die Oberächen werden während des Betriebs sehr heiß, berühren Sie sie
nicht.
• Benutzen Sie das Gerät in Anwesenheit von Kindern nur unter Aufsicht.
• Tauchen Sie das Gerät, das Netzkabel und den Stecker nicht in Wasser
oder andere Flüssigkeiten.
• Achten Sie darauf, dass das Netzkabel keine heißen Oberächen berührt.
• Benutzen Sie das Gerät nicht wenn Netzkabel oder Stecker beschädigt
sind oder das Ge- rät in irgendeiner Art nicht funktioniert. Lassen Sie das
Gerät nur von einem Fachbetrieb überprüfen und reparieren.
• Stellen Sie das Gerät nicht in der Nähe von Mikrowellen, Gas- oder
Elektroöfen auf.
• Lassen Sie um das Gerät herum genug Platz, damit die Luft zirkulieren
kann.
• Ziehen Sie vor der Reinigung den Stecker aus der Steckdose.
• Passen Sie auf, wenn Sie Behälter mit heißen Flüssigkeiten bewegen.
• Benutzen Sie zur Reinigung keinen Metallschwamm, um das Gerät nicht zu
beschädigen und Stromschlägen vorzubeugen.
• Der Ofen eignet sich nicht für übergroßen Lebensmittel oder übergroßes
Kochgeschirr.
• Um Brände zu vermeiden, decken Sie den Ofen nicht ab und stellen Sie ihn
nicht unter Vorhänge.
• Die folgenden Materialien eignen sich nicht zur Verwendung im Ofen:
Pappe, Plastik, Papier und entzündliche Materialien. Lagern Sie außer dem
Zubehör keine Gegenstände im Ofen, wenn Sie ihn nicht benutzen.
• Ziehen Sie den Stecker aus der Steckdose, wenn Sie das Gerät länger nicht
benutzen.
• Kinder, physisch und körperlich eingeschränkte Menschen sollten
das Gerät nur benutzen, wenn sie vorher von einer Aufsichtsperson
ausführlich mit den Funktionen und den Sicherheitsvorkehrungen vertraut
gemacht wurden.

5
DE
BEDIENFELD
Zeitregler
Die maximale einstellbare Zeit beträgt 60 Minuten.
Nach Ablauf der gewünschten Zeit ertönt ein Signal
und das Gerät schaltet sich ab.
Kontrollleuchte
Diese Leuchte schaltet sich ein, sobald das Gerät
eingeschaltet ist.
Temperatur-Regler für untere Ofeneinheit
An diesem Temperatur-Regler können Sie eine
Temperatur zwischen 60°C und 240°C einstellen.
Funktionsschalter
Hiermit stellen Sie ein, ob der untere Ofen mit
Oberhitze, Unterhitze oder beidem kombiniert
betrieben werden soll.
Zeitregler
Die maximale einstellbare Zeit beträgt 60 Minuten.
Nach Ablauf der ge- wünschten Zeit ertönt ein
Signal und das Gerät schaltet sich ab.

6
DE
INBETRIEBNAHME UND BEDIENUNG
Schalten mit dem Funktionsregler auf Ober- und Unterhitze und drehen Sie
den Temperaturregler auf 240°. Drehen Sie nun den Zeitregler auf 10 Minuten,
um das Gerät vor der ersten Verwendung durchzuheizen. Dabei kann zu einer
leichten Rauch- und Geruchsentwicklung kommen. Dies ist völlig normal und
stellt keine Fehlfunktion dar.
VORSICHT
Verbrennungsgefahr! Das Gehäuse des wird während der
Verwendung sehr heiß. Fassen Sie es während der
Benutzung nicht an, damit Sie sich nicht verbrennen.
Bedienung
Erhitzen sie kleine Speisen in der oberen Kammer. Für größere Mengen
emp ehlt sich die Benutzung der unteren Einheit oder beider zusammen.
Sie können in der oberen Einheit Speisen durch die von der unteren Einheit
abgegebene Wärme warmhalten.
1. Schieben Sie den Rost in den Ofen und schließen Sie die Glastür.
2. Stellen Sie am Temperatur-Regler und dem Funktionsschalter die
gewünschte Temperatur und Funktion ein.
3. Heizen Sie den Ofen vor, indem Sie den Zeitregler auf 5 Minuten stellen.
(Auch zum Auf- tauen von Speisen sollte der Ofen vorgeheizt werden. Es
wird eine Temperatur von 65°C empfohlen)
4. Platzieren Sie die Speise in der Mitte des Rosts und schließen Sie die
Glastür.
5. Stellen Sie den Zeitregler auf die gewünschte Zeit. Sobald die Zeit
abgelaufen ist, ertönt ein Signal und der Ofen schaltet sich automatisch ab.
6. Alternativ können Sie den Zeitregler auch auf „Stay on“ stellen. So können
Sie den Ofen ununterbrochen für längere Zeit verwenden als für die
maximal 60 Minuten. Stellen Sie den Zeitregler wieder auf „OFF“ wenn Sie
fertig mit dem Garen sind.

7
DE
REINIGUNG UND PFLEGE
• Ziehen Sie den Stecker aus der Steckdose und lassen Sie das gerät
vollständig abkühlen, bevor Sie Teile zur Reinigung entnehmen.
• Benutzen Sie zur Reinigung keine spitzen oder scharfen Gegenstände, um
die Oberächen nicht zu beschädigen.
• Reinigen Sie die Glastür mit einem Schwamm und etwas Seifenwasser und
wischen Sie sie danach mit einem Handtuch trocken.
• Stellen Sie den Ofen auf eine ebene, hitzebeständige Oberäche, bevor Sie
ihn benutzen.
HINWEISE ZUR ENTSORGUNG
Wenn es in Ihrem Land eine gesetzliche Regelung
zur Entsorgung von elektrischen und elektronischen
Geräten gibt, weist dieses Symbol auf dem Produkt
oder auf der Verpackung darauf hin, dass dieses
Produkt nicht im Hausmüll entsorgt werden darf.
Stattdessen muss es zu einer Sammelstelle für das
Recycling von elektrischen und elektronischen Geräten
gebracht werden. Durch regelkonforme Entsorgung
schützen Sie die Umwelt und die Gesundheit
Ihrer Mitmenschen vor negativen Konsequenzen.
Informationen zum Recycling und zur Entsorgung
dieses Produkts, erhalten Sie von Ihrer örtlichen
Verwaltung oder Ihrem Hausmüllentsorgungsdienst.
HERSTELLER & IMPORTEUR (UK)
Hersteller:
Chal-Tec GmbH, Wallstraße 16, 10179 Berlin, Deutschland.
Importeur für Großbritannien:
Chal-Tec UK limited
Unit 6 Riverside Business Centre
Brighton Road
Shoreham-by-Sea
BN43 6RE
United Kingdom


9
EN
Dear Customer,
Congratulations on purchasing this device. Please read
the following instructions carefully and follow them to
prevent possible damages. We assume no liability for
damage caused by disregard of the instructions and
improper use. Scan the QR code to get access to the
latest user manual and more product information.
CONTENT
Safety Instructions 10
Control Panel 11
Use and Operation 12
Cleaning and Care 13
Hints on Disposal 13
Producer 13
TECHNICAL DATA
Item number 10026452
Power supply 220-240 V ~ 50/60 Hz
Capacity 14/28 L
Dimesions 49 x 46 x 36 cm (W x H x D)

10
EN
SAFETY INSTRUCTIONS
• Don’t touch hot surfaces of oven.
• Close supervision is necessary when any appliance is used by or near
children.
• To protect against electric shock, do not immerse cord, plug or any parts
of the oven on water or other liquid. Don’t let cord touch hot surfaces of
oven.
• Do not operate appliance with damaged cord or plug or after the appliance
malfunctions, or has been damaged in any manner. Return the appliance
to the nearest authorized service center for examination, repair or
adjustment.
• Do not place on or near a hot gas or electric burner, neither a heated Oven
nor a microwave oven.
• When operating the Oven keep at least four inches of space on all sides of
the Oven to guaran- tee adequate air circulation.
• Unplug from outlet when not in use or before cleaning.
• Take extreme caution while removing tray or disposing of hot grease or
other hot liquid.
• Do not clean with metal scouring pad. Pieces can break off the pad and
touch electrical parts, creating a risk of electric shock.
• Oversized foods or metal utensils must not be inserted in a toaster oven as
they may create a re or a risk of electric shock.
• A re may occur if the Oven is covered or touching ammable material
,including curtains, draperies, walls, and the like, when in operation. Do not
store any item on the Oven during operation.
• Do not place any of the following materials upon the Oven: cardboard,
plastic, paper, or other ammable materials. Do not store any materials,
other than manufacturers recom- mended accessories, in this Oven when
not in use.
• Unplug appliance from electrical outlet when not in use for a long time.
• This product is not designed for use by persons (including children) who
have reduced physical, sensory or mental capacities or persons with no
experience or knowledge, unless they are instructed and supervised in the
use of the appliance by a person responsible for their safety.

11
EN
CONTROL PANEL
Timer
The maximum adjustable time is 60 minutes. When
the desired time has elapsed, a signal sounds and the
unit switches off.
Indicator light
This light comes on when the unit is turned on.
Temperature knob for the lower cave
Temp knob suit to lower chamber setting temp when
bake various food. You can choose different temp up
to bake various foods. Temp control is from 60°C to
240°C Max optional.
Shift knob
Through shift switch optional setting Up; lower; Up/
Lower three way to
bake (to applicable lower chamber only).
Timer
Set the timer for the desired baking time according
to baking time of the food you are baked. 60 minutes
timer maximum, Timer with bell ring and automatic
power off when nished work.

12
EN
USE AND OPERATION
Use the function knob to choose top or bottom heat and turn the temperature
control to 240 °C Now turn the time slider to 10 minutes for preheating before
the rst use. There may be a slight odors and smoke. This is normal and does
not indicate a malfunction.
CAUTION
Risk of burns! The housing gets very hot during use. Be
careful and don’t touch hot surfaces of oven.
Operation
Toast a little food by upper chamber. It is better to choose lower chamber to
toast more food or upper and lower chamber using at the same time. To keep
warm of upper case using spa- re temperature of lower chamber when toast
food at there On the housing does not turn on the power source under the way
or toast low temperature require food with upper chamber.
1. Place the Bake Rack inside the toast oven and close the glass door.
2. Turn the TEMP/FUNCTION to the bake temperature setting for the
food you are using. According the different food to choose the desired
Temperature from 60-240°C.
3. Adjust Shift switch, According to needs to adjust the upper, middle and
lower electric heating tube different combination work to carry on food
toast.
4. Preheat the oven by turning the timer dial to 5 minutes. Timer will be
automatic power off with bell ring when the preheat nished, It must be
preheated when defrost of food.
5. Place the food to be baked into the center of oven tray and close the glass
door. Set the Timer for the desired baking time. When the cycle is nished
You can hear the bell ring will be alarmed. This time the timer will be
Automatically turn off and the oven stop heating.
6. Set the Timer to STAY ON position when the baking time over than 60
minutes. To ensure the oven stay on always. Turn the timer to OFF position
after baked.

13
EN
CLEANING AND CARE
• Unplug the oven and allow all parts to cool completely before cleaning or
moving.
• Don’t use any sharp utensils to clean the bake pan, as this may cause
damage to the surface painting.
• Clean the glass door with a soapy damp rag or sponge and then dry it by
towel.
• Place the oven on a dry, level heat resistant surface before using.
DISPOSAL CONSIDERATIONS
If there is a legal regulation for the disposal of electrical
and electronic devices in your country, this symbol
on the product or on the packaging indicates that this
product must not be disposed of with household waste.
Instead, it must be taken to a collection point for the
recycling of electrical and electronic equipment. By
disposing of it in accordance with the rules, you are
protecting the environment and the health of your
fellow human beings from negative consequences. For
information about the recycling and disposal of this
product, please contact your local authority or your
household waste disposal service.
MANUFACTURER & IMPORTER (UK)
Manufacturer:
Chal-Tec GmbH, Wallstrasse 16, 10179 Berlin, Germany.
Importer for Great Britain:
Chal-Tec UK limited
Unit 6 Riverside Business Centre
Brighton Road
Shoreham-by-Sea
BN43 6RE
United Kingdom


15
ES
Estimado cliente,
Le felicitamos por la adquisición de este producto.
Lea atentamente las siguientes instrucciones y sígalas
para evitar posibles daños. No asumimos ninguna
responsabilidad por los daños causados por el
incumplimiento de las instrucciones y el uso inadecuado.
Escanee el siguiente código QR para obtener acceso a
la última guía del usuario y más información sobre el
producto.
ÍNDICE
Indicaciones de seguridad 16
Controles 17
Puesta en funcionamiento y uso 18
Limpieza y cuidado 19
Retirada del aparato 19
Fabricante 19
DATOS TÉCNICOS
Número de artículo 10026452
Suministro eléctrico 220-240 V ~ 50/60 Hz
Capacidad 14/28 L
Dimensiones 49 x 46 x 36 cm (ancho x alto x profundidad)

16
ES
INDICACIONES DE SEGURIDAD
• Lea atentamente estas indicaciones y conserve el manual de instrucciones
para consultas posteriores.
• Las supercies del horno se calientan mucho durante su funcionamiento,
no las toque.
• En presencia de niños, utilice el horno solo si estos están bajo vigilancia.
• No sumerja el aparato, el cable de alimentación ni el enchufe en agua ni en
ningún otro líquido.
• Asegúrese de que el cable de alimentación no entra en contacto con
supercies calientes.
• No utilice el horno si el cable de alimentación o el enchufe están dañados
o si el aparato tiene problemas en su funcionamiento. Consulte con un
técnico para examinarlo y realizar la reparación pertinente.
• No coloque el aparato cerca de microondas o fogones eléctricos o de gas.
• Deje suciente espacio alrededor del horno para que el aire pueda circular
correctamente.
• Antes de limpiar el aparato desenchúfelo.
• Extreme las precauciones cuando mueva recipientes que contengan
líquidos a altas temperaturas.
• No utilice lana de acero para limpiar el horno, podría dañarlo y causar una
descarga eléctrica.
• Este horno no está indicado para alimentos o vajilla demasiado grandes.
• Para evitar incendios, no tape el horno ni lo instale debajo de cortinas u
objetos similares.
• Los siguientes materiales no son aptos para su uso en el horno: cartón,
plástico, papel y materiales inamables. Excepto los accesorios propios del
horno, no guarde ningún tipo de objeto en él cuando no lo utilice.
• Desenchufe el aparato si no lo utiliza.
• Las personas, incluidos niños, con discapacidades físicas, psíquicas o
sensoriales o carentes de la experiencia y conocimiento necesarios no
podrán utilizar el aparato salvo que estén bajo supervisión o hayan sido
previamente instruidas sobre su utilización y las indicaciones de seguridad
y se hayan familiarizado con sus funciones.

17
ES
CONTROLES
Temporizador
El tiempo máximo programable es de 60 minutos.
Una vez transcurrido ese tiempo, el horno emite un
pitido y se apaga.
Piloto
Esta lámpara se ilumina cuando el aparato está
encendido.
Regulador de temperatura para la parte inferior
del horno
En este regulador de temperatura puede ajustar la
temperatura entre 60 °C y 240 °C.
Interruptor de funcionamiento
Con este interruptor puede seleccionar el modo
de funcionamiento de la parte inferior del horno:
calor desde arriba, calor desde abajo o combinación
de ambos.
Temporizador
El tiempo máximo programable es de 60 minutos.
Una vez transcurrido ese tiempo, el horno emite un
pitido y se apaga.

18
ES
PUESTA EN FUNCIONAMIENTO Y USO
Seleccione el modo combinado de calor desde arriba y abajo en la rueda y
establezca la temperatura a 240°. Programe el temporizador para 10 minutos
para calentar el aparato antes del primer uso. Es posible que note cómo se
forma un poco de humo y un ligero olor; este fenómeno es completamente
normal y no supone ningún fallo ni avería.
ATENCIÓN
Riesgo de quemaduras. La estructura del horno se calienta
mucho con el aparato en marcha. No toque el horno
mientras esté encendido para no quemarse.
Uso
Caliente los platos más pequeños en la cámara superior. Para platos más
grandes se recomienda utilizar la cámara superior o ambas. Puede mantener
caliente la cámara superior con el calor generado en la parte inferior.
1. Introduzca la bandeja en el horno y cierre la puerta de cristal.
2. Ajuste la temperatura y función deseadas con los reguladores
correspondientes.
3. Ajuste las ruedas para utilizar la parte superior, inferior o las dos.
4. Precaliente el horno (normalmente 5 minutos antes de cocinar).
Para descongelar alimentos también será necesario precalentarlo,
preferiblemente a una temperatura de 65 °C.
5. Coloque los alimentos en el medio de la bandeja y cierre la puerta.
Programe el temporizador. Cuando haya transcurrido el tiempo, se emitirá
un pitido y el horno se apagará automáticamente.
6. Como alternativa puede colocar el temporizador en la función “Stay on”,
lo que le permitirá tener el horno encendido durante más de 60 minutos.
Apague el temporizador cuando haya terminado de cocinar.

19
ES
LIMPIEZA Y CUIDADO
• Desenchufe el aparato y deje que se enfríe por completo antes de retirar
las piezas para su limpieza.
• No utilice objetos puntiagudos ni alados para limpiar el aparato, podría
dañar su supercie.
• Limpie la puerta de cristal con una esponja y un poco de agua con jabón y
séquela posteriormente con un paño.
• Coloque el horno en una supercie plana y resistente al calor antes de
utilizarlo.
INDICACIONES SOBRE LA RETIRADA DEL
APARATO
Si en su país existe una disposición legal relativa a la
eliminación de aparatos eléctricos y electrónicos, este
símbolo estampado en el producto o en el embalaje
advierte que no debe eliminarse como residuo
doméstico. En lugar de ello, debe depositarse en un
punto de recogida de reciclaje de aparatos eléctricos y
electrónicos. Una gestión adecuada de estos residuos
previene consecuencias potencialmente negativas
para el medio ambiente y la salud de las personas.
Puede consultar más información sobre el reciclaje y
la eliminación de este producto contactando con su
administración local o con su servicio de recogida de
residuos.
FABRICANTE E IMPORTADOR (REINO UNIDO)
Fabricante:
Chal-Tec GmbH, Wallstraße 16, 10179 Berlín, Alemania.
Importador para Gran Bretaña:
Chal-Tec UK limited
Unit 6 Riverside Business Centre
Brighton Road
Shoreham-by-Sea
BN43 6RE
United Kingdom

This manual suits for next models
1
Table of contents
Languages:
Other oneConcept Oven manuals