oneisall PFD-002 Pro User manual

Automatic
Pet Feeder with WIFl
PFD-002 Pro
User Manual
ON-D97

Video Tutorialoneisall support Scan to
Download APP
oneisall Official
Community
Thank you for choosing us! To use the feeder correctly, please take a
moment to read this User Manual before you use the product.
If any accessories are missing, there are quality issues, or you have any
questions about this feeder’s usage, please feel free to contact us. via
For more information, you can visit our website
www.oneisall.com
We showcase buyer’s voice on our website regularly. You are welcome to
record and share your own experience of our products.

01
01
02
03
05
09
10
12
12
13
14
15
15
16
17
18
18
19
20
21
Contents
In the Package
Product Overview
LED Display Introduction
Assemble the Feeder
Connect to APP
Manual Feeding Setting
Feeding Schedule Settings
View the Feeding Log
Slow Feed Setting
Share and Remove Devices
Statement for WIFI Indicator
Statement for Battery Icon
Record A Message
The Desired Amount of Kibbles
Tips for Cleaning
Specification
Use Precautions
Troubleshooting
Issues of connection
Warranty

In the Package
Product Overview
Lid
Food tank
Switch for
the tank
Stainless
steel bowl
Dial
Lid button
LED Display
Food slide
Metal post
Bowl holder
Desiccant box
Battery compartment
Power jack
1xAutomatic
Pet Feeder
2xStainless Steel
Bowl and Holder
1xPower Cord
with Adapter 1xDesiccant Bag
1xUser Manual 1xQuick Guide 1xSponge
4xMetal Post 2xFood Slides
Quick Guide
01

LED Display Introduction
FEED: Manual feed RECORDE: Record a message
RESET: Clean all settings
Locked/Unlock WIFI indicator
Battery icon
02

Assemble the Feeder
1. Take out the machine, press the
button in front of the top lid, open
the tank and take out all
accessories.
2. Invert the machine and install 4 AA
batteries.
Note:
The back-up batteries are not included
in the package.
3.Install the charging cord. Insert the
Type-C end into the port of the feeder.
4. Take out two food slides, insert them to
the feeder.
03

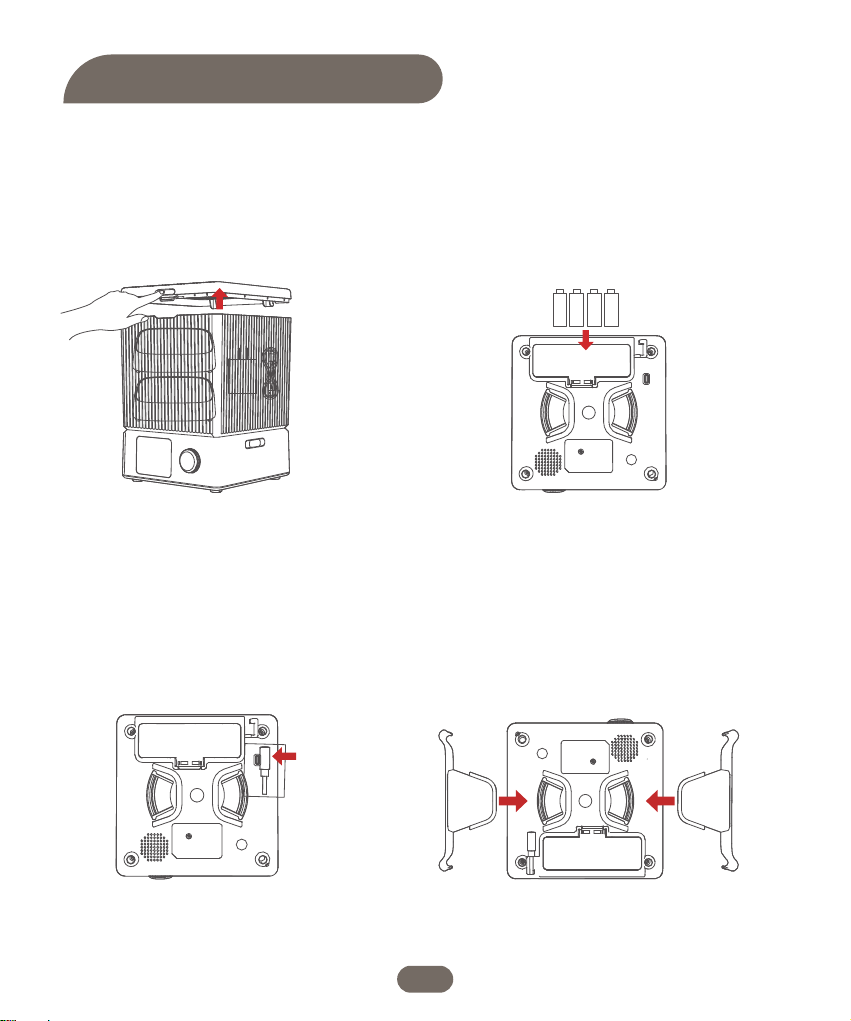
5. Take out 4 metal posts and insert them
into four holes at the bottom of the
machine.
7. Turn the machine over after all is
installed. Place the desiccant bag into the
desiccant box.
6. Align the 2 holes at the bottom of the
bowl holder with 2 metal posts and install
them properly. Do the same on the other
side.
8. Fill the tank with pet dry food. Place the
stainless steel bowls and connect the
charging cord to power supply.
Note:
Kibble size allowed: 4-12mm/0.2-0.5 inch in
diameter.
Do not use for canned or wet food.
Tips:
1. The batteries keep the feeder work under blackout.
2. Please use the attached 5V/1A adapter in daily.
04

05
Connect to APP
1. Download and install the Smart Life app.
The feeder supports 2.4GHz and 5GHz WiFi
System requirements
iPhone on iOS 10.0 or later. Smartphone on Android 5.0 or later.
Note:
To proceed with the installation and sign-up process, please grant the necessary
authorization. Upon entering your email address, you will receive a verification code. It is
essential to enter this code before proceeding to set your account password.
Smart Life

Note:
If you are using batteries as the sole power supply for the feeder, a battery icon will be
displayed on the device.
2. Turn on the Bluetooth feature on your mobile phone is turned on. Next, connect your
phone to a Wi-Fi network and enable GPS location services.
3. To activate the feeder, first, turn it on. Press and hold the dial button for approximately 3
seconds to unlock it. Then, rotate the dial to the RESET icon and hold it for 5 seconds. You
will notice that the WIFI icon will turn red and start flashing.
06

4. On the app, locate the "+" symbol on the right side and click on it to add a new feeder to
your account.
5. Within the app, utilize the “Add Device” feature to detect the device as depicted in the
provided image.
The model name of the device should be PFD-002 PRO. Once the device is identified, click
on the "Add" button to proceed.
07

6. When connecting the feeder for the first
time or switching to a new Wi-Fi network,
you will be prompted to enter the Wi-Fi
password. Please enter the password in the
provided field and click on the "Next" button
to continue.
7. Please wait patiently for the connection
to be established and succeed. This may
take a few moments.
8. Once the connection is successfully established, click on the "Done" button to finalize the
setup. You will notice that the WIFI icon on the device will turn white and stop blinking.
When connecting the feeder to the power outlet, please note that the middle menu
bar on the device will disappear automatically after 5 seconds of no user interaction.
When using batteries as the sole power supply, it's important to be aware that the
entire screen will turn black after 30 seconds of inactivity. To reactivate the screen,
simply turn the dial as desired, and it will light up again.
08
Note:

1. Once the connection process is
completed, the mobile phone will
automatically open the settings menu.
2. Choose the desired number of portions by
selecting the appropriate value, and then
click on the "Manual" option. In accordance
with the provided image, the feeder will
dispense 5 portions.
Manual Feeding Setting
09

1. Click on the "Meal Plan" option to
access the feeding plan setting
interface.Tap on “Add” option to set
feeding schedule.
2. Select the desired number of days of the
week for feeding. Then, choose the feeding
time and specify the number of portions for
each feeding.
Feeding Schedule Settings
10

Once the settings are properly configured, you will obtain a schedule as illustrated below:
You have the flexibility to set up to 10 meals in total, with a maximum of 60 portions per meal.
11

1. Click on the "Feed Record" option to view the log for the current week, which will display
the feeding records after each feeding session has been completed.
View the Feeding Log
Click on the settings icon. From there, you have the option to switch off the indicator.
Additionally, you can enable the Slow Feed switch, which will adjust the grain interval to 10
seconds per portion.
Slow Feed Setting
12

Share the device.
1. To enter the modification page, click on
the pencil icon located in the upper right
corner of the feeding interface within the
app.
2. Tap on "Share Device" to share this
feeder with your family and friends.
Share and Remove Devices
13

On the device list screen, press and hold the desired device for 3 seconds to access the
"Remove Device" screen. From there, select the device you wish to remove and click on the
"Remove Device" button.
Remove devices
Statement for WIFI Indicator
State of the icon
Red+Flash
White+Stay on
White+Flash quickly
Connecting to network
Connected to network
Indicates
Disconnected from the network, the device
retained the memory of the last mobile phone
it was connected to.
White+Flash slowly Disconnected from the network and does not
have memory of the last mobile phone.
14

When the battery is fully charged, the battery icon will be displayed in white. However, if the
battery level becomes low, the icon will turn red and start blinking as a warning indicator.
If you notice the battery icon turning red and blinking, it is an indication that the battery
needs to be replaced.
Statement for Battery Icon
1.While in the unlock state, turn the dial to select the "RECORDER" icon. The icon will start
flashing. Press and hold the dial button. You will hear two beeps, indicating that the
recording has started. Speak to record your personalized calling message.
2. Release the dial when you have finished recording your message. Once the recording is
complete, it will automatically play back once for confirmation.
3. If you wish to change the calling record, simply repeat steps 1 and 2. This will allow you to
record a new calling message.
Please note that each calling message can be up to 10 seconds in length.
Record A Message
15

Note:
1. The number displayed as "PORTION" on the device indicates the amount of food that
will be dispensed for each bowl.
2. It is important to note that the device does not support delivering different portion
sizes to each bowl simultaneously. The same portion size will be dispensed to all bowls.
Based on our laboratory experiment, the size of the kibble we used measured
approximately 0.3 inches.
Here's the data from our experiment
Please note that the provided data is for reference purposes only. It is essential to conduct
your own testing to determine the appropriate amount of dry food for your specific pet,
considering the particular brand and type of dry food you are using.
The Desired Amount of Kibbles
Cup
1/8
1/4
1/3
1/2
1
Portion
2
3
4
6
12
Gram
15
29
38
57
114
Here are the steps:
1. In the following steps, we will assume that both of your pets require the same amount of
food.
2. For instance, if ½ cup of food equals 6 portions, then ¼ cup would be equivalent to 3
portions.
3. Set the portion number on the device to 3.
4. Measure the dispensed kibbles. If the amount matches your desired quantity, it means the
setting is correct.
5. If the dispensed amount does not align with your desired quantity, adjust the portion
number until it gets closer to the desired amount.
16

Tips for Cleaning
1. Before cleaning, make sure to unplug
the charging cord from the feeder.
2. Unlock the tank by following the
instructions provided, and carefully remove
it from the feeder. Pour out any remaining
cat food from the tank.
3. Wash the lip, food tank, stainless steel
bowl, and bowl holder using mild soap
and warm water. Rinse them thoroughly.
Afterward, allow them to air dry or use a
clean cloth to wipe them dry.
4. Please note that the machine and tank
base should only be cleaned using a soft
dry cloth. These parts are not detachable
and are not waterproof, so avoid exposing
them to water or other liquids.
17
Table of contents
Popular Pet Care Product manuals by other brands

microjig
microjig BLADECLEAN BC-81012 instruction manual

Dogtra
Dogtra BALL TRAINER PRO owner's manual

Ella's Bubbles
Ella's Bubbles ELLA MICROBUBBLE THERAPY PET SPA owner's manual

Petsafe
Petsafe Staywell Petporte Smart Flap Fitting instructions

D.T. System
D.T. System H20 1810 Series owner's manual

Leuchtie
Leuchtie Premium quick start guide