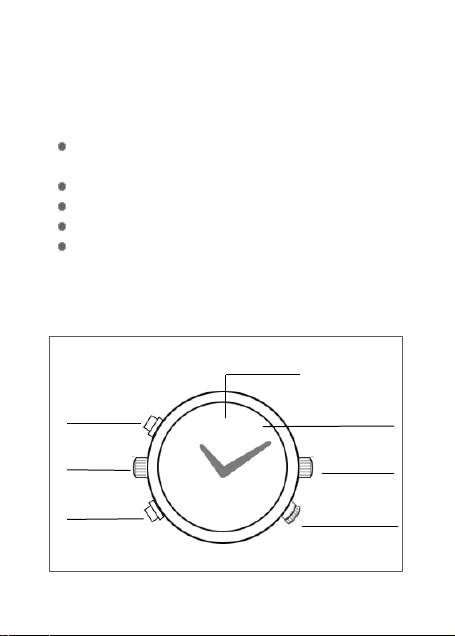
OneTech OTP-LS8 User manual

Smart Watch DVR
User Manual
OTP-LS8

Please read this manual carefully and
thoroughly before any attempt to operate this
product and retain it for your future reference.
Smart DVR Features
Super image sensor for low illumination
video recording, quick light response
Super HD 1296P @ 30fps, 720P up to 60fps
H.264 compression
Built-in micro SD card, support up to 128GB
ultra-integrated watch type design, suitable
for meeting recording, evidence recording,
and outdoor sports scenes, etc.
Smart DVR Layout
Lens
Microphone
crown
LED Indicator
Function
button
Reset
button
USB crown
Time adjust
crown
(Waterproof )

Main Operations
Important: Setting for waterproof
(only for waterproof type)
Before any contact with water, be sure to screw
the microphone crown and USB crown to the
case by turning the crowns clockwise while
applying gentle pressure, be sure to put the
time adjust crown to the normal position.
Note: After setting for waterproof, no voice will
be recorded during video recording, due to the
microphone hole is sealed.
waterproof
Not waterproof
(Microphone hole
Opened.)

1. Powering the Smart DVR On/Off
To power on the Smart DVR,press and hold
the Function button until the blue indicator
light appears. After a few seconds the green
light will flicker several times and then turn off,
the Smart DVR will automatically begin
recording video.
To turn off the Smart DVR push and hold the
Function button until the light turns off.
2. Recording Video
(1).Power on the Smart DVR as in step 1. When
first turned on the Smart DVR will
automatically begin recording video.
(2).Push the Function button to stop recording,
the blue light turns on and the Smart DVR is in
standby mode.
(3).Push the Function button again to begin
another recording.
The video streaming is divided into one file
every 10 minutes.
NOTE: Be sure to unscrew the microphone crown
for normal recording with voice.

3. Taking Photo
(1).To enter the photo mode, make sure the
Smart DVR is in standby mode(the blue light is
solid on), double-click the Function button, the
Smart DVR will go into the photo mode and
the blue and green light will blink alternately.
(2).Click the Function button once to take a
picture, the blue light will blink twice.
(3).to quit the photo mode, double-click the
Function button again, the Smart DVR will back
to standby mode, the blue light keeps on.
4. Recording Audio
(1). To enter the audio recording mode, make
sure the Smart DVR is in standby mode(the
blue light is solid on), Click the Function
button 3 times quickly, the blue light will blink
several times and then turn off, the Smart DVR
will automatically begin audio recording.
(2). To stop/quit audio recording mode, just click
the Function button once, the Smart DVR will
back to standby mode, the blue light keeps on.

5. Motion Detection
(1). To enter the motion detection recording
mode, make sure the Smart DVR is in standby
mode(the blue light is solid on), Click the
Function button 4 times quickly, the green light
will blink, the Smart DVR entered motion
detection mode. When the object is moving in
front of lens, the Smart DVR will start video
recording automatically, green light blink faster.
When the object stop moving, after a few
seconds, the Smart DVR will stop recording.
When the disk space is full, it will cut the earliest
recorded file, to free space for new video file.
(2). Click the Function button once, will pause
motion detecting, and the green light will keep
on.
(3). To quit motion detection mode, again click
the Function button 4 times quickly and
continuously, the Smart DVR will back to standby
mode, the blue light keeps on.
6. Auto Power Off
(1). When the battery power is low, the blue
light will blink for seconds, and then the Smart

DVR will shut down.
(2). When the memory is full, both the blue and
green light will blink for seconds, and then the
Smart DVR will shut down.
(3). If no operation for two minutes in standby
mode, the Smart DVR will shut down.
7. Charging the Battery
The Smart DVR has an internal battery. The
battery can be charged via computer USB port or
DC 5V adapter. Unscrew the USB crown, put the
plug of USB cable in the Smart DVR first, then
put another plug in the USB port of computer or
DC 5V adapter.
If the blue light is flashing, that means the Smart
DVR is in charge.
Please wait for the blue light stopping flashing
(keeping solid on), which means the Smart DVR
is full of power.
8. Reset your Smart DVR
When the Smart DVR works abnormal, you can try
to reset it. Press both the Reset button and

Function button once in same time, restart the
Smart DVR, it may work normally.
9. Setting your Smart DVR
Plug the Smart DVR into the computer USB port,
a new removable disk will appear on the
computer screen. Open the removable disk, you
will find the file
setup.exe
under the root
directory, double-click the file to run it, following
window will appear:
You can set date/time, frame size, video quality,
etc. After finishing changing, click the button
Create configuration file on the lower left to save the
settings. Click the button Default Setting to restore

the factory default Settings.
After safely removing the Smart DVR from the
computer and turn on the Smart DVR, the
settings will take effect.
10. Watch time adjusting
(1). Pull the time adjust crown out to the time
correction position.
(2). Turn the crown to move the minute hand to
set the correct time.
(3). Securely return the crown to the normal
position.
Specifications:
View Angle:
65°
Min. Illumination:
1 Lux
Video Format:
MOV
Compress Format:
H.264 advanced version
Vedio Resolution:
2304x1296 1920x1080,
1280x720
Frame Rate:
1296P/1080P @30fps
720P @30fps/60fps
Photo Format:
JPG 4352x3264

Storage:
Micro SD up to 128GB
USB Interface:
USB 2.0
Battery Charge:
DC 5V/500mA
Battery Capacity:
380mAH
Dimension:
52×45×15mm(approx.)
Net Weight:
110 g (approx.)
Caution:
Your Smart DVR is a product of superior design and
craftsmanship and should be treated with care.
The Smart DVR may become fairly hot during
recording –this is normal. To ensure proper
cooling do not block the flow of air to the cover
of the Smart DVR.
Do not drop, or knock the Smart DVR. Rough
handling can break internal circuit boards and
fine mechanics.
Important:
All jurisdictions have specific laws and regulations relating
to the use of cameras and voice recorders. Before using
any camera and/or voice recorder for any purpose it is the
buyer′s responsibility to be aware of all applicable laws
and regulations that prohibit or limit the use of cameras
and voice recorders, and to comply with the applicable
laws and regulations.
Table of contents