Onkyo TX-NR646 Installation guide

En
TX-NR646
AV RECEIVER
Basic Manual
This manual includes information needed when
starting up and also instructions for frequently
used operations. The Advanced Manual is
published on the web for ecological reasons and
has more detailed information and advanced
settings.
http://www.onkyo.com/manual/txnr646/adv/en.html
Advanced Manual
found here
TX-NR646_BAS_En_SN29401979_20150226.indd 1 2015/02/26 14:59:53

En-2
ContentsFeatures
Advanced Manual (on the web)
The Advanced Manual, published as an e-manual on the
web, has more detailed information and advanced settings.
The Advanced Manual is created in a format that makes
it easy to read on a PC or Smartphone. The Advanced
Manual has the following content:
Details on AM/FM reception
Playing Music Files on a USB Storage Device
Listening to Internet Radio
Playing Music with DLNA
Playing Music Files in a Shared Folder
Operating Music Files with the Remote Controller
Listening Mode
Advanced Settings
Operating Other Components with the Remote
Controller
Advanced speaker connections
Connecting and Operating Onkyo RI Components
Firmware Update
Troubleshooting
Reference Information
Advanced Manual found here
http://www.onkyo.com/manual/txnr646/adv/en.html
Equipped with 7 ch amplifier
Supports playback in Dolby Atmos format which
provides 360-degree placement and movement of
sounds including overhead sound
Supports playback in DTS:X, which is DTS's next-
generation object-based surround sound technology
that includes height to deliver a fully-immersive listening
experience to your living room
Dolby Surround listening mode expands 2 ch, 5.1 ch or
7.1 ch source to available speaker configurations
Equipped with 4K compatible HDMI IN/OUT jacks
Equipped with 2 HDMI output jacks
Supports the HDMI Standby Through function which
allows signal transmission from players to the TV in
standby state
Supports HDCP2.2, a strict copy-protection for providing
high quality content (HDMI IN1 to IN3/HDMI OUT MAIN/
SUB)
Supports ARC (Audio Return Channel)
Supports USB storage playback
Supports variety of network functions such as Internet
Radio, DLNA, AirPlay etc.
Supports Wi-Fi and Bluetooth®
Equipped with a PHONO jack enabling connection with
a turntable
Bi-Amping capability
A/V Sync Function to correct deviation of audio and
video
Multi-zone function which allows you to play a different
source in another room from the main room
32 bit DSP (Digital Signal Processor) with excellent
calculation performance
Music Optimizer™ for compressed digital music files
Phase Matching Bass System
Automatic speaker setup available using supplied
calibrated microphone (AccuEQ Room Calibration)
Supports playback of MP3, WMA, WMA Lossless,
FLAC, WAV, Ogg Vorbis, Apple Lossless, DSD, Dolby
TrueHD via network and USB storage device (the
supported formats will differ depending on the use
environment)
Refer to the back cover for supplied accessories.
Basic Manual (this manual)
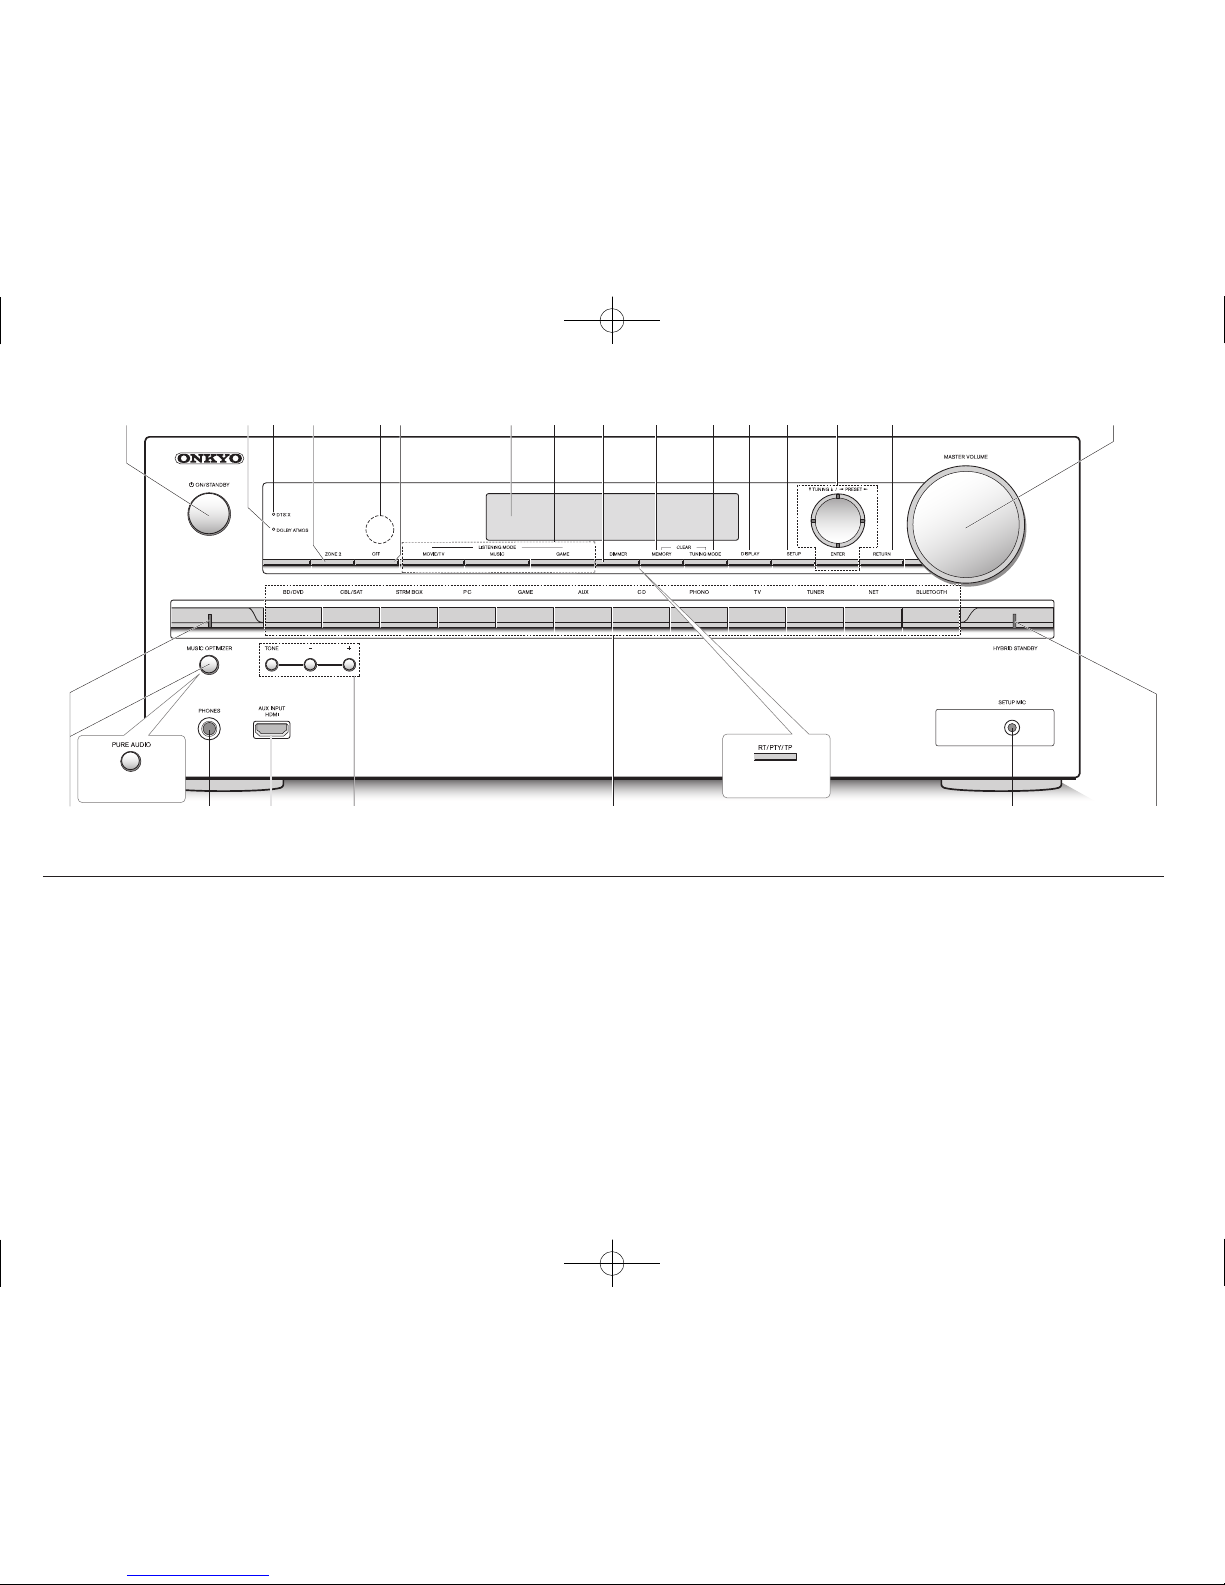
Front Panel..........................................................................3
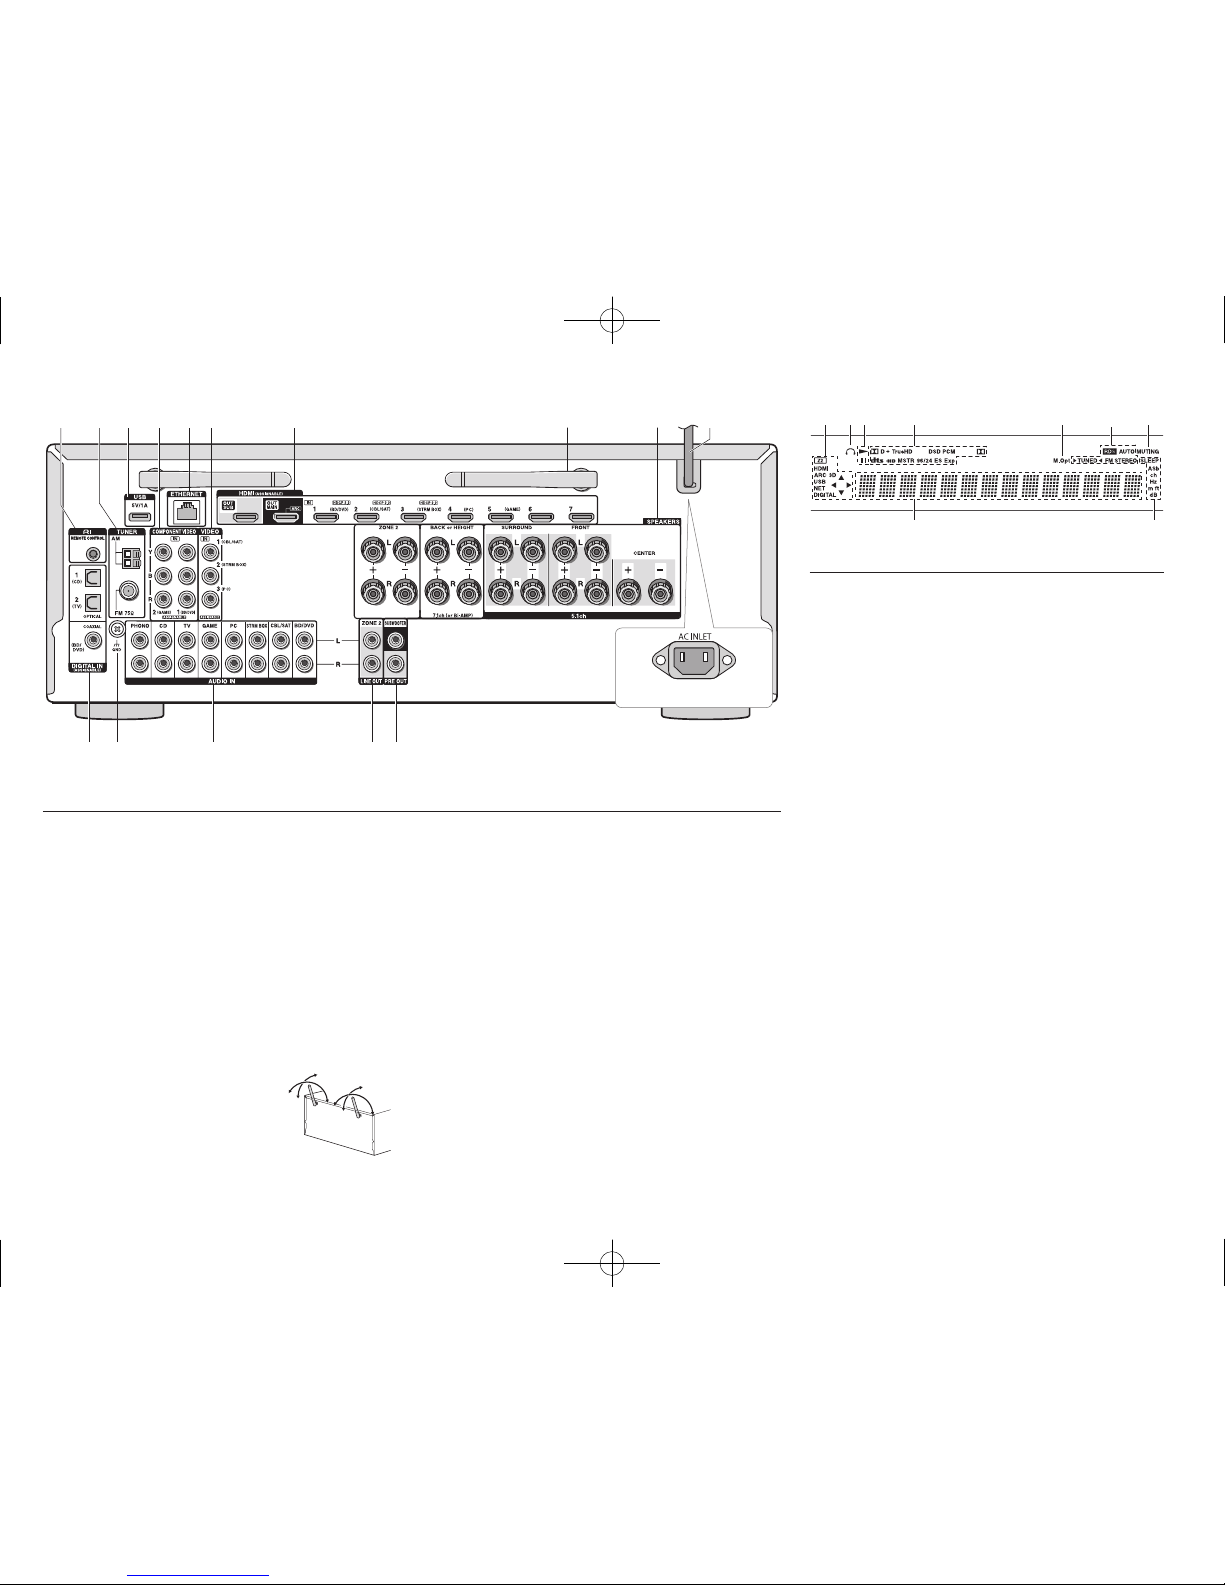
Rear Panel...........................................................................4
Display.................................................................................4
Step 1: Connections���������������������������������������������� 5
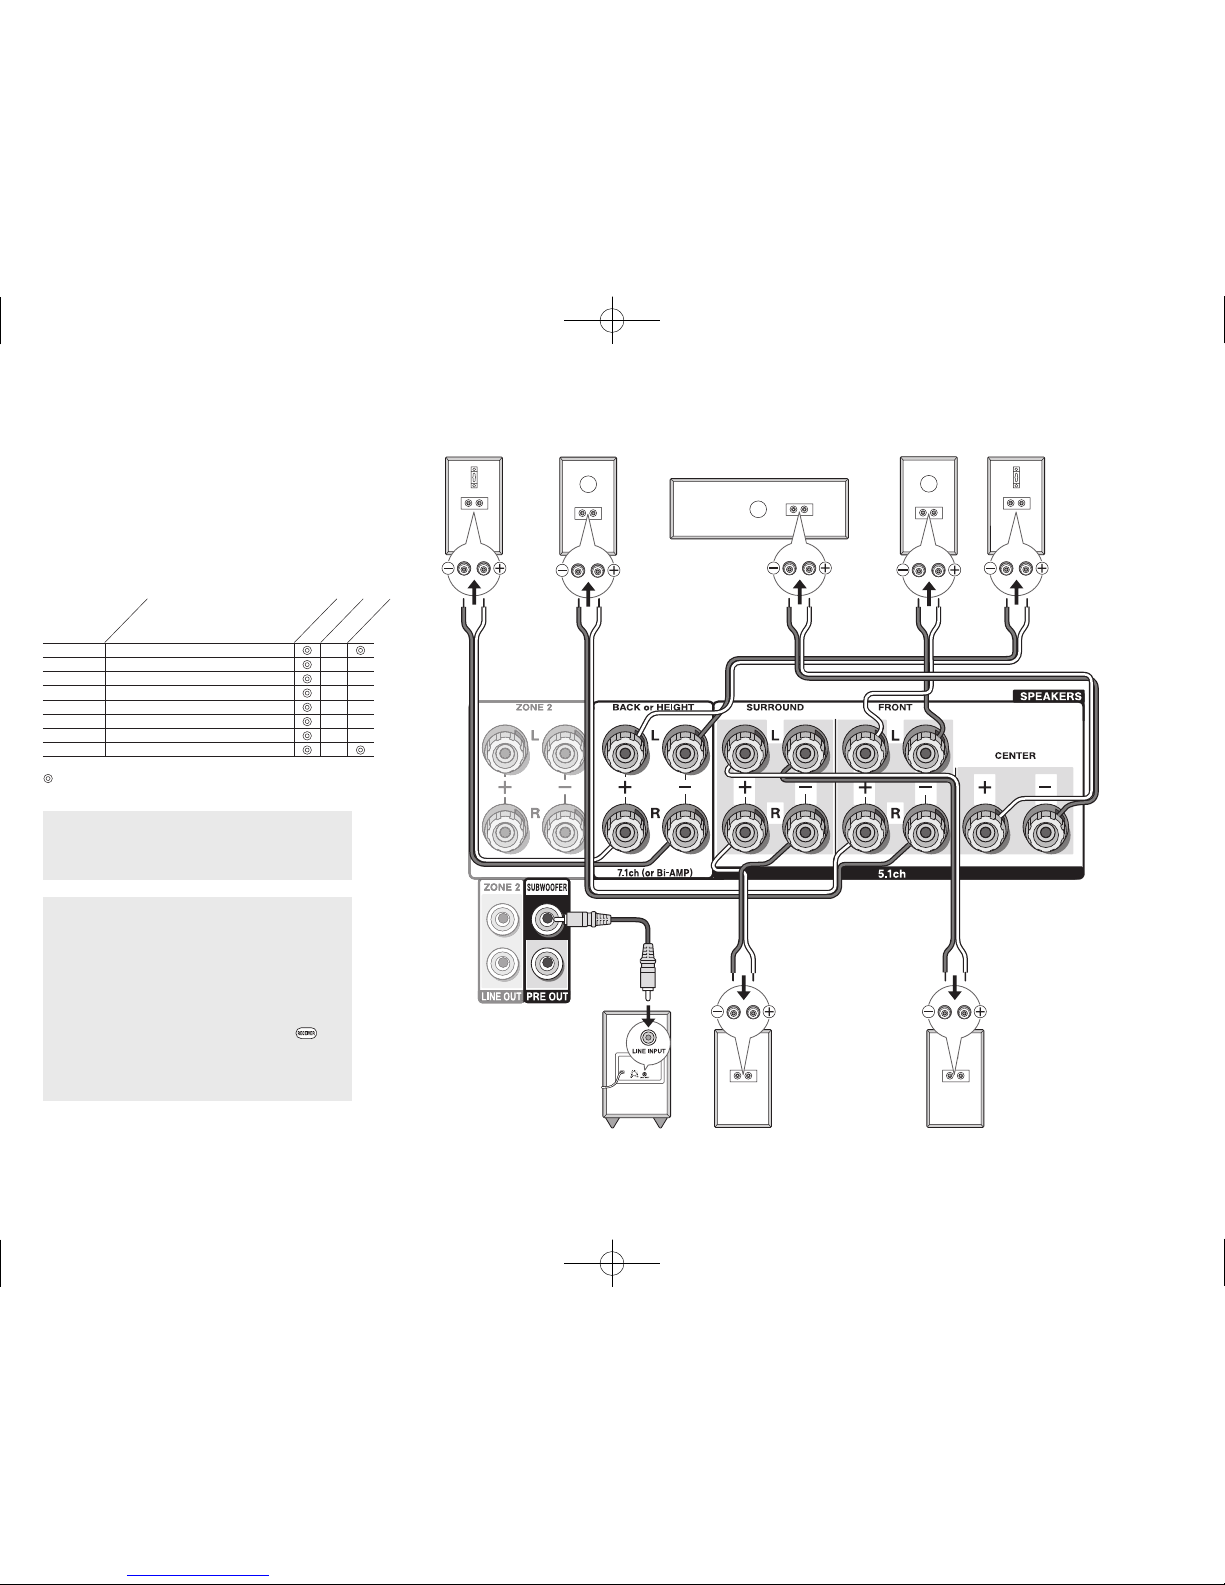
1 Connecting speakers........................................................5
・Speaker layout ..............................................................5
・Height speaker types ....................................................5
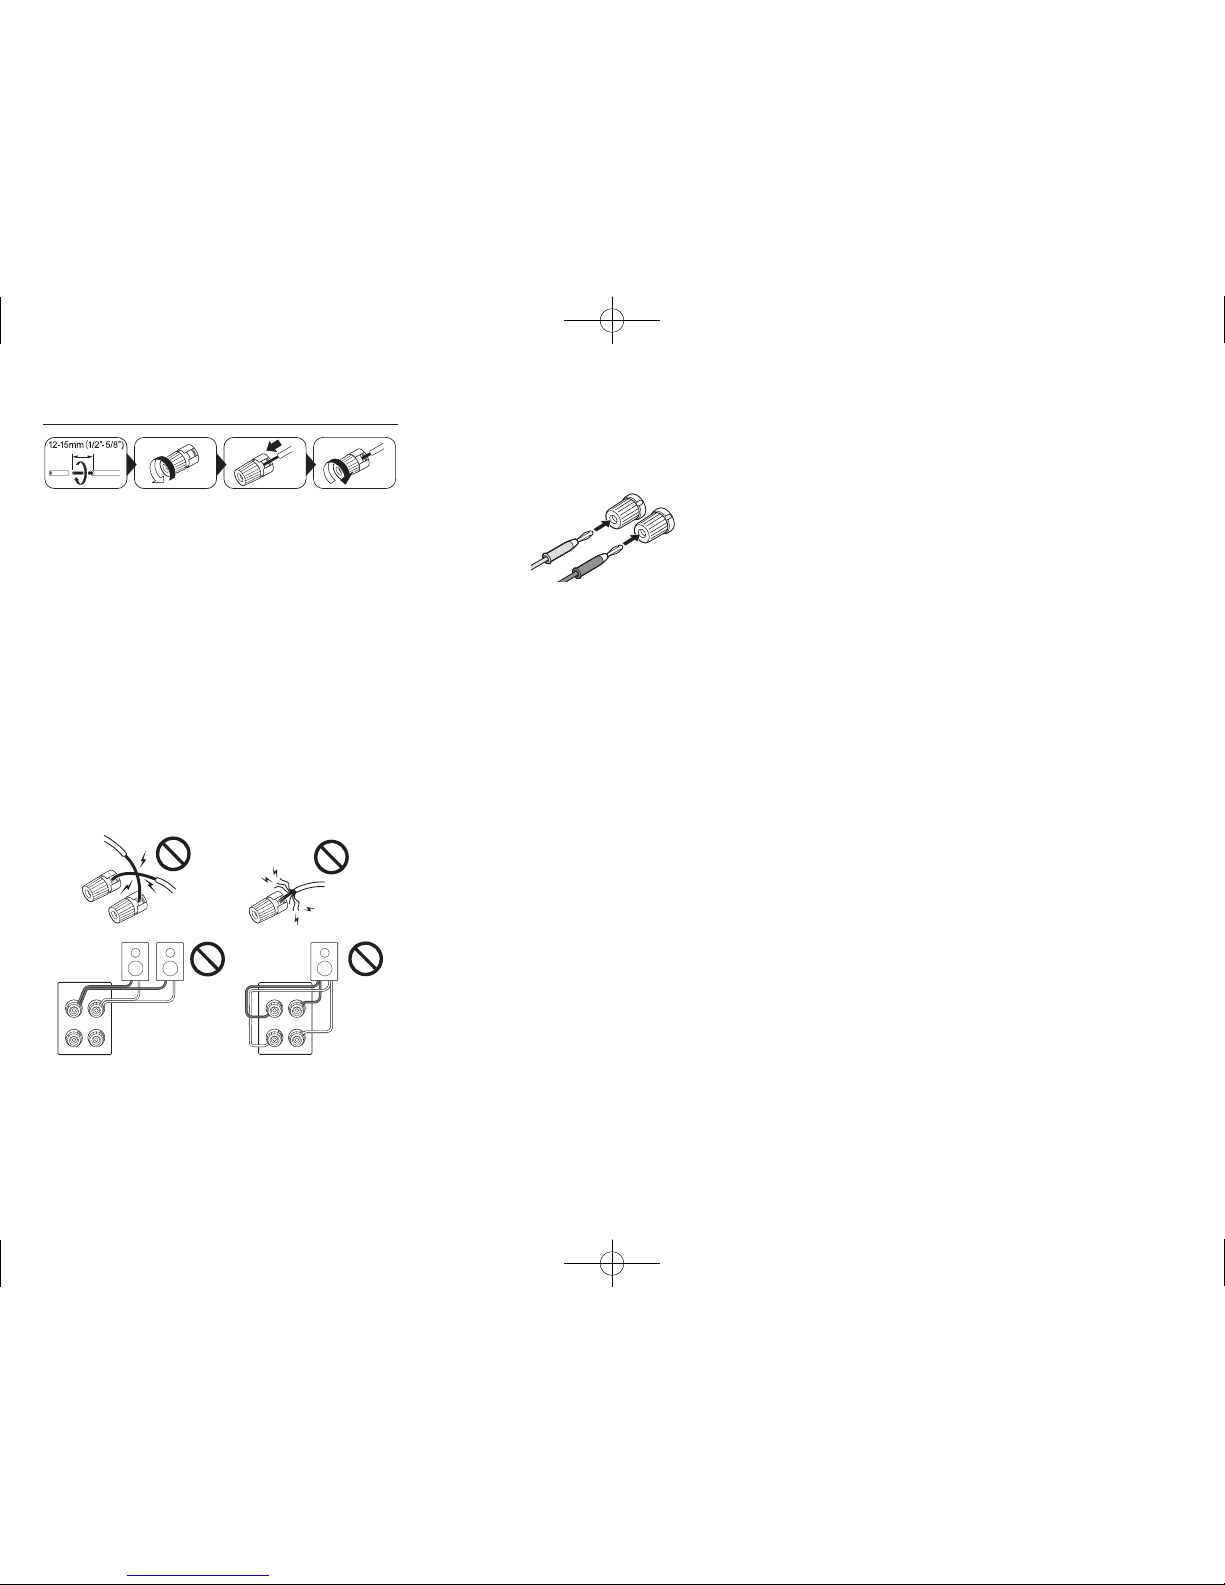
・Instructions on how to connect speakers......................7
2 Connecting the TV and players........................................8
・HDMI cable connection.................................................8
・Connecting Components without HDMI........................9
3 Other connections ..........................................................10
Step 2: Initial Setup ��������������������������������������������� 11
1 AccuEQ Room Calibration .............................................11
2 Source Connection.........................................................12
3 Remote Mode Setup ......................................................13
4 Network Connection.......................................................13
Step 3: Playing Back ������������������������������������������� 15
1 Basic Operations............................................................15
・Part names and functions of the remote controller .....15
2 Network Functions..........................................................16
3 AirPlay®..........................................................................16
4 Bluetooth®......................................................................17
5 AM/FM Radio .................................................................17
6 Multi-zone.......................................................................18
・Making Multi-zone Connection....................................18
・Performing Multi-zone Playback .................................19
7 Quick Setup Menu..........................................................19
8 Other useful functions ....................................................20
Troubleshooting.................................................................21
Specifications ....................................................................22
Table of image resolutions.................................................23
Resolutions supported by HDMI........................................23
Supplied Accessories ..........................................Back cover
TX-NR646_BAS_En_SN29401979_20150226.indd 2 2015/02/26 14:59:53

En-3
124 9 F G H I K6 L578 J
N
MR SP QO
3
(European, Australian
and Asian models)
(European, Australian
and Asian models)
Front Panel
1 zON/STANDBY button: Turns the unit on or into
standby mode.
2 DOLBY ATMOS indicator: Lights when playing Dolby
Atmos.
3 DTS:X indicator: Lights when playing DTS:X.
4 ZONE2 button: Controls the multi-zone function.
5 Remote control sensor: Receives signals from the
remote controller.
6 OFF button: Switches the multi-zone function off.
7 Display
8 LISTENING MODE buttons: Allow you to select the
listening mode.
9 DIMMER button (North American and Taiwanese
models): Switches the brightness of the display.
RT/PTY/TP button (European, Australian and Asian
models): Can be used when receiving the station
transmitting text information.
F MEMORY button: Registers a station.
G TUNING MODE button: Switches the tuning mode.
H DISPLAY button: Switches the information on the
display.
I SETUP button: Used when making settings.
J Cursor buttons,
l
TUNING
j
button,
d
PRESET
c
button and ENTER button: Move the cursor and
confirms the selection. When listening to AM/FM
broadcasting, tune in to the station with
l
TUNING
j
or
select the registered station with
d
PRESET
c
.
K RETURN button: Returns the display to the previous
state.
L MASTER VOLUME: Allows you to adjust the volume.
M MUSIC OPTIMIZER button/indicator (North American
and Taiwanese models): Turns on/off the MUSIC
OPTIMIZER function that improves the quality of the
compressed audio.
PURE AUDIO button/indicator (European, Australian
and Asian models): The display and analog video
circuits are turned off to switch the unit to Pure Audio
mode and provide purer sound.
N PHONES jack: Stereo headphones with a standard plug
are connected.
O AUX INPUT HDMI jack: A HD camera or such other
device is connected.
P TONE and Tone Level buttons: Adjust the high tone
and low tone.
Q Input selector buttons: Switch the input to be played.
R SETUP MIC jack: The supplied speaker setup
microphone is connected.
S HYBRID STANDBY indicator: Lights if the unit enters
standby mode when the HDMI Standby Through, USB
Power Out at Standby, Network Standby or Wakeup
from Bluetooth function is enabled.
TX-NR646_BAS_En_SN29401979_20150226.indd 3 2015/02/26 14:59:53

En-4
G
F
IH J K
9
8
12 3 5 764
(Taiwanese models)
Rear Panel
1 RI REMOTE CONTROL jack: An Onkyo product with RI
jack can be connected and synchronized with this unit.
2 TUNER AM/FM (75Ω) terminal: The supplied antennas
are connected.
3 USB port: A USB storage device is connected so that
music files stored in it can be played. USB devices can
be supplied with power when connected with a USB
cable.
4 COMPONENT VIDEO IN jack: Component video input
jack
5 ETHERNET port: Used for LAN connection
6 COMPOSITE VIDEO IN jacks: Analog video signals are
input.
7 HDMI IN/OUT jacks: Digital video signals and audio
signals are transmitted between the unit and the
connected devices.
8 Wireless antenna: Used for Wi-
Fi connection or when using a
Bluetooth-enabled device. Adjust
their angles according to the
connection status.
9 SPEAKERS terminals: Speakers are connected. To
use the Multi-zone function, connect the speakers in the
separate room to the ZONE2 speaker terminals.
F Power cord (North American, European, Australian
and Asian models)
AC INLET (Taiwanese models): The supplied power
cord is connected.
G DIGITAL IN COAXIAL/OPTICAL jacks: Digital audio
signals are input.
H GND terminal: The ground wire of the turntable is
connected.
I COMPOSITE AUDIO IN jacks: Analog audio signals are
input.
J LINE OUT ZONE 2 jack: Audio output jack connected
to the pre-main amplifier for multi-zone playback in a
separate room.
K PRE OUT SUBWOOFER jack: A subwoofer with built-in
amplifier is connected.
14 623 75
98
Display
1 Lights in the following conditions. "Z2": Zone 2 output
is on. / "HDMI": HDMI signals are input and HDMI
input selector is selected. / "ARC": Audio signals are
input from ARC compatible TV and TV input selector
is selected. / "3D": Input signals are 3D. / "USB" ():
"NET" input is selected and USB storage device is
connected. / "NET" (): "NET" input is selected and
the unit is connected to the network. / "DIGITAL":
Digital signals are input and the digital input selector is
selected. / Cursor indicators: NET or USB is controlled.
¼ "USB" and "NET" will flash if the connection is not correct.
2 Stays lit when headphones are connected.
3 Lights when NET or USB is controlled.
4 Lights according to the type of input digital signals and
the listening mode.
5 Stays lit when Music Optimizer is enabled.
6 Lights in the following conditions. "AUTO": Tuning mode
is auto. / "TUNED": Receiving AM/FM radio.
flashes while tuning is automatically performed. / "FM
STEREO": Receiving FM stereo. / "RDS" (European,
Australian and Asian models): Receiving RDS
broadcasting.
7 "MUTING": Flashes when muting is on.
8 Lights in the following conditions. "SLEEP": Sleep timer
has been set. / "ASb" (Auto Standby): Auto Standby
is on. / "ch": Channel is being set. / "Hz": Crossover
frequencies are being set. / "m/ft": Speaker distances
are being set. / "dB": Speaker volume is being set.
9 Displays various information of the input signals.
Pressing DISPLAY displays the type of input digital
signals and the listening mode.
90°
180°
90°
180°
TX-NR646_BAS_En_SN29401979_20150226.indd 4 2015/02/26 14:59:54

Step 1: Connections
En-5
1 Connecting speakers
Speaker layout
#
$
%
&
'
7
8
9
G
H
F
"
Important: The power cord must be connected only after all other connections are
completed.
" # Front speakers To enjoy the Dolby Atmos listening
mode, height speakers or back
speakers need to be installed. There
are a variety of height speakers apart
from this type. see the next section
for details.
To use the multi-zone function, see
"Multi-zone" in "Step 3: Playing
Back".
$Center speaker
% & Surround speakers
'Subwoofer
7 8 Back speakers
9 F Height speakers (Front High)
G H Height speakers (Rear High)
5.1 ch: "#$%&'
7.1 ch: "#$%&'+78 or
"#$%&'+9F or
"#$%&'+GH
78 speakers, 9F speakers and
GH speakers share the same speaker
terminals. Select either of the groups.
Characteristics of speaker types
"# output front stereo sound and $
output center sound such as dialogs and
vocals. %& create back sound field. '
reproduces bass sounds and creates rich
sound field.
Connecting 78 speakers, 9F speakers
or GH speakers enables playback in 7.1
ch configuration. 78 (back) speakers
improve sense of envelopment created by
back sound field as well as seamlessness
of back sounds, providing more natural
sound experiences in the sound field.
9F or GH (height) speakers produce
surround effects on a height plane. This
unit can perform optimal sound field
processing for the type of height speakers
actually installed and registered in "Initial
Setup".
Height speaker types
Installing speakers in ceiling
a b
fe
c d
a b Top Front
c d Top Middle
e f Top Rear
Ceiling speakers, etc. are used for
maximizing effects in Dolby Atmos or
Dolby Surround listening mode. Install Top
Front speakers so that they are positioned
at a point between directly above the
listening position and directly above the
front speakers. Install Top Middle speakers
so they are directly above the listening
position. Install Top Rear speakers so
they are positioned at a point between
directly above the listening position and
directly above the back speakers. You can
select (a)(b), (c)(d) or (e)(f) on the
unit. For connection with the unit, use the
SPEAKERS BACK or HEIGHT terminals.
Dolby Laboratories recommends
placing the speakers as described in
"Installing speakers in ceiling" to obtain
the best Dolby Atmos effect.
Using Dolby Enabled Speakers
g
i
h
j
g h Dolby Enabled Speakers (Front)
i j Dolby Enabled Speakers (Surround)
A Dolby Enabled Speaker is specially
designed to be used as a height speaker.
There are two types of Dolby Enabled
Speakers; one type is designed to be
placed on top of other speakers such as
front speakers and surround speakers,
TX-NR646_BAS_En_SN29401979_20150226.indd 5 2015/02/26 14:59:54

Step 1: Connections
En-6
'
Subwoofer with built-in
power amplifier
&
Surround R
8FH
Right back
Or right height
79G
Left back
Or left height
%
Surround L
$
Center
#
Front R
"
Front L
A speaker configuration
where only one back
speaker is connected is
not supported.
and the other type is designed to be integrated with normal
speakers. Dolby Enabled Speakers placed with their
diaphragms facing toward the ceiling create higher effect
in the Dolby Atmos and Dolby Surround listening modes
by providing sounds echoing off the ceiling. You can select
(g)(h) or (i)(j) on the unit. For connection with the unit,
use the SPEAKERS BACK or HEIGHT terminals.
When playing Dolby Atmos, the speakers required depend
on how you have setup your back speakers or height
speakers. The following shows combinations of speakers
for reproducing Dolby Atmos.
1 Back
2 Front High
3 Rear High
4 Top Front
5 Top Middle
6 Top Rear
7 Dolby Enabled Speaker (Front)
8 Dolby Enabled Speaker (Surround)
Connection
pattern
Front
Center
Surround
Back or Height
: Required, : Optional
Connection of a subwoofer is optional.
Important: (North American and Taiwanese models)
speaker with less impedance than the supported value
may result in failure.
Important: (European, Australian and Asian models)
have to change the setting if any of the speakers
a speaker with less impedance than the setting
may result in failure. You can set up by viewing the
guidance displayed on the TV screen. Select the item
with the cursor buttons of the remote controller and
press ENTER to confirm your selection. To return
to the previous screen, press RETURN. Press
RECEIVER and then SETUP on the remote controller.
Select "2. Speaker" - "Configuration" - "Speaker
Impedance" and change the default value from "6ohms"
to "4ohms".
TX-NR646_BAS_En_SN29401979_20150226.indd 6 2015/02/26 14:59:55

Step 1: Connections
En-7
Instructions on how to connect speakers
Cut and remove the plastic coating from the end of the
speaker cable, twist the core and connect it to the terminal.
Be sure to make correct connection between the unit's
jacks and speaker's jacks (+ to + and - to -) for each
channel. If connection is wrong, a bass sound may become
poor due to reverse phase. Up to two subwoofers with
built-in power amplifier can be connected to the subwoofer
jacks. Set the cut-off filter selection switch of the subwoofer
to DIRECT. If the subwoofer does not have a cut-off filter
selection switch but has a cut-off frequency adjusting dial,
turn it to the maximum frequency. If your subwoofer does
not have built-in power amplifier, you can connect a power
amplifier between the unit and the subwoofer.
The speaker setting is 7.1 channels at the time of
purchase. You can change it manually or by using
automatic speaker setting.
Short-circuiting the + cable and - cable or contacting
the cable core to the rear panel of the unit may cause
failure. Also do not connect two or more cables to one
speaker terminal or one speaker to several terminals.
When using commercially available banana plugs:
tighten the speaker terminals to the end and then insert
the banana plugs. Do not insert the core of speaker cable
directly into the hole for banana plug of speaker terminal.
(North American models)
TX-NR646_BAS_En_SN29401979_20150226.indd 7 2015/02/26 14:59:55

Step 1: Connections
En-8
2 Connecting the TV and players
HDMI
IN
HDMI
OUT
HDMI
OUT HDMI
OUT
HDMI
OUT
HDMI
OUT
TV
Blu-ray Disc/
DVD player
Streaming media Player, etc.Satellite/Cable
set-top box, etc.
Game console
Personal computer
HDMI cable
To use the ARC function, connect to the ARC
compatible HDMI jack of the TV and make an
appropriate setting on the unit. See "2 Source
Connection" of "Step 2: Initial Setup".
HDMI cable connection
The unit has many HDMI jacks on its rear panel and each
of them corresponds to an input selector button of the
same name on the front panel. For example, a Blu-ray Disc
player will be connected to the HDMI IN1 jack and the BD/
DVD button on the front panel will be used to listen to the
playback sound (if the player is CEC compliant, input will
be switched automatically when play is started). If you add
another Blu-ray Disc player, you can use any other jack
than HDMI IN1. It is possible to change assignment of the
input jacks and input selector buttons. For how to make
settings, see the Advanced Manual.
To connect the TV and the unit, connect the HDMI OUT
MAIN jack of the unit and the HDMI IN jack of the TV using
a HDMI cable. With this connection, it becomes possible to
display the setting screen of the unit on the TV or transmit
video/audio signals from the player to the TV. If your TV
supports ARC (Audio Return Channel), it is possible to
play the TV sound with the AV receiver's speakers with
this connection only. If your TV does not support ARC, you
need, in addition to the HDMI OUT MAIN jack connection,
a digital optical cable connection between the digital audio
out optical jack of the TV and the DIGITAL IN OPTICAL
jack of the unit or an analog audio cable connection
between the audio output jack of the TV and the AUDIO IN
TV jack of the unit.
DIGITAL
OPTICAL
OUT
AUDIO
OUT
TV
¼ Audio connection with a TV not supporting ARC
¼ Select an appropriate
connection for your TV.
The unit supports the HDMI Standby Through function
that allows video and audio signal transmission from
players to the TV even if the unit is in standby. You have to
TX-NR646_BAS_En_SN29401979_20150226.indd 8 2015/02/26 14:59:55

Step 1: Connections
En-9
modify the settings to enable the input selection link with
CEC (Consumer Electronics Control) compliant device,
connection with ARC compatible TV, and HDMI Standby
Initial Setup".
Another TV can be connected to the HDMI OUT SUB
jack.
To enjoy HDCP2.2 protected video, connect the player
to one of the HDMI IN1 to IN3 jacks and connect the
unit and the TV via HDMI. You will be unable to view
images protected by HDCP2.2 if your TV does not have
a HDCP2.2 compatible input jack.
To play 4K or 1080p video, use a high speed HDMI
cable or high speed HDMI with Ethernet cable.
Connecting Components without HDMI
If your AV component does not have HDMI jack, use an
available jack of your component for cable connection with
this unit.
4
123
5
1 A player with a digital audio out jack can be connected.
Digital optical cable (OPTICAL)
¼ As the digital in optical jack of the unit has a
cover, push in the cable against the cover as it
is turned inside.
Digital coaxial cable (COAXIAL)
2 A player with component video output jacks can be
connected.
Component video cable
¼ Its transmitted video has higher quality than
that of composite video cable.
3 A player with a composite video output jack can be
connected.
Composite video cable
4 A player with analog audio out jacks can be connected.
When using jacks 2and 3for video input, connect
to the audio input jacks corresponding to the jacks
connected at 2and 3. (For example, when video input
connection is to the 2BD/DVD jack, the audio input
connection should also be to the 4BD/DVD jacks.)
¼ It is possible to change assignment of the input jacks and input
selector buttons. For how to make settings, see the Advanced
Manual.
¼ To enjoy multi-zone playback with a player, connect player to either
1or 4jacks.
Analog audio (RCA) cable
5 Connect a turntable that uses an MM type cartridge and
does not have a built-in audio equalizer. If the connected
turntable has a built-in audio equalizer, connect it to the
4CD jack.
¼ If it uses an MC type cartridge, install an audio equalizer compatible
with MC type cartridge between the unit and the turntable by
connecting it to the 4CD jack. For details, refer to the turntable's
instruction manual.
¼ If the turntable has a ground wire, connect it to the GND terminal of
this unit. If connecting the ground wire increases noise, disconnect it.
Video upconversion function
Video signals input to the composite video input
jack or the COMPONENT VIDEO IN jacks will be
upconverted to HDMI signals and then output from
the HDMI output jack.
AV Receiver
¼ When you upconvert video signals input to
the COMPONENT VIDEO IN jacks and output
them from the HDMI OUT jack, set the output
resolution of the player to 480i or 576i. If the input
has 480p/576p or higher resolution, a message
prompting you to change the resolution setting
will appear. If your player does not support 480i or
576i output, use the composite video jack.
¼ If multiple video signal inputs are put into one input
system, the output will be made in the order of
HDMI, COMPONENT VIDEO/composite video.
TX-NR646_BAS_En_SN29401979_20150226.indd 9 2015/02/26 14:59:56

Step 1: Connections
En-10
3 Other connections
AM/FM antenna connections
Connect the antennas to listen to AM/FM broadcast. When
listening to the broadcast for the first time, adjust the
antenna position and orientation to get the best reception.
AM loop antenna
(supplied)
Indoor FM antenna
(supplied)
Fix with a tack on
the wall.
(North American and
Taiwanese models) (European, Australian
and Asian models)
Assemble the AM loop antenna (supplied).
Network connection
You can enjoy Internet radio, DLNA and AirPlay by
connecting the unit to LAN. The unit can be connected to
the router with an Ethernet cable or to the wireless LAN
router with Wi-Fi connection. In case of wired connection,
Network Connection" of "Step 2: Initial Setup" for Wi-Fi
settings.
Internet radio
Router
NAS
Headphones connection
Connect stereo headphones with a standard plug (1/4
inch or ø 6.3 mm) to the PHONES jack on the front panel.
Sound from the speakers will be off while you are using the
headphones.
If you selected any other listening mode than Pure
Audio (European, Australian and Asian models), Stereo,
Mono and Direct, connecting headphones will switch the
listening mode to Stereo.
Power cord
Taiwanese models include removable power cords.
Connect the power cord to AC INLET of the unit and then
connect to the outlet. Always disconnect the outlet side
first when disconnecting the power cord. When the unit is
turned on, a large instantaneous current may flow affecting
functionality of the computer and other devices, so it is
recommended to use a separate outlet.
TX-NR646_BAS_En_SN29401979_20150226.indd 10 2015/02/26 14:59:56
Other manuals for TX-NR646
2
Table of contents
Other Onkyo Receiver manuals

Onkyo
Onkyo TX-8511 User manual

Onkyo
Onkyo TX-SR806 AV Reciever Manual

Onkyo
Onkyo TX-NR900E User manual

Onkyo
Onkyo HT-RC460 User manual

Onkyo
Onkyo TX-NR609 User manual

Onkyo
Onkyo TX-RZ610 Installation guide

Onkyo
Onkyo TX-8050S User manual

Onkyo
Onkyo HT-RC470 User manual

Onkyo
Onkyo TX-SR506 Quick start guide

Onkyo
Onkyo TX-SA706 User manual

Onkyo
Onkyo HT-S570 User manual

Onkyo
Onkyo HT-R380 User manual

Onkyo
Onkyo TX-NR3010 User manual

Onkyo
Onkyo TXNR905 - AV Network Receiver Specification sheet

Onkyo
Onkyo TX-NR545 User manual

Onkyo
Onkyo TX-SR302 User manual

Onkyo
Onkyo TX-SR707 User manual

Onkyo
Onkyo TX-NR616 User manual

Onkyo
Onkyo TX-NR5100 User manual

Onkyo
Onkyo HT-R820THX User manual