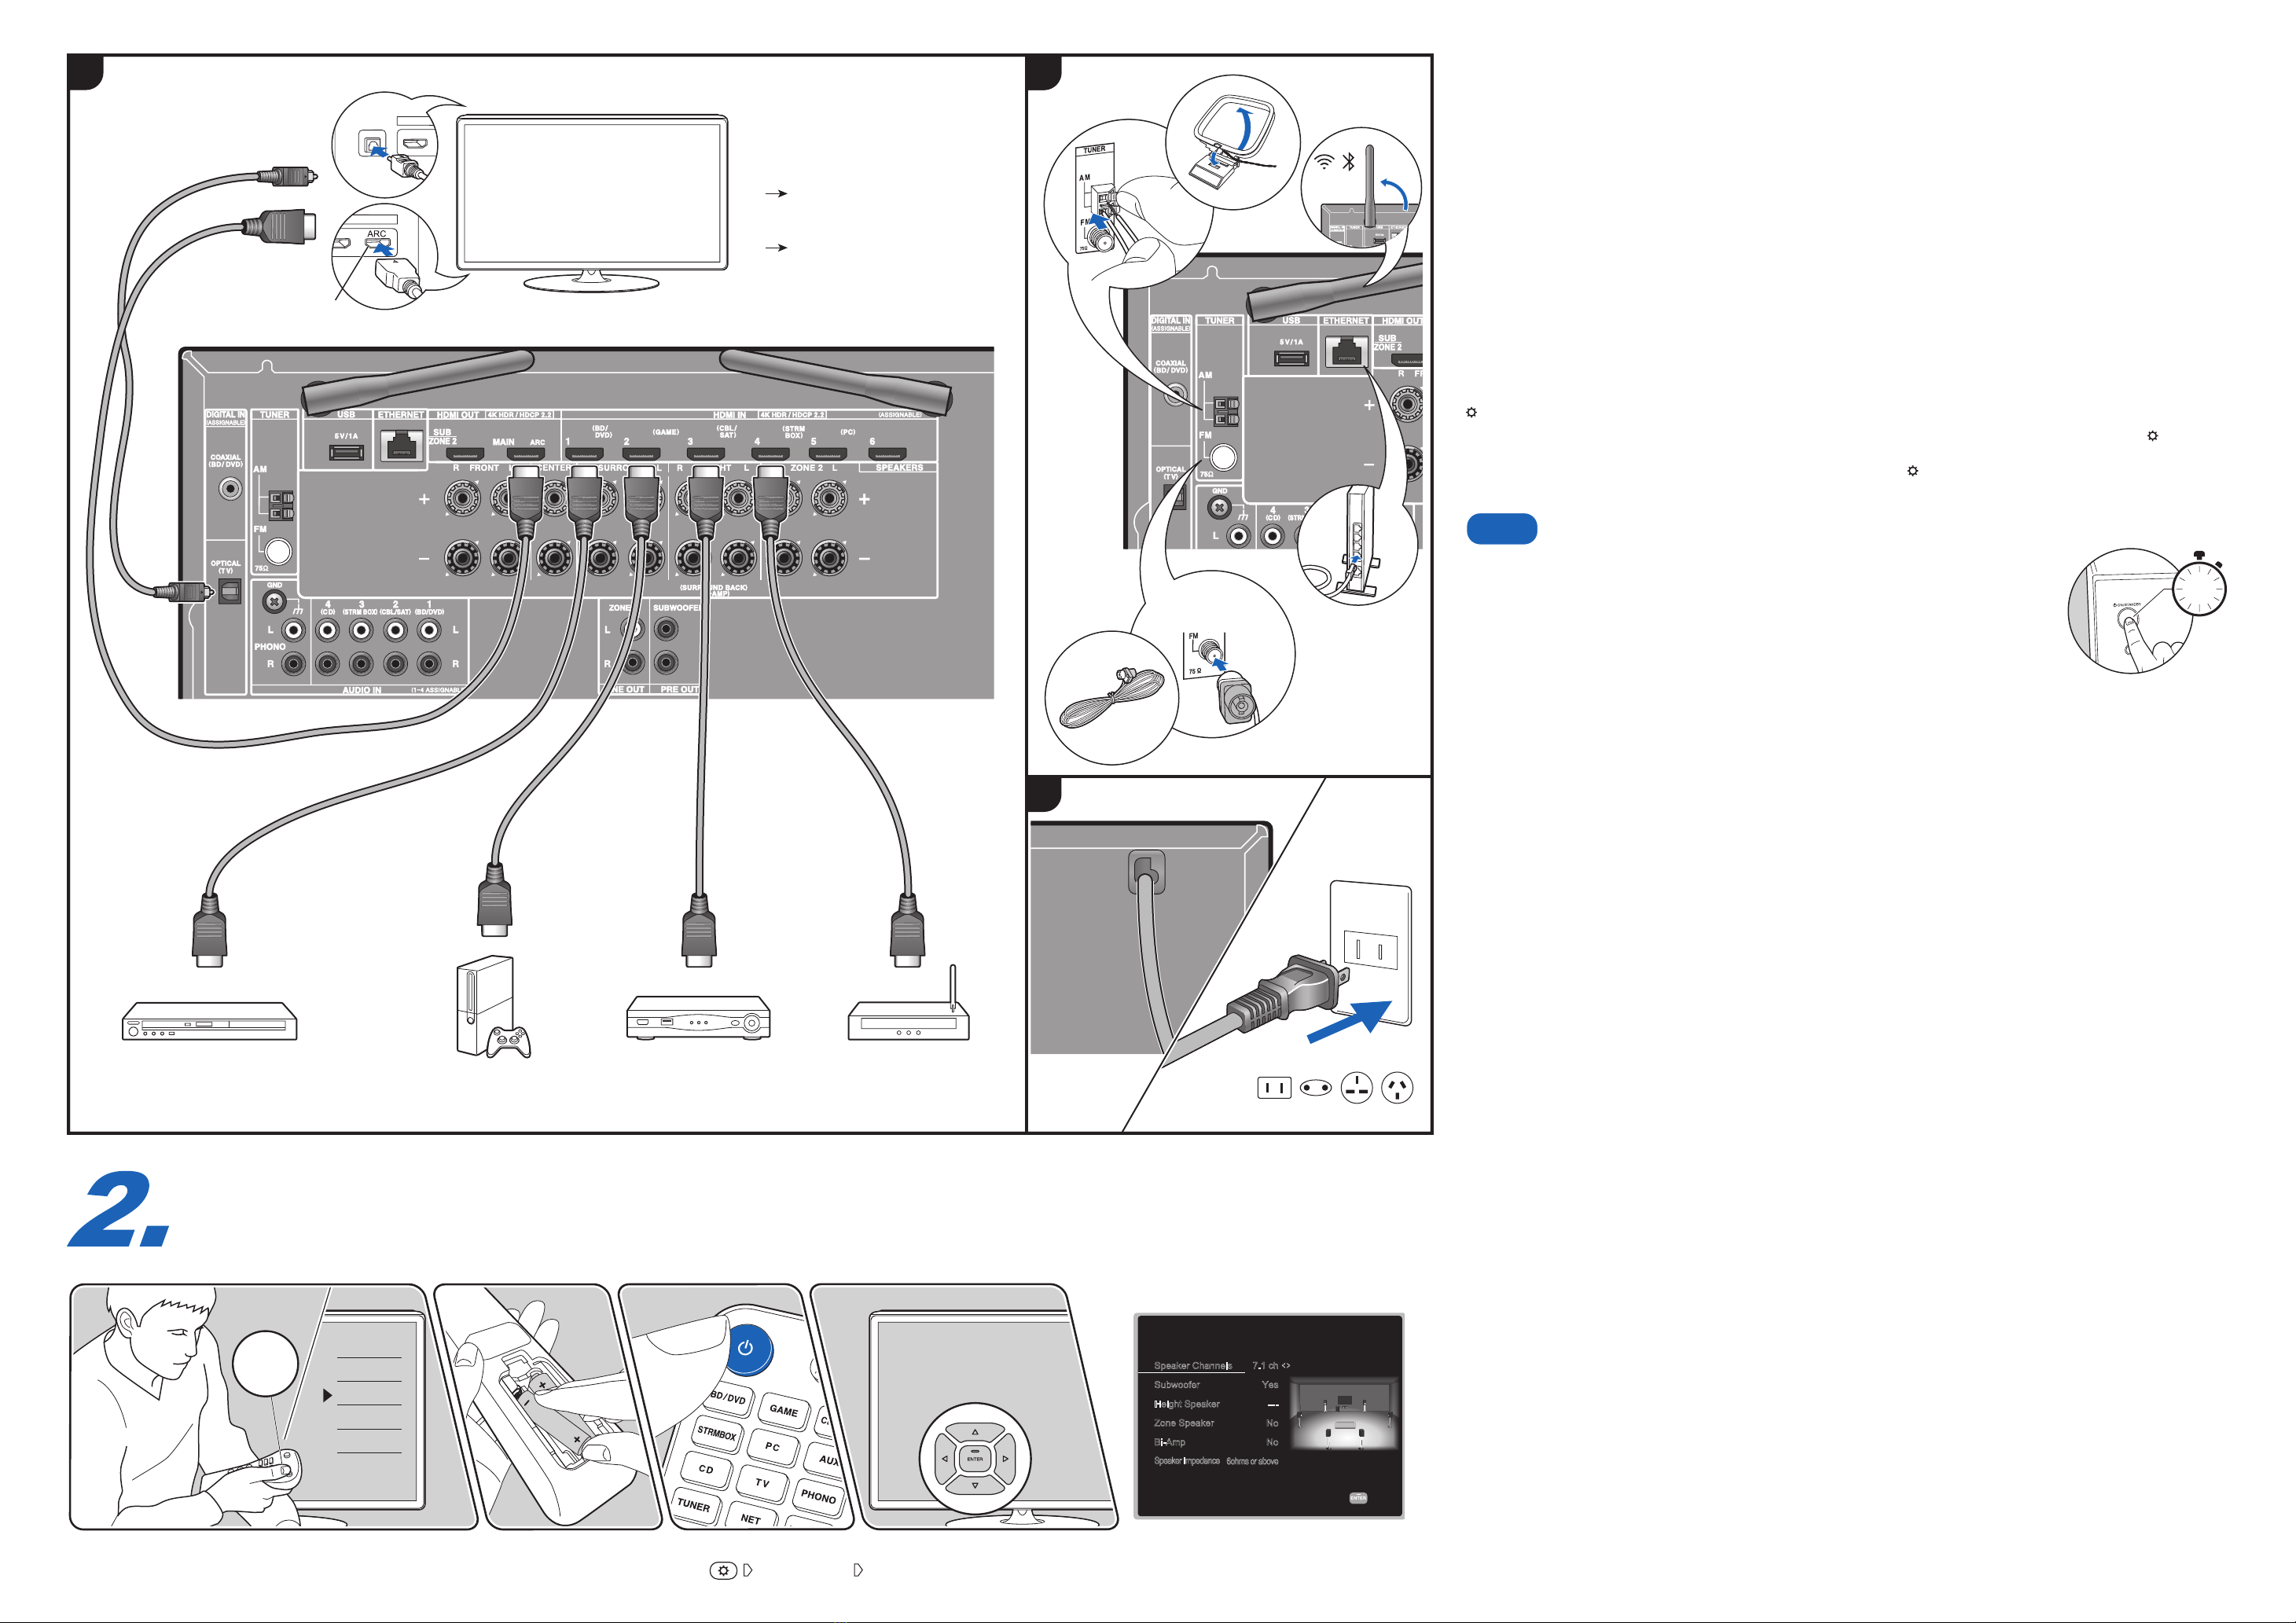
BD/DVD Cable/Satellite set-top box
Streaming
media playerGAME
ARC TV
c
Non-ARC TV
c+ d
d
ARC
c
*4
*5
6
Initial Setup with Auto Start-up Wizard
Conguration avec l’assistant de démarrage automatique / Conguración con el asistente de arranque automático
Inputs
TV
HDMI 1
HDMI 2
HDMI 3
TV’s REMOTE
*6
Speaker Setup
Select how many speakers you have.
Next
< >
Speaker Impedance
6ohms or above
Speaker Channels
Subwoofer
Height Speaker
Zone Speaker
Bi-Amp
7.1 ch
Yes
No
No
-
-
-
To redo the initial setup / Pour refaire la conguration initiale / Para rehacer la conguración inicial
“7. Miscellaneous” “4.Initial Setup”
cHDMI cable
d Digital optical cable
*1
En : Used during Initial Setup. / Fr : Utilisé durant la conguration initiale. / Es : Utilizado durante la conguración inicial.
*2
En : Connect speakers with 4 Ω to 16 Ω impedance. If any of the connected speakers have 4 Ω or more to less than 6 Ω impedance, in “Initial Setup”, “Speaker
Setup”, set “Speaker Impedance” to “4ohms”. / Fr : Raccordez des enceintes de valeur d’impédance comprise entre 4 Ω et 16 Ω. Si l’une des enceintes
raccordées possède une impédance qui se situe entre 4 Ω et moins de 6 Ω, dans “Initial Setup”, “Speaker Setup”, réglez “Speaker Impedance” sur “4ohms”.
/Es : Conecte altavoces con una impedancia de entre 4 Ω y 16 Ω. Si cualquiera de los altavoces conectados tiene una impedancia de 4 Ω o más hasta
menos de 6 Ω, en “Initial Setup”, “Speaker Setup”, ajuste “Speaker Impedance” en “4ohms”.
*3
En : Make sure the wires at the ends of the speaker cables are twisted tightly and do not stick out of the speaker terminals when connecting. The unit can be
damaged if the exposed wires of the speakers touch the rear panel or the + and - wires touch each other. / Fr : Assurez-vous de torsader légèrement les ls
à l’extrémité du câble d’enceinte et qu’ils ne sortent pas des bornes d’enceinte lors du raccordement. L’appareil peut être endommagé si les ls dénudés des
enceintes entrent en contact avec le panneau arrière ou si les ls + et - se touchent. / Es : Asegúrese de que los hilos de los extremos de los cables de los
altavoces estén bien trenzados y no sobresalgan de los terminales de los altavoces al conectarlos. La unidad podría sufrir daños si los cables expuestos de
los altavoces tocan el panel trasero o los cables + y - se tocan entre sí.
*4
En : Choose an HDMI IN jack on the TV that supports ARC when connecting. Settings are required to use the ARC function. Select “Yes” for “ARC Setup” in
“Initial Setup”. / Fr : Pour raccorder, choisissez sur le téléviseur une prise HDMI IN qui prend en charge la fonctionnalité ARC. Des réglages sont nécessaires
pour utiliser la fonctionnalité ARC. Sélectionnez “Yes” pour “ARC Setup” dans “Initial Setup”. / Es : Elija un conector HDMI IN en el TV compatible con ARC al
realizar la conexión. Para usar la función ARC se requieren algunos ajustes. Seleccione “Yes” para “ARC Setup” en la “Initial Setup”.
*5
En : If you connect this unit to the network using wired LAN, connect an LAN cable to the ETHERNET port. / Fr : Si vous connectez cet appareil au réseau
à l’aide du LAN filaire, branchez un câble LAN au port ETHERNET. / Es : Si conecta esta unidad a la red usando una LAN con cable, conecte un cable de
LAN al puerto ETHERNET.
*6
En : Switch the input on the TV to that assigned to the unit. Follow the guidance displayed on the screen to complete Initial Setup. If you selected “No,
Skip” for “ARC Setup” in the Initial Setup, to enable HDMI CEC and HDMI Standby Through function, after completing Initial Setup, you will need to press
on the remote controller and make the settings in “5. Hardware” - “1. HDMI”. / Fr : Réglez l’entrée du téléviseur sur celle assignée à l’appareil. Suivez
les instructions afchées sur l’écran pour terminer la Conguration initiale. Si vous sélectionnez “No, Skip” pour “ARC Setup” dans la Conguration initiale,
pour activer la fonction HDMI CEC et HDMI Standby Through, une fois la Conguration initiale terminée, vous devrez appuyer sur la touche de la
télécommande et effectuer les réglages dans “5. Hardware” - “1. HDMI”. / Es : Cambie la entrada en la TV a aquella asignada a la unidad. Siga la guía
mostrada en la pantalla para completar la conguración inicial. Si seleccionó “No, Skip” para “ARC Setup” en la conguración inicial, para activar la función
HDMI CEC y HDMI Standby Through, tras completar la conguración inicial deberá pulsar en el mando a distancia y realizar los ajustes de “5. Hardware” -
“1. HDMI”.
When the unit is operating erratically
Lorsque l’appareil fonctionne de façon irrégulière / Cuando el funcionamiento de la unidad sea
errático
En : If operation becomes unstable, try restarting the unit. Set the unit to standby, then press and hold
ON/STANDBY on the main unit
for 5 seconds or more. / Fr : Si le fonctionnement devient instable, essayez de redémarrer l’appareil. Mettez l’appareil en mode veille, puis
appuyez sur la touche
ON/STANDBY
de l’appareil principal pendant au moins 5 secondes. / Es : Si el funcionamiento se vuelve inestable,
pruebe a reiniciar la unidad. Ajuste la unidad en el modo de espera y después mantenga pulsado
ON/STANDBY
en la unidad principal
durante 5 segundos o más.
En : If restarting doesn’t x the problem, try unplugging the power cord and HDMI cables then replugging them in again, initializing settings (with
the unit ON, while pressing CBL/SAT on the main unit, press
ON/STANDBY.), and trying Firmware Update. / Fr : Si le redémarrage de règle pas le problème, essayez de débrancher
le cordon d’alimentation et les câbles HDMI puis de les rebrancher, paramères d’initialisation (avec l’appareil en marche, tout en appuyant sur la touche CBL/SAT de l’appareil principal,
appuyez sur
ON/STANDBY.), et essayez la Mise àjour du micrologiciel. / Es : Si reiniciar la unidad no soluciona el problema, pruebe a desconectar el cable de alimentación y los
cables HDMI y volverlos a conectar, a ajustar de inicialización (cuando la unidad se encuentra en ON, mientras pulsa CBL/SAT en la unidad principal, pulse
ON/STANDBY.), y a
actualizar el rmware.
5"
SN29403578_TX-NR595_QSG_U3_1811XX.indd 2 2018/12/03 20:34:13


