Onkyo GR-PS100 User manual

Ja En
Speaker Bracket
GR-PS100
取扱説明書
Instruction
Manual
SN29403452_GR-PS100_JaEn_1802XX.book 1 ページ 2018年2月19日 月曜日 午後2時41分

2
安全上のご注意
0本機を強度の足りないぐらついた台や丸棒に
設置しないでください。また、スピーカー取
り付け以外の目的で使用しないでください。
破損やけがをする場合があります。
0本機取り付け後は、定期的に安全点検を実施
し、落下・転倒・回転の危険性が無いことを
確認してください。経年変化や振動等によ
り、ネジが緩んだり、取り付け強度が低下す
ることがあります。
0ネジや固定具の緩みによるガタツキが生じた
場合は締め直してください。締め直してもガ
タツキが直らない場合は、使用を中止してく
ださい。ガタツキがあるまま使用しますと、
落下や転倒などを引き起こす原因になりま
す。
0取り付けの不備、誤使用、天災などによる事
故や損傷、または、スピーカーおよびクラン
プ取り付け部の傷や破損に対しては、当社は
一切責任を負いません。
0配線ケーブルに気をつけてください。配線さ
れた位置によっては、つまずいたり引っかけ
たりして、落下や転倒など事故の原因となる
ことがあります。
0本機に乗ったりぶら下がったりしないでくだ
さい。特にお子様が、ぶら下がったり、周辺
で遊んだり、ネジや固定具を緩めたりしない
ように、ご注意ください。
0本機は防水仕様ではありません。本機の近く
に液体が入った容器 (花瓶など)を置いた
り、雨や湿気にさらさないでください。ま
た、風呂場や屋外の水辺などでは使用しない
でください。
0本機のお手入れについて:表面の汚れは、中
性洗剤をうすめた液に布を浸し、固く絞って
拭き取ったあと乾いた布で拭いてください。
化学ぞうきんなどお使いになる場合は、それ
に添付の注意書きなどに従ってください。シ
ンナー、アルコールやスプレー式殺虫剤を本
機にかけないでください。塗装が落ちたり変
形することがあります。
取り付け方法
スピーカー取り付け部がロッド固定つまみより
も下に位置しないように設置してください。
テーブルや棚板に取り付ける
丸棒に取り付ける
0安全のために、十分な強度のあるワイヤーな
どで落下防止の処置を行ってください。
最大51mm
最大51mm
ロッド固定つまみ
最大Φ30mm
ロッド固定つまみ
SN29403452_GR-PS100_JaEn_1802XX.book 2 ページ 2018年2月19日 月曜日 午後2時41分

3
Ja
主な仕様
この他、取扱説明書 ( 本書 ) が付属しています。
本製品は、M5 用ネジ穴を 2 個( ピッチ 60 mm) 設けたスピーカーを取り付けることができます。
※アングルロッドは、4 方向からクランプに差し込んで使用できます。
寸法
本体重量:0.8 kg(1 台 )、最大取付可能重量:4.5 kg( スピーカーの形状や取り付け方向によって最
大取付可能重量以下であっても固定できない可能性があります。)
※スピーカー側のネジ穴の深さは 12 mm 以上必要です。
1アングルロッド差込穴 2ロッド固定つまみ 3クランプハンドル
4スピーカー固定ネジ 5落下防止ワイヤー取付用穴 6ロックハンドル
ɹʳʽʡᴥᴯᴦ ɬʽɺʵʷʍʓᴥᴯᴦ
Ɔ
Ɔ
Ɔ
60mm
90mm310mm
10mm
(※)
〜51mm
(丸棒の場合
〜Φ30mm) 50mm
SN29403452_GR-PS100_JaEn_1802XX.book 3 ページ 2018年2月19日 月曜日 午後2時41分

4
取り付け手順
1. まず、スピーカーにアングルロッドを取り付
けます。
スピーカー固定ネジはしっかり締めてくださ
い。またロックハンドルが緩んでいる場合は
締め直してください。
2. クランプをテーブルや棚板、丸棒に挟み、ク
ランプハンドルを回してクランプがぐらつか
ないよう固定します。棚板の場合は、クラン
プを奥までしっかり挿入してください。
3. スピーカーを取り付けたアングルロッドをク
ランプに挿入します。
このとき、アングルロッドの先端がクランプ
から必ず 10 mm 以上出るように挿入してく
ださい。
4. 挿入したアングルロッドの平面の部分が、
ロッド固定つまみのネジの先端にあたるよう
に向きを調整した後、ロッド固定つまみを回
してアングルロッドを固定します。
0取り付け後、ネジやハンドルが緩むことが
あります。そのときは、必ず締め直してく
ださい。
1
2
3
4
10mm
以上
10mm以上
SN29403452_GR-PS100_JaEn_1802XX.book 4 ページ 2018年2月19日 月曜日 午後2時41分

5
En
Safety precautions
0Avoid placing this unit on surfaces or poles
that lack sufficient strength or are unstable.
Furthermore, do not use for any purpose
other than to attach speakers. Damage or
injury may result.
0After attaching this unit, perform regular
safety checks to ensure there is no danger of
falling, toppling, or rotating. Factors such as
aging and vibration can cause the screws to
become loose, thus weakening the
attachment.
0Retighten the screws and fittings if there is
movement caused by loosening. If the
movement is not improved by retightening,
cease use of the unit. Using the unit while
there is still movement can cause falling or
toppling.
0Onkyo accepts no responsibility for damage
or injury that arises due to incorrect fitting,
incorrect use, or acts of nature; nor will we
accept responsibility for scratching or
damage to the speaker or clamp fittings.
0Take care when laying cables. Depending on
placement, a tripping hazard may exist which
can cause accidents such as falling or
toppling.
0Do not get onto or dangle from this unit. Take
special care with children to ensure that they
do not dangle from the unit, play in the
vicinity, or loosen the screws or fittings.
0The unit is not waterproof. Do not place
containers with liquids (vases, etc.) near the
unit or allow it to be exposed to rain or
moisture. Also avoid using in bathrooms or
outdoors near water.
0Care and maintenance of the unit: To clean
off surface dirt, dip a cloth in a diluted solution
of neutral detergent, wring thoroughly, wipe
the dirt off, and then wipe with a dry cloth.
Follow the cautions, etc., included with
chemical wipes and other cleaning products
before using them. Do not get thinners,
alcohol, or insect sprays on this unit. This
may cause the coating to come off or
deformation of the case.
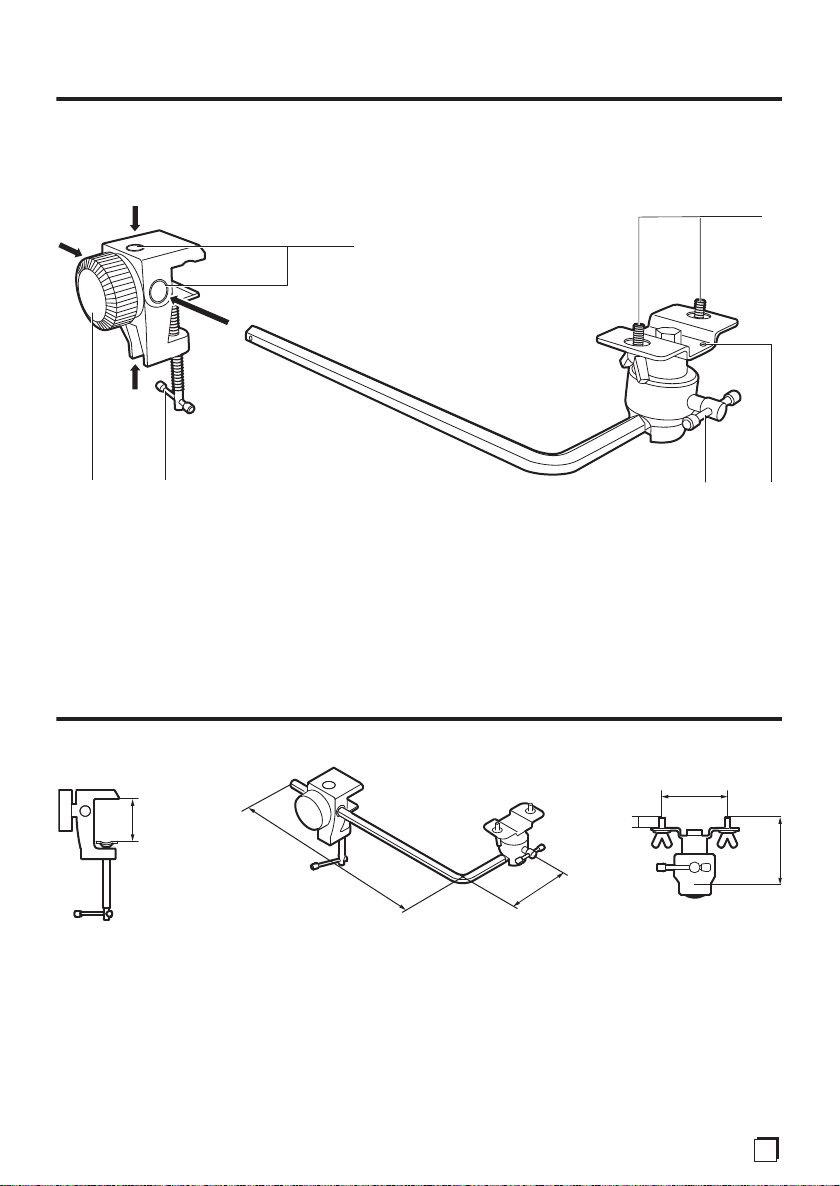
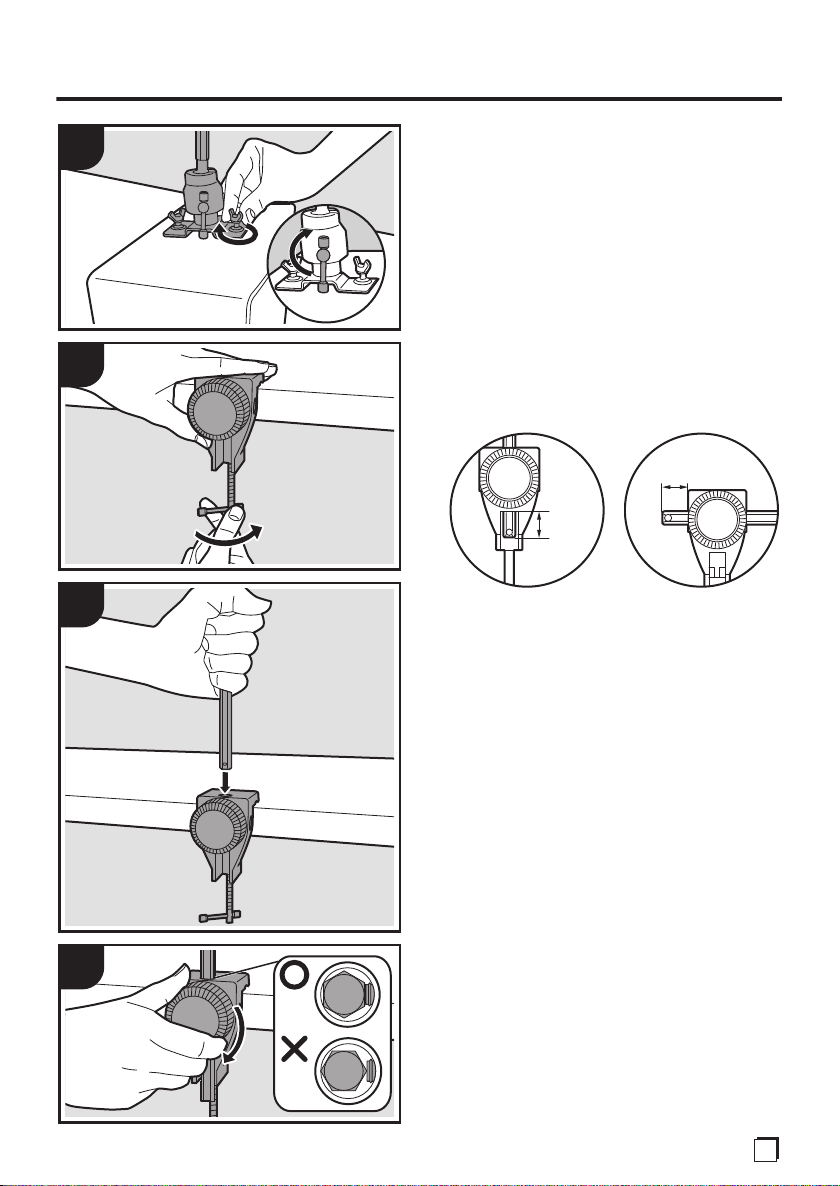
Attaching methods
Do not install so that the speaker attachment
parts are lower than the dial for fixing the rod.
Attaching to a table or shelf
Attaching to a cylindrical pole
0
For safety purposes, take measures to prevent
falling by using wire, etc., of sufficient strength.
Max 51 mm
Dial for fixing rod
MaxΦ30 mm
Dial for fixing rod
SN29403452_GR-PS100_JaEn_1802XX.book 5 ページ 2018年2月19日 月曜日 午後2時41分

6
Specifications
Additionally, the unit is supplied with an instruction manual (this document).
You can attach a speaker equipped with 2 screw holes for M5 (60 mm (2-3/8") pitch) to this product.
* The angled rod can be inserted in the clamp from any one of four directions.
Dimensions
Main unit weight: 0.8 kg (1.8 lbs) (1 set), Maximum attachable weight: 4.5 kg (9.9 lbs) (Depending on
the shape of the speaker and how it is attached, it may not be possible to fix it in place even if it is less
than or equal to the maximum attachable weight.)
* The screw holes of the speaker need to be at least 12 mm (1/2") deep.
1Hole for inserting angled rod 2Dial for fixing rod 3Clamp handle
4Screws for attaching speaker 5Hole for attaching fall prevention
wire
6Lock handle
Clamp (2) Angled rod (2)
*
*
*
60mm(2-3/8")
90mm
(3-9/16")
310mm
(12-3/16")
10mm
(3/8")(*)
〜51mm
(2")
(forapole
〜Φ30mm
(1-3/16"))
50mm
(1-15/16")
SN29403452_GR-PS100_JaEn_1802XX.book 6 ページ 2018年2月19日 月曜日 午後2時41分

7
En
Attaching procedure
1. First attach the angled rod to the speaker.
Tighten the screws for attaching the speaker
firmly. Also, if the lock handle is loose, tighten
it again.
2. Put the clamp over the table, shelf, or pole,
then turn the clamp handle until the clamp is
fixed and does not move. When fitting to a
shelf, push the clamp as far onto the shelf as
possible.
3. Put the angled rod with speaker attached into
the clamp.
When doing so, insert so that the end of the
angled rod extends at least 10 mm (3/8")
through the clamp.
4. After adjusting the angled rod you have
inserted so the flat part contacts the end of
the screw of the dial for fixing the rod, turn the
dial for fixing the rod to fix the angled rod in
place.
0The screws and handle may become loose
after fitting. Be sure to retighten them if this
occurs.
1
2
3
4
10 mm
or above
10 mm or above
SN29403452_GR-PS100_JaEn_1802XX.book 7 ページ 2018年2月19日 月曜日 午後2時41分

SN 29403452
(C) Copyright 2018 Onkyo & Pioneer Corporation Japan. All rights reserved. *29403452*
F1802-0
<日本>
オンキヨーオーディオコールセンター
050-3161-9555(受付時間10:00〜18:00
(土・日・祝日・弊社の定める休業日を除きます))
<U.S.A.>
18 Park Way, Upper Saddle River, N.J.
07458, U.S.A.
For Dealer, Service, Order and all other
Business Inquiries:
Tel: 201-785-2600 Fax: 201-785-2650
http://www.us.onkyo.com/
For Product Support Team Only:
1-800-229-1687
http://www.us.onkyo.com/
<Germany>
Gutenbergstrasse 3, 82178 Puchheim, Germany
Tel: +49-8142-4401-0 Fax: +49-8142-4208-213
http://www.eu.onkyo.com/
<UK>
Anteros Building, Odyssey Business Park,
West End Road, South Ruislip, Middlesex,
HA4 6QQ United Kingdom
Tel: +44 (0)871-200-1996
Fax: +44 (0)871-200-1995
For Product Support only: +44 (0)208-836-3510
http://www.uk.onkyo.com/en/
<France>
6, Avenue de Marais F - 95816 Argenteuil Cedex
FRANCE
For Product Support only: +33 969 368 138
http://www.fr.onkyo.com/fr/
<Hong Kong>
Unit 1033, 10/F, Star House, No 3,
Salisbury Road, Tsim Sha Tsui Kowloon,
Hong Kong.
Tel: +852-2429-3118 Fax: +852-2428-9039
http://www.hk.onkyo.com/
<PRC>
302, Building 1, 20 North Chaling Rd.,
Xuhui District, Shanghai, China 200032,
Tel: +86-21-52131366 Fax: +86-21-52130396
http://www.cn.onkyo.com/
<Asia, Oceania, Middle East, Africa>
Please contact an Onkyo distributor
referring to Onkyo SUPPORT site.
http://www.intl.onkyo.com/support/
The above-mentioned information is subject to
change without prior notice.
Visit the Onkyo web site for the latest update.
〒130-0015 東京都墨田区横網一丁目10番5号
1-10-5 Yokoami, Sumida-ku, Tokyo 130-0015 JAPAN
http://www.onkyo.com/
SN29403452_GR-PS100_JaEn_1802XX.book 8 ページ 2018年2月19日 月曜日 午後2時41分
Table of contents
Popular TV Mount manuals by other brands

Vintage view
Vintage view W Series installation instructions

Omnimount
Omnimount TVM-21 Assembly instructions

New Star
New Star Neomounts PLASMA-W065BLACK instruction manual

New Star
New Star FPMA-D950 instruction manual

New Star
New Star Neomounts WL70-550BL12 instruction manual

Omnimount
Omnimount OE150T instruction manual

Omnimount
Omnimount WM3-S instruction manual

VOGELS
VOGELS WALL 3325 Mounting instructions

d & b audiotechnik
d & b audiotechnik Z Series Mounting instructions

New Star
New Star FPMA-W50 instruction manual

B-Tech
B-Tech mountlogic BT7514 Installation guide & parts list

VOGELS
VOGELS MA 3030 Series installation guide