Onson J30 User manual


Please read the instructions before using the product - the warranty card is included and the picture is for reference only


Information Security
1

Information Security
2
Name and content of harmful substances in the product
Email: [email protected]
Telephone: 1-855-919-0908
Address: 1601, Building 2, No. 1, Qingqing Road, Qinghu, Longhua District, Shenzhen, China
Shell
PCB
Component
Item
Hazardous substance
Mercury
(Hg)
○
○
Lead
(Pb)
×
×
Cadmium
(Cd)
○
○
Hexavalent
chromium
(Cr(VI))
○
○
Polybrominated
bipheny
(PBB)
○
○
Polybrominated
diphenyl ethers
(PBDE)
○
○
Accessories ○
×○ ○ ○ ○
This form has been formulated in accordance with SJ/T 11364.
○:Indicates that the contents of the hazardous substances in all homogeneous materials of the parts should be below
the limit value as per stipulation of GB/T 26572.
×:Indicates that the content of the hazardous substance in at least one homogeneous material of the component
exceeds the limit value as per stipulation by GB/T 26572, and the replacement of the hazardous substance could not
be realized due to the limitation of the global technological development level. Printed circuit board (PCB) components:
including printed circuit board and its parts, electronic components and so on. According to the different product model,
the product you purchase may not contain all of the above components.

Robot cleaner (Qty*1)
3
Product Package List and Introduction
Force shutdown press key
·Short press to shut down.
Clean/switch robot cleaner push button
· Short-Press the button to start the
recharging function.
·
·Long press to turn on or off.
Short press the button to start the cleaning
function.
Partial Local sweep button
·Short press to start local cleaning.
·Hold down the local sweep key and the
recharging key for more than 3 seconds at
the same time.
Note: press any key to pause while
cleaning/recharging or partial local
cleaning.
Reset the WiFi
Recharge push button
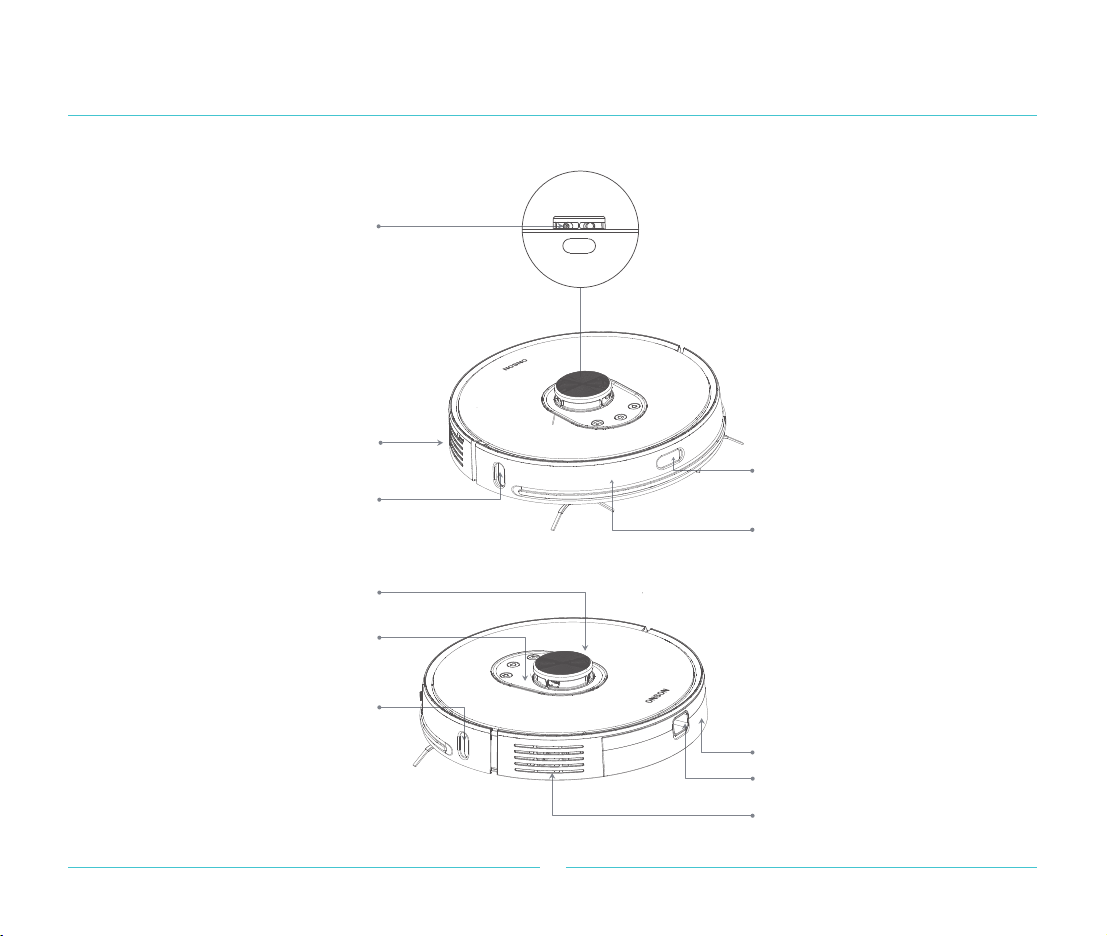
Robot cleaner
4
Product Package List and Introduction
Infrared recharge sensor/infrared
anti-collision sensor
Collision sensor
Laser distance
measurement sensor
TOF sensor along the wall/
infrared auxiliary recharge sensor
Loudspeaker
Laser head plate cover laser
cover pressure sensor
Laser head plate cover
Infrared auxiliary recharge sensor
Air Vent Cutout
Dust box
Dust box button

Robot cleaner
Product Package List and Introduction
Charging connected charging pole sheet
Universal direction wheel
Cliff sensor
Side brush
Driven wheel
Rolling brush
Dust collector connection
charging pole plate
5

Accessories list
Dust box
Before using the dust box module, it is necessary to find the accessory - filter screen, and then use after installing the filter screen.
Dust box top
holder
Dust box filter
screen
Dust box bottom
holder
Dust box flip
Dust box button
Dust box clip
Cleaning tool
Dust box
Product Package List and Introduction

Accessories list
1. Recharge dock
7
Product Package List and Introduction
Charging spring plate
Recharging dock indicator light
Signal emission area
Power source interface
Recharger seat back
Recharger seat front Recharger seat adapter
Power cord length 1.2m

8
Installation
1. Install a recharging dock
Lean the recharging dock against the wall, lay on flat levelled ground.
Make sure the recharging dock is 1.2 meters distance in vertical front direction and 0.5 meters on both sides.
Lean against the wall Not leaning against the wall
1
2

9
Installation
Long press to start the robot cleaner, press the return key to automatically find the charging dock for charging.
On/off push button indicator light
color represents power
· white: power load ≥ 15%
· orange light breathing:
power load < 15%
·Note: If the power is low, it may not be possible to start the robot cleaner. Please align precisely the robot cleaner at
the charging spring on the recharging dock. The switch button orange light is always on when charging.
3

10
Installation
3. The App Settings
Connect to the mobile phone client terminal (if you do not need to use App control, this step can be skipped).
Download the App
Scan the QR code below to download and install the App.
1

11
Operation instruction
When the robot cleaner is in operation state, press any key to
pause, then press after the pause, the robot cleaner will
continue to clean, press to recharge and end the cleaning,
press to carry out local cleaning.
Power on/power off
Long press the button to start the robot cleaner, the key indicator
lights up slowly, and the robot cleaner enters standby mode. When
the robot cleaner is at static motionless status,long press to shut
down, the white light will be slowly off, the current cleaning job is
completed.
Note: The robot cleaner cannot be shut down during charging.
Whole House Clean
Short press to start the whole room cleaning (see the
picture below).
Press any key to pause while cleaning.
Note:
· It is suggested that the sweeping robot start cleaning from
the recharging dock or dust collector.
· If the power is too low, the whole house cleaning cannot be
started, please charge first and then start the whole house
cleaning.
· When the power is insufficient during the cleaning process,
the robot cleaner will automatically return to the charging
station for charging. When the power is sufficient, the robot
cleaner will automatically return to the interruption to continue
the cleaning.
· Please tidy up all kinds of wires (power cord) on the ground
before cleaning, so as to avoid electrical power failure caused
by dragging of the robot cleaner during cleaning and damage
to goods or wires and materials.
Charging
Automatic mode: after the cleaning, the robot cleaner will recharge
automatically.
Manual: in the paused state, press to start the recharging.
When the robot cleaner is charging, the orange indicator light of the
switch button is always on, and the white indicator light breathes
brightly after being fully charged.
Note: If the robot cleaner does not start cleaning from the recharging
dock or dust collector, the recharging may fail. The robot cleaner will
automatically return to the starting position of cleaning. Please
manually put the robot cleaner back to the recharging dock or dust
collector to charge.
Cleaning method
After starting, the robot cleaner will scan and generate a map and
partition the zone intelligently. In the partitioned zone, sweep along
the wall first, plan the cleaning path route and then sweep each
partition zone one by one with the bow filling scheme.
Zone I clean completed Zone II clean completed
Zone IV clean job pending Zone III clean in progress
Pause
Note: When paused, charge the robot cleaner against the charging
dock, and the cleaning will be completed.

12
Operation instruction
Partial cleaning
Failure state
When the robot cleaner is in standby or paused, short press
the local key sweep key to start the partial location sweep.
This mode is used to clean the square area with the robot
cleaner as the center of 1.6m x 1.6m. After the sweep, the
robot cleaner will automatically return to the starting position
and stop working.
1.6m
1.6m
Note: Starting partial cleaning when paused will end the previous
cleaning and start the new cleaning task.
Add water or clean the mop during the process
of water dust integration device
If the robot cleaner needs to add water or clean the mop during the
cleaning process, please firstly press on the cleaner to pause
and remove the water and dust integration device.
When there is an abnormal occurrence during the operation of the
robot cleaner, the on-off button indicator will quick flicker in orange
color and give a voice indication. For the solution, please refer to
"troubleshooting" on Page 20.
Note: If there is no operation for 10 minutes under the failure state,
and the robot cleaner will be dormant automatically.
Dormancy
If there is no operation maintaining exceeding 20 minutes, the
cleaner will automatically enter the dormancy state. In the
dormancy state, after the breathing lamp is off, press any key
to wake up the robot cleaner.
Note:
· The robot cleaner will not enter dormancy while charging on
the recharging dock.
· Automatic shutdown after dormancy to low power state.
Reset the WiFi
When the router changes the configuration, forgets the password
or causes the phone to be unable to connect to the robot cleaner
for other reasons, hold down the keys ( + )until the voice
prompts "reset WiFi", and then reset the WiFi connection according
to the relevant part of the WiFi network configuration in the quick
setting instructions.
whole house cleaning
Use the mobile App to click the whole room cleaning, the robot
cleaner will perform the whole room cleaning.
Room cleaning
Use the mobile App to click on the room cleaning, add and
configure the room, and then select the room to carry out the
cleaning task.
Designated location cleaning
The mobile App can be used to specify the target point on the
map, and the robot cleaner will automatically plan the route to the
designated location.
Zone cleaning
Using the mobile App, you can set the zone cleaning function, and
the robot cleaner will clean according to the planned area on the
phone.
Cleaning mode
Standard mode is set as default, using the mobile phone client
end client to choose quiet, automatic, powerful, only mop the
ground choices.

13
Daily maintenance
Middle sweep rolling brush cleaning
tolls use instruction
Main brush (weekly cleaning is recommended)
1. Turn over the cleaner, press down the clasp and remove the main
brush cover.
2. Take out the main brush upward and clean the main brush bearing.
3. With the matching main brush cleaning tool, cut off the tangled hair
on the main brush.
4. Re-install the main brush back and press the main brush cover
tightly, then fix the clasp.
Note: It is recommended to replace the main brush every 6-12 months to ensure the cleaning effect.
Middle sweep
base support
Middle sweep
rolling brush

14
Daily maintenance
Side brush (weekly cleaning is recommended)
Use a screwdriver to unscrew and clean the brush.
Note: it is recommended to replace the side brush
every 3-6 months to ensure the cleaning effect.
Battery
The robot cleaner is equipped with a high-performance rechargeable lithium battery pack. In order to maintain the battery
performance, please keep the robot cleaner under charging condition for daily use.
Note: If you do not use it for a long time, please preserve it in shutdown condition. Minimum every three months one time
charging is recommended to prevent the battery for long over-discharge damage.

15
Daily maintenance
1.Push the dust box release button to take it out. 2. Open the dust box clasp.
3. Empty the garbage. 4. Open the dust box clamp-shell and dismantle the
filter cover and filter mesh (HEPA).
Dust box and filter mesh (weekly cleanup is recommended)

16
Daily maintenance
Wipe and clean each sensor of the robot cleaner with
a soft dry cloth, including:
1. Four cliff sensors at the bottom of the robot cleaner.
2. Side wall sensor on the right side of the robot cleaner.
3. Charging docking charging pole at the bottom of the
robot cleaner.
4. Dust collector charging pole at the bottom of the robot
cleaner.
5. Infrared auxiliary recharging sensor.
Robot cleaner sensor
TOF sensor along
the wall
Infrared auxiliary
recharging sensor
Infrared auxiliary
recharging sensor
Cliff sensor
Charge connection
charging pole plate
Dust collector
charging pole plate

17
Daily maintenance
Recharging dock
(monthly replacement recommended)
Universal direction wheel
(recommended monthly cleaning)
wheel
proper
Wheel
shaft
support
1.Turn the robot cleaner up
and pull out the universal
direction wheel.
2.Clean hair and dirt from
the wheel body and shaft.
3. Re-install the wheel proper
and press it tightly.
Note: It can be washed with tap water,
dried and loaded back.
Firmware upgradation
The firmware of the robot cleaner can be upgraded by using the mobile client terminal. Please connect the recharging
dock and ensure the power is more than 15% before upgrading.
When the firmware is upgrading, the indicator light of the push button is showing white and orange color alternately.
Wipe the charging spring of recharging dock with a soft
dry cloth.
This manual suits for next models
1
Table of contents
Other Onson Vacuum Cleaner manuals