ForOFG003GrowWall
12g±1(0.42oz)
ProductNumber:OAMS23A
Nutrient
GrowBox Quick Guide Manual
Thank you for purchasing OPCOM Farm GrowBox, the indoor hydroponics growth system. It is designed with
easy installation and efficient growing system in one-touch AUTO mode, up to 50 plants capacity.
Read the quick guide manual carefully before setting up. For detailed user manual and assembly video,
please scan the QR code or visit GrowBox page at www.opcom.com/CN/growbox-support.php.
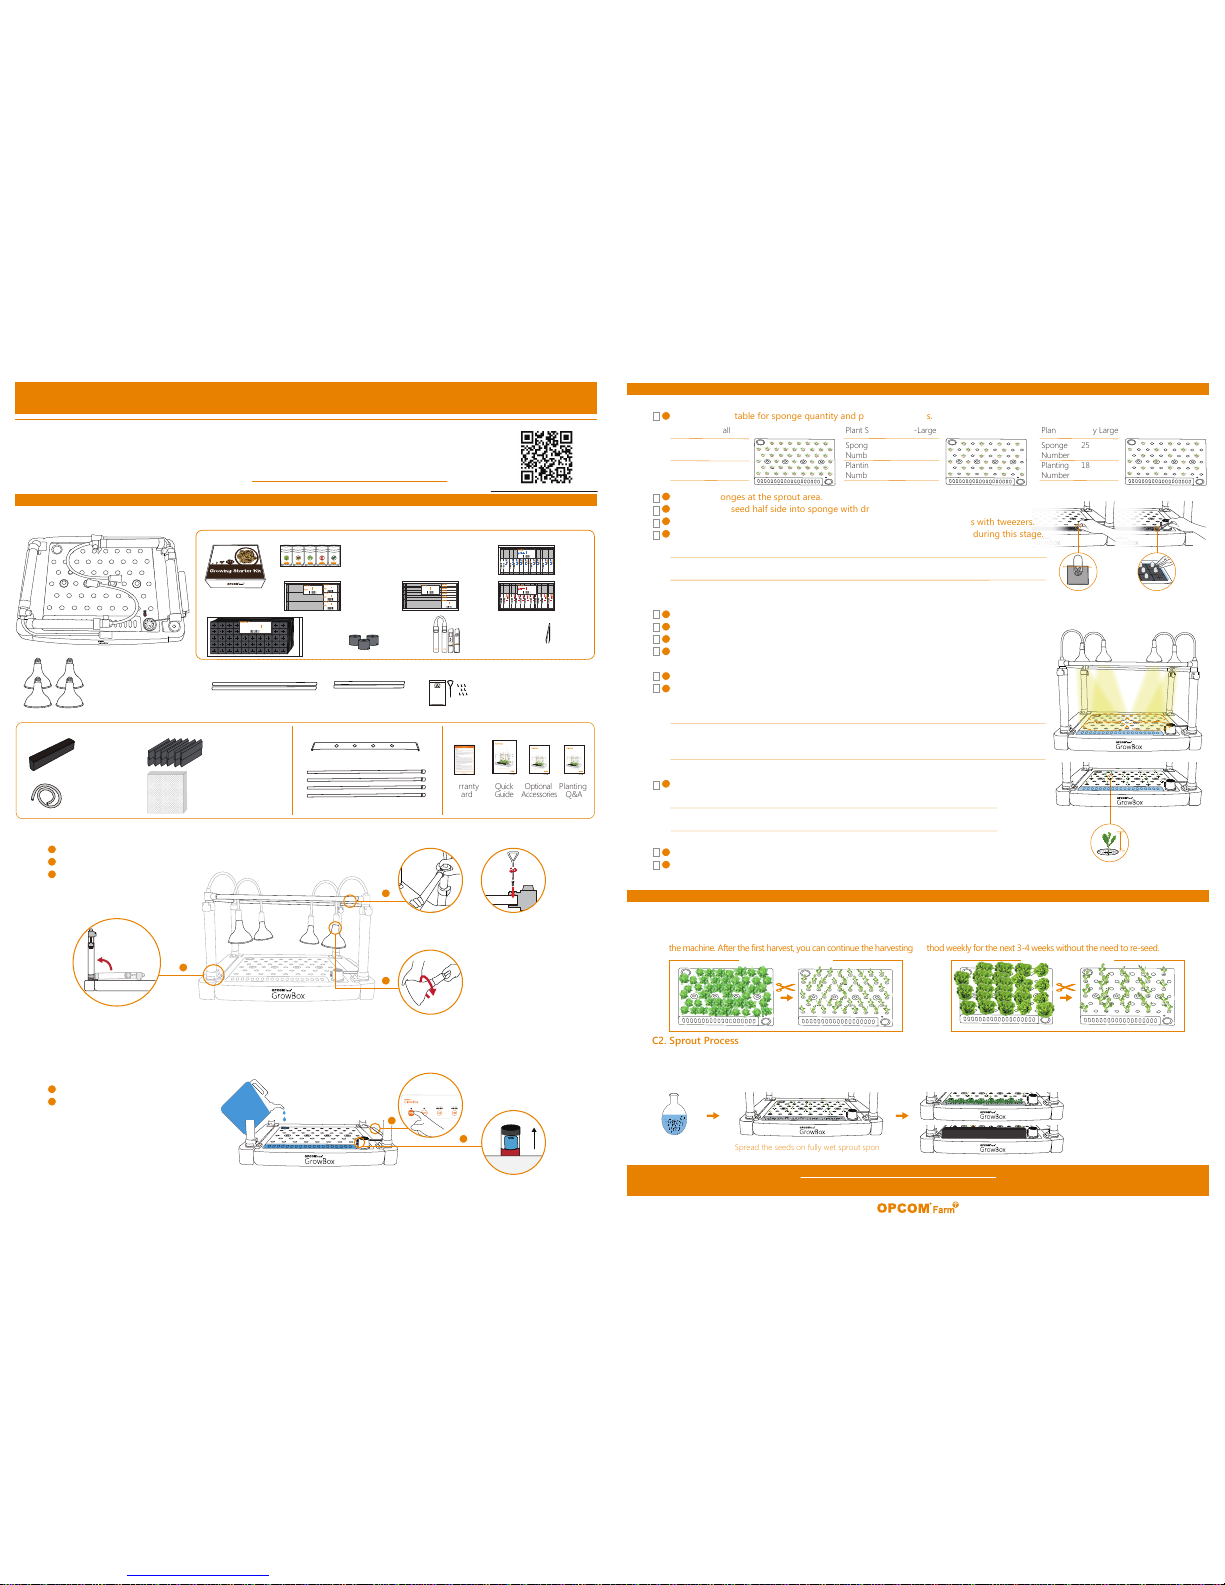
A1. Remove all parts from box and check all accessories.
A2. Easy Set Up
Raise the four Support Arms straight up.
Install the Long and Short Support Tubes.
Install the LED Growth Lamps.
Add 4.2 gallons water to the unit.
Turn power on and test the unit,
please refer to user manual page
9 for cycle descriptions.
A. Assembly
Quick
Guide
Manual
Planting
Q&A
Warranty
Card
Lighting support kit
Planting Accessories
Insect Net
(OAAS05A)
Draining Tube x 1
(OAAS06A)
Sprout Cover
(OAAS04A)
Sprouting Sponges x 12
(OAMS02A)
Short Support Tube x 2
(OANS05A)
Long Support Tube x 2
(OANS04A)
Screw pack (Screw Φ4 x 10mm x 8
& Screwdriver x 1)
(OAAS03A)
!
UserManual
OptionalAccessories Kit
Optional
Accessories
Kit
UserManual
OptionalAccessories Kit UserManual
PlantingQ&A
18W LED Growth Lamp
(L18B) x 4
(OAEE02A)
Climbing Tube Holder x 1 (OAAS04A)
Climbing Tube x 4 (OANS05A)
Climbing tube kit
Screw four LED Growth Lamps into holder clockwise.
Tighten until snug, but not too tight.
Maintain water level and keep the
water level indicator on the top.
Insert tubes into sockets, ensuring that the holes line up.
Use the included screws and screwdriver to line up hole.
Do not use power tools as this may damage the plastic.
1
1
3
3
2
2
4
5
4.2 gallons
15L
5
4
B. Planting
B1. Sowing stage
Refer to below table for sponge quantity and planting numbers.
Fully wet sponges at the sprout area.
Insert capsule seed half side into sponge with dry hands
After 30 minutes of seed sowing, remove the top half of the seed capsules with tweezers.
Cover the sprout cover for 0-7 days for sprouting and ensure sponge wet during this stage.
1
2
3
4
5
C. Optional
C1. Regrowing
OPCOM Farm is designed with a special re-grow process to maximize harvest capacity for family consumption. First harvest cycle takes
3-4 weeks after seeding young plant is planted. During harvesting, cut out the larger leaves and allow the smaller ones to continue to grow in
the machine. After the first harvest, you can continue the harvesting method weekly for the next 3-4 weeks without the need to re-seed.
C2. Sprout Process
GrowBox is not only a hydroponics system but also a Sprout Machine with our free gift, sprout cover. Within one Hydroponics cycle time, you have
3-4 sprout harvests and each harvest cycle is 7-10 days. Enjoy your maximum planting capacity. Refer to user manual pages 19-20 for details.
Please visit OPCOM farm website at www.opcom.com/CN/growbox-support.php for complete information, including user
manual, Planting Q&A, videos and updates.
Control Box
Sowing
Stage
Time after planting
Day 0~Day 7
LED Mode
OFF
Pump Mode
OFF
Notes
・Remove the top half of the seed capsules.
・Wet Sponge.
Control Box
Seedling
Stage
Time after planting
Day 7~Day 14
LED Mode
ON
Pump Mode
ON
Notes
・Ensure seeds germination rate>70%.
・Adjust LED lights position.
・Ensure EC & pH value.
Control Box
Growing
Stage
Time after planting
After Day 14
LED Mode
AUTO
Pump Mode
AUTO
Notes
・Maintain EC & pH value.
B2. Seedling Stage
When the germination rate exceeds 70%, move to the seedling stage, discard excess sponges.
Move all sponge to the growing hole and set up in balance depending on plant size.
In each sponge, keep strong plants and cut the other weak plants.
Add 1 nutrient starter into the water and ensure EC between 1000-2000 µS/cm
(=1.0-2.0 ms/cm).
Ensure pH between 5.5-6.5 (adjust by pH +/-).
Adjust LED lights and keep distance to cover all plants.
* For EC & pH adjustment instructions, please refer to user manual pages 25-26.
1
B3. Growing Stage
When young plants grow to 3-4 inches height, change control box to AUTO mode.
1
B4. Grow to Harvest
After 4-6 weeks, harvest the larger plants for consumption.
Reserve smaller plants to grow.
* To save time, sow the new seeds in sprout box for the next planting cycle before a week of harvesting.
2
1
2
3
4
5
6
Plant Size
Sponge
Number
Planting
Number
Small
72
50
Plant Size
Sponge
Number
Planting
Number
Medium-Large
36
25
Plant Size
Sponge
Number
Planting
Number
Very Large
25
18
Put seeds in warm water
for 24 hour.
Spread the seeds on fully wet sprout sponge.
3-4 inch
Open top cover for green sprout.
Cover for no edible green parts.
www.opcomfarm.com/growbox/support
User Manual
Day 0 Day 1 Day 7-10
5-6 weeks (25 plants)3-4 weeks (50 plants)
☑
Please read and follow every steps to avoid any malfunction.
* Please keep the seed capsules in refrigerator.
EC and pH Meter Set
with Bag
Tweezers
Seeds Capsules
Green Lettuce,Red Leaf Lettuce,Basil (100 pcs/bottle)
Cherry Tomato, Cucumber (30 pcs/bottle)
Replacement
Filters x 3 EC pH
Grow Kit
Seedling
Sponge
(50 x 8)
100 seed capsules
SeedCapsules
Basil
Basil
OSHB01A
30 seed capsules
SeedCapsules
CherryTomato
CherryTomato
S-LT001
30 seed capsules
SeedCapsules
Cucumber
Cucumber
S-LT001
100 seed capsules
SeedCapsules
RedLeaf Lettuce
RedLeafLettuce
OSLT02A
100 seed capsules
SeedCapsules
OSLT01A
Lettuce
pH-
1.6g x 15
pH+
1.0g x 15
ForOFG003GrowWall
1.3g(0.045oz )
ProductNumber:OAMS25A
ForOFG003GrowWall
1.3g(0.045oz )
ProductNumber:OAMS25A
ForOFG003GrowWall
1.3g(0.045oz )
ProductNumber:OAMS25A
ForOFG003GrowWall
1.3g(0.045oz )
ProductNumber:OAMS25A
ForOFG003GrowWall
1.3g(0.045oz )
ProductNumber:OAMS25A
ForOFG003GrowWall
1.3g(0.045oz )
ProductNumber:OAMS25A
ForOFG003GrowWall
1.3g(0.045oz )
ProductNumber:OAMS25A
ForOFG003GrowWall
1.3g(0.045oz )
ProductNumber:OAMS25A
ForOFG003GrowWall
1.3g(0.045oz )
ProductNumber:OAMS25A
ForOFG003GrowWall
1.3g(0.045oz )
ProductNumber:OAMS25A
ForOFG003GrowWall
1.3g(0.045oz )
ProductNumber:OAMS25A
ForOFG003GrowWall
1.3g(0.045oz )
ProductNumber:OAMS25A
ForOFG003GrowWall
1.3g(0.045oz )
ProductNumber:OAMS25A
ForOFG003GrowWall
1.3g(0.045oz )
ProductNumber:OAMS25A
ForOFG001GrowBox
1.3g(0.045oz )
ProductNumber:OAMS25A
ForOFG001GrowBox
1.3g(0.045oz )
ProductNumber:OAMS25A
ForOFG003GrowWall
1.3g(0.045oz )
ProductNumber:OAMS25A
ForOFG003GrowWall
1.3g(0.045oz )
ProductNumber:OAMS25A
ForOFG003GrowWall
1.3g(0.045oz )
ProductNumber:OAMS25A
ForOFG003GrowWall
1.3g(0.045oz )
ProductNumber:OAMS25A
ForOFG001GrowBox
1.3g(0.045oz )
ProductNumber:OAMS25A
ForOFG001GrowBox
1.3g(0.045oz )
ProductNumber:OAMS25A
ForOFG001GrowBox
1.3g(0.045oz )
ProductNumber:OAMS25A
ForOFG001GrowBox
1.3g(0.045oz )
ProductNumber:OAMS25A
ForOFG001GrowBox
1.3g(0.045oz )
ProductNumber:OAMS25A
ForOFG001GrowBox
1.3g(0.045oz )
ProductNumber:OAMS25A
ForOFG001GrowBox
1.3g(0.045oz )
ProductNumber:OAMS25A
ForOFG001GrowBox
1.3g(0.045oz )
ProductNumber:OAMS25A
ForOFG001GrowBox
15pcs
Product Number : OAMS18A
ForOFG003GrowWall
2.8g(0.098oz )
Product Number : OAMS27A
ForOFG003GrowWall
2.8g(0.098oz )
Product Number : OAMS27A
ForOFG003GrowWall
2.8g(0.098oz )
Product Number : OAMS27A
ForOFG003GrowWall
2.8g(0.098oz )
Product Number : OAMS27A
ForOFG003GrowWall
2.8g(0.098oz )
Product Number : OAMS27A
ForOFG003GrowWall
2.8g(0.098oz )
Product Number : OAMS27A
ForOFG003GrowWall
2.8g(0.098oz )
Product Number : OAMS27A
ForOFG003GrowWall
2.8g(0.098oz )
Product Number : OAMS27A
ForOFG003GrowWall
2.8g(0.098oz )
Product Number : OAMS27A
ForOFG003GrowWall
2.8g(0.098oz )
Product Number : OAMS27A
ForOFG003GrowWall
2.8g(0.098oz )
Product Number : OAMS27A
ForOFG003GrowWall
2.8g(0.098oz )
Product Number : OAMS27A
ForOFG003GrowWall
2.8g(0.098oz )
Product Number : OAMS27A
ForOFG003GrowWall
2.8g(0.098oz )
Product Number : OAMS27A
ForOFG003GrowWall
2.8g(0.098oz )
Product Number : OAMS27A
ForOFG003GrowWall
2.8g(0.098oz )
Product Number : OAMS27A
ForOFG003GrowWall
2.8g(0.098oz )
Product Number : OAMS27A
ForOFG003GrowWall
2.8g(0.098oz )
Product Number : OAMS27A
ForOFG003GrowWall
2.8g(0.098oz )
Product Number : OAMS27A
ForOFG001GrowBox
1.6g(0.056oz )
Product Number : OAMS27A
ForOFG001GrowBox
1.6g(0.056oz )
Product Number : OAMS27A
ForOFG001GrowBox
1.6g(0.056oz )
Product Number : OAMS27A
ForOFG001GrowBox
1.6g(0.056oz )
Product Number : OAMS27A
ForOFG001GrowBox
1.6g(0.056oz )
Product Number : OAMS27A
ForOFG003GrowWall
2.8g(0.098oz )
Product Number : OAMS27A
ForOFG003GrowWall
2.8g(0.098oz )
Product Number : OAMS27A
ForOFG003GrowWall
1.6g(0.056oz )
Product Number : OAMS27A
ForOFG001GrowBox
1.6g(0.056oz )
Product Number : OAMS27A
ForOFG001GrowBox
1.6g(0.056oz )
Product Number : OAMS27A
ForOFG001GrowBox
1.6g(0.056oz )
Product Number : OAMS27A
ForOFG001GrowBox
15pcs
Product Number : OAMS20A
Nutrient Starter
15g x 3
Nutrient
5g x 15
ForOFG003GrowWall
12g±1(0.42oz)
ProductNumber:OAMS23A
Nutrient
ForOFG003GrowWall
12g±1(0.42oz)
ProductNumber:OAMS23A
Nutrient ForOFG003GrowWall
12g±1(0.42oz)
ProductNumber:OAMS23A
Nutrient
ForOFG003GrowWall
12g±1(0.42oz)
ProductNumber:OAMS23A
Nutrient
ForOFG003GrowWall
12g±1(0.42oz)
ProductNumber:OAMS23A
Nutrient
ForOFG003GrowWall
12g±1(0.42oz)
ProductNumber:OAMS23A
Nutrient
ForOFG003GrowWall
12g±1(0.42oz)
ProductNumber:OAMS23A
Nutrient ForOFG003GrowWall
12g±1(0.42oz)
ProductNumber:OAMS23A
Nutrient ForOFG003GrowWall
12g±1(0.42oz)
ProductNumber:OAMS23A
Nutrient
ForOFG003GrowWall
12g±1(0.42oz)
ProductNumber:OAMS23A
Nutrient
ForOFG003GrowWall
12g±1(0.42oz)
ProductNumber:OAMS23A
Nutrient ForOFG003GrowWall
12g±1(0.42oz)
ProductNumber:OAMS23A
Nutrient
ForOFG003GrowWall
12g±1(0.42oz)
ProductNumber:OAMS23A
Nutrient
ForOFG003GrowWall
12g±1(0.42oz)
ProductNumber:OAMS23A
Nutrient
ForOFG003GrowWall
12g±1(0.42oz)
ProductNumber:OAMS23A
Nutrient
ForOFG003GrowWall
12g±1(0.42oz)
ProductNumber:OAMS23A
Nutrient
ForOFG003GrowWall
12g±1(0.42oz)
ProductNumber:OAMS23A
Nutrient ForOFG003GrowWall
12g±1(0.42oz)
ProductNumber:OAMS23A
Nutrient
ForOFG003GrowWall
12g±1(0.42oz)
ProductNumber:OAMS23A
Nutrient
ForOFG003GrowWall
12g±1(0.42oz)
ProductNumber:OAMS23A
Nutrient
ForOFG003GrowWall
12g±1(0.42oz)
ProductNumber:OAMS23A
Nutrient
ForOFG003GrowWall
12g±1(0.42oz)
ProductNumber:OAMS23A
Nutrient
ForOFG001GrowBox
5g±1(0.18oz)
ProductNumber:OAMS23A
Nutrient
Nutrient
ForOFG001GrowBox
15pcs
Product Number : OAMS24A
ForOFG003GrowWall
15g±2(0.52oz)
ProductNumber:OAMS21A
Nutrient
Starter
ForOFG003GrowWall
15g±2(0.52oz)
ProductNumber:OAMS21A
Nutrient
Starter
ForOFG003GrowWall
15g±2(0.52oz)
ProductNumber:OAMS21A
Nutrient
Starter
Nutrient
Starter
ForOFG001GrowBox
3pcs
ProductNumber:OAMS22A
30x30 x30 mm
Plant Sponge 50 x 8 pcs
ProductNumber: OAMS19K