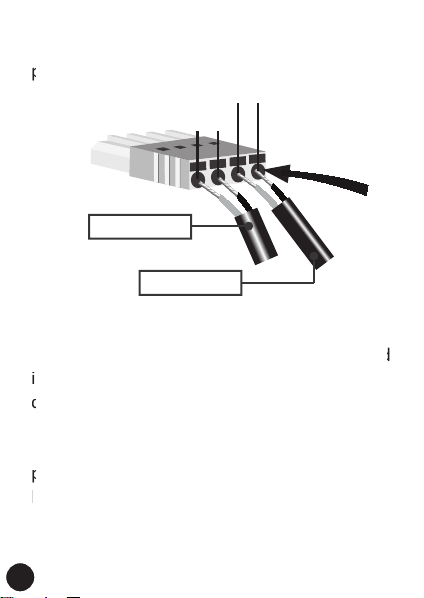
Open Grow GroLab TankBot User manual

www.opengrow.pt
TANKBOT
EN
E
S
FR
(HW09, HW10)
INSTALLATION
MANUAL
MANUAL DE INSTALACIÓN
MANUAL
L
M
AN
U
EL D
'
IN
S
TALLATI
O
N
®
© 2019 Open Grow, LDA. All rights reserved.
IMTB2019V01

EN
E
S
FR
RESET USB POWER
12V~24V
EC PHTEMP
12 34
II
OUTPUTS
+
-
+
-
+
-
+
-
POWER OUT
+
-
+
-
V1 V2
I
1
34 5
6 7 8 9
3
2
1

43 21
II
INPUTS
4 3 2 1
CONTROL
5
10
12
13
14
11
2
EN
E
S
FR

15 16
17
18
19
EN
E
S
FR
3

EN
E
S
FR
4
1
2
3
4
5
6
7
8
9
10
11
12
13
Direct DC power put
Controller connection outputs
EC sensor outlet
Temperature sensor outlet
PH sensor outlet
Module reset buon
12~24VDC power supply input
Sensor connecon inputs
Manual switch buons
Status signal LED
Backets for wall-mounng
Type-B USB outlet (Firmware updates)
RF antenna outlet

EN
E
S
FR
RF communication antenna
Water/soil/air temperature sensor
110~230VAC / 12~24VDC power supply
USB Type-B cable (Firmware updates)
4 Pin quick connector
PH probe with BNC connector
14
15
16
17
18
19
5
INSTALLATION 1
Peripherals connecon
Screw the communicaon antenna (14) into
the module port (6). For correct communica-
on, turn the antenna in order to posion it
vercally according to the direcon of the
module.
14
6

8 9 17
EN
E
S
FR
Place the module on a firm surface, far from
flood-prone areas. It is recommended that the
module be mounted on a wall with the fixing
holes on the upper part.
Once the module has been mounted, connect
the power cable (17) to the module’s power
supply input (9) and the transformer to a
110~230VAC outlet.
With this connecon made your module is
powered and the LED indicator (13) should
start to blink. You also now have power availa-
ble on the Power output connector (1).
6

EC PH
Connect the pH and EC sensors to their respecve
outlets. Insert the p of the plug and turn it
clockwise to screw it in.
EN
E
S
FR
Connect the pH and EC sensors to their respecve
outlets. Insert the p of the plug and turn it
c
Never exchange the posion of the pH and EC
sensors.
A wrong connecon may deteriorate your devices
or the module itself.
Calibrate the sensors using the soware. Consult
the calibraon guide available by directly
accessing Tutorials on your desktop. Once
adjusted, insert the pH and EC sensors in your
water tank.
7

EC PHTEMP
345
16
Connect the water temperature sensor (16) to the
module outlet (4) and place it in the water tank.
EN
E
S
FR
Connect the water temperature sensor (16) to the
m
If you use any system to heat the water, maintain
the sensor away from it.
Connect the cables of the peripherals to the
sensor and actuator plugs (2/10). Each Plug is
divided in two secons, one for each device.
Perform the following steps to correctly connect
them without generang polarity problems.
8

+
-
+
-
Device 1
Device 2
Twist the bare wire together and trimm it
with a cung tool so that when it is inserted
into the plug it is not exposed and does not
cause bad contact with other cables.
To remove a wire from the plug, use a pin to
press the hole associated to each cable
located at the surface of the plug. Finally, pull
the cable out of the hole to remove it.
Connect your actuators (OUTPUTS) in the
following order, respecng the posion of the
plug:
EN
E
S
FR
T
t
w
d
i
t
c
T
o
p
e
l
l
t
Connect your actuators (OUTPUTS) in the
following order, respecng the posion of the
p
9

12 34
II
OUTPUTS
+
-
+
-
+
-
+
-
Next, carry out the same procedure on your
sensors (INPUTS). Keep in mind that inverng the
polarity of the sensor you will also invert the data
recorded by TankBot. You can invert this polarity
on the soware without the need to re-wire the
system.
Never connect sensors to the OUTPUTS and
actuators to the INPUTS. A wrong connecon can
deteriorate your devices or the module itself.
Lastly, connect the plugs of the sensors (INPUTS)
and actuators (OUTPUTS) to their respecve
outlets.
EN
E
S
FR
Next, carry out the same procedure on your
sensors (INPUTS). Keep in mind that inverng the
polarity of the sensor you will also invert the data
recorded by TankBot. You can invert this polarity
on the soware without the need to re-wire the
s
Never connect sensors to the OUTPUTS and
a
n
d
Lastly, connect the plugs of the sensors (INPUTS)
and actuators (OUTPUTS) to their respecve
o
10

EN
E
S
FR
COMUNICATIONS
Connecon to GroNode
Make sure GroNode is correctly installed and
accessible through the GroLab Soware, if
not follow the instrucons provided inside
the GroNode’s manual.
Aer installing TankBot, open the GroLab
Soware, establish connecon with GroNode
and then, access Modules through the main
menu.
Usually 2 or 3 minutes are enough for GroNo-
de to detect a newly installed module. Aer
being detected, it automacally appears in
the Modules menu under the respecve
module type secon. You can check the list of
modules of same type on the right side of this
menu.
Note that one GroNode supports a maximum
of 4 modules of each type.
2
C
Make sure GroNode is correctly installed and
accessible through the GroLab Soware, if
not follow the instrucons provided inside
t
Aer installing TankBot, open the GroLab
Soware, establish connecon with GroNode
a
n
m
U
-
de to detect a newly installed module. Aer
being detected, it automacally appears in
t
e
module type secon. You can check the list of
modules of same type on the right side of this
m
Note that one GroNode supports a maximum
o
11

EN
E
S
FR
12
Problems or losses in
communicaon
GroNode was designed to communicate with
the other modules through radio frequency
signals. The range of acon is 25 meters (82
feet) indoors and 100 meters (328 feet)
outdoors depending on space condions.
Access the Modules menu on the GroLab
Soware and check if your modules are availa-
ble. If they aren’t available or they are
experiencing communicaon losses, it is
possible that you have exceeded the distance
between your modules and GroNode.
Inside the Modules menu, you can find a
wireless signal icon that indicates if the
selected module is connected to the GroNode.
NOTICE: Some load-bearing walls and electronic devices
may interfere with the signal.

-
EN
E
S
FR
13
www.opengrow.pt support@opengrow.pt
If the problem persists, perform a test run by
placing the module next to the GroNode and
check the module’s communicaon status
through the soware. If communicaon has
been successfully re-established, repeat this
operaon at different distances unl you detect
the maximum communicaon distance.
If the module is not found at all, try to cycle the
GroNode through all the available communica-
on channels unl you find your modules,
allowing 3 minutes between channel changes.
To change the communicaon channel, open
the GroLab Soware and connect to the GroNo-
de. Inside the Main Menu (Configuraons), go
to Sengs (GroNode) → General Sengs Tab.
Click the buon in the lower right corner to
enable eding and change the communicaon
channel to the desired channel. To apply the
changes, click the green buon in the lower
right corner.
If aer following the previous steps your modu-
les sll don’t show up on the GroLab Soware,
please contact our technical support.

EN
E
S
FR
UPDATES
Firmware Updates
Keep in mind that some soware updates
will require updang your devices’ Firmware.
All updates will provide crucial improve-
ments, ensuring your system’s performance.
Connect the type-B USB cable (15) to your
device’s USB outlet (8) and follow the instruc-
ons indicated in the GroLab Soware.
3
USB POWER
12V~24V
89
15
14

EN
E
S
FR
4
S
AFETY IN
S
TR
U
CTI
O
N
S
T
he followin
g
g
eneral safety
g
uidelines are provided to help ensure your ow
n
p
ersonal safety and protect your product from potenal dama
g
e.
•
Do not aempt to service t
h
e product and never disassem
bl
e t
h
e product. Fo
ome products with a user replaceable baery, please read and follow th
e
n
strucons provided
b
y t
h
e insta
ll
aon manua
l
.
•
Keep your device away from radiators and heat sources.
•
Keep your equipment away from extremely hot or cold temperatures to ensur
e
hat it is used within the speci
fi
ed operan
g
ran
g
e.
•
Do not push any ob
j
ects into the air vents or openin
g
s of your equipment. Doin
g
o can cause a
fi
re or electric shock by shorn
g
out interior components.
•
Ensure that nothin
g
rests on your equipment
'
s cables and that the cables ar
e
n
ot
l
ocated w
h
ere t
h
ey can
b
e stepped on or tripped over.
•
Do not spill food or liquids on your equipment.
•
Before you clean your equipment, disconnect it from the electrical outlet. Clea
n
y
our device with a so cloth li
g
htly dampened with water. Do not use liquids o
a
erosol cleaners, which may contain flammable substances.
•
If your equipment does not operate normally - in parcular, if there are an
y
u
nusual sounds or smells comin
g
from it - unplu
g
it immediately and contact a
n
a
ut
h
orized dea
l
er or t
h
e Open Grow support center.
•
To help avoid the potenal hazard of electric shock, do not connect o
d
isconnect any cables, or perform maintenance or reconfi
g
uraon of you
e
quipment durin
g
an electrical storm.
•
Check the volta
g
e ran
g
before you connect the equipment to an electric
a
o
utlet to ensure that the required volta
g
e and frequency match the availabl
e
p
ower source.
•
Also, ensure that your GroLab modules and aached devices are electricall
y
ated to operate wit
h
t
h
e AC power avai
l
a
bl
e in your
l
ocaon.
•
Do not plu
g
the equipment power cables into an electrical outlet if the powe
c
a
bl
e is dama
g
ed.
•
To prevent e
l
ectric s
h
oc
k
, p
l
u
g
t
h
e equipment power ca
bl
es into proper
ly
g
rounded e
l
ectrica
l
out
l
ets.
•
If you use an extension power cable, ensure that the total ampere ran
g
of th
e
p
roducts p
l
u
gg
ed into t
h
e extension power ca
bl
e does not exceed t
h
e amper
e
an
g
of the extension cable.
The following general safety guidelines are provided to help ensure your own
p
•Do not aempt to service the product and never disassemble the product. For
some products with a user replaceable baery, please read and follow the
i
n
•
•Keep your equipment away from extremely hot or cold temperatures to ensure
t
•Do not push any objects into the air vents or openings of your equipment. Doing
s
•Ensure that nothing rests on your equipment's cables and that the cables are
n
•
•Before you clean your equipment, disconnect it from the electrical outlet. Clean
your device with a so cloth lightly dampened with water. Do not use liquids or
a
•If your equipment does not operate normally - in parcular, if there are any
unusual sounds or smells coming from it - unplug it immediately and contact an
a
•To help avoid the potenal hazard of electric shock, do not connect or
disconnect any cables, or perform maintenance or reconfiguraon of your
e
•Check the voltage rang before you connect the equipment to an electrical
outlet to ensure that the required voltage and frequency match the available
p
•Also, ensure that your GroLab modules and aached devices are electrically
r
•Do not plug the equipment power cables into an electrical outlet if the power
c
•To prevent electric shock, plug the equipment power cables into properly
g
•If you use an extension power cable, ensure that the total ampere rang of the
products plugged into the extension power cable does not exceed the ampere
r
15

EN
E
S
FR
5
WARRANTY
Open Grow, LDA, guarantees the purchaser that the product is free from
material and/or manufacturing defects. Open Grow, LDA, liability is limited
to the repair or replacement of any defecve parts. Do not ship directly to
Open Grow, LDA, without first consulng with us to verify the procedure
that should be followed.
Contact our technical services at support@opengrow.pt.
All Open Grow, LDA, products have a 2-year guarantee except for
consumables (sensors and/or actuators of any type) and under normal
use.
The loss of the “GroNode” module’s internal baery life as a result of its
aging is not considered a manufacturing defect. Follow the replacement
procedure indicated in the user manual available on your applicaon or
request more informaon from the technical services.
A guarantee claim is non-transferable and only the original purchaser can
submit one. To enforce the guarantee the customer must always provide
the purchase invoice.
GUARANTEE DISCLAIMER:
Applicaon of the guarantee is excluded should the breakdown of the
defecve part or parts be a result of the product’s inadequate and/or
negligent use. Understood as inadequate and/or negligent use is any use
other than the one for which the product is meant and/or that is
recommended in the instrucons manual, not execung the maintenance
operaons recommended in the instrucons manual, carrying out
operaons that are different from those menoned and that compromise
the quality of the product, modificaons that are not performed by
authorized repairers and/or with non-original or non-approved parts.
16

EN
E
S
FR
This symbol on the product or packaging means that according to
local laws and regulaons this product should not be disposed of in
the household waste but sent for recycling. Please take it to a
collecon point designated by your local authories once it has
reached the end of its life, some will accept products for free. By
recycling the product and its packaging in this manner you help to
conserve the environment and protect human health.
This symbol on the product or packaging means that this product is
compliant with RoHS Regulaons of the European Parliament and
Council Direcve on the Restricons of the Use of Certain
Hazardous Substances in Electrical and Electronic Equipment
(2011/65/EU).
Open Grow, LDA, reserves the right to update and/or modify the content
of its products at any me without prior warning. Check out our Terms &
Condions at www.opengrow.pt.
6
COMPLIANCE
This symbol on the product or packaging means that this product is
in compliance with the following direcves and regulaons:
•(2014/53/EU) Radio equipment direcve.
•(2011/65/EU) RoHS direcve.
•(2014/35/EU) Low voltage direcve.
•(2014/30/EU) EMC.
Frequency Band(s) Max. Output Power
(EIRP)
2.4 G 2.4 - 2.4835 GHz 100 mW
17

EN
E
S
FR
NOTES

®
© 2019 Open Grow, LDA. All rights reserved.
IMTB2019V01
Specificaons are subject to change without noce. GroLab is a registered trademark
of Open Grow, LDA. Other brands and product names are trademarks or registered
trademarks of their respecve holders.
No part of the specificaons may be reproduced in any form or by any means or used to
make any derivave such as translaon, transformaon, or adaptaon without
permission from Open Grow, LDA.
EN
Las especificaciones están sujetas a cambios sin previo aviso. GroLab es una marca
registrada de Open Grow, LDA. Otras marcas y nombres de productos son marcas
comerciales o marcas comerciales registradas de sus respecvos propietarios.
Ninguna parte de las especificaciones se puede reproducir de ninguna forma ni por
ningún medio, ni se puede ulizar para obtener ningún derivado, como traducción,
transformación o adaptación sin el permiso de Open Grow, LDA.
ES
Les spécificaons sont sujees à changement sans préavis. GroLab est une marque
déposée de Open Grow, LDA. Les autres marques et noms de produits sont des marques
commerciales ou des marques déposées de leurs propriétaires respecfs.
Aucune pare des spécificaons ne peut être reproduite sous quelque forme ou par
quelque moyen que ce soit, ni être ulisée pour obtenir des dérivés tels que la
traducon, la transformaon ou l'adaptaon sans l'autorisaon de Open Grow, LDA.
FR
(+351) 232 458 475
Open Grow, LDA
Edicio Expobeiras
Prq. Industrial de Coimbrões
3500-618 Viseu
Portugal
info@opengrow.pt
support@opengrow.pt
www.opengrow.pt
www.opengrow.pt/support
Table of contents