OPTi GoboPro FX User manual

GoboPro FX
1. Read and understand all instructions before using the equipment.
2. Close supervision is necessary when any appliance is used by, or near, children.
3. Care must be taken, as burns can occur from touching hot parts.
4. Do not operate appliance with a damaged cord, or if the appliance has been
dropped, or damaged, until it has been examined by a qualified engineer.
5. Position the cord so that it will not be tripped over, pulled, or come into contact with
hot surfaces.
6. If an extension cord is necessary, a cord with a current rating at least equal to that of
the appliance should be used. Cords rated for less amperage than the appliance may
overheat.
7. Always unplug appliance from electrical outlet before cleaning and servicing and
when not in use. Never yank cord to pull plug from outlet. Grasp plug and pull to
disconnect.
8. Let appliance cool completely before packing. Loop cord loosely around appliance
when storing.
9. To reduce risk of electric shock, do not immerse power supply or other liquids.
10. To reduce the risk of electric shock, do not dismantle this appliance.
11. Do not attempt to service the projector unless you are qualified and working under
the direction of the manufacturer
12. The use of an accessory attachment not recommended by the manufacturer may
cause a risk of fire, electric shock, or personal injury.
13. A safety chain or cable must be fitted to the projector and secured to an immovable
object where applicable. The securing point must be able to withstand the shock weight
of the projector should it fall.
14. After any maintenance or cleaning all parts must be absolutely dry before refitting to
the projector.
15. During focussing of the projected image beware of moving the projection lens too
far, as this may cause the lens to become separated from the projector, and perhaps to
dropped and broken which may cause injury.
16. Flammable surfaces should be 0.5m away from the front of the projector
Instructions
Important Safety Instructions
When using your projection equipment basic safety precautions
should be followed:
Designed and Manufactured in the UK by [OPTI] Kinetics 1

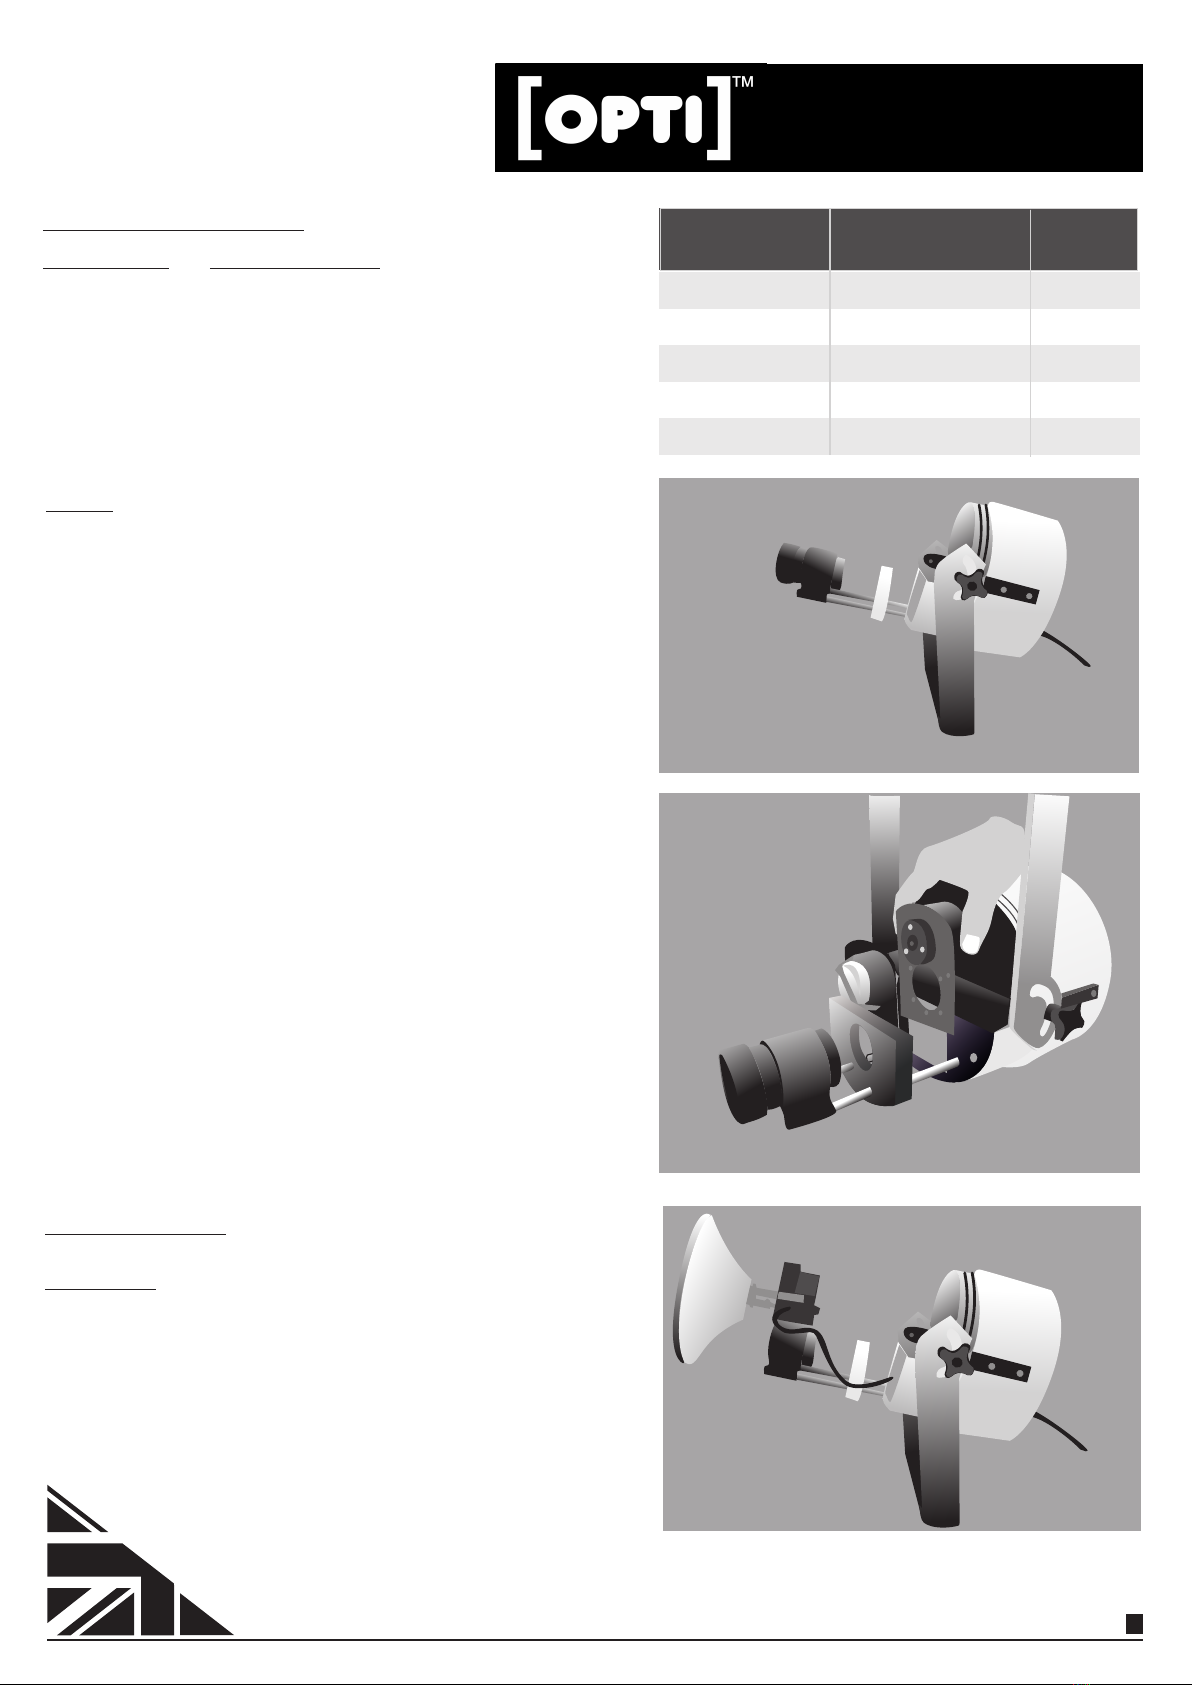
Lens Fitting & Focusing
If you would like to add or change the lens, loosen the screw on
the bottom of the lens housing and remove the lens (if currently
inserted). Insert the new lens to a balanced position and tighten
the screw on the bottom of the lens housing.
To project a focused image, it is necessary to finely adjust the
focusing lens after the unit has been pointed at the desired
projection surface. To adjust the focusing lens, loosen the
screw on the side of the lens housing and slide the housing
along the rails until the image is focussed. Secure the
lens housing to the rails by tightening the screw on the side.
Power Supply
A 28V mains supply suitable for 100-240V AC is supplied with an
appropriate IEC power cable. The power supply is not suitable for
use in wet conditions and should be installed in a dry location or
waterproof box. The low voltage power cable can be extended by
means of 4-pin XLR extension leads. Power cores should be
capable of carrying at least 6A.
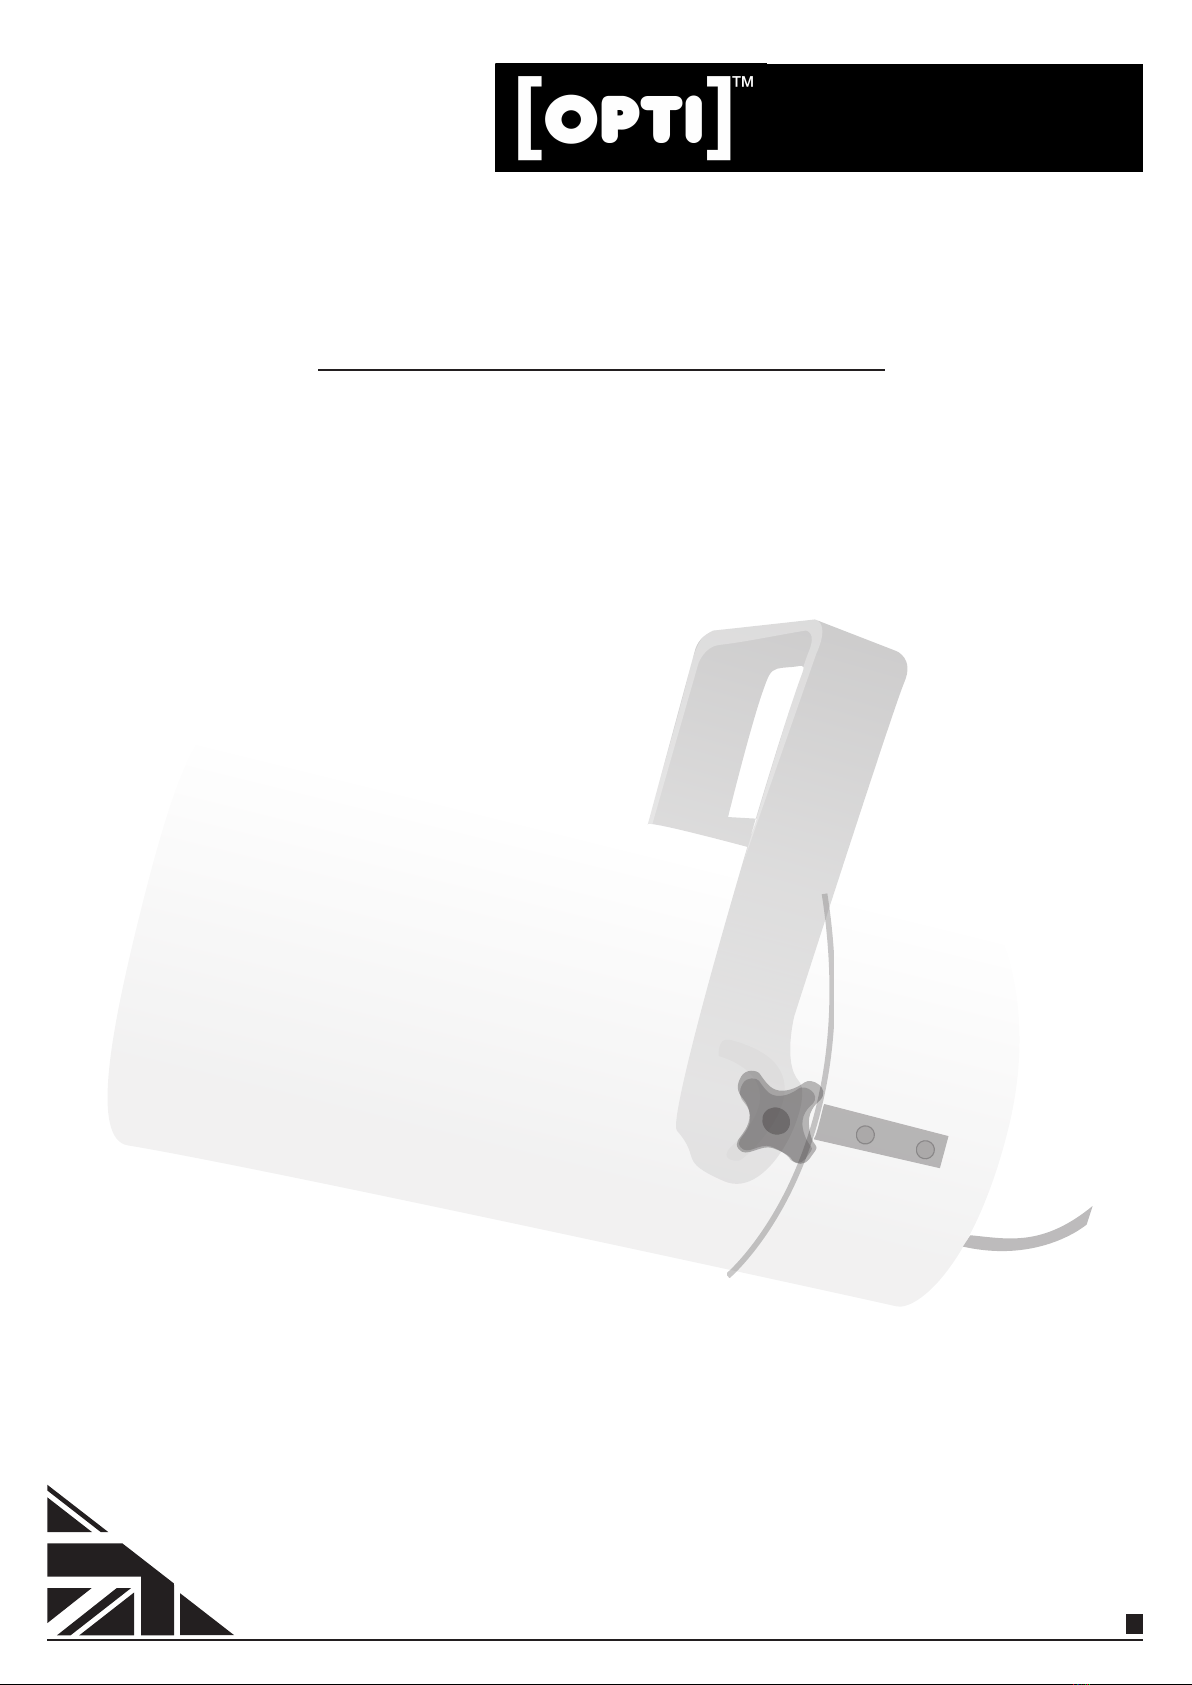
Mounting
All [OPTI] GoboPro and GoboPro+ are supplied with one u-shaped
bracket that can be mounted to any immovable surface. The
mounting bracket hole is 11mm. The angle of the u-shaped bracket
can be adjusted using the pivot handles on the side of the
projector. If the projector is to be mounted vertically downwards, it
is recommended a small disk is installed above the projector to the
risk of water pooling in the back of the unit.
Waterproof Hood
All [OPTI] GoboPro, GoboPro+ and GoboPro FX are supplied with
one 200mm long IP-rated 65 hood (suitable for 20mm-120mm
lenses). To remove the hood, gently wiggle the hood and pull the
hood off. To reattach the hood, gently wiggle and push the hood
onto the projector. Please note that there will be a different size
hoods available to be accommodate 150mm lenses and bigger.
There is a 1mm hole at the front of the hood to drain condensation.
This hole should be aligned at the bottom of the projector.
To secure the hood to the projector.
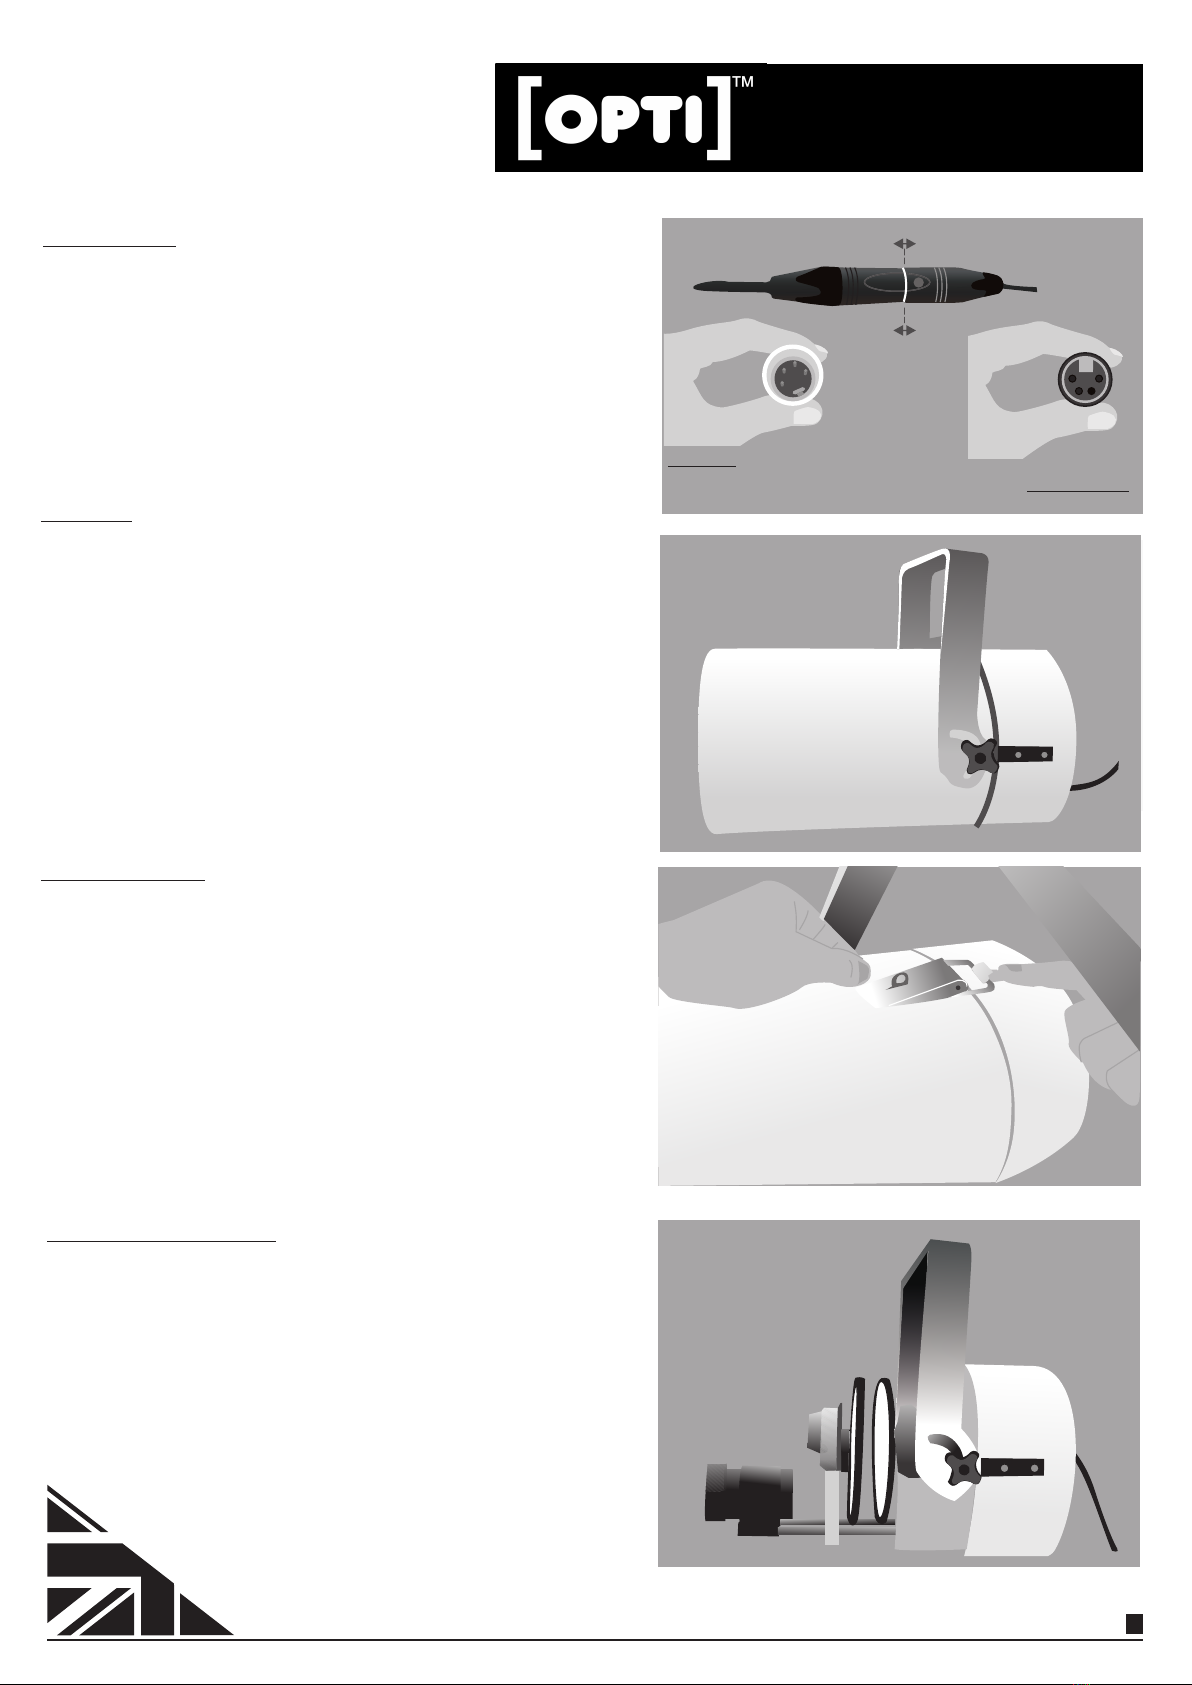
Power Supply End
Projector End
Pin 1 - 0V
Pin 2 - +28V
Pin 3 - Data Link In (to projector)
Pin 4 - Data Link Out (from projector)
41
2
3
Designed and Manufactured in the UK by [OPTI] Kinetics 2
GoboPro FX

Designed and Manufactured in the UK by [OPTI] Kinetics 3
Distance Calculation Formula
Please note all [OPTI] GoboPro and GoboPro+ can be used
with 52.5mm barrel lenses so there may be other lenses
available.
Effects
There are two gates in the projector for holding effects cards
(rotators, static gobos etc). The one nearest the light source
commonly referred to as the front gate or the first gate, is the
one that this normally used for the projected object. (Please
note that some effects such as 'Light through Trees' are
achieved through deliberately not focussing on the object in
the first gate.) Usually the second gate is used to hold
distortion wheels or other effects.
The first gate position is integral to the body of the projector.
Effect cards are simply slid into the slot of the gate and pick
up power from spring connectors inside the gate. Typical first
effect cards are wheel rotators such as FGM6340AG or
cassette rotators FG6391AG.
The position of the gates is important as it can completely
change the image and the effect. Note: If rotating effects, the
gates should not be positioned two close together.
Front of Lens Effects
Multi Mirror
A multi mirror can be used with the OPTI GoboPro FX to
create a fantastic multi-image effect.
Lens Focal Projection Distance
Object Size Image Size
x
GoboPro FX
Lens Focal
Length
Projection Distance
to Image Size (Ratio)
45mm1:1
60mm 3:2
85mm 2:1
120mm 3:1
150mm 4:1
Lens
Degrees
50°
39°
26°
18°
15°

1
YEAR
Guarantee
0.5m
38 Cromwell Road Luton LU3 1DN England
Designed and Manufactured in the UK by [OPTI] Kinetics 4
Multi-mirror
The multi-mirror can be controlled using the switch and dial
buttons on the back of the unit.
The switch controls the direction of the rotation and the dial
controls the speed.
Guarantee
[OPTI] Kinetics Limited guarantees this product for 1 year from the
date of purchase from all mechanical, electrical or assembly
defect. Within this 1-year period any fault will be repaired or
remedied free of charge. To extend the warranty free of charge to
3 years, please register your [OPTI] GoboPro/GoboPro+ projector
by vising www.opkinecs.co.uk. The guarantee is void if the
projector has been opened or if a repair has been attempted by
anyone other than an [OPTI] Kinetics authorised repairer.
GoboPro FX
Technical Specificaon
[OPTI] GoboPro FX LED Projector
FG2030
Static and/or rotating image. Integral Rotator for Cassette
Projector takes 52.5mm diameter object lenses. Other lenses available*
45, 60, 85, 120, 150, Zoom
Manual
120W LED
8000
3800 Lux at 1m Diameter
7500 K
Black or White
Two active gates and one front of
lens effect connection
Manual. DMX ad Wifi Adapter Available
Dimming, control of all effect paramеters.
IP 65 with front cover fitted. Suitable for outdoor use.
Mains adapter 28V at 4.74A. (Adapters not to IP65).
L38 H37 W37 Od20 CM
8Kg
NAME:
Part Number:
Gobo Projection:
Lens Size:
Lens options:
Focus:
Light Source:
Lumens:
Brightness:
Colour temperature (Kovin):
Colour of Projector:
Control:
Remote control:
Projection Rating:
Power Supply:
Dimension of projector:
Weight:
Effects
Table of contents
Popular Lighting Equipment manuals by other brands

Steren
Steren PAR-030 instruction manual

FLOS
FLOS OK F4640019 Assembly

Vaxcel
Vaxcel ProLine T0435 Assembly and installation instructions

Osram
Osram Traxon e:cue Allegro Media Tube Lite installation guide

Code 3
Code 3 LED X 2100 Installation & operation manual

Qazqa
Qazqa Cage Rack WL 2 Black 105135 instruction manual