Optilife AU981 User manual

Version: D
- 1 -
Optilife Smoke Alarm User Manual
Model number: AU981
Thank you for purchasing the Optilife AU981
interconnectable smoke alarm. Please take a few minutes to
read this user manual thoroughly to familiarise yourself with
its operation.
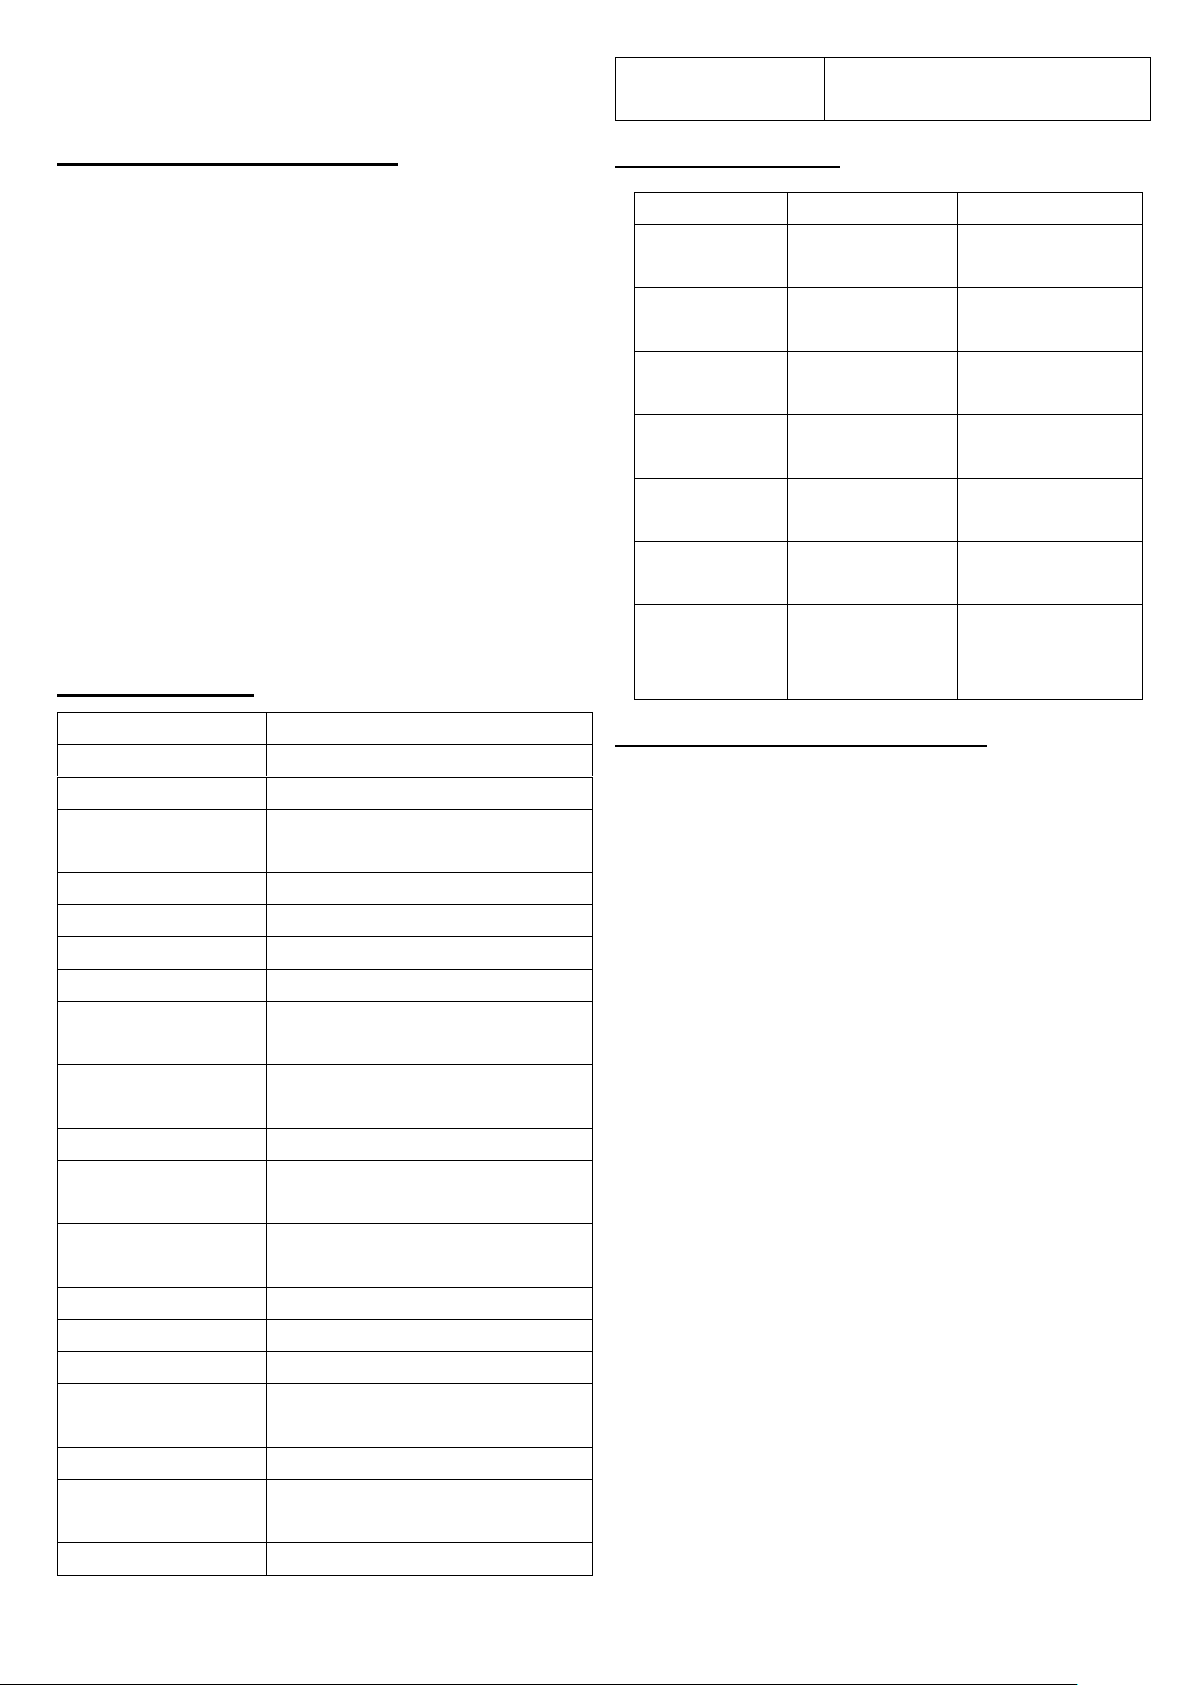
Product Specifications:
Power: built-in DC3V(CR17450) Lithium battery (battery
not replaceable)
Operation current :<70mA
Alarm volume :>85dB(A) at 3 meters.
Smoke sensitivity: 0.09-0.15dB/m
Interconnection: up to 40 devices
Activated smoke alarm sound pattern: ISO 8201
BI 0.5s - pause 0.5s – BI 0.5s – pause 0.5s – BI 0.5s –
pause 1.5s, with the red LED flash, pattern is
repeated.
Wireless activated (supporting alarms) sound pattern:
Bi - Bi - pause 1s, repeat this pattern
Description:
The AU981 unit is a photoelectric smoke alarm device.
Photoelectric technology is more sensitive at detecting slow
smoldering fires.
Installation Suggestions:
It is suggested that an AU981 smoke alarm unit be installed
in every room and hallway of the house (excluding bathroom
and kitchen). Ensure that all occupants are aware of the alarm
tones to respond accurately if alerted.
For rooms greater that 9 meters in length an AU981 alarm
should be installed at each end of the room.
Important Safety Information:
1: Each AU981 smoke alarm unit should be tested monthly by
pressing the button.
2: Alarm can be silenced by ventilating room if activated by a
non-threatening source.
3: The AU981 smoke alarm is designed to detect smoke or
combustion particles in the air, it is not designed to sense
heat, flame or gas. This smoke alarm is designed to give
audible warning of a developing fire. This smoke alarm is
not warranted to protect lives or property from fire. Smoke
alarms are not a substitute for insurance.
4: AU981 should be replaced approximately every 10 years.
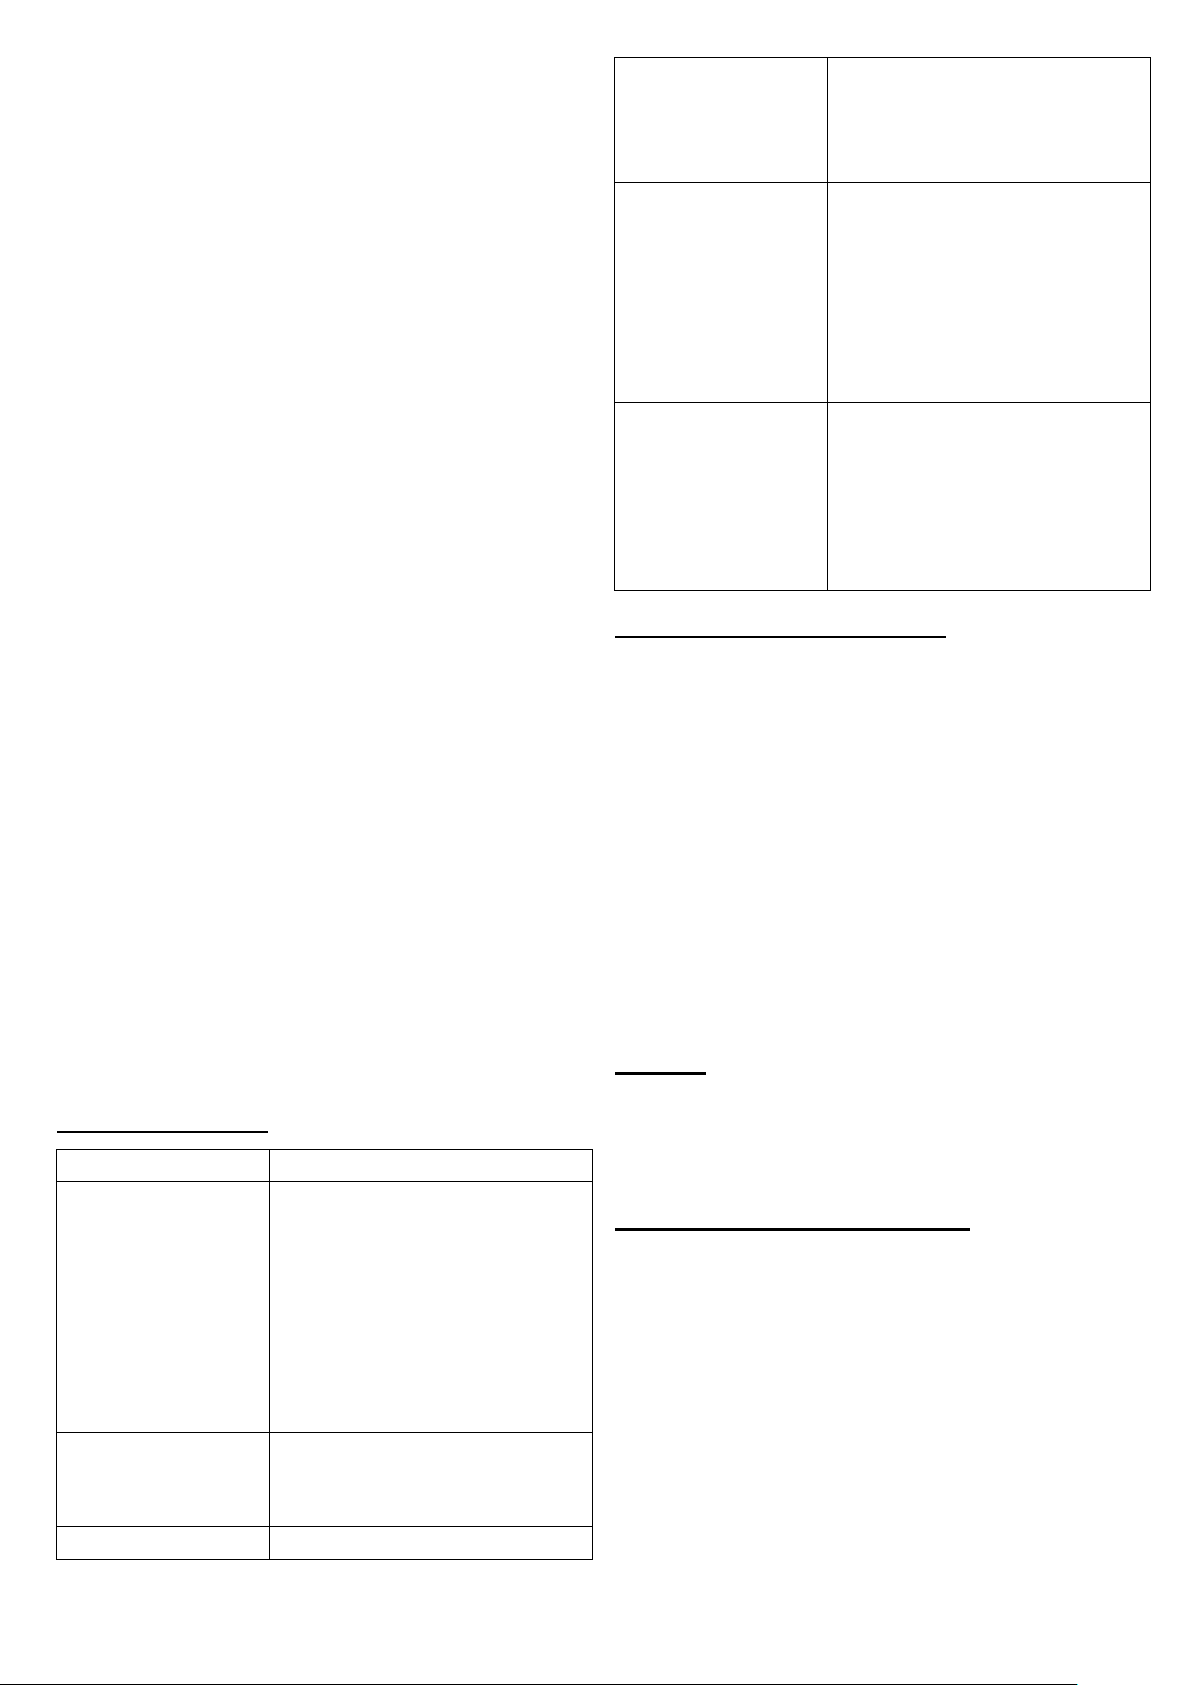
Do Not Install Smoke Alarms:
1: Near appliances or areas where normal combustion
can regularly occur (kitchens, fire places & hot water units).
2: In areas with high humidity eg. bathrooms or near
dishwashers or washing machines, install at least 3 metres
away from these areas.
3: Near air returns, or heating and cooling vents. Install at least
1 metre away from these areas. The air may blow smoke
away from the detector, affecting detection.
4: In rooms where temperatures may fall below 0℃ or rise
above 40 ℃ or in humidity higher than 93%. These
conditions will reduce battery life or cause a fault in the
alarm.
5: In extremely dusty, dirty, or insect infested areas, particles
could interfere with the smoke alarm operation.
6: In an area where people regularly smoke.
Activating Battery
To activate AU981 smoke alarm install mounting plate to the
ceiling, then turn unit clockwise to click into place.
DO NOT use an open flame to test your alarm, this could
damage the alarm and void your warranty.
Testing Alarms
To test the alarms, press firmly on the test button on one of the
alarms in the suite for 3 seconds until it lets out a siren sound,
then release. Wait approx. 3 seconds for the supporting alarms
in the in the network to sound for 10 chirps, and the red LED’s
of the supporting alarms will flash rapidly. (The light on the
test initiating alarm will not flash or sound) The red LED’s will
continue
to flash for 5 minutes, if you wish to stop them flashing prior
to the 5 minutes, simply push the test button on each unit.

Version: D
- 2 -
Alarm silence (silence mode)
If the alarm has been activated by a non-emergency
situation you can place the alarm into Silence Mode.
To achieve this, push the test button once, this will pause
the alarm for approximately 10 minutes. The red LED will
continue to flash every 8 seconds to indicate that the alarm
is in Silence mode. The smoke alarm will reset itself after
approximately 10 minutes if the combustion particles have
been removed from the area. If they are still present after 10
minutes, the alarm will activate again, and the test button
should be pressed again to activate Silence Mode.
Note: By pressing the test button on the alarm that has been
activated, all interconnected alarms will silence. To reset
the LED’s, push the test button on each unit where the LED
is flashing.
Technical data:
Model
AU981
Power supply
CR17450 non-replaceable LiMnO2
Battery Service Life
10 years
Operation
temperature
0℃…45℃
Operation humidity
< 93%RH
Alarm Current
< 70mA
Alarm Volume
> 85dB(A) @ 3 meters
Quiescent Current
<11uA
Low Voltage
Threshold
DC 2.65V ±4%
Hush Time (silence
mode)
10 minutes ±10%
Do not disturb time
10 hours
Smoke Alarm Sound
Pattern
ISO 8201
Radio Link Alarm
Sound Pattern
Bi - Bi - pause 1 s, with red LED
flashing
Interconnection
up to 40 devices
Wireless Frequency
433.42MHz
Wireless Distance
> 100 meters in line of sight
Receiver category
(SRD Class)
2
Duty cycle (%/h)
1
Wireless Response
Time
< 30 seconds.
Australian Standard
AS3786:2014
Dimensions
114mm in diameter x 37.9mm
deep.
Signal indication:
Wireless function description:
Wireless frequency: 433.42MHz
Operation current:
RF Receiver: < 6mA
RF emitter: < 30mA
Wireless distance: up to 100 meters – line of sight
1: Setting up Wireless Code
Note: Make sure the device is in normal standby mode.
Press the button 3 times in 2 seconds, the red LED aluminates
(No network yet) or the green LED aluminates (networking),
then the blue LED aluminates for 30 seconds, the detector has
entered "send wireless code mode".
Note: If successfully paired with another detector in "learning
mode", the green NET LED is lit for 3 seconds, then enter
"send wireless code mode" again. If there is no pairing for
continuous 30 seconds or press the button for 3 times within
2 seconds again, the detector will enter standby status.
2: Learning mode
Note: Before operation, the unit must be in normal working
mode.
Press the button for 3 times within 2 seconds, the unit first
enter " Learning mode " and the red NET LED (No
networking yet) or green NET LED (Already networking) is
lit for a while. Then, if the colour of the NET LED is same as
another detector in "send wireless code mode" (Green led
on 5s), it indicates the radio link is successfully paired. The
green LED will turn off after 3 seconds.
Mode
LED
Audible
Standby
Flash every 40
seconds.
-
Silence Mode
Flash every 8
seconds.
-
Low battery
Flash once every
40 seconds.
Beep once every
40 seconds.
Fault
Detected
-
Beep once every
40 seconds.
Alarm
Activated
Flash once every
second.
3 beeps every 4
seconds
Test Button
Pushed
Flash once every
second.
3 beeps every 4
seconds
Radio link test
Flash twice every
second for 5
minutes
Beep for 10
seconds

Version: D
- 3 -
NOTE: Products can be learned repeatedly, but all products
must be studied with the same product.
3: Clear interconnection code
If you want to cancel networking:
1): Push and hold the test button, then power on alarm, the
red LED will illuminate. Keep pressing the test button till
the LED turns off.
2) Press the test button again, the LED will illuminate and
start flashing. When the LED stops flashing, the code has
been successfully cleared and the device is back in its
initial state.
4: Radio link test
To ensure that all the products have been successful learning.
1): Select one device, press and hold the button for about 2
seconds until the device goes into “test alarm mode” and
then release the button, the device will auto send “radio
link test” information.
2): After short delay, all other devices will go into “radio link
test” status for 5 minutes (red led flashes twice every
second, no audible signal). If not, the device network
learning failure or the distance between the connected
devices is too large (the connected devices cannot reach
each other).
NOTE: In “radio link test” status device, press the button
and the device immediately enters the normal standby
mode.
NOTE: Before installing, place the product in each installed
room and select the device in the farthest room for this
test, to ensure that other products successfully enter the
"radio link test" status.
Trouble shooting:
Problem
Method of disposal
Smoke alarm device
does not sound when
tested.
1. Fit the alarm on the bracket and
turn the alarm body clockwise for
POWER ON.
2. Clean smoke alarm device. Please
refer to the “maintenance and
cleaning” section.
3. If still not working contact
supplier.
The alarm “chirp”
with red LED flashing
once every 40 seconds.
The battery is getting low and
smoke alarm unit must be replaced.
Smoke alarm device
Clean smoke alarm device. Please
chirp occurs every
40 seconds(alarm
goes into fault
mode).
refer to the “maintenance and
cleaning” section. If after cleaning
as directed, problem still exists
contact supplier.
Smoke alarm device
sounds unwanted
alarms intermittently
or when residents are
cooking, taking
showers, etc.
1. Press test button to put alarm into
silence mode.
2. Clean smoke alarm device. Please
refer to the “maintenance and
cleaning” section.
3. Move smoke alarm device to new
location and press test button.
The alarm sound is
distorted and different
from its original sound
and starts and stops.
1. Clean smoke alarm device. Please
refer to the “maintenance and
cleaning” section.
2. If fault continues please contact
supplier.
Maintenance and Cleaning:
The alarm requires periodic cleaning to remove dust, dirt, and
debris.
Use a vacuum cleaner with the soft brush, vacuum all sides
and covers of device.
The AU981 smoke alarm has a low battery indicator, the alarm
will “chirp” approx every 40 seconds and the red LED light
will flash once at the same time for a minimum of thirty days
when the battery gets low. AU981 smoke alarm must be
replaced when this occurs.
WARNING: The battery is sealed and not replaceable.
IMPORTANT: Do not attempt to remove the cover to clean
inside. This will affect the warranty.
Repair:
Caution: Do not attempt to repair the smoke alarm. It will
affect your warranty. Contact your supplier.
Wall Position for Installation:
·Smoke, heat and flames are most likely to spread horizontally
after rising to the ceiling, so if possible install the smoke
alarm unit in the middle of the ceiling
·If the smoke alarm unit is unable to be installed in the
middle of the ceiling please ensure it is at least 30cm in from
the corner. (see diagram 1).
·If you are installing the smoke alarm unit on the wall, it
should be installed lower than 10cm but no more than 30cm
below the ceiling (see diagram 1).
·If the length of the room or the hall is greater than 9 metres,

Version: D
- 4 -
please consider installing 2 – 3 units to ensure all areas are
covered.
·
Installation:
•Ensure you have set up the wireless function prior to
installing smoke alarm units.
•Refer to (diagram 3) for installation instructions
ensuring unit is safely secured to ceiling using
supplied plugs and screws.
•When the ceiling is slanting, the smoke alarm unit
will need to be installed 50cm away from the highest
ceiling point in the room (see diagram 2).
Warranty Information:
Company warrants to the original consumer. Purchase each
new smoke alarm to be free from defects in material and
workmanship under normal use and service for a period of 3
years from the date of purchase. This warranty does not cover
damage resulting from accident, misuse or abuse or lack of
reasonable care of the product.
In no case shall company be liable for any incidental or
consequential damages for breach of this or any other warranty
express or implied, whatsoever. Please contact Optilife
Safety on the number provided for any warranty issues.
Optilife Australia Pty Ltd
11 Production Drive, Campbellfield VIC 3061
Phone: 1300 634 480
Email: admin@optilifesafety.com.au
Diagram 1
Diagram 2
Diagram 3
Popular Smoke Alarm manuals by other brands

System Sensor
System Sensor 2151 Installation and maintenance instructions

pyrexx
pyrexx PX-1C Operating, installation and maintenance manual

DAITEM
DAITEM SH151AX 3 installation manual

LST
LST GD-55000-122 Specification sheet

Siterwell
Siterwell GS508C user manual

AJAX
AJAX FireProtect 2 RB Heat Jeweller manual