Optima Lighting Matrix DMX PRO+ User manual

DMXPRO+
4CH
DMX
DIMMER PACK
USER'S
MANUAL
OUTPUT:
5Aleh,TOTAL
15AMax
www
.OplimaLighting.com
MODE
CHASE
Manual-G
Manual-H
DMXPro+
4CH.DMXDIMMERPACK
l CH 2CH 3CH 4CH
o0 0 0
LIGHTING
IN£::.
Cop
yright
©Optima
Li
ght
ing. Inc. Allrights reserved.

Thank you for purchasing
the
Opfima
Lighfing 4
channel
DMX
dimmer
pack.
To ensure
a
durable
and
consistent
performance
of this
product,
please
read
these
operating
instrucfions carefully
and
familiarize yourself with
the
basic operations.
This
unit has
been
tested
at
the
factory
prior to shipping.
PRODUCT
FEATURES:
• 3 pin
XLR
female
and
male
connectors
for DMX
control
•One,
two
or four
channel
configuration
option
Dimming or switching setting of
any
channel
in DMX or
manual
mode
Digital display for easy setting
and
control
•
Double
output
11
Ov
grounded
outlet
per
channel
16built in preset programs
• Music
mode
with sound sensitivity
knob
• Full
manual
control
over
each
channel
in DMX or
manual
mode
120v 60Hz/ 230v 50Hzswitch
Rope light
connection
output
• On / off
main
power
switch
CAUTION:
There are no user serviceable parts inside. Do
not
attempt
any
repairs yourself. Doing so will void
the
manufacturer's
warranty.
In
the
unlikely
event
your
unit
may
require service, please
contact
the
manufacturer
or
the
dealer
you
purchase
the
unit from.
FUNCTIONS
AND
CONTROLS
www.OptimaLighting.com
2
Copyright
©Optima
Lighting, Inc. All rights reserved.

OUTPUT:
SAleh,TOTAL
15AMax
-
1--1
DJllXAu+
4CH.DMXDIMMERPACK
MODE
ollx
CHA8E
MEIU
Add
..
u
Channell
Cl-C4
Program
8plld
Dimmer
DI.PLAy
......
A001-A512
CH:Ol-02lM
SwltohILlnur
P:Ol-P:15
8P:01-8P:88
dOOO·dl00
lCH
o
2CH
o
SCH
o
4CH
o
--++2
FF/ON
dOOO·dl00
FF/ON
"anull-e
.......
·H
EO
Cl-C4
Hl-H4
S~~~'-I
1=
~
H-
-P
~
Low Hlgll
---++-3
00
0
000
.PTI"~Jt
I
0000
"ODE "ENU ....
'"
456789 10
11
12
-E==========
www.OptimaLighting.com
Copyright
©Optima
Lighting. Inc. All rights reserved.
3

1. 110v
grounded
outlets
2.
Green
LED
Indicators: Indicators will illuminate
when
corresponding
channel
is
activated.
3. LCD Display:
This
multifunction
will display the setting
and
running
mode
of
the
unit.
4. 11OV/220V Switch:
Make
sure the switch is set to the
proper
voltage
setting prior
to
connecting
your
unit to
the
main
power
and
turning it on.
S. Built-In
microphone
for sound
control
6.
Audio
Sensitivity
7.
Mode
Button:
This
button
will switch the unit
between
"A"
DMX
mode
"P"
program
mode
"C"
manual
mode
(dimming)
and
"H"
manual
mode
(switching)
8. MENU Button:
This
button
will
activate
different
functions in DMX
mode,
program
mode
or
manual
mode.
9. ... Button:
This
button
will increase
the
value
of
the
function
you
are
controlling.
10.TButton:
This
button
will
decrease
the
value
of
the
function
you
are
controlling.
11.Power Cord:
Make
sure
the
unit is set to the
proper
voltage
setting prior to
connecting
your
unit to
the
main
power
and
turning it on.
12.Power Switch:
This
switch controls
the
unit's
main
power.
13.DMX Input:
This
connector
allows the
input
of DMX
control
signal.
14.DMX Output:
This
connector
allows
the
output
of DMX
control
signal to
the
next
DMX
device.
1S.
ROPE
LIGHT
Connector
16.Fuse: F
5A
250V 5X20mmX4PCS
OPERATION
The unit has four working
modes:
1. DMX
mode
as a single
channel.
two
channel
or four
channel
Dimmer
or
switching pack.LED next to A will
be
on.
2.
4-channel
chaser
in
auto
mode
or music
mode.
LED
next to Pwill
be
on.
3.
Manual
dimming
of
any
channel
.LED
next to C will
be
on.
4.
Manual
ON
and
OFFof
any
channel.LED next to H will
be
on.
POWER
SUPPLY
Before
plugging
your unit to
the
main
power
please
make
sure
the
source
voltage
in
your
area
matches
the
required
voltage
for
your
device.
Because line
voltage
may
vary
from
venue
to
venue,
4
www.OptimaLighting.com
Copyright
©Optima
Lighting. Inc. All rights reserved.

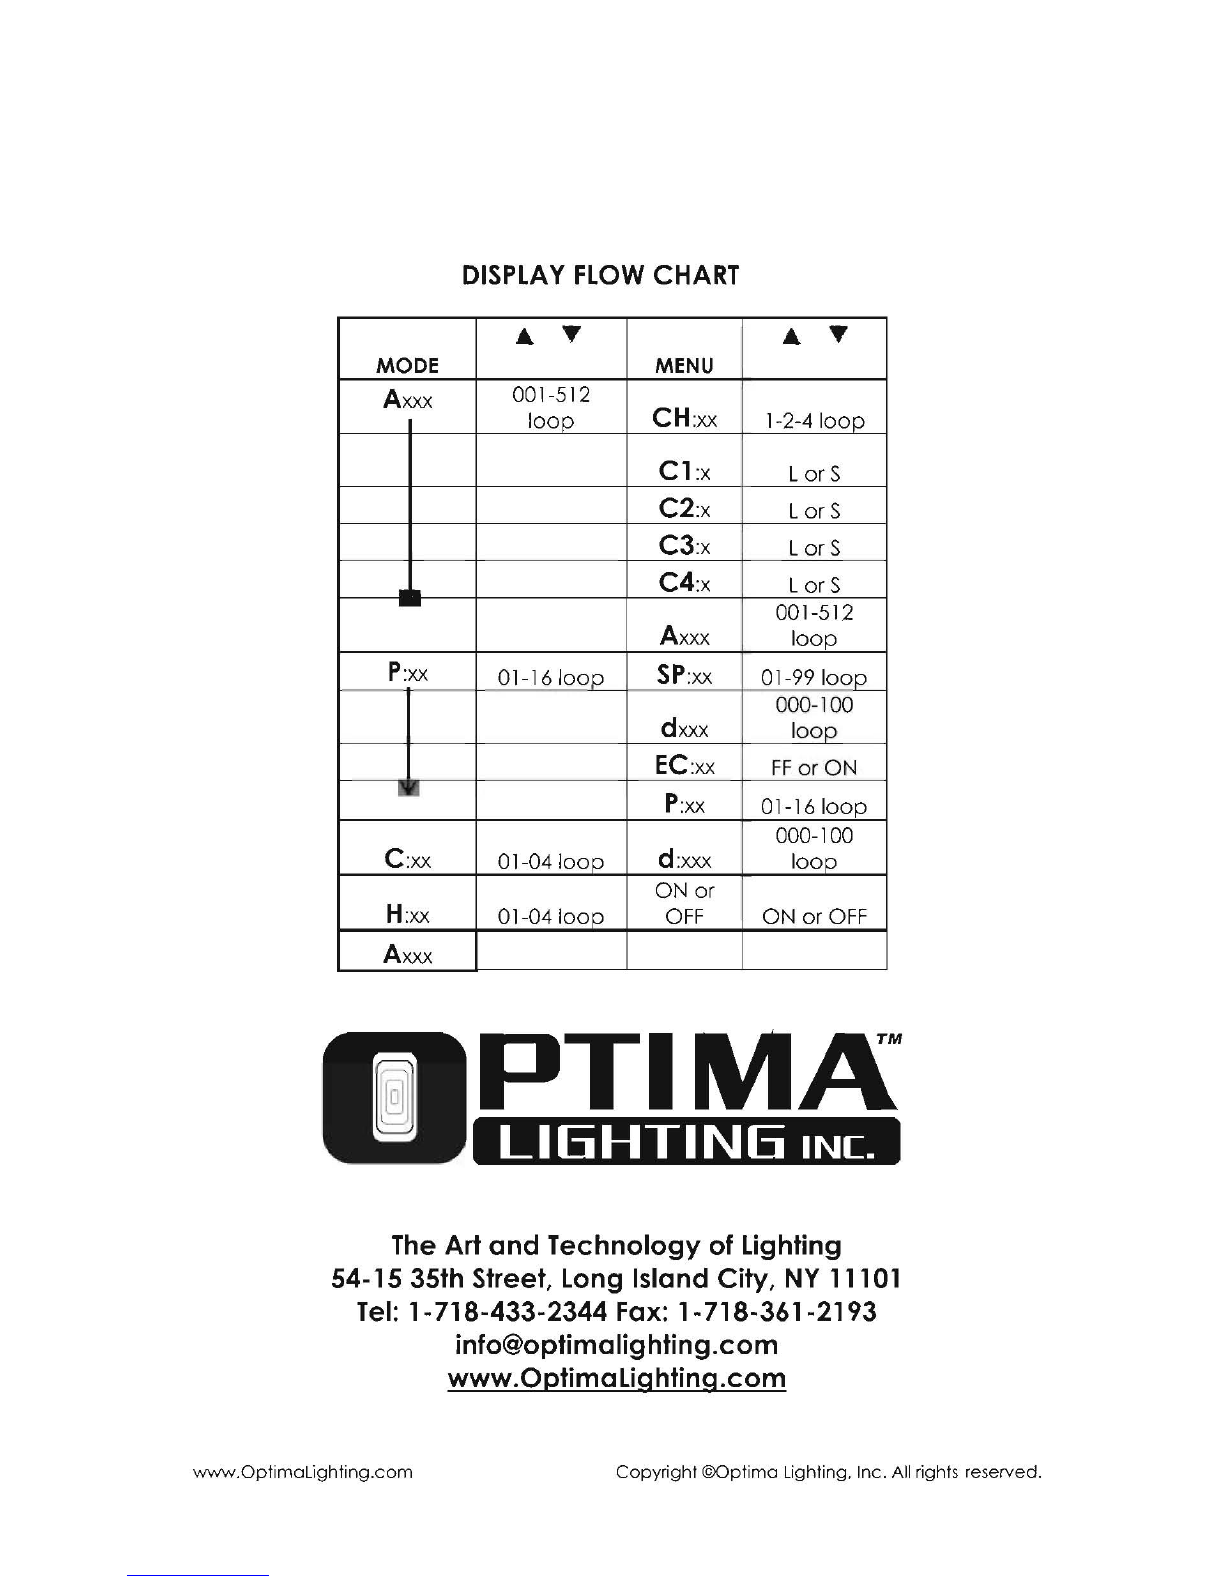
DMX MODE A 001 -512:
{The
LED
next
to
the
letter "A" on
the
display
willturn
ON)
In this
mode
you will be
able
to use your
pack
as a DMX
dimmer
or switching
pack.
This
function
will
allow
you to turn ON / OFFor
control
the intensity ofanon-DMX fixture with
the use of a DMX controller. You are
able
to set your
dimmer
/switching
pack
to
function
as a 1,2, or 4
channel
DMX
pack,
which
means you
can
combine
the
output
functions.
DMX
Operation
1.
Connect
a DMX controller to your
dimmer
pack
via the 3-pin
XLR
connector.
2.
Connect
your lighting fixture to
any
of the four
power
sockets on the front of the
pack.
3.
Decide
if you are
going
to use your
dimmer
pack
as 1,2, or 4
channel
pack.
This
function allows you to:
a. CH:Ol Controls the
output
to all four outlets with
one
DMX
channel.
b. CH:02
Group
outlet
channels
one
and
two
and
channels three
and
four.
The first
group
will be
controlled
by
one
DMX
channel
and
the
second
group
by
another;
this gives the
pack
a DMX
value
of
two.
c. CH:04
This
isthe
default
setting. Each
channel
is
controlled
by a individual
DMX
channel
(all channels are set to
dimming
mode).
4. To
change
the
packs
function
mode,
be sure you are in DMX
mode
Axxx.
Click
the
MENU
button
to select
"CH"
followed
by
two
digits. Then use the
.&.
or T
buttons to
change
the setting from 01,02, or 04. To exit this
"CH"
mode
click the
MENU
button
5 times, you will return to the address
mode
Axxx.
5. The
dimmer
pack
isinitially set to be
activated
by DMX address
one
(A001). To
change
this setting
make
sure you are in DMX
mode,
this will
be
indicated
by an
"A"
character
in the LCD
followed
by three numbers. Usethe.&. orT buttons to
select your desired DMX address
(AOO
1-A512).
6.
Remember
the DMX address tells your DMX controller
what
channel
will
activate
the
pack's
functions.
7. Your
pack
is
ready
to
operate
via DMX
and
the
LED
next to the "DMX signal" will
blink.
8. You are
able
to
change
the
function
of
each
channel
to be
dimming
or
switching regardless of the
mode
your
pack
isset to (CH:01, CH:02 or CH:04).
9. To
change
the
channel
to
dimming
or switching in DMX
mode
you will
need
to
push the
MENU
button
twice
so your display will show
Cl:5
or L.At this
time
you
are at the setting of
channell
where
5=switching
and
L=
dimming.
To
change
the setting of this
channel
just push the.&. or T
button.
To
go
to next
channel
push the
MENU
button.
The display will show the next
channel
C2:x. Click the
.&.
and
T
button
to
change
your setting.
Once
you
reach
C4
click
the
MENU
button
you will return to the
main
DMX
mode
Axxx.
Kee
p-
in mind that if
y.
ou
leave
y'our Rack in any'of the sub menu categories for more
www.OptimaLighting.com
Copyright
©Optima
Lighting. Inc. All rights reserved.
5

than 30 seconds the Rack willautomatically return to the main menu Axxx.
CHASE
MODE
uP"
01 -16
{The
LED
next
to
the
letter "P" on
the
display
willturn
ON}
Choose
this
mode
only
when
you
want
the
device
to
act
as a
4-channel
chaser.
This
device
has 16 built-in programs. You
can
select to run
any
of these
programs
and
control
the
chase
speed
(SP:01-99),
the
light
output
(dOOO-lOO)
dimming
or music
mode
(Ee:
FF
or ON).
1.
Connect
your
lighting fixture to
any
of
the
four
channel
power
sockets on
the
pack.
Keep in
mind
that
if you
connect
lights on the
same
channel
they
will turn
on
at
the
same
time.
2. Use
the
MODE
button
to select
chase
mode:
Chase
mode
is
indicated
on LCD
display as "P"
followed
by numbers 01-16. "P" stands for Program
Applied.
If
an
"A"
appears
in
the
LCD display, you
are
in DMX
mode,
"A"
stands for address.
3.
Once
you
have
selected
the
chase
program,
use
the
MENU
button
to select
your
desired
function:
SP
-
This
function
will
control
the
speed
your
chase
will run,
minimum
01
maximum
99.
d -
This
function
will
control
the
light intensity of
your
program,
000
minimum
100
maximum
(In d
mode
you will
control
the
intensity of all 4
channels
in an
equal
way).
EC-this will set your
program
to music
mode
ON or
automatic
mode
FF.
(In
music
mode
you will
need
to set
the
microphone
sensitivity to
your
preference).
4. You will
be
able
to
change
the
program,
chase
speed,
light intensity or music
mode
setting by selecting
the
up
Aor
down
T
button
(All values will
loop
so
once
you
reach
the
maximum
value
the
next
value
will
be
the
lowest or vise
versa) .
Keep in mind that if you
leave
your
pack
in any of the sub menu categories for more
than 30 seconds the
J:1ack
willautomatically,return to the main menu P:xx.
www.OptimaLighting.com
Copyright
©Optima
Lighting. Inc. All rights reserved.

Manual
dimming
mode
C:Ol-04:
(The
LED
next
to the letter "C" on
the
display
will turn
ON)
In this
mode
you will
be
able
to dim
any
of the 4 channels manually. Click
the
MODE
button
until you
get
to the
"C"
mode.
Select the
channel
you
would
like
to
control
by clicking
the"
or T
button.
Once
you
reach
the
desired
channel
click
the
MENU
button
and
the
display will show
the
current
manual
dimming
value
for
the
selected
channel
dxxx.
Push
the
..
or Tto
change
the intensity of the light
connected
to this
channel.
Keep in
mind
that
you
will be
able
to
loop
thru the
value
000 - 100just
by
holding
or clicking
the..
or T
button.
Once
you
are
in
the
dxxx
mode
and
would
like to
control
your
next
channel,
click
the
MENU
button.
That will
get
you
back
to the
C:xx
mode.
Select the
desired
channel
with
the"
or T
button
and
then
click the
MENU
button
that
will
bring you to the
dxxx
mode
and
you will
be
able
to
control
the
light intensity.
Ifyou do not
change
any value in the
dxxx
mode
for more than 30 seconds the
unitwill return to the main menu C:xx
Manual
ON /
OFF
mode
H:Ol-04:
(The
LED
next
to the letter "H" on the
display
will turn
ON)
In this
mode
you will
be
able
to turn
any
of
the
channels ON
and
OFFmanually.
Click the
mode
button
until you
get
to
the
"H"
mode:
select the
channel
you
would
like to
control
by clicking
the"
orT
button.
Once
you
reach
the
desired
channel.
click the
menu
button
and
the
display will show the current
mode
for
the
selected
channel
H:On or
H:OFF.
To
control
the
light
connected
to
that
channel.
click
the"
button
to turn it ON or the T
button
to turn it Off.
Once
you
are
in the ON or OFF
mode
and
would
like to
control
your
next
channel.
just click
the
menu
button
and
you will
be
back
at
the
channel
control
mode
H:xx.
If you do not change any value In the ON or OFF
mode
for more than 30 seconds
the unitwillreturnto the main menu
H:xx
Toexit
back
to the DMX
mode
just click the
mode
button.
www.OptimaLighting.com
Copyright
©Optima
Lighting. Inc. All rights reserved.
7

DISPLAY
FLOWCHART
•T•T
MODE
MENU
Axxx
001-512
loop
CH:xx
1-2-4
loop
C1:x
Lor
S
C2:x
Lor
S
C3:x
Lor
S
C4:x
Lor
S
001-512
Axxx
loop
P:xx
01-161000
SP:xx
01-991000
000-100
dxxx
loop
EC:xx
FF
or ON
II
P:xx
01-16100p
000-100
C:xx
01-04
loop
d:xxx
loop
ON or
H:xx
01-04
loop
OFF ON or OFF
Axxx
LIElHTINElINE.
The Art
and
Technology of Lighting
54-15 35th Street, Long Island City, NY 11101
Tel:
1-718-433-2344
Fax:
1-718-361-2193
www.OptimaLighting.com
Copyright
©Optima
Lighting, Inc. All rights reserved.
Table of contents
Popular Lighting Equipment manuals by other brands

LED Group
LED Group Robus R8MTS instructions

Armacost Lighting
Armacost Lighting RibbonFlex Home 421501 quick start guide

Vision & Control
Vision & Control LDLF60x600-G525/UDC Instructions for use

EuroLite
EuroLite TSL-100 LED Scan 20W LED-Scanner user manual

Photonic
Photonic ATO ML 600 B Operation and installation instruction

PR Lighting
PR Lighting XR130 Beam instruction manual

Griven
Griven Full Moon W user manual

PROLiNK
PROLiNK DS-3605 Quick installation guide

Star Headlight & Lantern
Star Headlight & Lantern Star Mini Phantom ULB9LDC Series operating manual

lumishore
lumishore Curved 20 installation manual

Lightolier
Lightolier FBP30 operating instructions

Saxby Lighting
Saxby Lighting 46393 Instruction leaflet