Optoma WPS Pro User manual

WPS Pro
User manual

2
Table of Contents
1 Overview.............................................................................................................................................................4
2 Package Contents...............................................................................................................................................5
3 USB Token Contents...........................................................................................................................................5
4 Physical Details...................................................................................................................................................5
5What You Might Need..........................................................................................................................................6
6 Quick Installation.................................................................................................................................................7
7 WPS Start/Standby Page....................................................................................................................................8
7.1 Quick Guide / User-List......................................................................................................................................8
7.2 Screen Saver......................................................................................................................................................8
8DoWiFi for Windows............................................................................................................................................9
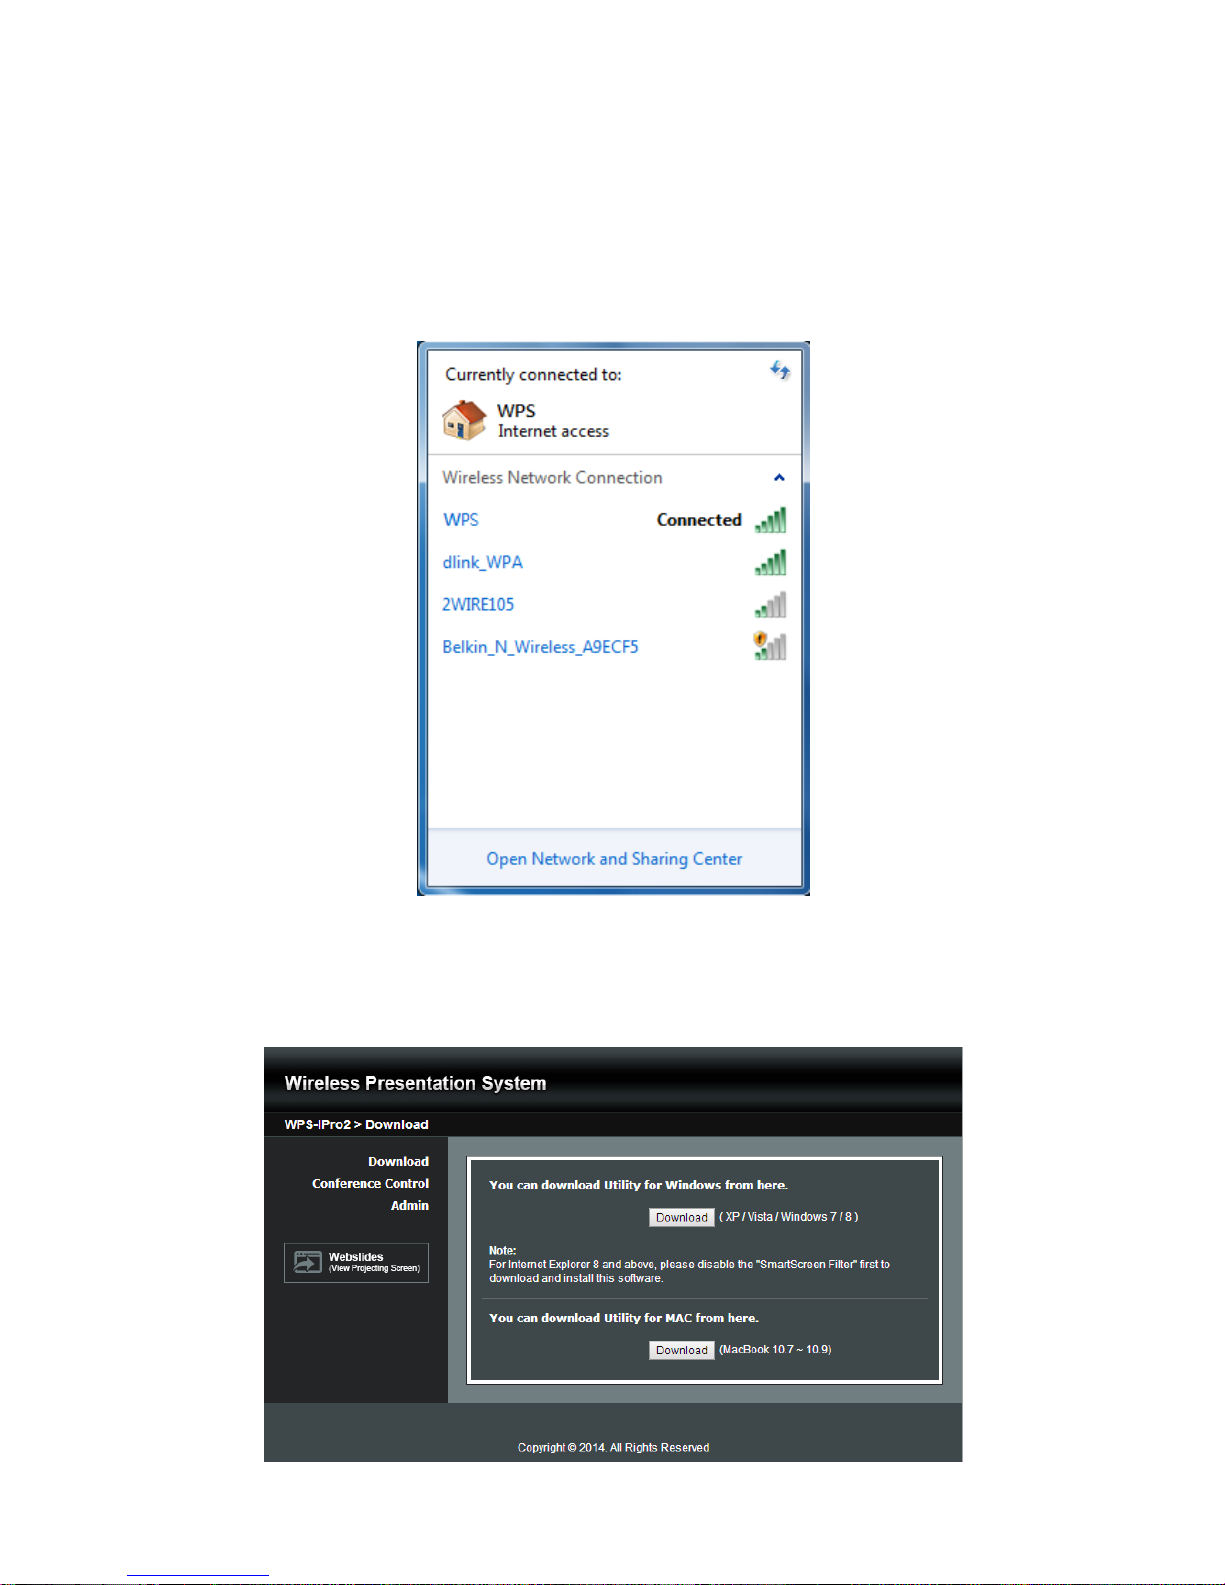
8.1 Install the application..........................................................................................................................................9
8.2 Start the application..........................................................................................................................................10
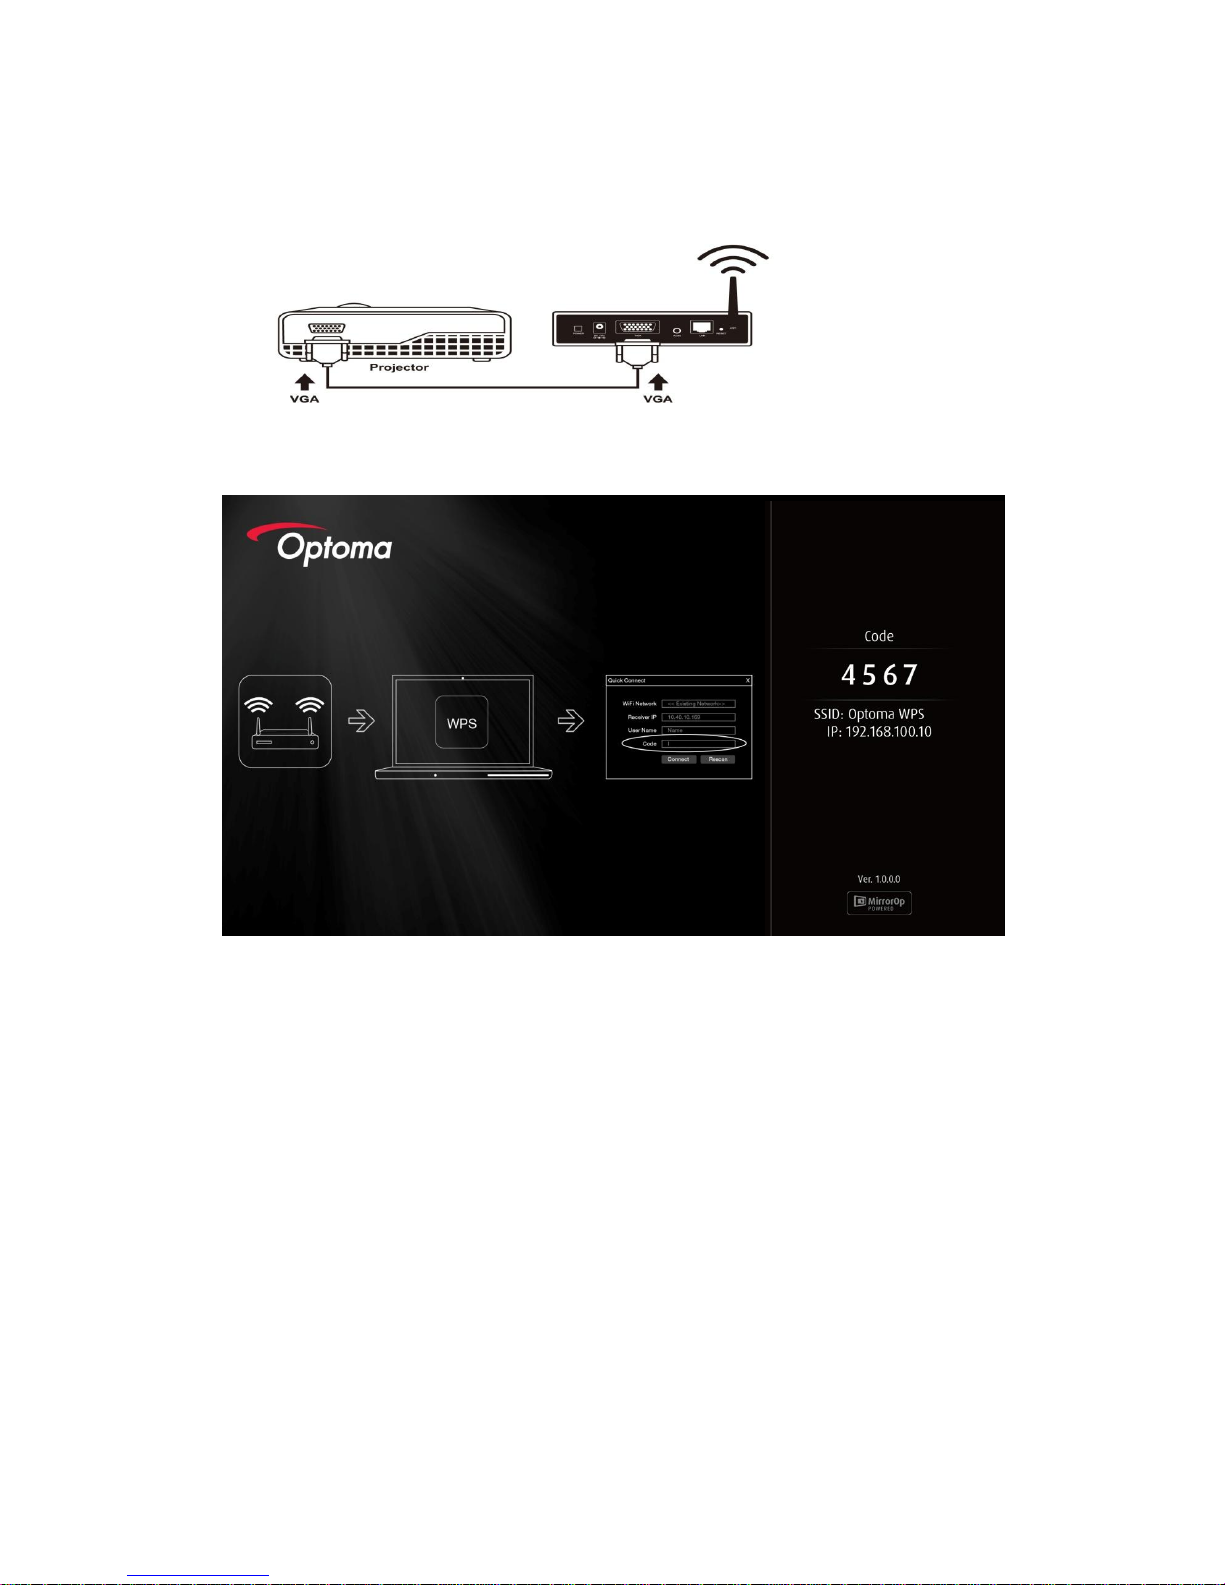
8.3 Quick Connect..................................................................................................................................................10
8.4 Connect to WiFi Network..................................................................................................................................11
8.5 Connect to Receiver Device.............................................................................................................................12
8.6 Login.................................................................................................................................................................13
8.7 Main User Interface..........................................................................................................................................13
8.8 Screen Projection.............................................................................................................................................13
8.9 Login code........................................................................................................................................................14
8.10 Menu .............................................................................................................................................................14
8.10.1 Show Receiver Information.........................................................................................................................15
8.10.2 Web Admin..................................................................................................................................................15
8.10.3 Search Receiver Device..............................................................................................................................15
8.10.4 Launch SidePad..........................................................................................................................................16
8.10.5 Launch WebSlides ......................................................................................................................................17
8.10.6 Select Projection Desktop...........................................................................................................................18
8.10.7 Projection Quality........................................................................................................................................18
8.10.8 Projection Mode ..........................................................................................................................................19
8.10.9 Resolution Settings .....................................................................................................................................19
8.10.10 Projection Aspect Ratio...............................................................................................................................19
8.10.11 Enable USB IWB Bridge..............................................................................................................................19
8.10.12 Advanced Screen Capture..........................................................................................................................19
8.10.13 Send Audio to Display.................................................................................................................................20
8.10.14 Auto Power Manager ..................................................................................................................................20
8.10.15 Auto WiFi Connect......................................................................................................................................20
8.10.16 Make WPS Token........................................................................................................................................21
8.10.17 Copy Application to desktop........................................................................................................................21
8.10.18 Hot Key ....................................................................................................................................................21
8.10.19 About .....................................................................................................................................................21
8.10.20 Exit ...................................................................................................................................................213
9DoWiFi for Mac ..................................................................................................................................................23
9.1 Install the application.......................................................................................................................................23
9.2 Start the application..........................................................................................................................................23
9.3 Quick Connect..................................................................................................................................................24
9.4 Connect to WiFi Network..................................................................................................................................24
9.5 Connect to Receiver Device.............................................................................................................................26
9.6 Login.................................................................................................................................................................26
9.7 Main User Interface..........................................................................................................................................27
9.8 Screen Projection.............................................................................................................................................27
9.9 Login code........................................................................................................................................................28

3
9.10 Menu .............................................................................................................................................................28
9.10.1 Show Receiver Information.........................................................................................................................29
9.10.2 Web Admin..................................................................................................................................................29
9.10.3 Search Receiver Device..............................................................................................................................29
9.10.4 Launch SidePad..........................................................................................................................................29
9.10.5 Launch WebSlides ......................................................................................................................................31
9.10.6 Select Projection Desktop...........................................................................................................................32
9.10.7 Projection Quality........................................................................................................................................32
9.10.8 Select Projection Mode ...............................................................................................................................32
9.10.9 Resolution setting........................................................................................................................................32
9.10.10 Projection Aspect Ratio...............................................................................................................................33
9.10.11 Send Audio to Display.................................................................................................................................33
9.10.12 Auto WiFi Connect......................................................................................................................................33
9.10.13 Hot Key .......................................................................................................................................................33
9.10.14 About...........................................................................................................................................................33
9.10.15 Exit ..............................................................................................................................................................33
10 Web Management...............................................................................................................................................34
10.1 Home Page ....................................................................................................................................................34
10.2 Download ...................................................................................................................................................34
10.3 Conference Control........................................................................................................................................35
10.4 Admin.........................................................................................................................................................36
10.4.1 System Status............................................................................................................................................37
10.4.2 Device Setup..............................................................................................................................................37
10.4.3 Network Setup............................................................................................................................................38
10.4.4 OSD Setup.................................................................................................................................................40
10.4.5 Change Passwords....................................................................................................................................41
10.4.6 Reset to Default .........................................................................................................................................42
10.4.7 Firmware Upgrade .....................................................................................................................................42
10.4.8 WebSlides Setup........................................................................................................................................43
10.4.9 Reboot System...........................................................................................................................................44
10.4.10 Logout ....................................................................................................................................................44
10.5 WebSlides........................................................................................................................................................45
11 Appendices..........................................................................................................................................................46
11.1 Optoma Global Offices.....................................................................................................................................47

4
1 Overview
WPS Pro is professional wireless presentation gateway. By enabling the Revolutionary “interactive” and “wireless”
functions, you can throw your presentations wirelessly from a PC, Mac, iPad, iPhone, or Android devices to a
projector! And use your pad, tab or phone to control your PC/Mac, or view the presenting slides!
WPS Pro Features Highlight:
Icon
Feature
Description
DoWiFi
Wireless presentation for Windows and Mac
Win: XP/Vista/7/8,
Mac: 10.6/10.7/10.8/10.9
Plug&Show
No software installation required. Just plug in the
USB drive to your PC.
MirrorOP Sender for
Galaxy
MirrorOp sender for Samsung Galaxy series
devices Support. Users can project any contents
from their Samsung Galaxy devices.
MirrorOp Presenter
High quality presentation and annotation via
iPhone/iPad or Android devices (Word, Excel,
PPT, PDF , Photo , Browser, Live Camera,
Screenshot)
SidePad
Control the projecting screen on PC or Mac via
iPhone/iPad or Android devices through MirrorOp
Receiver APP.
WebSlides
Broadcast slides to your devices with WiFi and
web browser.
Audience can save the projecting slides for
taking notes.
Webslides can be secured by password.
Quadrant Projection
Project four PC/Mac screens or MirrorOp
Presenter content to one projector/display at
once.
OSD User-List
Control projection from WPS Pro web page, or
use mouse to select a User from the standby
screen.
SNMP Manager
Manage WPS devices across the corporate
network through enhanced SNMP V2 protocol
Basic Features
Wireless screen and audio projection
Remote desktop control feature
Support Windows Win 8, Win7, Vista, XP
Support Mac version 10.7 and above
Plug and Show! No installation required … just plug in the accompanied token to a USB port, and
hassle free presentation can be started in seconds. (Windows)
MirrorOp Presenter Supportive for iOS/Android mobile devices
Up to 30FPS high speed 4-to-1 Split Screen Projection. Turn one projector into four, increase meeting
productivity right away.
Conference control! Allows moderators to streamline grand meetings.
Provide session security login, wireless WEP/WPA/WPA2 key and Gatekeeper function to protect
presentation contents and keep good security to office networks.
Web management including software download and device settings
Support WiFi AP-Client Mode

5
2 Package Contents
WPS Pro Box
WPS Pro USB Token
Power Adapter (DC +5V, 2.6A)
WiFi Antenna x 2
Wall-mount kit
Basic user manual
3 USB Token Contents
Windows Installer (WPS Windows Installer)
Mac Installer (WPS Mac Installer)
VAC Driver (For Windows XP Audio Projection)
VDD Driver (For Windows XP/Vista Virtual Extended Screen)
USBoIP Driver (For IWB feature)
User Manual
WPS Execution File
SVS Driver (For Mac Virtual Extended Screen)
Utility
PtG Converter (For MobiShow PtG function)
SNMP Manager (For SNMP Management)
4 Physical Details
Front Panel
Description
Power LED
LED Indicator: System Loading(Red), Ready(Green)
USB Port (Front)
USB port for USB mouse and keyboard
Power LED
USB Port

6
Rear Panel
Description
Antenna
WiFi Antenna
USB Port (Rear)
USB port for USB IWB device (HID type)
RJ-45
10/100M RJ-45 port
VGA Connector
VGA connector
HDMI
HDMI Connector
Audio Jack
Audio Jack (3.5mm)
Power Jack
Power Jack (5V/2.6A)
Bottom Side
Description
Screw Hole
Screw Hole for Wall Mount Kit
Reset Button
Press reset button and power on the device to execute
Hardware Reset.
5 What You Might Need
Projector or HDTV with VGA/HDMI interface
Windows or Mac PC/Laptop
Apple iPhone, iPad or iPod-touch device
Android Phone or Tablet device
Speaker (Optional, for audio projection feature)
USB Mouse and Keyboard (Optional, for remote desktop feature)
USB HID IWB Device (Optional, for IWB over IP feature)
Reset Button
Screw hole
(Optional kit for Wall Mount)
Power Jack
VGA Connector
RJ-45
Antenna
HDMI
Audio Jack
USB Port

7
6 Quick Installation
1) Connect WPS device to Projector/display through VGA/HDMI port and turn on projector/display power.
2) Connect the power adaptor to WPS device and press the power button to turn on WPS device. System will be
ready when the LED light turns to green.
It will show the default standby screen as below when system is ready.
3) Insert the speaker cable to WPS Pro audio jack for audio output if needed.
4) Insert the USB mouse or keyboard to WPS Pro front/rear USB port for On-Screen Display (OSD) control.
(Optional)
5) Insert the USB IWB/Touch Screen cable to WPS Pro rear USB port for IWB remote touch control if needed.
(Please noted that the front 2 USB ports do not support UoIP function).

8
7 WPS Start/Standby Page
7.1 Quick Guide / User-List
1) Connect WPS Pro device to Projector/Display through VGA/HDMI port and turn on Projector/Display power.
2) It will show the Quick Guide Information, WiFi Network Name, IPAddress and Code on standby screen.
3) If there is sender connected to WPS Pro device, it will show the User-List on standby screen, conference
moderator can use the USB mouse to select the User and control it remotely.
7.2 Screen Saver
4) System will enter the Screen Saver mode if none is connected, it will restore to standby status immediately
when there is any sender connected.
1Alan’s PC
2Chris android Pad
3Dave’s iPhone
4Edison Macbool
5Kishan’s Tablet

9
8 DoWiFi for Windows
(Do Not Support Windows Phone, Windows RT)
8.1 Install the application
1) Make sure your PC WiFi is enabled already, and connect your PC to WPS box through WiFi. You can find the
WiFi name of your WPS box information on the start/standby page.
2) Launch your browser and enter the Device Host Name (SSID) or IP address in the browser. You can find the IP
address and Host Name (SSID) on the projector/display screen. (Default Host Name (SSID) is WPS, Default
IP is 192.168.100.10)
3) Download the WPS software for “XP/Vista/Windows 7 / 8” and install on your PC. (Ps. You can also launch
the application from USB token directly.)

10
4) When the download is completed, follow the WPS Setup wizard to execute the software.
(Make sure your Wifi have connected to WPS and your PC’s personal firewall allows WPS software to
pass through.)
8.2 Start the application
1) Click WPS icon on desktop to execute the application, or launch the application from USB token
directly. (You can find the WPS-IPro2.exe under WPS-IPro2 folder).
2) It will start to search WPS receiver automatically.
8.3 Quick Connect
1) WPS will memorize the last successful connection profile and open the quick connect dialog, you can enter the
code (you can find the information on the standby screen or start screen) and press the “Connect” button to
connect this WPS directly.

11
2) If you want to connect to another WPS receiver, please press the “Rescan” button.
8.4 Connect to WiFi Network
1) WPS application will search the available WiFi Network and list the WPS WiFi Device. You can select a network
and press the “Connect” button to connect the selected WiFi Device.
2) You can press the “Refresh” button to search again or press the “All” button to list all available WiFi Network
name.
192.168.100.10

12
3) If you don’t like to change the WiFi Network and want to keep the connection to current network, you can press
the “Skip” button.
8.5 Connect to Receiver Device
1) WPS application will search and list the WPS receiver Device. You can select the target receiver device and
press “OK” button to connect the selected receiver device.
2) You can press the “Refresh” button to search again.
3) If you can’t find the target receiver device from the list, you can press the “Manual” button to enter the receiver IP
address manually and connect.

13
8.6 Login
1) When connecting to a “Code” protection enabled WPS receiver, you have to enter the “Code” and press the
“Connect” button to login the receiver.
(You can find the CODE from the OSD standby screen or right-upper corner of start screen)
(Enter the code into the circled area)
2) If you want to connect to another receiver or cancel the login, please press the “Cancel” button.
8.7 Main User Interface
8.8 Screen Projection
1) Click the “Play” button for full or “1,2,3,4” for split screen projection, you can project the main screen on to the
display immediately. Click the “Pause” button, you can freeze you projection screen, and click the “Stop” button
to stop projecting your screen.
Control Area for Screen
Projection Feature
Menu
Status Indicator
Login Code
Minimize the
window
Close the window

14
Button
Description
Full Screen projection (Support audio projection)
Project to Split #1 (Support audio projection)
Project to Split #2 (No audio projection)
Project to Split #3(No audio projection)
Project to Split #4(No audio projection)
Stop projecting
Pause projecting
Enable the Magnifier function
Note:
When projecting in full screen projection, if another user is clicking on the play button, the new user’s screen
will replace the previous user’s screen for projection.
When projecting in Quad view mode, if another user is clicking on the selected screen button(#1, #2 , #3, #4 ), the
new user’s screen will replace the previous user’s screen for projection.
8.9 Login code
Press on the login code, you can find the device IP address, SSID name and login code on the right of sidebar. The
information will disappear after 30 seconds. When there are other users trying to login to the device, the information
will pop up automatically for seconds and disappear again as well.
8.10 Menu
1) Press “Menu” button from the main UI, you will find the menu to enable the additional feature or to change the
application options.

15
2) You can click on the below function for extending menu to choose one to suit your needs.
Function
Select Projection Desktop
Projection Quality
Projection Mode
Resolution Setting
Projection Aspect Ratio
3) The below items are checked as default setting. You can uncheck them to suit your needs.
Item
Advanced Screen Capture
Send Audio to Display
Auto Power Management
Auto WiFi Connect
8.10.1 Show Receiver Information
1) Click on “Show Receiver Information”, it will display the Receiver Information, such as WiFi Name, IP Address
and code on the upper corners of the projecting screen, and it will close automatically after 30 seconds.
8.10.2 Web Admin
1) Click on “Web Admin”, it will open the browser and connect to the receiver web admin page automatically.
(You can find more details of web admin page in Chapter 10-Web Management.)
8.10.3 Search Receiver Device
1) Click on “Search Receiver Device”, it will disconnect from current receiver and search the receiver again.

16
8.10.4 Launch SidePad
1) Introduction: MirrorOp Receiver is an application to allow the user to connect Pad/Smartphone (Android and
iOS), PC, and display/projector via WPS device. User can then control the projecting PC via Pad/Smartphone.
Please refer to the below image for more information.
2) MirrorOp Receiver Control for Android/iOS device.
Android: Download “MirrorOp Receiver” from Google Play Store
iOS: Download “MirrorOp Receiver” from Apple Store.
Connect your Android/iOS device to WPS device through WiFi and Launch “MirrorOp Receiver”
Click on “Launch SidePad” from the menu. In seconds, you shall see the PC desktop shown on the
iOS/Andriod Device. Now you can control the projecting PC from your iOS/Android device.

17
3) If there is no Smartphone/Pad device detected after clicking on “Launch SidePad” the below image will
show up.
8.10.5 Launch WebSlides
Introduction:Webslides is an application to allow the user/presenter to broadcast the projecting screen/slides
to allow multiple login users to receive the slides during a presentation and save the slides for note taking later.
Note: Webslides is not available when Quad view is in use.
1) Presenter: Make sure your PC/Mac is connected to WPS box and click on “Launch Webslides”, when the
function is on, the item will be checked on the main menu.
2) Audience: Users need to connect to WPS WiFi Network as the presenter and then launch their browser and
enter WPS IP address (The information can be found on the projecting screen) on the URL of browser. Once the
users are connected, they will see the below image on their devices. Click on “Websildes” button. See below:
3) Start to receive the presenter’s slides. The below image can be seen on the audience’s browser.

18
Users can put the mouse/finger on each button to get the “tip window” for the function of each button.
Note:
The WPS logged-in user is not identical to WebSlides user, and they both consume the wireless bandwidth for
device connection. If there are more than 10 users logged into WPS, it is recommended to connect WPS to
company network through Ethernet or bridge WPS to a router due to wireless bandwidth concern. User should
connect WPS via company network or router in order to secure the projection performance. The WebSlides user
number should not exceed the recommended number on the web management page to prevent the connection
failure or low projection performance.
PS. Wireless Projection function and Conference Control function can support up to 64 users.
8.10.6 Select Projection Desktop
1) Click on “Select Projection Desktop”, you can select to project the main screen or the extended screen.
Note:1. For Windows XP system, you need to install “VDD.exe” driver first, you can find it from USB token.
2. For Windows 7/Vista Starter edition, it can’t support extended screen.
3. For some Win7/Win8 laptop/tablet, the extended screen feature is not supported if the display card
can’t support the extended screen function. This typically can be verified by checking whether it can
enable the extended screen through physical VGA cable, if yes, then it should work with WPS
software.
8.10.7 Projection Quality
1) Click on “Projection Quality”, choose “Normal” for faster projection speed with lower screen image quality, and
“Best” for clear screen image quality but slower projection speed.

19
8.10.8 Projection Mode
1) Click on “Select Projection Mode”, choose the Presentation mode for shortest latency or the Video mode for
auto-latency control to have better video performance.
8.10.9 Resolution Settings
1) Click on “Resolution Setting”, choose “Never Change” to keep original desktop resolution, “Always Change” to
change resolution automatically according to application’s recommendation, or “Always ask me” to prompt a
resolution change message to user.
8.10.10 Projection Aspect Ratio
1) Click on “Projection Aspect Ratio”, choose “Keep aspect ratio” to keep the original aspect ratio if the desktop
resolution is different from WPS output resolution, or choose “Fit full screen” to project the screen to full screen.
8.10.11 Enable USB IWB Bridge
1) Click on “Enable USB IWB Bridge”, it will enable the USB IWB Bridge feature.
2) When you start the full screen projection, it will bridge the IWB device to your PC wirelessly.
Note: You have to install the USBoIP driver first. You can find the driver from USB token.
8.10.12 Advanced Screen Capture
1) Click the “Advanced Screen Capture”, you will be able to see tip windows and other layered windows (include
the main UI) on the connected display.
However, the mouse cursor may blink from time to time when you are projecting your PC screen!
Disable “Advanced Screen Capture”.

20
Enable “Advanced Screen Capture”.
8.10.13 Send Audio to Display
1) Click on “Send Audio to Display” to start the audio projection feature. It will mute your local speaker during the
projection and restore it when it closes the application. The audio will be bridged to your display device.
Note: For Windows XP system, if you can’t hear the audio, please installs the Audio driver (“VAC.exe”, Virtual
Audio Control Driver) on your computer first, you can find the software from USB Token.
(Windows Vista, Win7 and Win8 is not necessary to install VAC driver)
8.10.14 Auto Power Manager
1) To make the highest projection performance, application will turn the PC’s windows power scheme from current
settings to “highest performance”, however, you can click on “Auto Power Manage” to enable or disable this
function and restore you power scheme immediately.
2)
8.10.15 Auto WiFi Connect
1) Click on “Auto WiFi Connect” to enable the WPS WiFi connection automatically.
Tip windows is shown in
projector
Tip windows is not
shown in projector
Table of contents