manuals.online logo
Brands
  1. Home
  2. •
  3. Brands
  4. •
  5. optonica
  6. •
  7. Accessories
  8. •
  9. optonica 7306 MINI User manual

optonica 7306 MINI User manual

7306, 7307
MINI
www.OPTONICALED.com
Thank you for purchasing 7306, 7307 Infrared motion sensor!
This product adopts high sensitivity detector, integrate circuit
and SMT; It combinesautomation, convenience, safety and
energy-efficiency; It has wide detection range made up of up and
down, left and right service field; It utilizes motion infrared rays as
control signal sources so that if a movement is detected within the
operations field, it will set the controlled load; It can identify day
and night automatically; It is easy to install with wide use
applications; It has the function of power indication anddetection indication.
SPECIFICATION:
Power Source: 220V/AC-240V/AC Detection Range:180º
Power Frequency: 50-60Hz Working Temperature: -20~+40
℃
Ambient Light: 10-2000LUX (adjustable) Working Humidity: <93%RH
Time-Delay: min: 10sec±3sec Installation Height: 1.8m~2.5m
Max: 7min±2min Power Consumption: 0.9W (work)
Rated Load: 800W (incandescent lamp) 0.9W (static)
400W (energy-saving lamp) Detection Moving Speed: 0.6~1.5m/s
Detection Distance: 12m max (<24
℃
)
FUNCTION:

Detection field: The wide detection range is made up of up anddown, left and right, the
detection range could be adjusted according to your preferences, however please note that
the moving orientation of the detection field is corelated to the sensitivity.

Identify dayand night automatically: The ambient light could be adjusted according to your
desire: when turn to SUN (max), it will work dayand night, when turn it to MOON (min), it will
only work in the ambient light less than 10LUX. As for adjustment, please refer to testing
way.

Time-delay is added continually: When it receives the second induction signals after the first
induction, it will compute time once more on the rest of the first time-delay basis (set time).

Time-delay is adjustable: It can be set according to yourdesire, the minimum is 10sec±3sec,
and the maximum is 7min±2min.
Good sensitivity Poor sensitivity
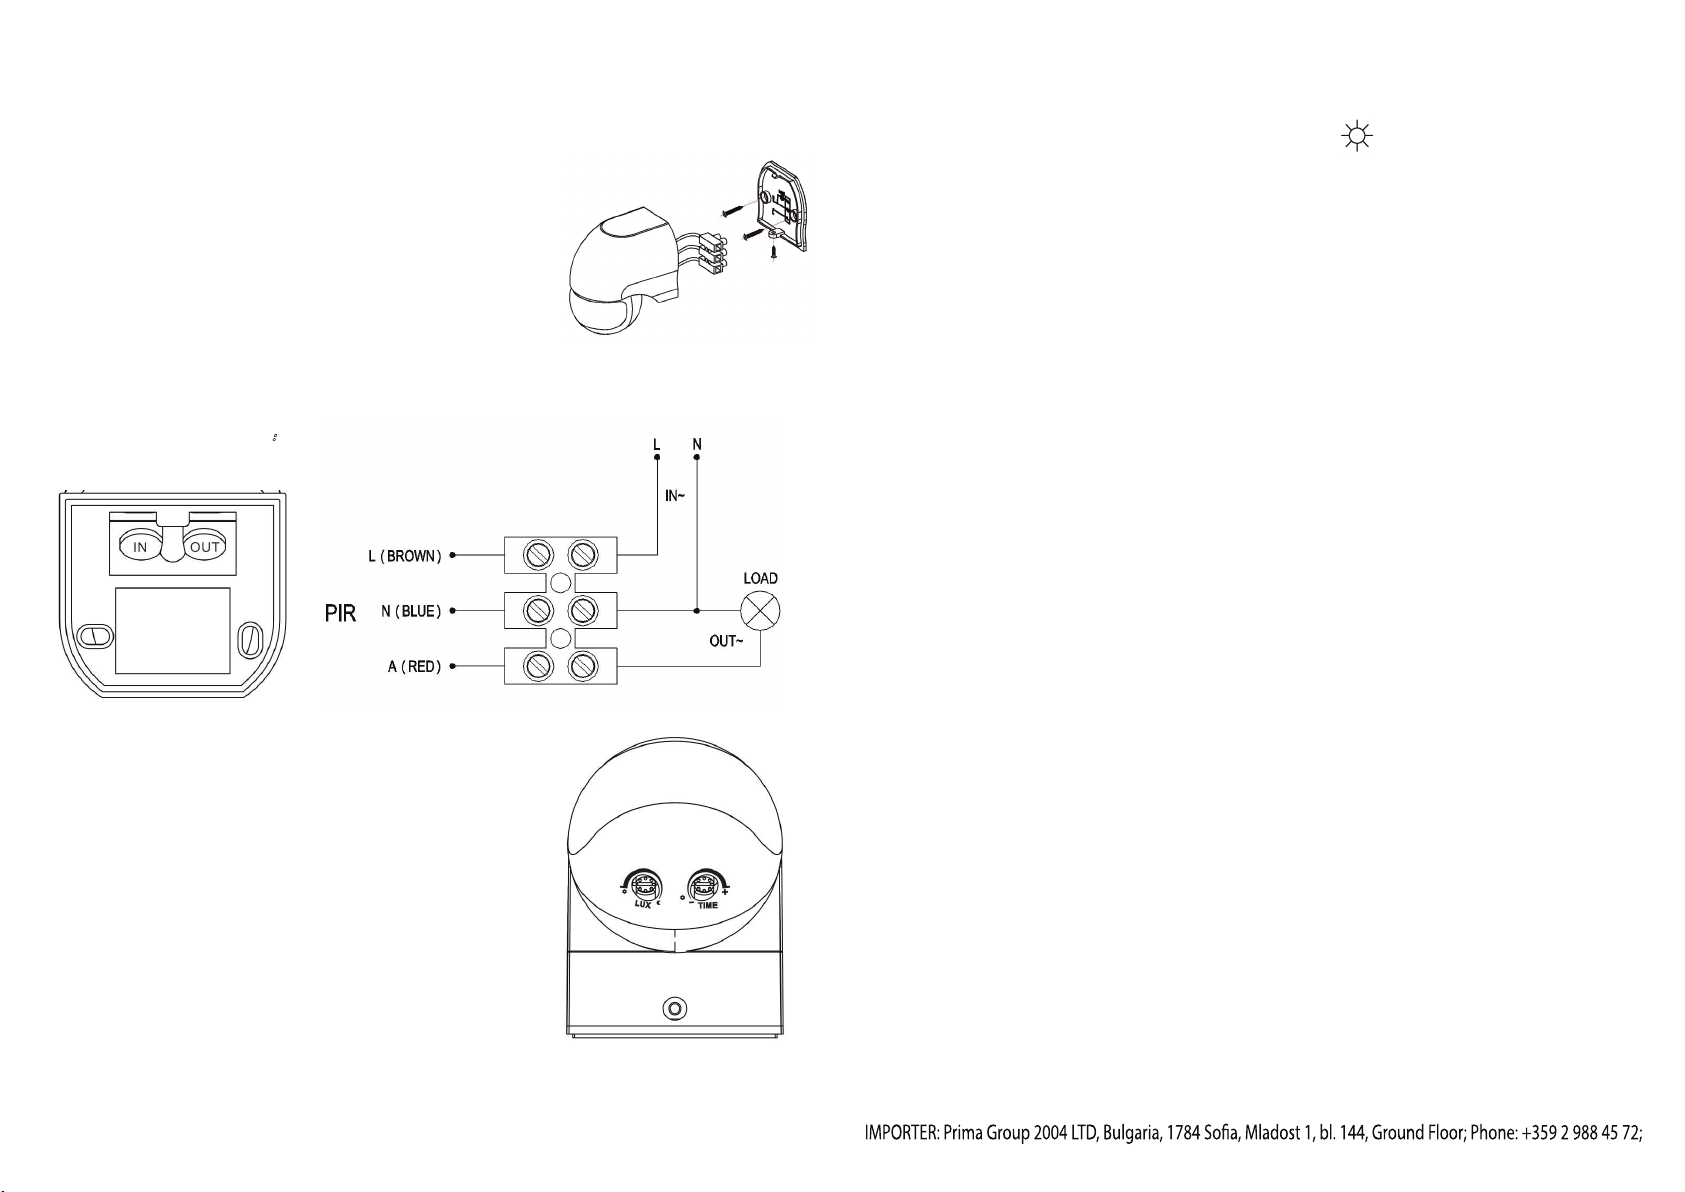
INSTALLATION: (see the diagram)

Shut off power.

Loosen the screw on the bottom lid, open the wiring
terminal, pass the wire of power and load through the
bottom lid.

Fix the bottom lid with inflated screw on the selected
position.

Connect the power and load wire into connection-wire
terminal according to the connecting figure.

Put the sensor on the bottom lid, twist the screw tightly then switch the power on and test it.
CONNECT-WIRE FIGURE
:
(See the right figure)
TEST:

Turn time knob anti-clockwise to the minimum; turn the
LUX knob clockwise to the maximum (SUN), Switch on
power, the controlled load should not work, needing to
preheat within 5-30sec.

The sensor will commence operating in 5-10 sec when
the first induction is finished; the load should work when
received sensor signal and stop working within 7-13sec
with no any sensor signal.

Turn LUX knob to minimum anti-clockwise, if you test it
when the ambient light is more than 10LUX, the
induction load would not work after the load stops working; the load should work if you cover
the detection screen with opaque object (towel etc),it would be regular the load stops to
work within 7-13sec under no induction signal condition.
Note: when testing in daylight, please turn LUX knob to (SUN) position, otherwise the
sensor lamp could not work!
NOTE:

Should be installed by qualified electrician only.

Avoid installing it on an unstable surface.

There should be no hindrance and/or moving objects in front of the detection windows to
effect signal reception.

Avoid installing it near air temperature alteration zones such as air conditioning, central
heating, etc.

For your safety, please do not open the cover unless you have cut off power completely.

If there is discrepancy between instruction and the function of the product, please give
priority to the product instruction icons.
TROUBLESHOOTING:

In case when the load does not operate:
a. please check if the connection-wiring of power and load is correct.
b. please check if the load is good.
c. please check if the working light set correspond to ambient light.

The sensitivity is poor:
a. Please make sure that there is no obstruction in front of the detection window to
effect to signal reception.
b. Please check if the ambient temperature is not too high.
c. Please check if the induction signal source is in the detection fields.
d. Please check if the installation height corresponds to the height showed in the
instruction.
e. Please check if the moving orientation is correct.

The sensor cannot shut off the load automatically:
a. Please check if there is continual signal in the detection field.
b. Please check if the time delay is set to the longest.
c. Please check if the power corresponds to the instruction.
d. Please check if the temperature near the sensor has changes abruptly, due to air
conditioner or central heating etc.

This manual suits for next models

1

Other optonica Accessories manuals

optonica 7318 User manual

optonica

optonica 7318 User manual

optonica 7312 User manual

optonica

optonica 7312 User manual

optonica SE7301 User manual

optonica

optonica SE7301 User manual

optonica 7322 User manual

optonica

optonica 7322 User manual

optonica 7317 User manual

optonica

optonica 7317 User manual

Popular Accessories manuals by other brands

VOLTCRAFT 20 00 92 operating instructions

VOLTCRAFT

VOLTCRAFT 20 00 92 operating instructions

Knocks KDDM-2 operating instructions

Knocks

Knocks KDDM-2 operating instructions

SUREHATCH SH60 user manual

SUREHATCH

SUREHATCH SH60 user manual

Eaton GHG 521 operating instructions

Eaton

Eaton GHG 521 operating instructions

Tait TB7100 Installation and operation manual

Tait

Tait TB7100 Installation and operation manual

GP MP10B instruction manual

GP

GP MP10B instruction manual

LEGRAND 6 547 40 quick start guide

LEGRAND

LEGRAND 6 547 40 quick start guide

BERG In Ground user manual

BERG

BERG In Ground user manual

Rice Lake MSI-3460 Challenger 3 Technical manual

Rice Lake

Rice Lake MSI-3460 Challenger 3 Technical manual

ePadLink ePad user guide

ePadLink

ePadLink ePad user guide

Hudora 76128 INSTRUCTIONS ON ASSEMBLY AND USE

Hudora

Hudora 76128 INSTRUCTIONS ON ASSEMBLY AND USE

Bresser 7009996 instruction manual

Bresser

Bresser 7009996 instruction manual

FRIEDLAND D942S Libra+ instruction manual

FRIEDLAND

FRIEDLAND D942S Libra+ instruction manual

Fostex 6301B owner's manual

Fostex

Fostex 6301B owner's manual

Otto Bock 13E202 Series Instructions for use

Otto Bock

Otto Bock 13E202 Series Instructions for use

Sunbeam SHWL825 Series user guide

Sunbeam

Sunbeam SHWL825 Series user guide

HomeSeer HS-FLS100-G2 Quick start quide

HomeSeer

HomeSeer HS-FLS100-G2 Quick start quide

Kalorik EM 47774 manual

Kalorik

Kalorik EM 47774 manual

manuals.online logo
manuals.online logoBrands
  • About & Mission
  • Contact us
  • Privacy Policy
  • Terms and Conditions

Copyright 2025 Manuals.Online. All Rights Reserved.