1. Use
Discreet floodlight, for occasional illumination of small architectural details. Only
an IP68 connection to the electricity network ensures the IP68 degree of the
product/specific applications available on request.
2. Technical data
Moving head projector with 12 x 15W LED RGBW/W... Diffusion of light by rotational
symmetry of 10° 25° 40° 115° 10x42° 40x120° and elliptical for LEDS, 316L stainless
steel gland. Delivered with 8x0,22mmSubmersible cable.
3. Installation/assembly
Please comply with the applicable national safety requirements. We disclaim
all responsibility for non-compliant use or assembly. Similarly, we reject any
responsibility for any modifications you may make to the light fittings.
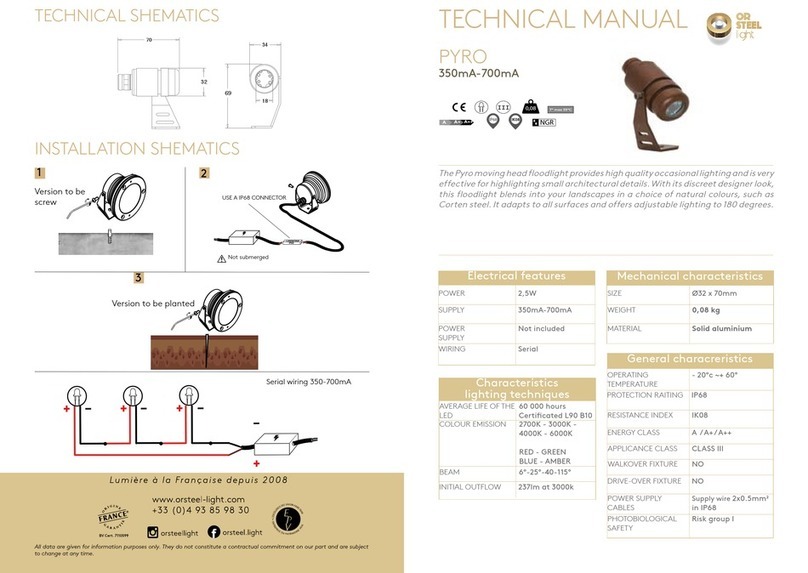
For their use, constant current spotlights must always be connected in series
to the corresponding DC power supply (see power packs) (1000mA). Exterior
installation can be carried out on different media. The spotlight can be installed
directly in concrete, paving blocks, plates, wood and using a Pt800 earth rod. We
cannot supply universal installation instructions because ground conditions and
the location will vary for each project.
The pictograms show examples of typical installations.
When mounting on a reinforced bracket, you must remove the screws.
Remove the projector from its support and direct it toward the object to be lit.
Then fix to the bracket using the A4 stainless steel screws provided. Use only
the factory-connected cables. Please indicate the required cable length when
ordering. In the event of mechanical stress, the cable must be installed in a
protective conduit.
The silicone cable must only be connected to the power supply in a dry environment
and, in the event of a direct connection in the ground, only connection units
compatible with a joint sealing compound should be used.
Connect the various conductors to power supplies in accordance with instructions.
4. Connecting to the power packs/connection matrix
Constant voltage headlamps should only be connected in series. If necessary,
connect in series in separate distribution boxes, the outside of which must also be
protected against humidity using a sealing compound.
5. General Maintenance Instructions
Do not use detergents which are harmful to metals when cleaning the spotlight.
The use of hydrochloric acid-based detergents on and around any parts of a
stainless steel light fitting is totally forbidden.
Regularly clean the spotlight and its mounting box to avoid any rust deposit
Caution: Do not use a high pressure cleaner. Caution: Protect the spotlights from
frost; where appropriate, dismantle or ensure special protection. Any lost screws
must be replaced by stainless steel V4A screws. According to conditions of use
(power, environmental circumstances), it is recommended to change the seals
(on the glass, screw fittings and O-rings) and the cable every 5 to 8 years.
6. Warranty conditions
The following time limits and provisions of the warranty shall apply from
the date of delivery: - 24 months for Orsteel spotlights. The warranty covers
defects in materials, manufacturing defects and any treatment which is proven
to be attributable to the manufacturer. Any damage resulting from the non-
compliance with this user leaflet or any non-compliant repair is excluded from the
warranty. We disclaim any guarantee where the installation has not been carried
out according to the instructions or where unsuitable bulbs or connection cables
have been used. We reserve the right to make any modification corresponding to
technical advancement.
7. Important Notice
(The warranty becomes void in the event of non-compliance with the following
points)
The absence of damage during transport must be verified before installation.
Any assembling and installation, as well as any electrical work, must be carried
out by qualified personnel.
To avoid any rust deposits, only stainless steel tools should be used.
The cable length for lamps must be chosen to avoid extending it in water or in a
damp environment. Any subsequent claim for this reason will not be accepted.
A mounting distance of 10 cm between each device is strongly recommended to
avoid mutual heating.
Equipment must be connected without current, otherwise surges in the power
supply could damage the LEDS. There must be no primary voltage when changing
LEDs.
When connecting the lamps, please ensure that polarity matches! A polarity error
may damage the LED module.
The customer is advised to install protection against any over voltage compliant
with standards DIN VDE 0100-443, DIN VDE 0100-534 and En 62305.
INSTALLATION GUIDE


