Orchid Righteous 3D II User manual

Righteous 3D
II
User's Manual

Righteous 3D II User's Manual
2
1998 Orchid Technology. This manual is copyrighted. All rights reserved. This
document may not, in whole or part, be copied, reproduced, reduced or
translated by any means, either mechanical or electronic, without prior consent
in writing from Orchid Technology.
Righteous 3D II is a registered trademark of Orchid Technology. All other
products mentioned in this manual are trademarks of their respective manufac-
turers.
Orchid Technology
45365 Northport Loop West
Fremont, CA 94538-6417
P/N: 06-00334-02

Righteous 3D II User's Manual
1
Table of Contents
Introduction 4
About This Manual 5
Before You Begin 6
Section 1 - Hardware Installation 7
Installing Righteous 3D II 7
Connecting two Righteous 3D II's 8
Righteous 3D II Diagram 9
Section 2 - Software Installation/Configuration11
Software Installation Overview 11
Windows 95 11
Driver Installation 11
Software Installation 12
Windows 95 14
Configuring Your Righteous 3D II 14
Section 3 - Technical Information 19
Technical Information Overview 19
Troubleshooting Righteous 3D II 19
Support and Information Services 22
Technical Support 22
Appendix A - Technical Specifications 25
Technical Specifications 25
Connector Pin-Out Specifications 26
SLI Connector Pin-Outs 27

Righteous 3D II User's Manual
2
Appendix B - Direct3D 29
Direct3D Overview 29
3D Graphics Glossary 31
Software Licensing Agreement 33
FCC Notice 35
Index 36

Righteous 3D II User's Manual
3
List of Figures
Figure 1.1: PCI Slots 7
Figure 1.2: Righteous 3D II Cable Connections 8
Figure 1.3: Righteous 3D II 8MB Diagram 9
Figure 2.1: Software Installation Screen 12
Figure 2.2: Software Configuration Screen 14
Figure 2.3: Hardware Configuration Screen 16
Figure 2.4: Advanced Configuration Screen 16
Table 3.1: Operation Troubleshooting 20
Table 3.2: Display Troubleshooting 21
Figure 3.1: Support and Information Services 23
Figure A.1: Connector Pin-Outs 26
Figure A.2: 34-pin Flat Ribbon Cable 27
Figure A.3: SLI Connector Pin-Outs 27

Righteous 3D II User's Manual
Introduction
Thank you for entering the generational leap beyond in
PCgraphics—three-dimensionalgraphicswiththeRigh-
teous 3DII. It's a dedicated 3D accelerator that oper-
ates transparently with existing 2D graphics accelera-
tors and delivers true arcade 3D graphics performance.
Designed for the serious game player who demands the
highest performance for games, Righteous 3D II deliv-
ers “Righteous Results.”
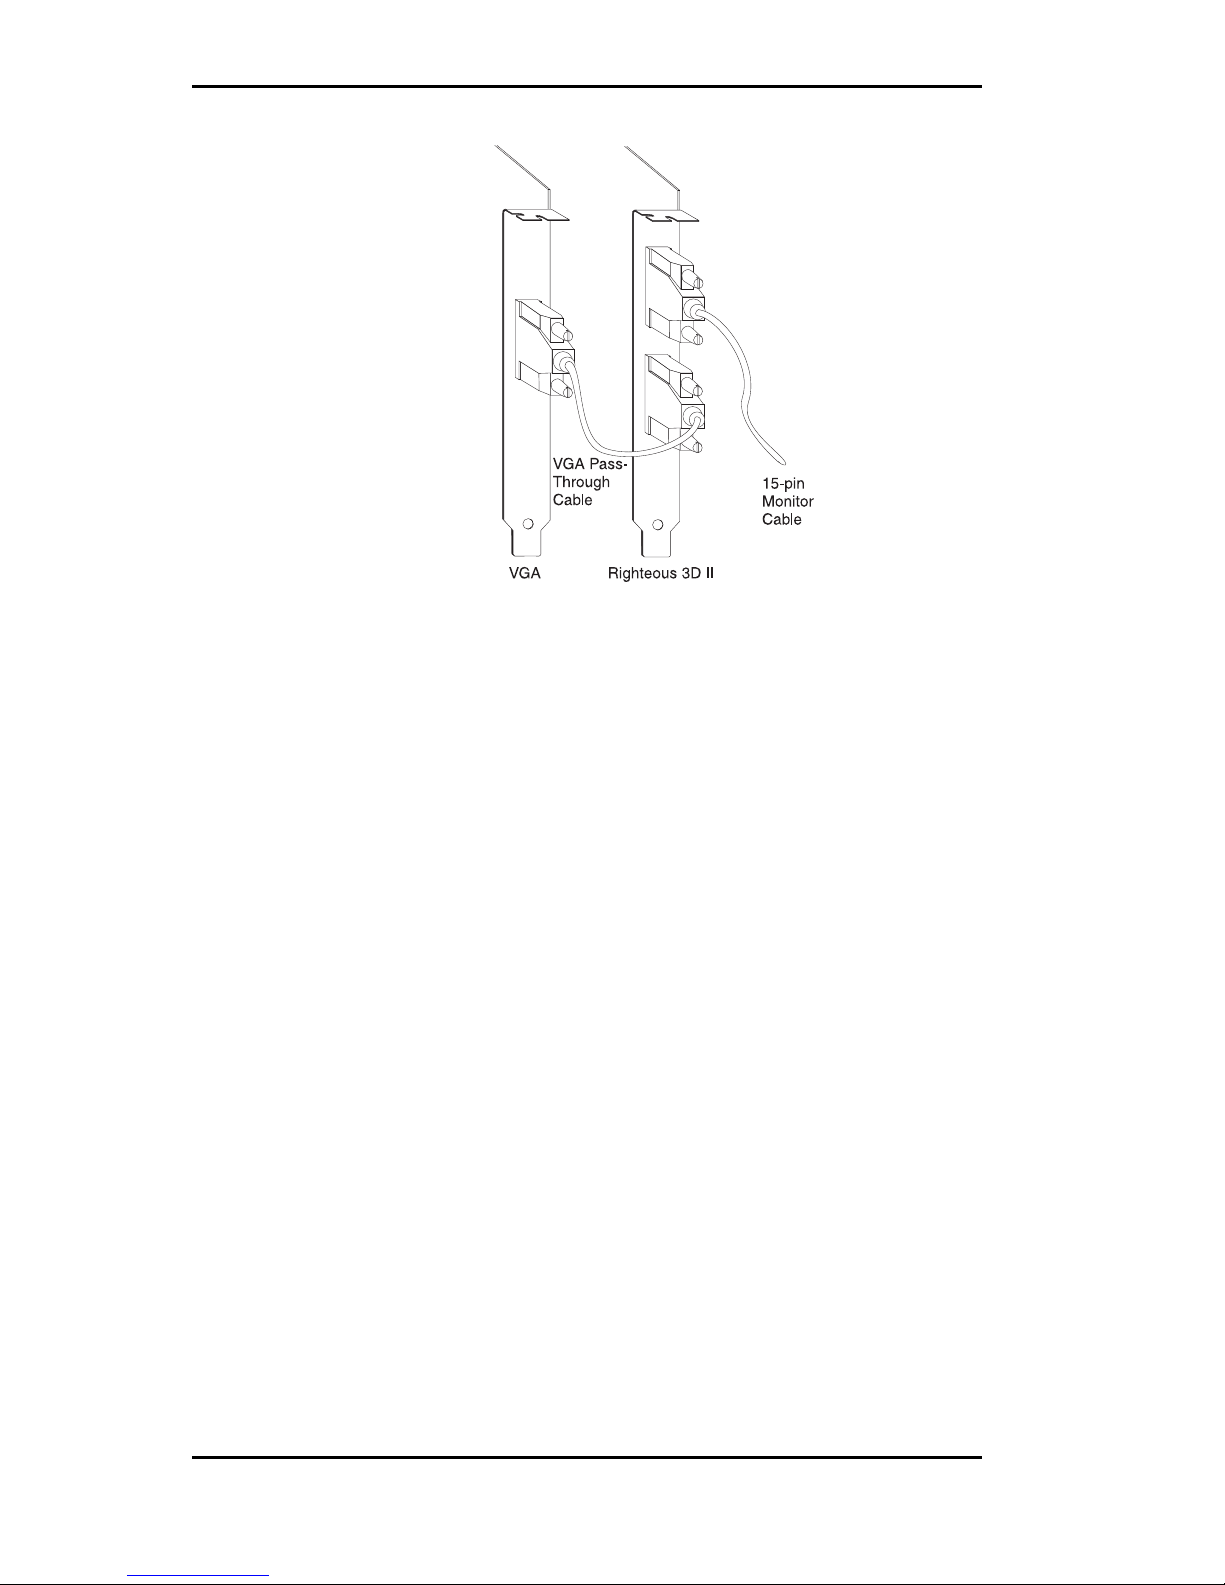
Righteous 3D II is multimedia-ready for your Pentium
PCI-based system. It installs into an available PCI slot
and connects via a cable to your VGA graphics accel-
erator. Righteous 3D II is available in configurations of
8MB or 12MB of EDO DRAM memory.
Based on 3Dfx Interactive Voodoo2 Graphics,™ Righ-
teous 3D II’s triple 64-bit memory architecture provides
direct access to the frame buffer and texture memory.
Thisadvanceddesignusesdualtexture-processingunits,
each of which can apply texture to an object in a single
pass.
In addition, two Righteous 3D II’s of the same memory
configuration can be connected together to accelerate
the next generation of games. When connected by an
internal cable, the cards automatically enter Scanline
Interleave (SLI) mode and work simultaneously on
each frame of animation, which provides an impressive
increase in performance.
Care has been taken to ensure that Righteous 3D II will
provide you with years of trouble-free operation. We
believe you’ll be pleased with your purchase.
4

Righteous 3D II User's Manual
5
About This Manual
While Righteous 3D II is designed to be easy to install,
we recommend that you refer to your computer’s refer-
ence manual when terminology or installation steps are
unfamiliar to you.
Section 1: Hardware Installation
How to properly install the Righteous 3D II.
Section 2: Software Installation
How to install the Righteous 3D II drivers and software.
Section 3: Technical Information
Help to ensure that Righteous 3D II is operating prop-
erly.
Appendix A: Technical Specifications
Righteous 3D II's technical specifications.
Appendix B: Direct3D
Information on the Direct3D feature of Righteous 3D
II.

Righteous 3D II User's Manual
6
Before You Begin
This manual will familiarize you with the features, instal-
lation and use of your Righteous 3D II. There are several
symbols and conventions used throughout this manual to
help draw your attention to a feature or to focus on
important information:
When you see the Magnifying Glass, it
refers to something you should take a
closer look at before proceeding further.
When you see the Exclamation Mark, it
gives important information on avoiding
damage.
Common Names
2D Two Dimensional
3D Three Dimensional
DDC Display Data Channel
DRAM Dynamic Random Access Memory
EDO Extended Data Out
FBI Frame Buffer Interface
PCI Peripheral Component Interconnect
SLI Scanline Interleaving
TMU Texture Mapping Unit
VGA Video Graphics Array

Righteous 3D II User's Manual
1
Section 1: Hardware Installation
Section
7
STATIC!
Before
handlingthe
Righteous
3D II, be
properly
groundedby
touchingthe
powersupply
housing.
Hardware Installation
Whether you are a beginner or experienced user,
Righteous 3D II's simplified design allows you to get up
and running quickly. Installation is simple and all
configuration settings are under software control. This
section gives you help on how to properly install the
Righteous 3D II and how to connect two Righteous 3D
II’s to utilize the Scanline Interleave feature.
Installing Righteous 3D II
1. Turn off the power to your computer and remove
the computer cover.
2. Select a PCI slot next to your VGA graphics
accelerator. Most computers accommodate both
PCI and ISA slots.
ThePCIslotsareusu-
ally the smaller slots
(see the example).
Please refer to your
computer's reference
manual for more in-
formation.
3. Remove the rear slot
cover bracket if it is
present and save the screw.
4. Now remove the Righteous 3D II from its antistatic
packaging.
5. Carefullyhold Righteous3DIIbythe topedges and
lower it into the PCI expansion slot. Ensure that
Righteous 3D II seats firmly into the slot.
6. Secure Righteous 3D II in place by fastening its
metal bracket with the screw you saved.
Figure 1.1: PCI Slots

Righteous 3D II User's Manual
8
Section 1: Hardware Installation
7. Connect your
monitor cable to
the top 15-pin
connector (blue)
on the Righteous
3D II.
8. Connect one end
of the VGA pass
through cable to
the bottom 15-pin
connector on the
Righteous 3D II.
9. Connecttheother
end of the VGA
pass-through
cabletothe15-pin
connectoronyour
VGA graphics accelerator.
10. Replace the cover of the computer.
You are now ready to install the Righteous 3D II
software drivers. Refer to Section 2: Software Installa-
tion.
Figure 1.2: Righteous 3D II
Cable Connections

Righteous 3D II User's Manual
Section 1: Hardware Installation
9
Righteous 3D II Diagram
NOTES:
❏15-pin VGA DDC connector (see Appendix A). Supports all popular
standardVGAandmuti-frequencymonitors.
❏15-pin VGA pass through connector (see Appendix A). Works with your
existinggraphicscard,includingyoursystemboardandAGPbasedcard.
❏Memory-8MBEDODRAM.(Righteous3DIIisalsoavailablewith12MB
ofEDODRAM.)Theadditionalmemoryisaddedtothebackofthecard.)
8 MB : 4MB for FBI + (2 by 2) TMUs
12MB : 4MB for FBI + (4 by 2) TMUs
❏J1-SLIConfigurationConnector(seeAppendixA).TheSLIconfiguration
cable is included.
Figure 1.3: Righteous 3D II Diagram

Righteous 3D II User's Manual
Section 1: Hardware Installation
10
Scanline Interleave (SLI) Feature
Two Righteous 3D II’s of the same memory configuration
can be connected together to double the texture fill-
rate and enable resolutions up to 1024x768. When
connected by the supplied SLI configuration cable, the
cards automatically enter SLI mode and work simulta-
neously on each frame of animation.
Connecting two Righteous 3D II's
The following instructions assume that you have al-
ready installed one Righteous 3D II card.
1. Select a PCI slot next to the Righteous 3D II
installed.
2. Carefully hold the second Righteous 3D II by the
top edges and lower it into the PCI expansion slot.
Ensure that it seats firmly into the slot.
3. Connect each end of the SLI configuration cable to
the 34-pin SLI configuration connector on each
card.
4. Connect the VGA pass-through cable and monitor
cable to one of the Righteous 3D II cards.
The
Righteous
3D II drivers
willauto-
detectwhich
card your
monitoris
pluggedinto
and drive it
properly.
Figure1.4:
Righteous3DII
SLIConfiguration

Righteous 3D II User's Manual
2
Section
11
Section 2: Software Installation
Thismanual
presumes
youare
already
familiarwith
the basics of
Microsoft
Windows.
Pleaserefer
tothe
Microsoft
manualwhen
terminology
orinstallation
stepsare
unfamiliarto
you.
Software Installation Overview
Once you complete the hardware installation, you can
begin the Righteous 3D II drivers and software instal-
lation. Righteous 3D II comes with awesome 3D titles
for your enjoyment. This section gives you the instal-
lation procedures for Windows 95 and DOS.
Windows 95
Driver Installation
1. Start Microsoft Windows 95. The New Hardware
Found screen appears.
2. Insert the Righteous 3D II CD into your CD-ROM
drive.
3. From the New Hardware Found screen, select the
"Driver From Disk Provided by Hardware Manu-
facturer" option. Click on OK.
4. Type in the driver location: D:\WIN95 (where D
is the CD-ROM drive letter). Click on OK.
5. Windows 95 copies the Righteous 3D II drivers to
your hard drive.

Righteous 3D II User's Manual
Section 2: Software Installation
12
Software Installation
The Righteous 3D II CD-ROM is configured to auto-
matically launch the software installation program.
1. Start Microsoft Windows 95.
2. Insert the Righteous 3D II CD into your CD-ROM
drive. The following screen appears:
NOTE: A pre-existing hardware installation may
prevent the software installation program from
launching automatically. If this occurs, run
D:\SETUP.EXE (where D is the CD-ROM drive
letter). Click on OK.
3. Before selecting any Direct3D game application or
demo, you must install the DirectX software first.
NOTE: It is highly recommended that you install
the version of DirectX provided with Righteous 3D
II.
4. Click onDirectXandfollowtheinstructionsonthe
screen.
5. After the DirectX software is installed, you will be
prompted to restart the system for the changes to
take effect.
6. After your system restarts, the Righteous 3D II
software installation program is automatically
launched.
Whenthe
AutoPlay
check box is
enabled,this
programwill
automatically
launchwhen
youinsert the
CD into your
CD-ROM
drive.
Figure2.1: SoftwareInstallationScreen

Righteous 3D II User's Manual
13
Section 2: Software Installation
7. You can make another selection or click on Exit to
close the Righteous 3D II Software Installation
program and return to the Windows 95 desktop.
User's Manual
Click on the User’s Manual button and the program
will install the Adobe Acrobat Reader, if not already
installed, or it will launch the user’s manual. After
installing the Adobe Acrobat Reader, click on the
User's Manual button again to launch the manual.
Final Reality
A benchmark utility that will test the effectiveness of
your system in processing and rendering 3D images.
Click on the Final Reality button to enable a series of
tests.
Games Demo
Click on this button to play demos that truly take
advantage of Righteous 3D II’s arcade 3D graphics
performance.

Righteous 3D II User's Manual
Section 2: Software Installation
14
Windows 95
Configuring Your Righteous 3D II
The Righteous 3D II Display Properties screen allows
you to configure the refresh rate, gamma correction
and displays driver information and the hardware con-
figuration.
1. From the Windows 95 desktop, click on the Start
button, select Settings, then select Control Panel.
2. From the Control Panel group, double-click on
Display. The Display Properties screen appears.
3. From the Display Properties screen, click on the
Righteous 3D II Setup tab. The following screen
appears:
4. Make your selections from the available options.
When you are finished, click on OK or Apply to
save your settings.
Figure2.2: SoftwareConfigurationScreen

Righteous 3D II User's Manual
Section 2: Software Installation
15
Information
This selection displays information on the Righteous
3D II driver, the 3D API drivers and your monitor type.
Refresh Rates
This selection allows you to select the refresh rates for
the supported Direct3D resolutions. Resolutions avail-
able are: 512x386, 640x400, 640x480, 800x600,
960x720 (12MB only), and 1024x768. Before selecting
the refresh rate, verify that your monitor is capable of
supporting the setting.
NOTES:
✍Righteous 3D II supports 3D game resolutions up to
800x600 with Z-buffering and up to 1024x768
without Z-buffering.
✍SLI mode (two cards) supports up to 1024x768 with
Z-buffering.
✍Theresolutionsupportedisdeterminedbythegame.
Z-Buffering is not selectable. It is a function that can
only be used by game developers.
Gamma Correction
The Gamma Correction selection allows you to adjust
the brightness of your display. You can change the value
of the Gamma for an individual channel (Red, Green or
Blue). For example, to set the Gamma for Red, move
the scroll bar up or down to adjust the Gamma value.
To test the Gamma value, click on the Test Settings
button to view the new Gamma value applied in 3D
mode. To return to the Righteous 3D II Display Prop-
erties screen, press the ESC key.
Foroptimal
performance,
setthe
refreshrate
as high as
yourmonitor
willsupport.

Righteous 3D II User's Manual
Section 2: Software Installation
16
Test Settings
Click on the Test Settings button to view the Gamma
Correction settings configured.
Hardware Configuration
Select Hardware Configuration to display the SLI con-
figuration, number of FBI's (Frame Buffer Interface),
total frame buffer memory, number of texture map
units and amount of texture memory. Click on the
Hardware Configuration button to display the follow-
ing screen:
Advanced Features
Click on the Advanced Features button to access
features that will enhance the Righteous 3D II's perfor-
mance.
Figure2.3: HardwareConfigurationScreen
Figure2.4: AdvancedConfigurationScreen

Righteous 3D II User's Manual
Do Not sync buffer swaps to monitor refresh rate -
when this box is checked, Direct3D and Glide applica-
tions will not synchronize buffer swaps with the vertical
retrace signal of your monitor. The rendering perfor-
mance may increase, however visual tearing may occur.
Force advanced texture filtering for Glide apps - when
this box is checked, Glide will turn on Advanced
Filtering mode. This will improve the quality of the
MIPMapped graphics with a slight hit to performance.
Force trilinear texture filtering for D3D apps - when
this box is checked, Direct3D will turn on Trilinear
mode. This will improve the quality of MIPMapped
graphics with no hit to performance.
Limit texture memory for Glide apps - when this box is
checked, TMU memory will be 2MB for Glide games.
Some Glide games may not work correctly with 4MB of
texture memory.
Force triple color buffering for Glide apps - when this
box is checked, Glide will turn on Triple Color Buffer-
ing. This will improve the color quality of the
MIPMapped graphics with a slight hit to performance.
Direct3D
Click on the Direct3D button to turn on Direct3D
support for your monitor refresh rates.
Glide
Click on the Glide button to turn on Glide support for
your monitor refresh rates.
Default Settings
Click on the Default Settings button to restore the
default settings.
Section 2: Software Installation
17
Direct3Dand
Glidesupport
canbeturned
onsimulta-
neously.

Righteous 3D II User's Manual
Section 2: Software Installation
18
Online Manual
This selection will give you access to the Righteous 3D
II's online user's manual.
Orchid Contacts
Click on this button to display information on how to
contact us.
Table of contents
Other Orchid Video Card manuals
Popular Video Card manuals by other brands

AMD
AMD Radeon HD 6950 user guide

Leadtek
Leadtek Quadro FX3000 user guide

3Dlabs
3Dlabs Wildcat III 6210 user guide

ATI Technologies
ATI Technologies 9600 - Radeon XT 128 MB DDR Video Adapter user guide

Panasonic
Panasonic AJ-YA935G quick start guide

Diamond Multimedia
Diamond Multimedia Radeon HD 4600 setup sheet