JVC LV-N402 User manual

Graphics card LV-N402WA
Instruction Manual
グラフィックスカード LV-N402JA
取扱説明書
B5A-3722-30

- 2 -
ENGLISH

ENGLISH
- 3 -
Graphics Card LV-N402WA
Instruction Manual

- 4 -
ENGLISH
FCC information
FCC (U.S. Federal Communications Commission)
This equipment has been tested and found to comply with the limits for a Class B digital
device, pursuant to part 15 of the FCC Rules. These limits are designed to provide
reasonable protection against harmful interference in a residential installation. This
equipment generates, uses, and can radiate radio frequency energy, and if not installed
and used in accordance with the instructions, may cause harmful interference to radio
communications. However, there is no guarantee that interference will not occur in a
particular installation. If this equipment does cause harmful interference to radio or
television reception, which can be determined by turning the equipment o and on, the
user is encouraged to try to correct the interference by one or more of the following
measures:
- Reorient or relocate the receiving antenna.
- Increase the separation between the equipment and receiver.
- Connect the equipment to an outlet on a circuit dierent from that to which the
receiver is connected.
- Consult your dealer or an experienced radio/TV technician for help.
FCC Warning
To assure continued FCC compliance, the user must use a grounded power supply cord
and the provided shielded video interface cable with bonded ferrite cores. Also, any
unauthorized changes or modications to this monitor would void the user’s authority
to operate this device.
Supplier’s Declaration of Conformity
Trade Name: JVC
Products: Graphics Card
Model Name: LV-N402xA
Responsible Party: JVCKENWOOD USA Corporation
500 Valley Road, Suite 203 Wayne, New Jersey 07470
TEL: 973-317-5000
This device complies with Part 15 of the FCC Rules. Operation is subject to the
following two conditions:
(1) This device may not cause harmful interference, and
(2) This device must accept any interference received, including interference that
may cause undesired operation.
The use of shielded cables for connection of the monitor to the graphics card is
required to ensure compliance with FCC regulations. Changes or modications to this
unit not expressly approved by the party responsible for compliance could void the
user’s authority to operate this equipment.

ENGLISH
- 5 -
Conformity
This apparatus is in conformance with the valid European directives and
standards regarding electromagnetic compatibility and environment.
Manufacturer EU contact address
JVCKENWOOD Corporation
3-12, Moriya-cho, Kanagawa-ku,
Yokohama-shi, Kanagawa
221-0022, JAPAN
This device complies with the requirements of the UK legislation
regarding electromagnetic compatibility and environment.
Manufacturer UK contact address
JVCKENWOOD Corporation
3-12, Moriya-cho, Kanagawa-ku,
Yokohama-shi, Kanagawa
221-0022, JAPAN
JVCKENWOOD Deutschland GmbH
Konrad-Adenauer-Allee 1-11, 61118 Bad Vilbel,
GERMANY
TEL: +49 6101 4988 228 (German, English)
e-mail: product-compliance@de.jvckenwood.com
JVCKENWOOD U.K. Limited
First Floor, Gleneagles, The Belfry,
Colonial Way, Watford, Hertfordshire
WD24 4WH, UNITED KINGDOM

- 6 -
ENGLISH
Contents
Introduction ........................................................................................................................................ 7
Package contents ........................................................................................................................... 7
Hardware requirements ...............................................................................................................7
Safety precautions .........................................................................................................................8
Hardware installation ....................................................................................................................9
(1) Disconnecting the power cables ....................................................................................... 9
(2) Installting the graphics card ................................................................................................ 9
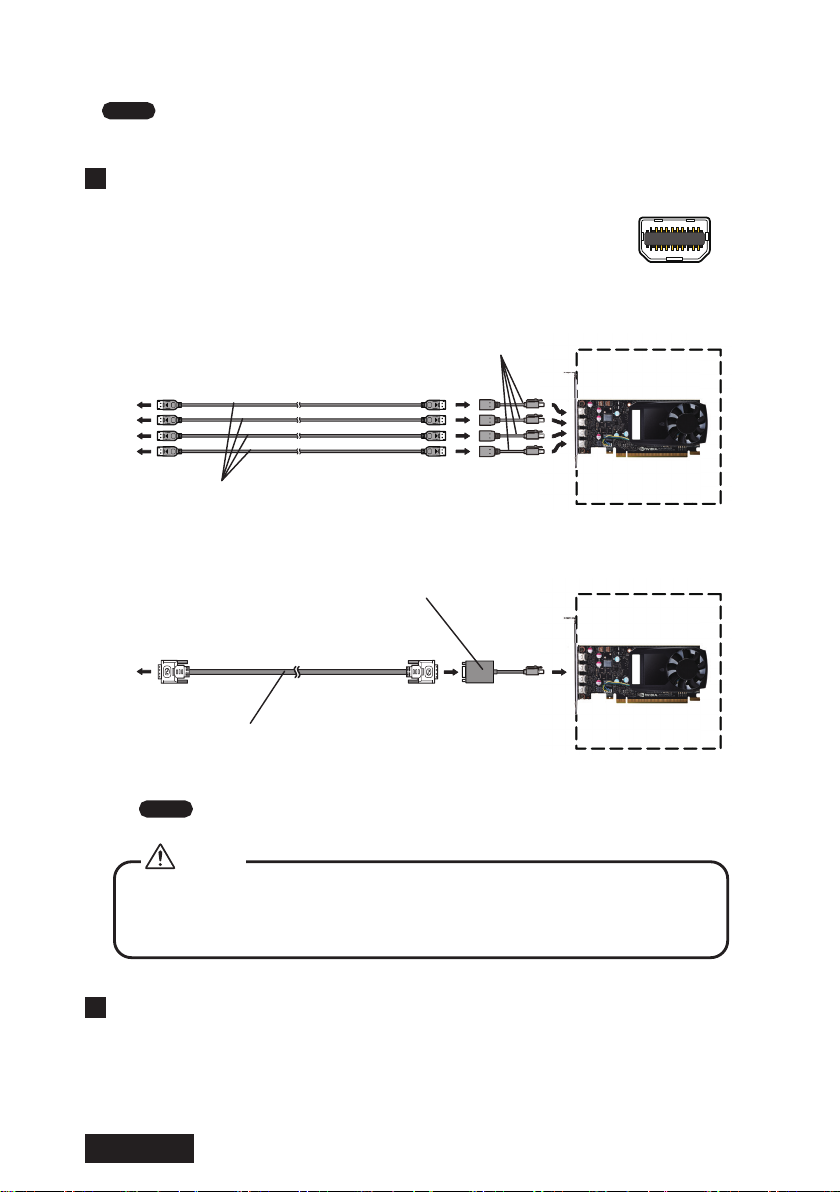
(3) Connecting the monitor ......................................................................................................10
(4) Connecting the power cables ...........................................................................................11
Software installation and setup .............................................................................................11
(1) Installing the display driver software ............................................................................11
(2) Software Installation .............................................................................................................11
(3) Setting up the display settings ........................................................................................14
(4) The check in multi-display mode, and completion of a setup ............................17
Primary monitor setup ................................................................................................................18
Multi-display modes .....................................................................................................................19
Changing multi-display modes ..............................................................................................20
Software uninstallation ..............................................................................................................27
Q&A .......................................................................................................................................................28
Prior to installation ......................................................................................................................28
Installation .......................................................................................................................................28
Display setup ..................................................................................................................................30
Miscellaneous ................................................................................................................................31
Technical specication ................................................................................................................32
After-sale service ............................................................................................................................34
Repair .................................................................................................................................................34
Driver upgrade ..............................................................................................................................34
Disposing of the product ..........................................................................................................34
Information on the waste electrical and electronic equipment ...............................34
* Company names and product names are brand names or registered brand names.

ENGLISH
- 7 -
Introduction
This manual provides step-by-step instructions on how to use the graphics card
LV-N402WA along with supported our LCD’s.
Package contents
Conrm that the package contains the following items:
Graphics card...................................................................................1
Driver DVD........................................................................................1
Mini DisplayPort to DisplayPort Adapter Cable ...............4
Mini DisplayPort to DVI Adapter Cable................................1
Low-Prole Bracket.......................................................................1
Instruction Manual........................................................................1
Hardware requirements
● PC/AT compatible computer with a processor equivalent to or higher than Intel Xeon/
Core i or AMD Phenom/Opteron (This card cannot be used on a server computer.)
● PCI Express 3.0 × 16 compliant slot (×1)
● Microsoft Windows 10/11
● Minimum system memory: 4 GB or more (Recommended: 8 GB or more)
● Minimum hard disk space: 300 MB or more
● DVD-ROM Drive
● Minimum 350 W system power supply (Recommended: 400 Watt or more)
● LCD Monitor(s)
Pixels LCD Monitor
1MP CL-R190
2MP MS25i2, MS-S200, CCL258i2, CL-S200, CL-R211
FHD CV-F238
3MP MS35i2*1, MS-S300*1, CCL358i2*1, CL-S300*1
5MP MS55i2*1,MS55i2 plus*1, MS-S500*1, CCL550i2*1, CL-S500*1
6MP CCL650i2*1, CL-S600
8MP CL-R813*1
12MP CL-S1200
Note *1: Dual-link is unavailable even if using the attached Mini DisplayPort.
In this case, your monitor supports only single-link.

- 8 -
ENGLISH
Safety precautions
Please take the following precautions for your safety in using this product:
● Do not try to repair or alter the product. It could cause re, an electric shock, and/or
other injuries.
● If any abnormality is detected, such as odor, noise, and overheat, turn o the power
and unplug it immediately. Otherwise, it could cause re and/or an electric shock.
● Do not touch the product with wet hands. It could cause an electric shock.
● This product is easily damaged by static electricity. Be careful when installing, storing,
and handling.
● Do not touch the electric terminals directly.
● Keep this product away from magnetized places and objects.
● Do not leave this product on the oor. If you accidentally step on it, you could get
injured or it could damage the product.

ENGLISH
- 9 -
Hardware installation
Notices
Please read the following notices before installing the graphics card.
● Make sure that your operating system is installed properly.
● Uninstall all previously installed drivers and display-related software such as Pivot.
● Log in as a user with administrative privileges to install the driver.
● Remove all currently installed old graphics card.
● Proper operation of this graphics card is not guaranteed when used with other
graphics cards for a multi-display setup. If an error occurs, see Q&A in this manual.
(1) Disconnecting power cables
Disconnect power cables of the computer and other peripheral devices.
(2) Installing the graphics card
1Remove the cover of the computer. (See the computer instruction manual.)
Caution: ESD (Electrostatic Discharge) Breakdown
Static electricity could damage delicate components of the computer and the
graphics card. Discharge static electricity by touching metal parts of the computer
prior to installation. Do not touch electric parts or terminals.
2Remove the old card or a bracket from an appropriate slot.
Caution: Burn
Internal parts may be hot if the computer has been turned on previously.
3Install the graphics card in the slot rmly. Make sure it does not touch any part of
the computer.
Caution: Ventilation
Ensure the proper airow for cooling the graphics card.
Install this graphics card in the slot where ambient temperatures are 35
degrees C or lower.
Slot: Leave the adjacent slot or slot that is close to heat producing components
open if multiple slots are available to release heat around the card suciently.
Inadequate heat release could shorten the product lifetime or cause some troubles.
Fan: Keep the computer’s internal cables away from the cooling fan, or keep things
away that could get caught in the fan. (E.g., labels are easy to come o when
heated.) If the computer is used without the fan working, it could cause a failure.
Dust: Dust inside the computer could restrict ventilation to cool o the card and
result in failure.
Important: Our warranty may not apply to the damages arising from those facts.
4Secure the bracket to the chassis of the computer.
5Put the cover back on the computer.

- 10 -
ENGLISH
(3) Connecting the monitor
Note The recommended cable length is less than 3.0 m. If you use a long cable, the
monitor may become unstable and ickers.
1LV-N402WA has four Mini DisplayPorts.
Use the supplied Mini DisplayPort to DisplayPort adapter cable
to connect this card and a monitor with a DisplayPort cable.
Mini DisplayPort
● In case of connecting the monitor’s DisplayPort
LV-N402WA
DisplayPort cable
Mini DisplayPort-DisplayPort conversion cable (supplied)
Computer
●In case of connecting the monitor’s DVI
LV-N402WA
DVI Cable
Mini DisplayPort to DVI Adapter Cable (supplied) Computer
The supplied Mini DisplayPort can be connected to DVI on monitors.
Note The attached Mini DisplayPort-DVI adapter cable does not support dual-link.
Do not connect/disconnect the signal cable while the monitor is turned on.
It could cause a graphics card failure. Connect/disconnect the signal cables
with the display disconnected.
Caution
2To use several monitors, connect the other monitor as well.

ENGLISH
- 11 -
(4) Connecting the power cables
Connect all power cables to the wall outlets, including the computer, the monitor, and
other peripheral devices.
Software installation and setup
Follow the instructions below to install the software (display driver) and set it up using
the setup program included in the accompanying driver DVD. See Q&A if any problem
occurs.
(1) Installing the display driver software
1Click the Start and then choose the Control Panel option. Control Panel window
opens up. Choose Uninstall a program. The window opens up.
2“NVIDIA Drivers” is chosen and clicked from the program list installed.
To Uninstall the Program, select it from the list and Uninstall button will appear.
Click Uninstall.
3After uninstallation, a message will appear prompting you to restart your computer.
Click the “Yes”, and then the computer will restart. Then uninstallation has been
completed.
(2) Software Installation
1Turn on the monitor, start the computer.
2Conrm that the Windows startup screen appears on the monitor.
3Log into Windows as a user with administrative privileges.
4Insert the driver DVD in the DVD-ROM drive.
5Install the driver using the setup program included in the supplied driver DVD.
Note If the Windows security screen appears, click “Install this driver software
anyway.”

- 12 -
ENGLISH
When the NVIDIA software license agreement screen appears, click “Agree and
Continue.”
6When the Installation options screen appears, select “Express (Recommended),”
and click “Next.”
7When the Windows Security screen appears, click “Install.”

ENGLISH
- 13 -
8When the NVIDIA Installer has nished screen appears, click “Restart Now.”
If the driver has been successfully installed, the screen is displayed properly after the
restart of the computer.
Note If you experience problems such as the installation was not done
normally, please refer to the “Q & A.”

- 14 -
ENGLISH
(3) Setting up the display settings
The resolution and the refresh rate list of each model
Pixel Display
mode Resolution Refresh rate (Hz) LCD Monitor
1MP Landscape 1280 × 1024 60 Hz CL-R190
2MP Portrait
Landscape
1200 × 1600
1600 × 1200 60 Hz
MS25i2, MS-S200,
CCL258i2, CL-S200,
CL-R211
FHD Landscape 1920 × 1080 60 Hz CV-F238
3MP Portrait 1536 × 2048
1640 × 2048 60 Hz CCL650i2
3MP Portrait 1640 × 2080 30 Hz/60 Hz
(60 Hz Recommended) CL-S600
3MP Portrait
Landscape
1536 × 2048
2048 × 1536
30 Hz/60 Hz
(60 Hz Recommended)
MS35i2*1, MS-S300*1,
CCL358i2*1, CL-S30 0*1
4MP Portrait 1920 × 2160 60 Hz CL-R813
5MP Portrait
Landscape
2048 × 2560
2560 × 2048
25 Hz/50 Hz
(50 Hz Recommended)
MS55i2*1, MS55i2 plus*1,
MS-S500*1, CCL550i2*1,
CL-S50 0*1
6MP Portrait 3072 × 2048
3280 × 2048 30 Hz CCL650i2
6MP Landscape 3280 × 2080 30 Hz/60 Hz
(60 Hz Recommended) CL-S600
6MP Portrait 2100 × 2800 60 Hz CL-S1200
8MP Landscape 3840 × 2160 30 Hz/60 Hz
(60 Hz Recommended) CL-R813
12MP Landscape 4200 × 2800 30 Hz/60 Hz
(60 Hz Recommended) CL-S120 0
*1: 30 Hz is the recommended refresh rate when connecting these models.

ENGLISH
- 15 -
Windows 10
1Right-click on the desktop and select “NVIDIA Control Panel.”
Windows 11
Right-click on the desktop and click "Show more options", and then you'll see "NVIDIA
Control Panel" and click it.
1
2

- 16 -
ENGLISH
2Please set “resolution (S)”, “Refresh rate”, and “Color depth” in “Change
resolution” of “Display” shown in menu on the left side of the screen.
In Windows 10, the color depth setting may be 8bpc. Please enter “10bpc” to
output color depth when connecting to monitors supporting 10-bit input.
Please change the color depth according to the following procedure when
connecting monitors supporting 10-bit input.
1. Select- "Use NVIDIA color settings"
2. Select- "SDR (30-bit color)" in Desktop color depth (C):
3. Select- "10bpc" on the output color depth (U)
4. Click- "Apply"

ENGLISH
- 17 -
※Follow the steps below to change color depth setting from 10 bpc to 8 bpc.
1. Select- "SDR (24-bit color)" in Desktop color depth (C):
2. Click- "Apply"
3. Select- "8 bpc" on the output color depth (U)
4. Click- "Apply"
(4) The check in multi-display mode, and completion of
a setup
1If required, change the multi-display mode.
Refer to the chapter in “multi-display mode.” ( P19)
2In the case of a multi-display, check the monitor of arrangement.
Display Properties>Settings (tab), click the Identication tab and check the
alignment of the display number. Combined with arrangement of the actual
monitor, and then click Apply button.
3In the case of a multi-display, check the primary monitor.
Display Properties>Settings(tab), To designate the primary monitor, on the
Monitor tab, click the icon that corresponds to the monitor that you want to
designate as the primary monitor, and then select the “This is my main monitor”
check box.
Click OK button.
4Remove the driver DVD from the DVD-ROM drive, and setup is over.

- 18 -
ENGLISH
Primary monitor setup
Follow the instructions below on how to set the monitor to primary.
1Run NVIDIA Control Panel.
2Select Display, click Set up multiple displays.
Right-click on the intended display, and select Make Primary.

ENGLISH
- 19 -
Multi-display modes
There are the following four multi-display modes are available:
Multi-display mode 1 monitor/a
card
Multiple (up to 4) monitors/a
card
① Single monitor:
Single-monitor setup 1
② Clone:
Multiple (up to 4) monitors
on the same card
display the same image
respectively.
11 11 1
③ Horizontal span:
Multiple (up to 4) monitors
on the same card are
combined into one desktop
(side-by-side).
1
④ Vertical span:
Multiple (up to 4) monitors
on the same card are
combined into one desktop
(one above the other).
1
⑤ Dual view:
Multiple (up to 4) monitors
on the same card are
working independently and
separately.
2
134
12
Note Set the same resolution to both monitors for the modes ②, ③, and ④.
The maximum resolution is up to 16384 × 16384 for mode ③.

- 20 -
ENGLISH
Changing multi-display modes
●Clone
1Run NVIDIA Control Panel.
2Select Display, click Set up multiple displays.
Right-click on the intended display, and select Clone with.
Select “Set up multiple displays” under “Display.”
Right-click on the display icon, select “Clone with,” and select the display icon
[ ] to be cloned with.
This manual suits for next models
1
Table of contents
Languages:
Other JVC Video Card manuals
Popular Video Card manuals by other brands

RealVision
RealVision VREngine/SMD2-PCI user manual

Gigabyte
Gigabyte GV-N94T-512I user manual

Asus
Asus Splendid HD Quick installation guide

Diamond Multimedia
Diamond Multimedia Stealth S9250 Specification sheet

Diamond Multimedia
Diamond Multimedia Radeon X1050 Specification sheet

EVGA
EVGA GeForce GTX 680 Superclocked specification