ORFELD VC818 User manual

Model No.: VC818
IMPORTANT: Read Before Using.
www.orfeldtech.com
Cordless Vacuum Cleaner
INSTRUCTION MANUAL

Contents
English------------------------------------------ 01~14
Deutsch------------------------------------------15~27
Italiano------------------------------------------- 28~40
Français----------------------------------------- 41~53
Español------------------------------------------54~66


02
2.Accessory Instructions
2.1 Telescopic Wand
Adjust the overall length of the wand to suit your cleaning requirements.
Ideal for both hard floors and carpets. Vacuums coarse and fine dirt at the same time.
2.3 2-in-1 Dusting Brush:
The frame with the bristles can be removed by pressing the release button.
1.Vacuums hard surface furniture with bristles;
2.Remove the bristles to vacuum upholstered furniture, curtain, etc.
2.4 10” Crevice Tool:
Clean in tight spaces or reach baseboards and ceilings with this slim crevice tool.
2.2 Full-size LED Multi-tasker Power Brush:
EN

03
3. Assembly
3.1 For Long-reach Cleaning
(1)Attach the power brush or your desired cleaning tool to the extension wand,
pressing it in until it clicks securely into place.
Insert the top of the extension wand into the handheld vacuum,
pressing it in until it clicks securely into place.
3.2 For Short-reach Cleaning
(1)Press the wand release button to disconnect the wand from the handheld vacuum.
(2)Attach the desired cleaning tool to the handheld vacuum.
3.3 Install the Dustbin
(1)Remove:
1.Press the dustbin release button and pull out.
EN

04
(2)Install:
1.Incline the dustbin, the slot on the dustbin towards the hook on the main body.
Push upward until the hook fixed into the slot. A 'click' sound will be heard when
it has been successfully accomplished.
3.4.Install The Battery
(1)Press the battery release lock, then pull the battery out.
(2)Slide the battery in the to bottom of the main body.
The battery will click into position when correctly fitted.
Install the battery
Pull the battery out
EN

05
4.Product Operation
4.1 Start To Work:
Note:
•Before the first use, please charge the product (please refer to "Battery Charging"),
please put it in the environment of 4°C (39.2°F) ~ 40°C (104°F),
After being left for 2 hours, charge the battery after it has returned to room temperature.
•Select the accessories according to needs (see "Accessory Instructions" ).
1) Press and hold the switch button to start vacuuming; release the switch button to stop.
2) Push the latch inside the switch button upward to maintain vacuuming; downward to restore.
Press the MAX button to go between regular mode and MAX mode.
Regular mode: Ideal for 90% daily-cleaning.
Max Mode: Ideal for the deeper cleaning task like carpet cleaning.
4.2 Empty The Dustbin
①
②
Latch
Reattach the dustbin’s bottom cover.
When finished,press the release button on the
side of the dustbin and empty the contents.
EN

06
(1)When only one battery indicator flashes, it means that the machine has no power.
Please charge the machine.
Remarks: When the machine has just been used, the machine gets a little hot,
it is recommended to charge it after cooling for 1h.
(2)When the battery is fully charged, all blue lights will be on.
Tip:To avoid being tripped accidentally, please put away the appliance on the powerhouse
near-wall during charging.
4.3 Charge The Battery
During Charging
Indicator Light
1.solid blue lights and other 3 blue lights blinking
successively: 25% power charged
2.solid blue lights and other 2 blue lights blinking
successively: 50% power charged
3.solid blue lights and other 1 blue lights blinking
successively: 75% power charged
4.solid blue lights: full power charged
EN

07
Tips:
• Charge the battery only with the adaptor provided by ORFELD .
• When you won't use the battery for a long time, please store in a cool dry place.
In this situation, please ensure that the battery has been half charged
• If you need an additional battery, please purchase from ORFELD.
5.Daily Maintenance
In order to maintain machine performance, it is recommended that you clean the
components on a regular basis.
Note: Clean the dustbin and filters every time after use,
and wash them with cold running water once 2 weeks.
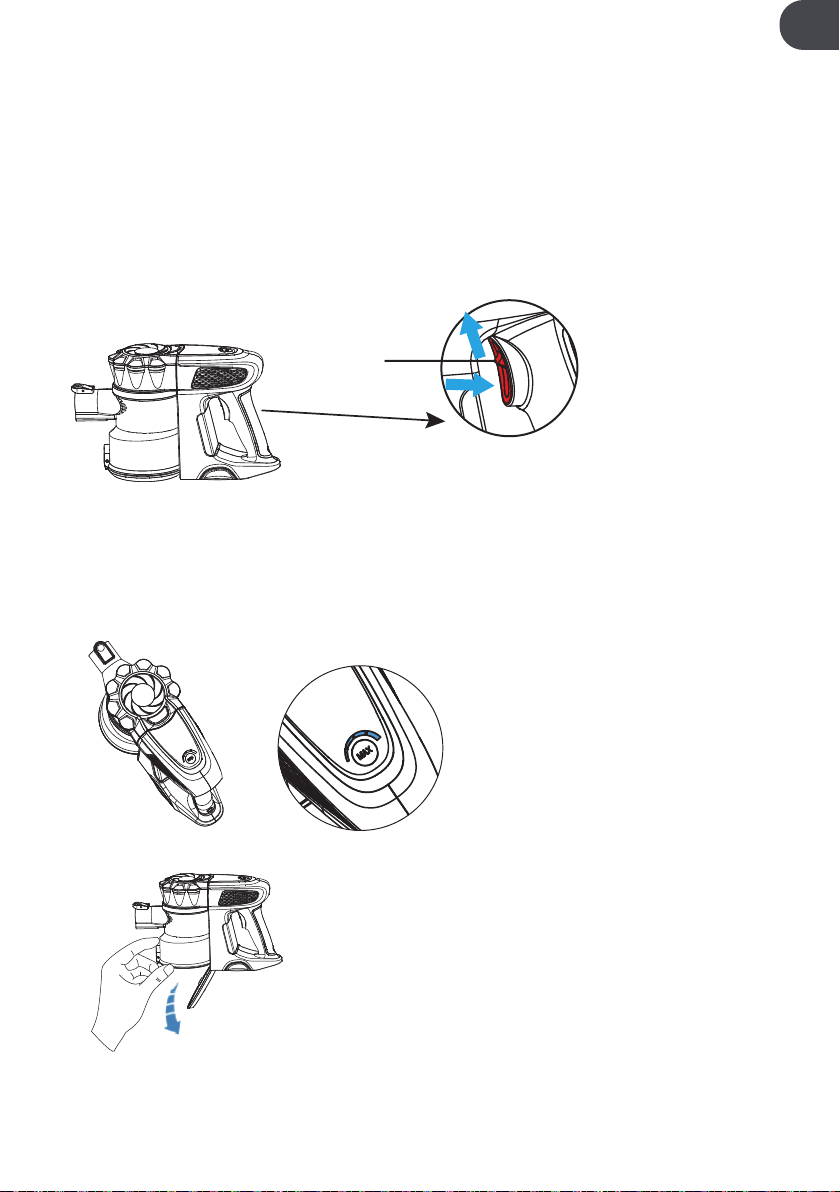
Four solid blue lights: Full power.
Three solid blue lights: 75% power.
Two solid blue lights: 50% power.
One solid blue light: 25% power.
Four blue light blinking: NO power.
On Work
4.4 Working Time
• Working time last about 30 min. on regular mode, and about 15 min. on MAX mode.
• Data is obtained by ORFELD laboratory using one battery and non-motorized accessories.
Charging Time
• Charging time takes about 4.5 hours.
• Based on results from ORFELD lab tests.
Lab test environment: temperature between 4℃(39.2°F) to 40℃(104°F ).
EN

08
5.1 Dustbin and Filters (Cand HEPA filter)
3) Take out the HEPA filter first, then lift up the cover.
1.Press the dustbin release button, pull out the dustbin as indicated in the picture.
2.Rotate to open the cover as shown below.
mesh filter
Dustbin
faucet
Do not get wet at the insertion port and spring
4.Wash the mesh filter,
HEPA filter and the Dustbin. 5.Please dry the HEPA filter and mesh filter completely
before putting them back in Dustbin.The dustbin and
mesh filter should be air-dried completely before
reinstalling When dry,assemble the filter to the mesh filter.
EN

09
5.2 Power Brush
1.Push the tab to the right, and lift the brush latch on the right,
then remove the brush from the brush window. Please see the above image.
2.Remove the hair and debris wrapped around the roller with Scissors.
3.Gently Clean the transparent brush window.
4.After the cleaning, install the brush into the machine.
6) Rotate the dust cup cap back shown as below.
A. See picture 1, the plane side of the cover should be on the same side of the dust - that has
icons of“lock”and“unlock”like the image shown below. The line on cover should match the
“unlock”icon on the top of the Dustbin.
EN

10
Battery
Charging Period
Battery Charger Output
Net Weight
Usage time
Power
Airflow
25.9V/2200mAh
4.5 hours
31V/500mA
2.3 kg
15min(Max-cleaning mode)
30min(Daily-cleaning mode)
160W
1.0 m /min
3
7. Technical Specification:
Problem Possible cause Possible solution
Vacuum not pick up debris 1. Dustbin is full
2. Filters clogged or dirty
3. Filters are out of service
1. Empty the dustbin
2. Clean the
3. Change the worn
Brush roller not spin Brush roller clogged by hair,
etc. Clean the brush roller
Poor suction 1. Dustbin not seated
completely
2. Filters clogged or dirty
3. Dustbin not installed
correctly
4. Low battery
5. Nozzle or dirt passage
clogged
1. Reinstall the dustbin.
Make sure lid is closed
completely
2. Clean the
3. Reinstall the dustbin
4. Fully charge the battery
5. Disconnect nozzle to
remove debris
Vacuum suddenly turns on
its own 1. Dustbin is full
2. Filters clogged or dirty
3. Vacuum overheat
1. Empty the dustbin
2. Clean the
3. Let vacuum cool down and
retry
Vacuum won’t turn ON or
charge 1. Low battery
2. Vacuum overheat 1. Fully charge the battery
2. Let vacuum cool down and
retry
Short running time 1. Low power
2. Filters clogged or dirty 1. Fully charge the battery
2. Clean the
To reducethe risk of shock and unintended operation, turn power and remove
battery pack before servicing.
In any other case or if the solution explained above did not solve the problem,
6. Troubleshooting:
EN

11
Read the operating instructions carefully and especially observe the safety
information. If you do not follow the safety instructions and information on proper
handling in this manual, we assume no liability for any resulting personal injury or
damage to property. Such cases will invalidate the warranty/guarantee.
a) General use
•To avoid explosion, or injury, inspect battery pack and charger for any damage before use.
DO NOT use vacuum with a damaged battery pack or charger.
•If handheld vacuum/wand is damaged, discontinue use.
•DO NOT use outdoors or on wet surfaces. Use only on dry surfaces.
•DO NOT vacuum up hard or sharp objects such as glass, nails, screws, or coins that could
damage the vacuum. DO NOT vacuum up drywall dust, ash, or embers. DO NOT use
as an attachment to power tools for dust collection.
•DO NOT vacuum up smoking or burning objects such as hot coals, cigarette butts, or matches.
•DO NOT vacuum up or combustible materials (e.g., lighter gasoline, or
kerosene) or use vacuum in areas where they may be present.
•DO NOT vacuum up toxic solutions (e.g., chlorine bleach, ammonia, or drain cleaner).
•DO NOT use in an enclosed space where vapors are present from paint, paint thinner, moth-
substances, dust, or other explosive or toxic materials.
•DO NOT vacuum up any liquids.
•DO NOT immerse vacuum in water or other liquids.
•Use extra care when cleaning on stairs.
•DO NOT handle charger or vacuum with wet hands.
•DO NOT leave vacuum unattended.
•Always turn this appliance before connecting or disconnecting nozzle.
•Use only Orfeld recommended chargers and batteries. Other types of batteries may burst,
causing injury and damage.
•DO NOT incinerate appliance, even if it is severely damaged, as battery pack may explode in a
•Keep your work area well lit.
•Keep the vacuum moving over the carpet surface at all times to avoid damaging the carpet
•DO NOT place vacuum on unstable surfaces such as chairs or tables.
8.Important Safety instructions
EN

12
•DO NOT put any objects into openings. DO NOT use with any opening blocked; keep free of
dust, lint, hair, and anything that may reduce
•DO NOT allow young children to operate the appliance or use as a toy. Close supervision is
necessary when any appliance is used near children. Care and cleaning shall not be made by
children without supervision.
•DO NOT use without brush roller, dustbin, and all in place.
•DO NOT use if is restricted; if the air paths or the nozzle become blocked, turn
the vacuum and remove battery. Clear all obstructions before returning battery to vacuum and
powering on again.
•Keep nozzle away from hair, face, uncovered feet, or loose clothing.
•DO NOT charge battery pack at temperatures below 32°F (0°C) or above 122°F (50°C).
•Store the appliance indoors. DO NOT use or store it below -4°F (-20°C). Ensure the appliance
is at room temperature before operating.
b)
•Before turning on the vacuum:
-Make sure that all are thoroughly dry after routine cleaning.
-Make sure brush rollers, dustbin, and all are in place after routine maintenance.
-Make sure accessories are free of blockages and keep openings away from face and body.
•Use only Orfeld recommended and accessories. Using others will void warranty.
c) Battery pack
•Battery pack is the power source for the appliance. When the battery pack is installed into the
appliance, DO NOT carry the appliance with your on the power button. DO NOT charge
appliance while powered on.
•Disconnect the battery pack from the appliance before making any adjustments or
troubleshooting. If the appliance is to be stored unused for a long period, remove the battery
pack.
•Use only Orfeld recommended chargers to charge. Use of an incorrect charger may create a risk
of when used with the battery pack.
• For optimum performance,wash the filter every 2 weeks with water.
Otherwise, may result in poor performance and loss of suction.
Please replace the fliter every 3 months and you could buy it on amazon.
EN

13
•Battery pack should not be stored at temperatures below -4°F (-20°C) or above 113°F (45°C)
to maintain long-term battery life.
•Battery pack should not be exposed to or submerged in any water, salt water, or other liquids.
•Use appliance only with designated battery pack. Use of any other battery packs
may create a risk of injury and
•When the battery pack is not in use, keep it away from all metal objects, such as paper clips,
coins, keys, nails, or screws. Shorting the battery terminals together increases the risk of or
burns.
•Under abusive conditions, liquid may be ejected from the battery pack. Avoid contact with
liquid, as it may cause irritation or burns. If contact occurs, with water. If liquid contacts
eyes, seek medical help.
•Keep battery pack away from heated surfaces.
•DO NOT expose battery pack or appliance to or temperature above 266°F (130°C) as it
may cause explosion.
•Follow all charging instructions and DO NOT charge the battery pack or appliance outside of
the temperature range in the instructions. Charging improperly or at temperatures
outside of the range may damage the battery pack and increase the risk of
•Appliance should only be serviced by a repair person using only identical replacement
parts. To ensure safety, DO NOT modify or attempt to repair the appliance or the battery pack
yourself, except as indicated in the instructions for use and care.
EN

14
EN

15
1.Product Overview
1
2
3
4
5
6
7
8
9
10
11
12
13
14
16
17
18
19
20
21
22
1.Gerät
2.Taste für Moduswechsel
3.Entriegelungstaste des Staubbechers
4.Entriegelungstaste der Aluminiumrohre
5.Teleskoprohr
6.Einstelltaste des Teleskoprohrs
7.Entriegelungstaste der Bodenbürste
8.Multifunktionale elektrische Bodenbürste
9.Taste zum Leeren des Mülleimers
10.Sockel-Stützgestell
11.2 in 1 Kombibürste
12.2 in 1 Staubbürste
13. HEPA-Filter
14. Oberdeckel
15. Ladegerät
16. Verriegelungshebel
17. Ein / Aus-Taste
18. Entriegelungstaste der Batterie
19. Sockel
20. Lange Flachdüse
21. Befestigungsschrauben des Sockels
22. Vorfilter
23. Staubbecher
15
23
DE

16
2. Beschreibung des Zubehörs
2.1 Teleskoprohr
Passen Sie die Gesamtlänge des Teleskoprohrs an Ihre Reinigungsanforderungen an.
Ideal für harte Fußböden und Teppiche. Gleichzeitig rauen und feinen Staub saugen.
2.3 2-in-1 Staubbürste:
Der Rahmen mit den Borsten kann durch Drücken der Entriegelungstaste entfernt werden.
1. Möbeloberfläche mit Vakuumborsten;
2. Bewegen Sie die Borsten, um gepolsterte Möbel, Vorhänge usw. zu saugen.
2.4 10”Flachdüse:
Mit diesem schlanken Werkzeug können Sie die Fußleisten-,
Decken- und Schienenrillen auf engstem Raum reinigen oder berühren.
2.2 Elektrischen Bodenbürste mit LED-Lampen:
DE

17
3. Montage
3.1 Reinigung über große Entfernungen
(1)Schließen Sie die elektrische Bodenbürste oder das erforderliche Reinigungszubehör
an das vordere Ende der Teleskopstange an und rasten Sie sie ein.
Führen Sie dann die Oberseite des Teleskoprohrs in die Vorderseite des
Handstaubsaugers ein und rasten Sie ihn ein. (folgenden Abbildung dargestellt)
3.2 Reinigung über kleine Entfernungen
(1) Drücken Sie die Taste, um das Teleskoprohr vom Handstaubsauger zu trennen.
(2) Wählen Sie das erforderliche Reinigungszubehör aus und installieren
Sie es direkt am Handstaubsauger. (folgenden Abbildung dargestellt)
3.3 Montage des Staubbechers
(1)Demontage:
1. Drücken Sie die Staubbecher-Entriegelungstaste,
entfernen Sie den Staubbecher in Pfeilrichtung.
DE

18
(2)Montage:
1.Kippen Sie den Staubbecher so, dass der Schlitz am Staubbecher zum Haken am
Gerät zeigt. Nach oben drücken, bis der Haken im Schlitz fixiert ist.
In den folgenden Fällen hören Sie ein Klickgeräusch.
3.4.Batterie entfernen und einlegen
(1) Drücken Sie die Entriegelung der Batterie und ziehen Sie die Batterie heraus.
(2) Schieben Sie die Batterie in die Unterseite des Geräts.
Bei ordnungsgemäßer Installation rastet die Batterie ein.
Batterie einlegen
Batterie ausnehmen
DE
Table of contents
Languages:
Other ORFELD Vacuum Cleaner manuals