Clothes Dryer
with UV Sterilization
: CD-S1248UV
: 220-240V~, 50/60Hz
: 1000W
Model
Voltage
Power
Maintance and Care
1) Unplug the power cord before cleaning.
2) Do not immerse the main body in water, it may cause electric
shocks.
3) Clean the Dryer with a soft cloth. To remove presistent dirt,
wipe down with a cloth that has been dampened with warm
soapy water.
Origin Map
Warranty
This product is guaranteed for 1 year (commercial use for 3
months)from the date of receipt against manufacturing defect.
The warranty does not cover the stand, clothes cover and other
accessories, damage or defect caused by negligence or use not
according to this instruction manual.
1) Plug the power cord into a 220-240V~ electrical outlet.
2. Turn the control knob clockwise, the Dryer switch on and the
power indicator light will be on.
3. Turn the control knob to set desired auto power off time.
- The range of the timer is from 0 to 180 minutes.
- When the control knob pointed at "UV" position, UV tube will
light on and process 15 to 20 minutes sterilization.
- Do not switch on the UV light when the dryer is working as
a heater.
4) To turn the Dryer off, rotate the control knob to "OFF" position.
5) Turn the control knob anti-clockwise to "ON" position for
drying without time limit.
6) Unlock the middle locating
rod when is foldable.After
unlock,holding the middle
rod and round tube to pull
it up.
Remark: For repair service, please contact and bring alone the
invoice or receipt to the Service Centre.
***Extra 3 months warranty: just complete Online Warranty
Registration within 10 days from the date of receipt, free
warranty will be extended to 15 months (not applicable to
commercial use). Please enter our website: www.origo.hk
Caution
1) Read all instructions carefully before using the Clothes Dryer.
Appropriately keep it for furture reference when necessary.
2) Before using the Dryer, check if the volatage marked on
the rating label corresponds to the mains in your home.
3) This appliance is not intended for use by persons (including
children) with reduced physical, sensory or mental
capabilities, or lack of experience and knowledge, unless
they have been given supervision or instruction concerning
use of the appliance by a person responsible for their safety.
Children should be supervised to ensure that they do not
play with the appliance.
4) Only the provided power cord can be used.
5) Remove all the package before using the Dryer.
6) The Dryer is not intended for use in wet or damp locations.
7) Place the Dryer on a stable surface and keep away from heat
source.
8) Do not use the Dryer in outdoor location.
9) The Dryer is designed for domestic use only.
10) Do not switch on the UV light when the dryer is working as
a heater.
11) Ensure spin-drying completely before using the Dryer.
12) To avoid being scalded, never touch the metal parts on the
wind outlet during drying process.
13) This Dryer is intended only for drying textiles washed in
water.
14) Check the clothing care label before drying, Make sure they
can be dried using the drying machine, pay special attention
to its temperature limits.
15) Keep a distance of at least 150mm between Dryer and the wall.
16) Lock on the middle locating rod when is work drying.
17) Clothes to be dried should be able to endure 75 degree
above, and maximum weight is 10 kgs.
18) Always check the Dryer, if the power cord is damaged, it must
be replaced and repaired by authorized service agent.
Operation
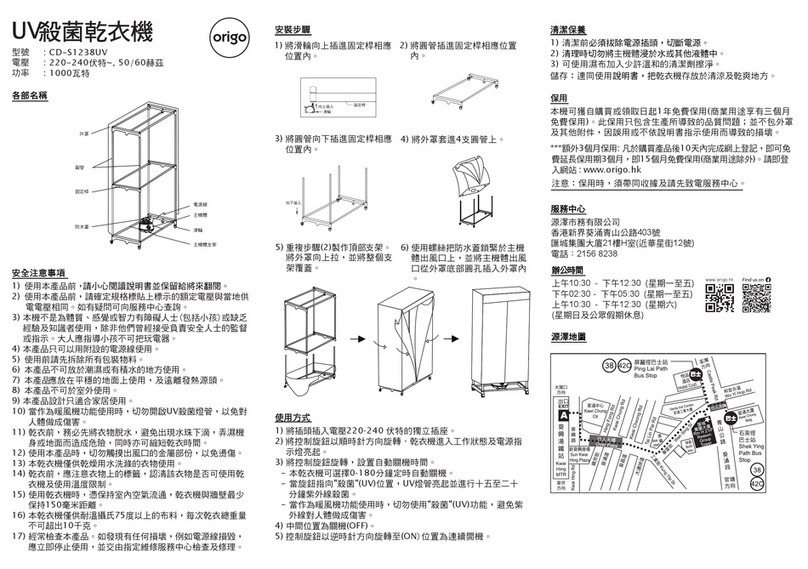
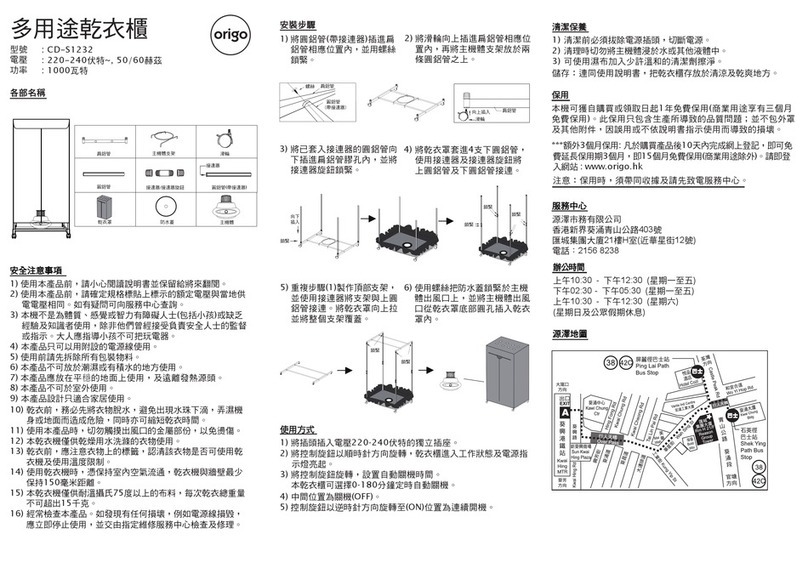
Main Parts STORAGE: Store the Dryer with these instructions in the original
box in a cool and dry place.
Clothes Cover
Water Proof
Plate
Caster
Power Cord
Main Body
Installation
2) Insert 3 round tubes into
correspond holes at the
lower locating rod.
1) Up insert the casters into
lower locating rod.
3) Insert 6 round tubes into
into the plastic holes of the
lower locating rod.
4) Put the clothes cover through
6 round tubes.
5) Insert the middle locating
rod onto the lower round
tubes and insert another
6 round tubes into middle
locating rod.
Up insert
Caster
Lower Locating Rod
Down
insert
7) Screw and fix the water proof cover on the wind outlet of the
main body, then insert the air outlet of the main body into the
clothes cover from the round hole at the bottom of the clothes
cover.
Round Tube
Middle Locating Rod
Service Centre
ORIGIN MARKETING LIMITED
Unit H,21/F, Reason Group Tower
(nearby 12 Wah Sing Street), 403 Castle Peak Road,
Kwai Chung, N.T., Hong Kong.
Tel: 2156 8238
Office Hours
10.30am - 12:30pm (Mon ~ Fri)
02:30pm - 05:30pm (Mon ~ Fri)
10:30am - 12:30pm (Sat)
(Closed on Sunday and Holiday)
StandingFeet
Lower LocatingRod
Upper LocatingRod
6) Insert the upper locating rod
onto the upper round tubes.
Let the clothes cover up to
cover the whole stand.


