eyepiece. Now, sight Polaris in the polar axis finder scope.
If you have followed the approximate polar alignment pro-
cedure accurately, Polaris will probably be within the field
of view. If not, move the tripod left-to-right, and adjust the
latitude up-and down until Polaris is somewhere within the
field of view of the polar axis finder scope.
4. Shine a red flashlight down the front end of the polar find-
er to illuminate the reticle within the field of view. Make
sure the flashlight shines in at an angle, so as not to block
the polar finder’s field of view. It may be helpful to have a
friend hold the flashlight while you look through the polar
finder. Note the constellation Cassiopeia and the Big
Dipper in the reticle.They do not appear in scale, but they
indicate the general positions of Cassiopeia and the Big
Dipper relative to the north celestial pole (which is indicat-
ed by the cross at the center of the reticle).Rotate the reti-
cle so the constellations depicted match their current ori-
entation in they sky when viewed with the naked eye.To do
this, release the R.A. lock lever and rotate the main tele-
scope around the R.A. axis until the reticle is oriented with
sky. For larger optical tubes, you may need to remove the
tube from the mount to prevent it from bumping into the
mount. Once the reticle is correctly oriented, use the right
ascension lock lever to secure the mount’s position.
5. Now use the azimuth adjustment knobs (Figure 2) and the
latitude adjustment L-bolts (Figure 5) on the mount to posi-
tion the star Polaris inside the tiny circle marked “Polaris”
on the finder’s reticle.You must first loosen the knob under-
neath the equatorial mount on the center support shaft to
use the azimuth adjustment knobs.Once Polaris is proper-
ly positioned within the reticle, you are precisely polar
aligned. Retighten the knob underneath the equatorial
mount.
If you do not have a clear view of Polaris from your observing
site, you will not be able to use the polar-axis finder to pre-
cisely polar align the telescope.
Note: From this point on in your observing session, you
should not make any further adjustments in the azimuth
or the latitude of the mount, nor should you move the tri-
pod. Doing so will undo the polar alignment. The tele-
scope should be moved only about its right ascension
and declination axes.
Additional Note Regarding Focusing the Polar
Axis Finder Scope
The polar axis finder scope is normally focused by simply
rotating the eyepiece focus ring.However, if after adjusting the
focus ring you find that the image of the reticle is sharp, but
the stars are out of focus, then you must adjust the focus of
the polar axis finder’s objective lens.To do this, first remove
the polar axis finder from the mount. Look through the polar
axis finder at a star (at night) or distant object at least 1/4 mile
away (during daylight). Use the eyepiece focus ring to bring
the reticle into sharp focus. Now, loosen the focus lock ring
(Figure 6) and thread the entire objective end of the finder
inward or outward until images appear sharp. Re-tighten the
focus lock ring. Once the polar axis finder’s objective lens is
focused, it should not need to be adjusted again.
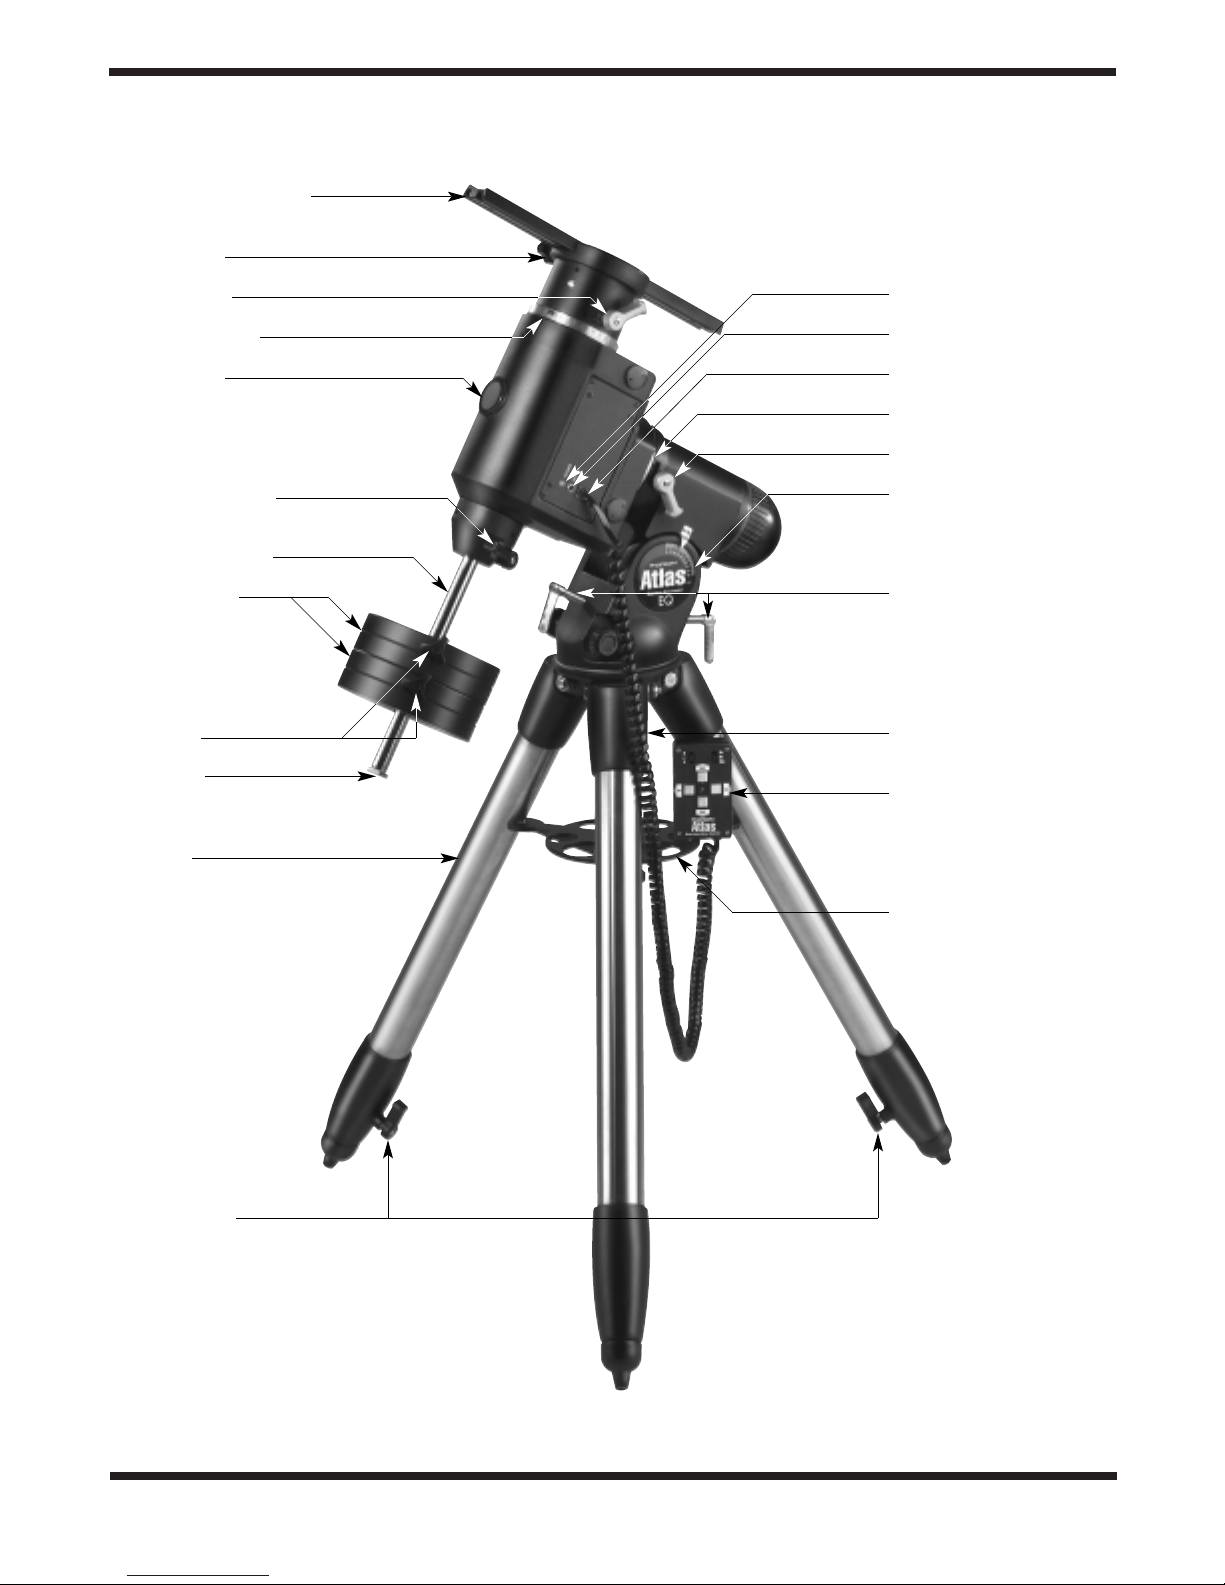
Operation of the Atlas Mount Motor Drives
The Atlas EQ mount comes with dual built-in motor drives.
These motor drives will be used to “track”objects in the night
sky, as well as to make minute adjustments when aiming the
telescope.The motors are controlled from the hand controller
(Figure 8). To start the drives, flip the power switch on the
hand controller to “N”if you live in the northern hemisphere, or
“S”if you live in the southern hemisphere.When you flip the
power switch, the power indicator light on the mount will glow
red and the power indicator light on the hand controller will
glow green. Your mount will now be moving at the sidereal
rate, which is the same rate as the sky’s apparent motion.
To move your telescope to a new object, loosen both the R.A.
and Dec. lock levers and move the telescope until it is pointed
in the general direction of the object you wish to view.
Retighten the R.A and Dec.lock levers.To center the object in
the eyepiece’s field of view, you will need to use the hand con-
troller.
There are four pushbuttons on the hand controller. If no but-
tons are pushed, the R.A. motor will turn on the R.A. axis at
sidereal rate to track the motion of the night sky. The left and
right buttons move the mount about its R.A. axis, and the up
and down buttons move the mount about its Dec. axis. The
rate of speed is determined by the rate switch at the top right
of the hand controller. If the switch is at the 2x position, the
mount will move at two times sidereal rate when the right hand
button is pushed, which will cause objects to viewed in the
eyepiece to move slowly eastward. If the left button is pushed,
the drive will stop turning, which will cause objects in the eye-
piece to move slowly westward.The top and bottom bottoms
will cause the telescope to move in Declination at the 2x
speed. Similarly, if the switch is at the 8x or 16x position, the
mount will move four times or eight times sidereal when a but-
ton is pushed.
7