Orion Sky Wizard Model 2 User manual

IN 035 1298
Providing Exceptional Consumer Optical Products Since 1975
Customer Support (800)676-1343
E-mail: support@telescope.com
Corporate Offices (831) 763-7000
P.O. Box 1815, Santa Cruz, CA 95061
INSTRUCTION MANUAL
Orion®
Sky Wizard™
#7802 Electronic Finder & Sky Catalog
Model 2

2
Congratulations! Your Orion Sky Wizard Model 2 will put the fun back in your telescope observing. It pro-
vides a digital readout of celestial coordinates, a database of more than 2,000 of the most interesting deep
sky subjects and the ability to guide the observer to astronomical objects. It’s designed to work with both
Altazimuth (including Dobsonian) and Equatorial type telescope mounts. The catalog information is stored
in permanent internal memory. The celestial subjects are organized by catalog: Messier (M), NGC and IC.
Many interesting stars are in the ST (Star) list. You can add up to 27 objects in your own NEW catalog.
Sky Wizard is designed for ease of use. Simply turn
it on, sight two stars, and let it guide you to celestial
objects. No need to polar align the telescope, no
need to input latitude, longitude, date or time (date
needed for planets). It provides virtually any tele-
scope with a continuous digital display of celestial
coordinates.The unique method of alignment by two
star sightings provides good pointing accuracy over
the entire sky.
Finding an object is easy. Just select any subject
from one of the catalogs and tell the instrument to
find it by using the FIND function. The display will
then give pointing instructions on how to move your
telescope.
At the beginning of each observing session, you
align Sky Wizard with the current sky by selecting
a star from the SETUP section (a list of the bright-
est navigational stars), pointing the telescope at
that star, and then signaling that the star is cen-
tered in the eyepiece. The procedure requires
sighting on only one star for a polar aligned equa-
torial mount, but sighting a second star will improve
accuracy. An Altazimuth telescope requires two
star sightings for alignment. Additional sightings
made during the observing session reduce cumu-
lative errors. Sky Wizard weighs only 5 ounces,
including the internal battery, and may be conve-
niently mounted near the eyepiece. Sky Wizard
connects to the optical encoders with a plug-in
connecting cable. The red LED display is easy to
read and does not interfere with night adapted
vision. A dimming button adjusts the brightness of
the display. Sky Wizard is especially useful under
light polluted skies where few visible stars are
available to guide you to deep sky objects.
Sky Wizard is connected to your telescope with
optical encoders. The encoders sense the rotation
of the telescope within 0.09° (precise enough to
bring any object into a low power field of view), and
can track telescope motion at rates as high as 100°
per second. The encoders are attached by various
methods depending on your telescope model.
Installation kits and encoders are sold separately
from Sky Wizard to allow for this variation in attach-
ment method. Encoder mechanical installation
instructions and encoder ratios are provided
with the installation kits.
Powered by a single 9-volt alkaline battery, Sky
Wizard provides over 24 hours of operation with the
display fully dimmed. It can also operate from an
external 12-volt DC power supply connected to the
battery snap.
Table of Contents
1. Installation............................................................................................................................. 4
2. Operation .............................................................................................................................. 6
3. Sample Observing Session .................................................................................................. 9
4. Specifications...................................................................................................................... 10
5. Catalog Listings .................................................................................................................. 11
6. Setup Star List .................................................................................................................... 14
7. Troubleshooting your Sky Wizard ......................................................................................... 14
8. Quick Reference ................................................................................................................... 15

3
1. Installation
The INSTALL mode is used when Sky Wizard is first installed
on your telescope. INSTALL tells Sky Wizard what kind of
telescope you are using, the desired scroll rate for the subject
description display, and the resolution or gear ratio of the
encoders. This information is on the Installation Instructions.
When inputting the gear ratios, you must go all the way
through the INSTALL sequence until the word INSTALL
appears again to update any changes.
To start: Press MODE. Scroll UP or DOWN until the display
reads INSTALL and press ENTER.
Telescope Mount Type
The display first prompts you to select the type of telescope mount
used. The current telescope mounting type will be displayed.
Press UP or DOWN to select the desired telescope type.
Mount type choices:
For telescopes such as Celestron and Meade Schmidt-
Cassegrains with fork mounts (not counterweighted
German-type mounts):
Equatorial fork mount: SCOPE EQ
Equatorial fork mount, perfectly aligned: SCOPE EP
For all telescopes on German-type equatorial mounts (mounts
with a counterweight on a shaft balancing the weight of the
optical tube) including Celestron Super Polaris telescopes:
German-type equatorial mount: SCOPE GQ
German-type equatorial, perfectly aligned: SCOPE EP
For altazimuth telescopes, including Dobsonian and other
telescopes which move in vertical & horizontal planes:
(Choice of vertical or horizontal index is based on your prefer-
ence, not on the telescope itself. See SETUP).
Altazimuth, horizontal index: SCOPE AZ
Altazimuth, vertical index: SCOPE AV
For a motor-driven “Poncet” type equatorial table such as
those sometimes used with a Dobsonian telescope:
Equatorial table, vertical index: SCOPE ET
When you have selected the correct type of mount, press
ENTER to advance to the next step.
Perfectly Aligned Option (EP or GP). For equatorial tele-
scopes, you can choose a “perfectly aligned” telescope type
if your telescope is on a permanent mount known to be in
good polar alignment, or if your portable telescope can be
easily polar aligned accurately. If you choose a “perfectly
aligned” type, Sky Wizard does not ask for or require an initial
mount index, and uses only a single star to get oriented with
the sky. The “Sync” function has no effect. This mode will
result in improved accuracy, especially near the poles, if your
telescope is indeed perfectly aligned (due to elimination of
rounding errors in the complex mathematical transformation
normally needed to adjust for polar alignment error).
Display Scroll Rate
The rate of scrolling messages is displayed: SCROLL 5. Set the
flashing digit using the UP and DOWN buttons. 0 is very slow, 5 is
about right and 9 is very fast. Press ENTER to go to the next step.
Encoder Settings
(See Instructions w/ your install kit for correct settings).
The proper encoder settings (ratios) for your specific tele-
scope mount are located on a chart in the Installation
Instructions that came with the installation kit for your specific
telescope. Simply input these ratios in the Install mode by
scrolling up and down and pressing ENTER after each correct
number that is blinking. Be sure to go all the way through the
install sequence (pressing ENTER each time) until the word
Install reappears to update any changes.
Custom installation
(Skip this section if you have purchased an Installation Kit
for a specific telescope or you already know the encoder
ratios.) The Sky Wizard needs to be told how many turns of
an encoder indicate one turn of the telescope. The ratio is
1.000 for a 2048-step encoder. If you have an altazimuth tele-
scope, or any mount where gears or pulleys are NOT used,
divide 2048 into the encoder resolution. The encoder resolu-
tion (steps per revolution) is printed on the side of the
encoders you received with your installation kit. You will prob-
ably have the larger high resolution encoders (4000 steps/
revolution) or the smaller standard resolution encoders (2160
steps/revolution).The 4000 encoder direct drive ratio would be
0.5120. The 2160 encoder direct drive ratio would be 0.9481.
In INSTALL mode, after inputting telescope type and scroll
rate, input first the RA encoder ratio (1) then the Dec. encoder
ratio (2). Adjust the blinking digit using the UP and DOWN but-
tons. When the digit is correctly set, press ENTER to advance
to the next digit. After all the digits are set for the first RA
encoder (AZ on altaz scopes), ( Example 1-5120) the display
switches to the second, DEC (Altitude on altazimuth scopes):
(Example 2 +5120). Set it to the required numbers in the same
way as the first. It is common to determine the encoder polar-
ity (+/-) by trial and error using Encoder Direction Test. (See
Chp 2, ENC Test section, page 7)
If you are installing Sky Wizard on an equatorial mount or with
any kits that uses gears or pulleys, you will need to figure the
encoder ratio for your install kit. If you purchased an Orion
install kit for your telescope, the instructions for that kit will list
the required encoder settings to enter in your Sky Wizard.
Simply enter those settings as listed here. Read the
discussion in the next section if you need to determine your
own encoder settings.
Determining Encoder Ratios
You don’t need to worry about this if you know the encoder
ratios from your Install Kit Instructions. If you are custom-
installing a Sky Wizard and need to determine the proper
encoder ratios, read on. Many custom mountings use gears to
drive the optical encoders. This can increase the resolution
and/or make the installation more convenient. It is necessary
to set the ratio of each encoder that is driven by gears. To

4
determine the correct ratios if using gears, divide 2048 into the
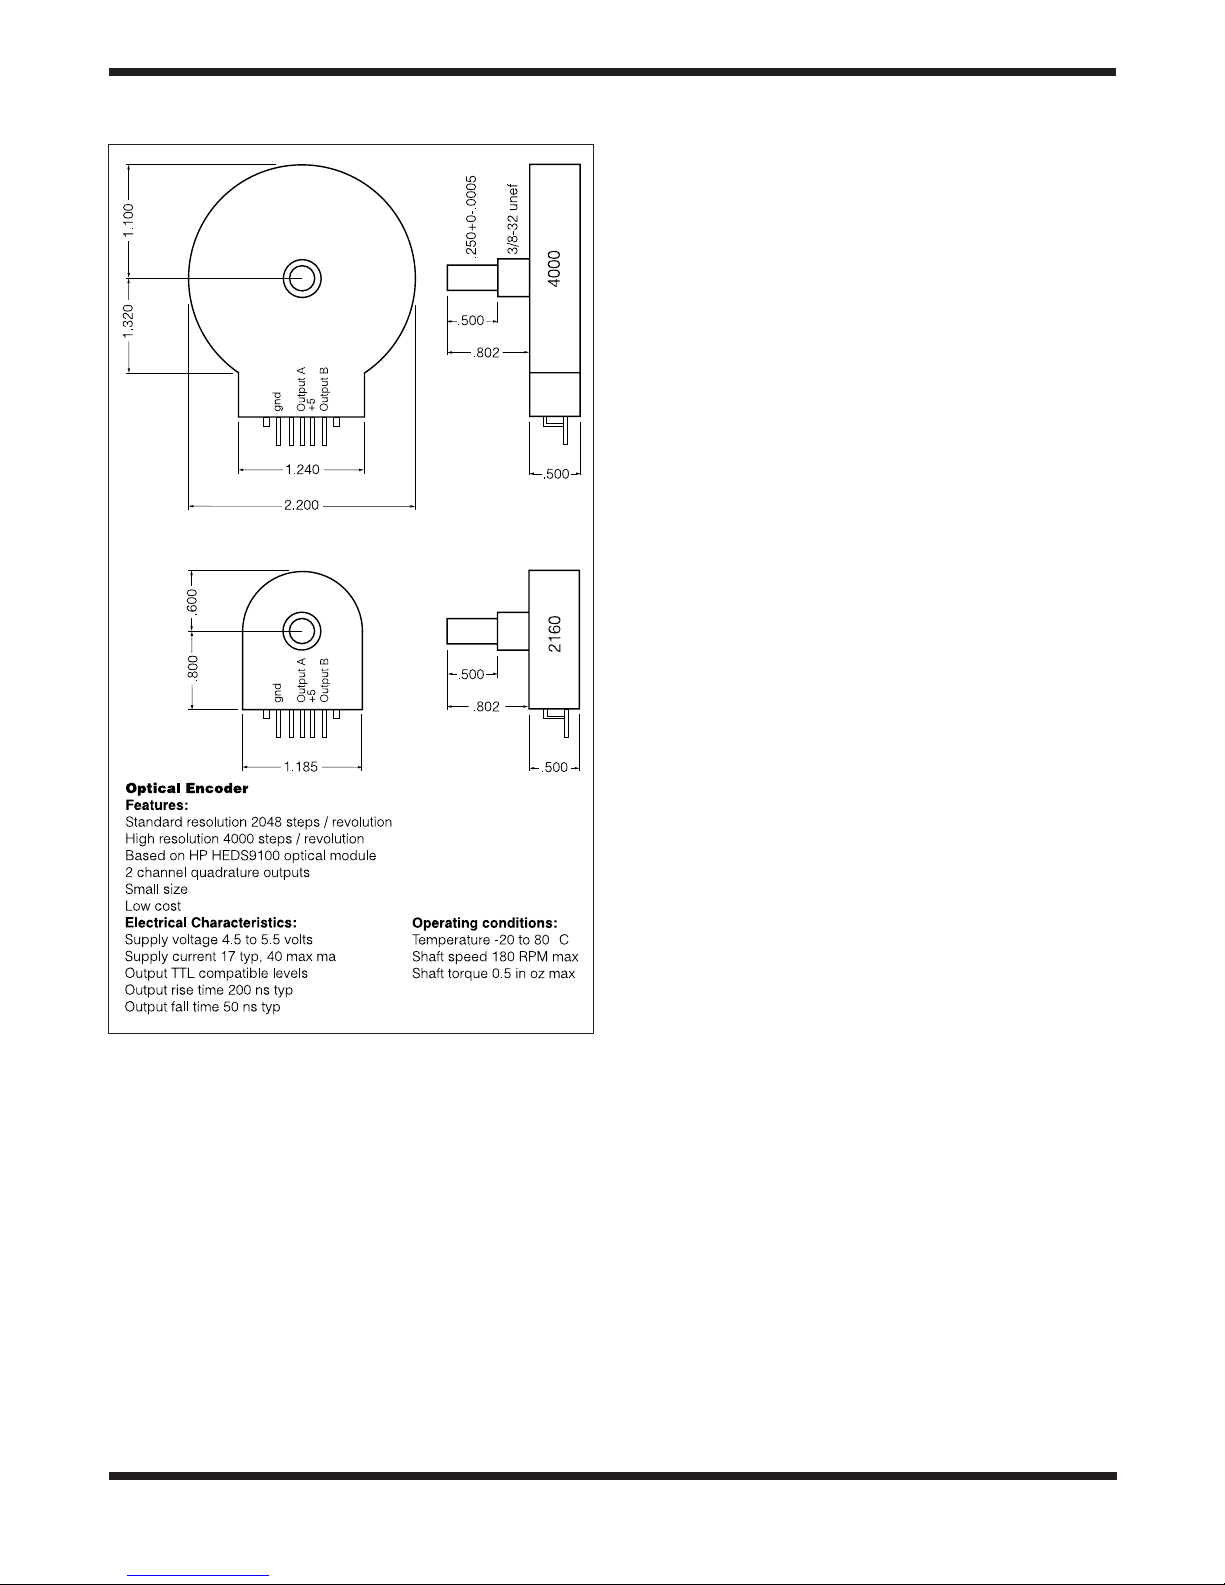
encoder resolution (4000 for the larger high resolution, 2160
for the smaller standard resolution). Then multiply that number
by the number of teeth on the encoder gear and divide by the
number of teeth on the telescope axis gear. For example, if
using a High Resolution (4000 step) encoder with a 84 tooth
gear connected to it and the telescope axis has a 96 tooth
gear attached to it, the ratio would be 2048/4000 X 84/96 =
0.4480. It is common to determine the encoder polarity (+/-) by
trial and error using Encoder Direction Test.
Encoder Direction Test
The purpose of the encoder direction test is to make sure the
encoders are set to the correct polarity, correct ratios, and that
nothing is slipping. You must do this test at home before trying
the Sky Wizard at night. It is the last step in the installation
procedure before going out into the field. If you find that your
Sky Wizard is way off, you must do this test before calling for
assistance.
Equatorial Telescopes: Point the telescope up and slightly
toward the South so that the Dec. is at 0 deg. on the original
(mechanical) setting circles. Rotate the original RA (mechanical)
setting circles so that RA = 00. Turn the Wizard off, then back on
to clear the Wizard and press ENTER after the Wizard reads
DEC=0. Press MODE and scroll to ENC TEST mode. Press
ENTER and it should read 000 +000.
Move the declination axis to 90° north. The display should
now show “000 +090” if the dec axis “sign” is correct. If not,
re-enter the INSTALL mode and change the sign to negative
for the DEC axis (2). If the second numerical value is not
+090, then the encoder ratio is incorrect. Check your
Installation Instructions to see if you have inputted the correct
encoder ratios in the INSTALL Mode.
To check the RA axis, again point the telescope up and slightly
toward the South so that the Dec. is at 0 deg. on the original
(mechanical) setting circles. Rotate the original RA (mechani-
cal) setting circles so that RA = 00. Turn the Wizard off, then
back on, to clear the Wizard and press ENTER after the Wizard
reads DEC=0. Press MODE and scroll to ENC TEST mode.
Press ENTER and it should read 000 +000. Move the telescope
toward the Western Horizon so that the RA= 18 Hrs. and it
should read 090 +000. If it reads another value, such as 270
+000 then go back to the INSTALL and change the +/- sign and
repeat the test. If you get any other values, check the encoder
ratios in INSTALL mode. Also check that the encoder and hard-
ware are properly installed. Make sure all setscrews are tight.
Altazimuth telescopes: Turn on Sky Wizard and position the
telescope vertically as requested by the instrument in AV (tele-
scope type) or horizontal in AZ. Press ENTER then the MODE
button. Scroll to the ENC TEST mode to display encoder angle.
In AV mode tilt the altitude axis down approximately 45° from
vertical. Move it up 45 deg. in AZ. Check that the display shows
“000 +045.” If the display is in agreement with the telescope
position, then the altitude encoder polarity is correct and no
change to the gear ratio is required. If not, press the MODE but-
ton, scroll to INSTALL, press ENTER. Repeat the Install
procedure until you get to 2. Then change the + sign to a - sign.
Be sure to go all the way through the install mode until the word
INSTALL reappears to update the changes.
Press the MODE button and scroll to ENC TEST and press
ENTER. Move the telescope about the azimuth bearing from
North towards East. The azimuth should increase from 0° to
90° (first numbers) if you rotate the telescope 90° to the East.
The display should now read “090 -045,”where the 45° is from
the test of the altitude axis. If the values are off, check the
encoder ratios in the INSTALL mode. Make sure the encoders
and hardware are installed correctly. If the AZ is off, make sure
the bottom bolt is NOT rotating. A drop of “super glue” on the
very bottom bolt and washer will help (applied from the bottom,
NOT top). If the ALT is off, make sure the altitude bearing is
rigid. If the display is in agreement with the telescope position,
then the altitude encoder polarity is correct and no change to
the gear ratio is required. If not, press the MODE button, scroll
to INSTALL, press ENTER. Repeat the Install procedure until
you get to 1. Then change the + sign to a - sign (or vice versa).
Be sure to go all the way through the install mode until the word
INSTALL reappears to update the changes.
Startup Index Mark
Once you have finished running INSTALL to tell Sky Wizard
about your telescope, there is one final step which need only be
done one time. As mentioned in the SETUP command, you will
see that your telescope mount needs to be aimed to a particular
position once each time you set up to observe. The accuracy of
Sky Wizard is dependent upon your accurately setting the initial
index mark, so take your time just this once!
Equatorial Mounts. If your telescope has an Equatorial Mount
with mechanical setting-circle dials, these will do nicely. First,
verify that the declination setting circle is accurately set by aim-
ing your telescope to 90° declination (telescope aimed up the
polar axis). Rotate the telescope in Right Ascension and look
for any tube “wobble.” You can verify this by looking through an
aligned finder to see that stars rotate around the middle of the
field of view. If necessary, adjust the tube so there is no wobble
and reset the setting-circle to 90°.
Another method for Fork Mounted Equatorial telescopes is to
check the Dec. setting circle using a bubble level. This should
be done inside using a carpenter’s level, before going out into
the field. Take the telescope off the wedge and put it on a level
surface. Make sure the drive base is level and the telescope
is pointed straight up with the corrector end away from the
drive base and the Dec. = 90. Place the level across the front
of the corrector cell, perpendicular to the fork arms. Adjust the
Dec. slow motion until it is level. Adjust the Dec. setting circle
to read exactly 90.
German-type Equatorial Mounts. These mounts have two
possible positions for the 0° declination setting required during
initialization. It is important to use the correct one, or the encod-
er sensing will be backwards. The telescope should be aimed
generally EASTWARD when the declination is set to 0°.
Determine which of the two zero degree index marks corre-
sponds to this direction, and place an indicating mark there for
future use. You can confirm the setting circles are accurate by
pointing the telescope exactly North. Rotate the telescope in RA

5
only. Stars should rotate about the center of the field of view. For
Altazimuth or Dobsonian telescopes, put a simple index align-
ment mark on your scope to save you time in the future.You can
choose to make the index mark with the telescope aiming either
vertically or horizontally, depending on your choice in the
INSTALL program. A precisely vertical orientation can be deter-
mined by rotating the telescope around the base and looking for
any tube “wobble.” Better yet, use a carpenter’s level. Adjust the
angle until no wobble can be seen while rotating the telescope.
You can also install a “stop” in the rocker box so the telescope
stops at exactly the vertical position. Alternately, a horizontal
orientation can be made by placing the telescope base on a
very level surface, and then leveling the telescope tube with a
carpenter’s level. Mark a line on the telescope bearing and on
the body to use for an index mark.
2. Operation
Overview
Sky Wizard 2 has eight operating modes. Each mode or func-
tion performs a different task. Pressing the MODE button
shows the current mode. Change to a different mode by
pressing either SELECT button (up or down arrow). The
SELECT buttons are always used for scrolling through the list
of available choices. The UP button advances through the list
in a forward direction, the DOWN button moves backwards.
The operating modes are:
CATALOG Display or choose an object in one of the
catalogs.
ENC TEST Test mode–verifies encoder rotation & correct
installation.
FIND Tell Sky Wizard to display direction/distance to
the last object chosen in one of the catalogs.
INSTALL Run when you first install Sky Wizard on your
telescope.
RA DEC Displays celestial coordinates.
SETUP Run at the beginning of each observing
session.
SYNC Tell Sky Wizard that the current object has
been exactly centered – “tweaks” the current
alignment.
TIMER Use the built-in utility timer.
Power On Initialization
When you first turn on Sky Wizard, you need to aim the telescope
to a particular position so the angle of one encoder to the telescope
is known. This step is critical to accuracy. Depending on the type of
mount you have, the display shows one of the following messages:
DEC=0, LEVEL ME, or VERTICAL. Only with a perfect polar align-
ment (EP or GP) does the Sky wizard go directly to SETUP.
Turn on Sky Wizard. It will briefly display the startup message
ORION SKY WIZARD V 2.00. The numbers displayed are the
software version number. Sky Wizard will display one of the
following depending on the mount type choice you made when
you ran INSTALL. (See Installation for more information).
SET DEC=0–(Equatorial mount) Set telescope declination to
the 0° index mark on the mechanical setting circles. You must
verify that your mechanical setting circles are EXACT. Aim
telescope at celestial equator, 90° from the pole. (German
Equatorial mountings must have the encoder initialized with
the declination axis set at the east of the meridian zero decli-
nation, the optical tube on the west side.) See Chp 6, page 14
Startup Index Mark for more information.
SET LEVEL ME–(Altazimuth mount type AZ) Aim telescope
tube horizontally to your index mark (telescope aimed at the
horizon if scope base is level). The telescope tube must be
exactly parallel with the bottom of the rocker box. You must
verify that this is exact with a bubble level your first time out.
SET VERTICAL–(Altazimuth mount type AV) Aim telescope
tube vertically to your index mark (telescope aimed directly
overhead if scope base is level). The telescope must be
exactly perpendicular to the bottom of the rocker box. You
must verify that this is exact with a bubble level your first time
out. After you have moved the telescope to the correct initial
position, press ENTER. Sky Wizard will then switch to SETUP
mode. (If you make a mistake in initializing the mount align-
ment, turn Sky Wizard off and on again to restart. There is no
other way to repeat mount initialization.)
The initialization steps above are critical to the pointing accu-
racy of the Sky Wizard. For example, an error of 1 deg. on the
initialization will result in errors up to 2 deg. Follow the steps
carefully in Chp 1, Startup Index Mark, page 5.
SETUP Star Alignment
Before Sky Wizard can tell you where to point your telescope,
it needs to get its bearings on the sky. You must do this at the
start of each observing session. SETUP mode automatically
accesses a short list of 30 named navigational stars (listed in
Chp 6, page 14). The brightest stars from both the Northern
and Southern hemispheres are included. These familiar bright
stars cover the sky so that at least two are visible at any time.
You’ll need to point your telescope to two known stars, tell Sky
Wizard which ones they are, and you’re ready to go.
To perform the setup star alignment:
1. Pick a bright known star from the list and center it in the eye-
piece.
2. Press MODE. If SETUP is not displayed, use the arrow
keys to display SETUP. Press ENTER.
3. Scroll through the star list to find the name of the star that
is centered in the eyepiece, then press ENTER.
4. Choose another bright star for the second alignment star
and repeat step 3. For best results the two stars should be
at least 60° apart. Avoid stars near the pole.
Note: Only one star sighting is required for perfectly
polar-aligned equatorial telescopes; however a second
sighting is recommended.

6
After Sky Wizard determines the transformation resulting
from star alignment, it displays a measure of how well the
alignment agrees with its star data. This “warp factor” is 0.0 for
perfect alignment, but an acceptable range is ±0.6. The dis-
play will show the warp for about 2 seconds. This represents
the error in degrees and tenths. Example: WARP=+0.5
If the warp factor is greater than 0.6, check to be sure you
have correctly identified the setup stars and repeat the setup
operation. Make sure that your Startup Index Mark is exact.
Never assume, for example, the mechanical setting circles
are exact for the Dec.=0 index mark. Always double check the
accuracy of the index mark, especially on your first night out.
If the warps are larger than 10, check the encoder polarity
and encoder ratios on your install kit instructions. Always do
the ENC TEST (Encoder Direction Test, see below) after
installing the Sky wizard, before you go out at night for the first
time. Note: if your telescope mount does not have the two
axes perfectly set at 90° apart, it may be impossible to reach
an acceptable warp factor. If this happens, correct the tele-
scope mount.
ENC Test
Encoder test must be done after installing the Sky Wizard on
the telescope, and before going out at night for the first time.
This allows verification that the encoders are functional and
move the correct direction and amount. The unit of measure
is whole degrees.
The display shows RA on the left and Dec. on the right. For
an equatorial mount the display will show both 000 on the
right ascension axis, and +000 on the declination axis. The
RA increases from 0 to 90 as you move toward the West 90
deg. The Dec. increases from 0 to +90 as you move the tele-
scope from the Equator to the North pole.
For an altitude/azimuth telescope mounting the display identi-
fies the first numbers 000 as the azimuth axis, and the second
numbers +000 as the altitude axis. Azimuth should be 0° for
logical north, and increase to 90° for logical east. Altitude is
0° when horizontal and +90° when vertical. Motion of the
telescope will change the encoder angles.
RA/DEC
Displays right ascension and declination, which provides a
continuous display of telescope position. Example: RA=0742
D=+28.1. This example shows a right ascension of 7 hours
and 42 minutes, and a declination of north 28.1 degrees.
Note: The final digit in the declination is in tenths of a degree.
Catalog
This mode retrieves information from one of Sky Wizard’s six
separate catalogs. Select this mode by pressing MODE, then
either UP or DOWN until CATALOG is displayed, then press
ENTER. Press the UP or DOWN arrow to select one of the cata-
logs, then press ENTER when the catalog you prefer is displayed.
Catalogs available (and typical display):
Star catalog: ST001
Messier catalog: M001
NGC catalog: NGC0001
IC catalog: IC0001
NEW (programmable) user’s catalog: NEW01
The Planets catalog: PLANETS
The first time a catalog is used the display will show its first
entry. For example, the Messier catalog displays M001, which
happens to be the Crab Nebula. The “M” will be blinking.
The ST (Star) Catalog contains many interesting stars, dou-
ble stars and red stars including all of the alignment stars. The
complete list is included in the back of this manual. First look
up the object, select CATALOG mode, choose ST , and enter
the index number using the arrow buttons to set the blinking
digit, pressing ENTER to advance to the next digit to be set.
Press ENTER after setting the last digit and the display will
show the coordinates. For the famous double star “Albireo” the
following information would appear on the display:
Example CATALOG display for selecting an object from the
star (ST) list:
Enter number: ST182
Coordinates: 0513+028
Description: ST182 MAG=4.5 SIZE=7.0
RHO ORION COLORED DOUBLE STAR
The MESSIER Catalog contains the full historical list of 110
objects identified by the famous French astronomer Charles
Messier. These objects are the most popular objects observed
by amateur astronomers. (The catalog list includes objects
now known to be duplicates or asterisms, which are identified
in the description.)
Select CATALOG with the MODE button and press ENTER. If
you are already in CATALOG, simply press the arrow buttons
to switch between the three groups and press ENTER. The
display will show M001. Enter the desired value of the blinking
digit using the arrow buttons and press ENTER to advance to
the next digit. When the last digit has been set, press ENTER
and the display will show the M number. Press ENTER again
to show the coordinates for the selected object. Press ENTER
again for a scrolling description which includes magnitude,
popular name, constellation and description.
Example CATALOG display for selecting an object from the
Messier (M) list:
Catalog number: M027
Celestial coordinates: 2000+227
Description: M027 MAG=8.0 SIZE=480
DUMBBELL NEBULAVULPECULA
PLANETARY NEBULA IRREGULAR

7
The NGC Catalog is the New General Catalog of deep-sky
objects complied by the Danish astronomer J.L.E. Dreyer
more than 100 years ago. It contains hundreds of excellent
examples of each type of deep-sky object and is the most well
known and used catalog by amateur astronomers beyond the
already mentioned Messier (M) Catalog.
The IC Catalog, the Index Catalog, contains objects which
were discovered in the decade or so after the NGC was first
published. This list contains objects similar to the NGC, but the
IC objects are typically fainter and more difficult to observe.
The NEW (User’s) Catalog is initially empty. It may be used
to store the coordinates of the observer’s favorite objects, for
current positions of an unexpected comet or nova, or for a
variable star observing list. There is space for 27 objects in
the memory. The objects are kept in memory even when
power is turned off.
First the object number is set in the same manner as selecting
any catalog object. After the object is selected, press ENTER
and the coordinates will be displayed. If you want to change the
coordinates press ENTER again. The first digit of the coordi-
nates will blink, this digit may be changed by pressing the UP
and DOWN buttons to increment or decrement the digit. When
the first digit is set press ENTER to go on to the next digit.
Should you decide not to change the coordinates, press MODE
to exit. When you have finished setting the digits, press
ENTER, then MODE to exit or UP or DOWN to go to another
entry in the catalog.
Example CATALOG display for selecting an object from the
NEW catalog:
Enter number: NEW15
Coordinates: 1930+275
The PLANETS Catalog consists of the major planets of the
solar system. The planetary positions are calculated accord-
ing to the date. While the date is not required for any other
type of celestial subject, it is necessary for calculating correct
planet positions. Sky Wizard will remind you to enter the date
the first time you choose the Planets catalog during an
observing session.
Press MODE, scroll to CATALOG, press ENTER. Scroll to
PLANETS and press ENTER. When DATE appears, press
ENTER twice. The last calendar date entered will be dis-
played. This date is used in the planetary orbit calculations.
The range of years is from 1950 to 2050. Press ENTER again.
The display order is Month, Date, and Year. The digits may be
set sequentially using the UP and DOWN buttons to set each
digit. Press ENTER when each digit is set to the desired
value. After setting all the digits of the date, press UP or
DOWN to select a planet.
The UP and DOWN buttons will allow you to scroll through the
list of planets. Press ENTER to display the current coordi-
nates of the planet.
The CATALOG display for selecting a planet:
MERCURY
VENUS
MARS
JUPITER
SATURN
URANUS
NEPTUNE
PLUTO
Find
The FIND mode provides steering directions to a pre-selected
object in the catalog. Pick an object from any of the catalog
databases, then press MODE to return the mode selector,
and press UP or DOWN until FIND is displayed, then press
ENTER. FIND takes the last object selected from the
CATALOG, compares the objects published coordinates with
the current telescope position, and displays steering direc-

tions. The unit of measure is degrees from the current
position. Suppose, for example, we selected M27, but the
telescope got bumped a few degrees before we could see it.
Use the FIND mode and move the telescope as indicated to
make the displayed deviation zero. The indication shows 2.3
degrees left and 1.5 degrees up. Press ENTER to obtain a
scrolling description.
Guide display arrows: 2.31.5
Description: M027 MAG=8.0 SIZE=480
DUMBELL NEBULA VULPECULA
PLANETARY NEBULA IRREGULAR
SA=08
As you move the telescope the numbers will count down until
the object is re-centered and the distance displayed is 0.0
degrees. If the distance back to the object is greater than 10
degrees in either direction, the steering will be in whole 1
degree increments. Once the object is within 10 degrees of
center the instrument will display finer resolution steering
directions of 0.1 degrees. The following sequence of guiding
displays shows how the guiding arrows and digits change as
the object is approached and then passed.
503617242.31.5 0•00•0 1.40.8
The guide mode displays guide directions based on the axes of
motion of the telescope mount. Thus an altazimuth mount will be
directed by the pointing arrows right, left and up, down. Motion in
one axis will not cause the other deviation display to change.
Scrolling UP or DOWN while in FIND mode will tell Sky
Wizard to move in the previously selected catalog database,
even though the display does not show the object.
If your telescope has a German-type equatorial mount, Sky
Wizard allows for the two possible ways to point at an object. Sky
Wizard will display the path from the current position that involves
the least turning. Should the observer want to “flop” the telescope
180°, Sky Wizard will guide you to that position as well.
Timer
The Timer is a stopwatch function which measures elapsed
time in hours, minutes, and seconds. It is a real convenience
to have an illuminated stopwatch right on the telescope for
observing the planets or comets. Press the MODE button and
select the TIMER option using the arrow buttons.
Press ENTER to enter the TIMER mode. Press the ENTER
button to start, stop, or reset the timer. Time is shown is hours,
minutes, and seconds.
SYNC
This function is usually used only when objects are not centered
in the field of view. It allows any star or object in the database to
be used for alignment. For example, center the Messier object
M37 in the eyepiece. Enter CATALOG mode and look up M37 in
the Mlist, then press MODE and scroll to SYNC mode. Press
the ENTER button to choose this as a new alignment fix. This
function is useful for obtaining a new alignment fix during the
middle of an observing session to correct small coordinate errors
that may accumulate due to slight misalignments of the encoder
installation. When you SYNC, Sky Wizard will display the object
as a reminder. Example: SYNC M037. If you SYNC with the
wrong subject, Sky Wizard may become disoriented and you will
need to run SETUP again to reorient accurately to the sky.
3. Sample Observing
Session
Power On & Setup Alignment
Let’s pretend we are observing through our telescope with an
equatorial mount, not perfectly polar-aligned. We turn on the Sky
Wizard. It will briefly display the startup message ORION SKY
WIZARD V2.0 (2.0 is the software version number - your unit
may have a larger number). Then it will display DEC=0, this
indicates that you need to point the telescope to declination
equal to zero (using the mechanical setting circles), where the
optical axis is perpendicular to both the right ascension and
declination axis. This means the telescope is pointed at the
Celestial Equator. (German-type Equatorial mountings must
have the encoder initialized with the declination axis set at the
east of the meridian zero declination. Be sure to use the Dec.
zero degree mark which coincides with the telescope aiming
toward East.)
Press ENTER when the declination angle is set at 0 Deg. The
display will then say MODE SETUP. Sky Wizard initially
assumes that your equatorial telescope is properly polar-aligned
(EP or GP mount type), in which case it is only necessary to
sight a single star at the beginning of the observing session.
Position the telescope so that a familiar bright star is centered in
the eyepiece. Press ENTER and use the arrow buttons to scroll
through the list of 32 stars until you find the name of the star that
is in the eyepiece. Press the ENTER button again.The telescope
is now aligned. A second star may be sighted in another region
of the sky to increase accuracy in GP or EP mount types. All
other mount types, you must sight on 2 stars.The first star sight-
ing should be at least 60° from the celestial pole, a second star
should be between 60° and 120° from the first star. It is best NOT
to use Polaris for the second star.
A second star sighting is also required for an altazimuth tele-
scope. It is critical that the initialization index mark for either
vertical or horizontal has been checked for accuracy. This
operation is described in the INSTALL section of this manual.
For our example we will use Regulus, the bright star at the
base of the backward question mark of Leo. In the SETUP
mode the display will show the first star name in the list of 31
bright stars. The first star in the list is Achernar, and the dis-
play will read ALIGN ACHERNAR
We want to use the star Regulus for our first star sighting, so
press down, and hold, the UP arrow button to advance
through the list of star names. If you went past Regulus while
scrolling, simply press the DOWN arrow button to back up.
Release the button when the display reads REGULUS.
Press ENTER when Regulus is in the center of the field of
view. Verify the star is still centered in the eyepiece and press
the ENTER button. For optimal coverage of the sky, pick a
second star that is between 60° and 120° away from the first
8

9
star. After the first star sighting, simply press one of the arrow
buttons to advance to another star name. To find Mizar, for
example, press the UP arrow button until the display reads
MIZAR. Center Mizar in the eyepiece and press the ENTER
button. The second star sighting is now complete.The display
will show the warp factor which is a measure of the amount of
agreement between the catalog angles and the measured
angles between sighted stars. WARP=-0.4.
Press the MODE button to exit SETUP. Scroll UP or DOWN to
select the RA DEC mode for display, then press ENTER. Sky
Wizard will now display the celestial coordinates for any telescope
position. In our example the display now reads the coordinates for
Mizar since that is where the telescope is currently pointed. The
display reads RA=1324 D=+54.9
Swing the telescope around and observe how quickly the instru-
ment tracks the telescope position. The high resolution encoders
are very sensitive to small motions. Sky Wizard can track
motions as great as 100° per second, which is faster than you
would probably dare move a delicate optical instrument. Sky
Wizard locks on to the current position instantly and provides a
steady display of the computed celestial coordinates.
RA/DEC Mode
Let’s do some observing. We have a long session ahead if we
want to view all the Messier objects, over 300 interesting stars
and the entire list of user catalog objects. Fortunately, Sky
Wizard will make the search quite easy. It’s time to use the
powerful database and the smart function called FIND.
To start, let’s just stay in RA-DEC mode and swing the tele-
scope around to one of our favorites; M37 in the constellation
Auriga. The coordinates are 0552+326. We are currently posi-
tioned on Mizar at 1324+54.9. Experiment by moving the
telescope around to increase and decrease the two coordi-
nates. Take a couple of minutes to master this action as you
become familiar with the relationship between the telescope
coordinate system and the celestial coordinate system. When
the display reads “RA=0552 D=32.6,” take a look through the
eyepiece. M37 is right there, a nice galactic cluster with red
giant stars; proof that the installation is functioning correctly
and the alignment stars were carefully centered in the eye-
piece during alignment.
Using the CATALOG
Now that we are pointed at M37 we would like to see the other
Messier object M36. But we forgot to bring our charts. Select
CATALOG, then press ENTER. We are now in the Sky Wizard
database. The display shows M001 when we enter this mode.
Press ENTER to choose the Messier catalog, then press the
UP or DOWN select buttons to enter the number 036. We set
one digit at a time, much like a digital wrist watch, by changing
the value of the blinking digit.
CATALOG initial setting: M001
Setting digits to M36: M036
Press the ENTER button to advance to the next blinking digit
and use the UP or DOWN buttons to increment or decrement
the value. Press ENTER after setting the last digit and the
display will show the coordinates.
M36 coordinates: 0536+341
M36 scrolling description: M036 MAG 6.0 SIZE=11 AURIGA
OPEN CLUSTER RICH SA=05
We now have the coordinates for M36. There are two ways to
go from here. We can remember the coordinates and switch to
RA DEC mode to steer the telescope, or use the FIND mode
to give us steering directions to the object from our current
position. The FIND mode indicates just how much motion is
required for each axis of rotation.
Using the FIND Function
Press the MODE button and select FIND, using the arrow but-
tons to scroll through the choices. The instrument remembers
the object “M036” as the last item selected, and shows the
steering distances in degrees from our current position. FIND
shows 6fi4 17fl, indicating that M36 lies 17° down and 6.4° to
the left of our current position. When the object is centered the
distances displayed will be zero.
FIND directions: 6fi4 17fl
Object centered: 0•0 0•0
While in FIND mode with M36 centered, press the ENTER
button again to see the name of the object which is of course
M36. This observing session is off to a good start.
Using the SYNC Function
While observing we notice that most of the objects are off
toward the same edge of the field of view when we zero the
FIND display. Probably we bumped the telescope base or
were off a little when we sighted a star. We can have Sky
Wizard slightly adjust the alignment by simply centering the
last object we located with FIND, then press MODE and
select SYNC, then press ENTER. The next object should then
be more accurately centered.
If SYNC makes things worse, you may have been aiming at
the wrong object. Just turn off Sky Wizard and align again
from scratch using SETUP mode.
4. Specifications
Dimensions 2.75" x 4.55" x 1.02"
Weight 5.2 ounces including 9v battery
Temperature Range -10°C to +50°C
Telescope types Equatorial, Altitude/Azimuth
(Dobsonian)
Display Light emitting diode (LED), red color,
8 character alpha numeric
Display Dimming 4 step pushbutton dimming 10:1
from full bright to full dimmed.
Display Resolution 1m right ascension, 10' declination
0.1° in guide mode

10
Display Modes SETUP function, alignment mode
that uses short star list RA-DEC
function, right ascension and
declination
CATALOG, complete database of
celestial objects from 3 sources
FIND displays steering coordinates
to object
TIMER elapsed time stopwatch
SYNC alignment mode that uses
complete catalog
INSTALL telescope installation
ENC TEST shows encoder angles
Database Complete list of 110 Messier objects.
Alignment star list 30 bright
navigational stars.
User catalog of 27 objects
225 interesting stars and double
stars.
NGC catalog of 1,785
IC catalog (selections) include: great
galaxies and galaxy clusters,
planetary nebula, globular clusters,
open clusters, interesting stars, plus
more. Descriptions based on
amateur telescope observations.
Include magnitude, size/separation/
type, constellation, name.
Equatorial Setup Star based on 1 or 2 star sightings,
polar alignment not required.
Latitude, longitude, date, and time
not required.
Alt/Azimuth Setup Requires 2 star alignment and
orthogonal positioning of encoder
axes. No input for latitude, longitude,
date, or time required.
User Catalog Retained without electrical power in
non-volatile memory.
Customization Retained without electrical power in
non-volatile memory.
Coordinate Epoch AD 2000
Sensing Method Optical encoders, quadrature
Encoder Resolution Standard resolution 2160-step, 0.17°
encoders high resolution 4000 step,
0.09° encoders
Sampling Rate 0.4 millisecond
Maximum Slew Rate 100° per second (high resolution 1:1
ratio)
Encoder gearing any ratio between 1:1 to 1:4
Angle representation 16 bits
Vector representation 48 bits
Sidereal Clock accuracy
0.05 %
Stopwatch accuracy 0.05 %
Power Requirements 5.1 to 12 volts DC
16 mA, display fully dimmed, typical
47 mA, display maximum brightness,
typical
Reverse polarity protected
Battery Recommended
Duracell, 9 volt alkaline 1604 battery,
may be operated on external 12V
DC power supply
Battery Life 35 hours with display fully dimmed
Encoder Dimensional Drawings:
Standard (2160-step) encoder
High Resolution (4000-step) encoder
5. Catalog Listings
Messier Catalog Database
Cat# Name RA h m.m Dec ° ' Size Mag Const Description
M001 Crab Nebula 05 34.5 +22 01 6 8.4 Tau nebula
M002 21 33.5 -00 49 12.9 6.5 Aqr globular cluster highly resolved
M003 13 42.2 +28 23 16.2 6.4 CVn globular cluster highly resolved
M004 16 23.6 -26 32 26.3 5.9 Sco globular cluster highly resolved
M005 15 18.6 +02 05 17.4 5.8 Ser globular cluster highly resolved
M006 Butterfly Cluster 17 40.1 -32 13 15 4.2 Sco open cluster rich
M007 17 53.9 -34 49 80 3.3 Sco open cluster bright scattered
M008 Lagoon Nebula 18 03.8 -24 23 90 5.8 Sgr nebula with dust and cluster
M009 17 19.2 -18 31 9.3 7.9 Oph globular cluster mottle
M010 16 57.1 -04 06 15.1 6.6 Oph globular cluster highly resolved
M011 Wild Duck Cluster 18 51.1 -06 16 14 5.8 Sct open cluster dense
M012 16 47.2 -01 57 14.5 6.6 Oph globular cluster highly resolved
M013 Great Hercules Cluster 16 41.7 +36 28 16.6 5.9 Her globular cluster highly resolved
M014 17 37.6 -03 15 11.7 7.6 Oph globular cluster
M015 21 30.0 +12 10 12.3 6.4 Peg globular cluster highly resolved
M016 Eagle Nebula 18 18.8 -13 47 35 6.0 Ser nebula with dust and cluster
M017 Swan Nebula 18 20.8 -16 11 46 6.0 Sgr nebula
M018 18 19.9 -17 08 9 6.9 Sgr open cluster bright scattered
M019 17 02.6 -26 16 13.5 7.2 Oph globular cluster
M020 Trifid Nebula 18 02.3 -23 02 29 6.3 Sgr nebula with dust
M021 18 04.6 -22 30 13 5.9 Sgr open cluster rich
M022 18 36.4 -23 54 24 5.1 Sgr globular cluster highly resolved
M023 17 56.8 -19 01 27 5.5 Sgr open cluster dense
M024 18 18.4 -18 25 5 11p Sgr open cluster dense
M025 18 31.6 -19 15 32 4.6 Sgr open cluster bright scattered
M026 18 45.2 -09 24 15 8.0 Sct open cluster rich
M027 Dumbbell Nebula 19 59.6 +22 43 480" 7.4 Vul planetary nebula irregular
M028 18 24.5 -24 52 11.2 6.9 Sgr globular cluster highly resolved
M029 20 23.9 +38 32 7 6.6 Cyg open cluster bright scattered
M030 21 40.4 -23 11 11 7.5 Cap globular cluster highly resolved
M031 Great Andromeda Galaxy 00 42.7 +41 16 178 3.5 And very elongated galaxy dusty
with bright core
M032 00 42.7 +40 52 7.6 8.2 And round galaxy with bright core
M033 Pinwheel Galaxy 01 33.9 +30 39 62 5.7 Tri spiral galaxy structure with
bright knots
M034 02 42.0 +42 47 35 5.2 Per open cluster rich
M035 06 08.9 +24 20 28 5.1 Gem open cluster rich
M036 05 36.1 +34 08 12 6.0 Aur open cluster rich
M037 05 52.4 +32 33 24 5.6 Aur open cluster dense
M038 05 28.7 +35 50 21 6.4 Aur open cluster rich

11
M039 21 32.2 +48 26 32 4.6 Cyg open cluster bright scattered
M040 Winnecke 4 12 22.4 +58 05 50" 9.0 UMa double star
M041 06 47.0 -20 44 38 4.5 CMa open cluster dense
M042 Great Orion Nebula 05 35.4 -05 27 66 4.0 Ori nebula
M043 05 35.6 -05 16 20 9.0 Ori nebula bright with dust
M044 Beehive Cluster 08 40.1 +19 59 95 3.1 Cnc open cluster bright scattered
M045 Pleiades 03 47.0 +24 07 110 1.2 Tau open cluster with nebulosity
M046 07 41.8 -14 49 27 6.1 Pup open cluster dense
M047 07 36.6 -14 30 30 4.4 Pup open cluster dense
M048 08 13.8 -05 48 54 5.8 Hya open cluster rich
M049 12 29.8 +08 00 8.9 8.4 Vir round galaxy with bright core
M050 07 03.2 -08 20 16 5.9 Mon open cluster rich
M051 Whirlpool Galaxy 13 29.9 +47 12 11 8.4 CVn spiral galaxy structure attached
companion
M052 23 24.2 +61 35 13 6.9 Cas open cluster dense
M053 13 12.9 +18 10 12.6 7.7 Com globular cluster highly resolved
M054 18 55.1 -30 29 9.1 7.7 Sgr globular cluster mottled
M055 19 40.0 -30 58 19 7.0 Sgr globular cluster highly resolved
M056 19 16.6 +30 11 7.1 8.3 Lyr globular cluster highly resolved
M057 Ring Nebula 18 53.6 +33 02 86" 8.8 Lyr planetary nebula ring with cen
tral star
M058 12 37.7 +11 49 5.4 9.8 Vir round galaxy with bright core
M059 12 42.0 +11 39 5.1 9.8 Vir elongated galaxy with bright
core
M060 12 43.7 +11 33 7.2 8.8 Vir round galaxy with bright core
M061 12 21.9 +04 28 6 9.7 Vir spiral galaxy structure
M062 17 01.2 -30 07 14.1 6.6 Oph globular cluster
M063 13 15.8 +42 02 12.3 8.6 CVn elongated galaxy with bright
core
M064 Black-eye Galaxy 12 56.7 +21 41 9.3 8.5 Com elongated galaxy dusty
M065 11 18.9 +13 05 10 9.3 Leo very elongated galaxy with
bright core
M066 11 20.2 +12 59 8.7 9.0 Leo spiral galaxy structure
M067 08 50.4 +11 49 30 6.9 Cnc open cluster dense
M068 12 39.5 -26 45 12 8.2 Hya globular cluster highly resolved
M069 18 31.4 -32 21 7.1 7.7 Sgr globular cluster
M070 18 43.2 -32 18 7.8 8.1 Sgr globular cluster
M071 19 53.8 +18 47 7.2 8.3 Sge globular cluster highly resolved
M072 20 53.5 -12 32 5.9 9.4 Aqr globular cluster
M073 20 59.0 -12 38 2.8 8.9p Aqr asterism
M074 01 36.7 +15 47 10.2 9.2 Psc spiral galaxy structure
M075 20 06.1 -21 55 6 8.6 Sgr globular cluster unresolved
M076 Little Dumbbell 01 42.3 +51 34 163" 10.1 Per planetary nebula irregular
M077 02 42.7 -00 01 6.9 8.8 Cet round galaxy with bright core
M078 05 46.7 +00 03 8 8.0 Ori reflection nebula bright
M079 05 24.5 -24 33 8.7 8.0 Lep globular cluster highly resolved
M080 16 17.0 -22 59 8.9 7.2 Sco globular cluster mottled
M081 09 55.6 +69 04 25.7 6.9 UMa spiral galaxy structure
M082 09 55.8 +69 41 11.2 8.4 UMa very elongated galaxy with
dust and bright knots
M083 13 37.0 -29 52 11.2 7.6 Hya barred spiral galaxy structure
M084 12 25.1 +12 53 5 9.3 Vir round galaxy with bright core
M085 12 25.4 +18 11 7.1 9.2 Com round galaxy with bright core
M086 12 26.2 +12 57 7.4 9.2 Vir round galaxy with bright core
M087 Virgo A 12 30.8 +12 24 7.2 8.6 Vir round galaxy with bright core
M088 12 32.0 +14 25 6.9 9.5 Com very elongated galaxy with
bright core
M089 12 35.7 +12 33 4.2 9.8 Vir round galaxy with bright core
M090 12 36.8 +13 10 9.5 9.5 Vir very elongated galaxy with
bright core
M091 12 35.4 +14 30 5.4 10.2 Com elongated galaxy with bright
core
M092 17 17.1 +43 08 11.2 6.5 Her globular cluster highly resolved
M093 07 44.6 -23 52 22 6.2 Pup open cluster dense
M094 12 50.9 +41 07 11 8.2 CVn elongated galaxy with bright
core
M095 10 44.0 +11 42 7.4 9.7 Leo barred spiral galaxy structure
M096 10 46.8 +11 49 7.1 9.2 Leo round galaxy with bright core
M097 Owl Nebula 11 14.8 +55 01 202" 9.9 UMa planetary nebula irregular
M098 12 13.8 +14 54 9.5 10.1 Com very elongated galaxy with
bright core
M099 12 18.8 +14 25 5.4 9.8 Com spiral galaxy structure
M100 12 22.9 +15 49 6.9 9.4 Com round galaxy with bright core
M101 14 03.2 +54 21 26.9 7.7 UMa spiral galaxy structure with
bright knots
M102 15 06.5 +55 46 5.2 10.0 Dra very elongated galaxy dusty
with bright core
M103 01 33.2 +60 42 6 7.4 Cas open cluster rich
M104 Sombrero Galaxy 12 40.0 -11 37 8.9 8.3 Vir edge on galaxy dusty
M105 10 47.8 +12 35 4.5 9.3 Leo round galaxy with bright core
M106 12 19.0 +47 18 18.2 8.3 CVn spiral galaxy structure with
bright knots
M107 16 32.5 -13 03 10 8.1 Oph globular cluster
M108 11 11.5 +55 40 8.3 10.1 UMa very elongated galaxy with
dust and bright knots
M109 11 57.6 +53 23 7.6 9.8 UMa elongated galaxy with bright
core
M110 00 40.4 +41 41 17.4 8.0 And elongated galaxy
Star Catalog Database
St# Name RA h m.m Dec° ' Size Mag Const Description
ST001 0254 00 01.2 +60 21 59" 7.6 Cas colored double star
ST002 ·3053 00 02.6 +66 06 15" 5.9 Cas colored double star
ST003 ·3062 00 06.3 +58 26 1" 6 Cas double star challenge
ST004 Alpheratz 00 08.4 +29 05 * 2.1 And star
ST005 35 00 15.0 +08 49 12" 5.8 Psc colored double star
ST006 R 00 24.0 +38 35 * 5.8 And variable star
ST007 55 00 39.9 +21 26 6" 5.4 Psc colored double star
ST008 Eta 00 49.1 +57 49 12" 3.4 Cas colored double star
ST009 65 00 49.9 +27 43 4" 6.3 Psc double star equal magnitude
ST010 Navi 00 56.7 +60 43 * 2.5 Cas star
ST011 ·79 01 00.1 +44 43 8" 6 And double star equal magnitude
ST012 U 01 02.3 +81 51 * 6.8 Cep variable star
ST013 Psi-1 01 05.6 +21 28 30" 5.3 Psc double star equal magnitude
ST014 Zeta 01 13.7 +07 35 23" 4.9 Psc double star
ST015 Z 01 16.1 +25 46 * 8.8 Psc red variable star
ST016 Achernar 01 37.7 -57 14 * 0.5 Eri star
ST017 P 01 39.8 -56 12 11" 5.1 Eri double star equal magnitude
ST018 ·162 01 49.3 +47 54 2" 5.8 Per triple star challenge
ST019 1 01 50.1 +22 17 3" 5.9 Ari colored double star
ST020 ·163 01 51.3 +64 51 35" 6.6 Cas colored double star
ST021 Gamma 01 53.5 +19 18 8" 4.6 Ari double star equal magnitude
ST022 Lambda 01 57.9 +23 36 37" 4.8 Ari colored double star
ST023 Alpha 02 02.0 +02 46 2" 3.8 Psc double star challenge
ST024 Gamma 02 03.9 +42 20 10" 2.2 And colored double star
ST025 59 02 10.9 +39 02 16" 5.6 And colored double star
ST026 Iota 02 12.4 +30 18 4" 4.9 Tri colored double star
ST027 Mira 02 19.3 -02 59 * 2 Cet variable star
ST028 Iota 02 29.1 +67 24 2" 4.5 Cas triple star challenge
ST029 Polaris 02 31.8 +89 16 18" 2 UMi double star
ST030 30 02 37.0 +24 38 39" 6.5 Ari colored double star
ST031 Gamma 02 43.3 +03 14 3" 3.5 Cet double star magnitude contrast

ST032 ·305 02 47.5 +19 22 3" 7.4 Ari double star challenge
ST033 RZ 02 48.9 +69 38 * 6.2 Cas variable star
ST034 Pi 02 49.3 +17 28 3" 5.2 Ari triple star
ST035 Theta 02 58.3 -40 18 8" 3.2 Eri double star
ST036 Epsilon 02 59.2 +21 20 1" 4.6 Ari double star challenge
ST037 Algol 03 08.2 +40 57 * 2.1 Per variable star
ST038 ·369 03 17.2 +40 29 3" 6.7 Per colored double star
ST039 Mirfak 03 24.3 +49 52 * 1.8 Per star
ST040 ·401 03 31.3 +27 34 11" 6.4 Tau double star equal magnitude
ST041 32 03 54.3 -02 57 7" 4.5 Eri colored double star
ST042 Epsilon 03 57.9 +40 01 9" 2.9 Per double star magnitude contrast
ST043 Omicron 2 04 15.2 -07 39 9" 4.4 Eri triple star challenge
ST044 T 04 22.0 +19 32 * 8.4 Tau variable star
ST045 1 04 32.0 +53 55 10" 5.4 Cam colored double star
ST046 Aldebaran 04 35.9 +16 31 * 0.9 Tau star
ST047 ·572 04 38.5 +26 56 4" 7.3 Tau double star equal magnitude
ST048 55 04 43.6 -08 48 9" 6.7 Eri double star equal magnitude
ST049 Iota 04 50.9 -53 28 12" 5.2 Pic double star
ST050 ST 04 51.2 +68 10 * 9.2 Cam red variable star
ST051 Omega 04 59.3 +37 53 5" 4.9 Aur double star magnitude contrast
ST052 Hinds Crimson Star 04 59.6 -14 48 * 5.5 Lep red variable star
ST053 Epsilon 05 02.0 +43 49 * 2.9 Aur variable star
ST054 Rho 05 13.3 +02 52 7" 4.5 Ori colored double star
ST055 Rigel 05 14.5 -08 12 9" 0.1 Ori double star magnitude contrast
ST056 14 05 15.4 +32 41 11" 5 Aur triple star
ST057 Capella 05 16.7 +46 00 * 0.1 Aur star
ST058 Eta 05 24.5 -02 24 1.5" 3.4 Ori double star challenge
ST059 118 05 29.3 +25 09 5" 5.8 Tau double star
ST060 ·718 05 32.4 +49 24 8" 7.5 Aur double star equal magnitude
ST061 Lambda 05 35.1 +09 56 4" 3.4 Ori double star magnitude contrast
ST062 Trapezium 05 35.3 -05 23 13" 5.1 Ori quadruple star
ST063 Sigma 05 38.7 -02 36 11" 3.7 Ori quadruple star
ST064 Zeta 05 40.8 -01 57 2.4" 1.8 Ori double star magnitude contrast
ST065 Betelgeuse 05 55.2 +07 24 * 0.5 Ori star
ST066 U 05 55.8 +20 10 * 4.8 Ori red variable star
ST067 Theta 05 59.7 +37 13 3.5" 2.6 Aur double star magnitude contrast
ST068 8 06 23.8 +04 36 13" 4.3 Mon colored double star
ST069 Canopus 06 24.0 -52 42 * -0.7 Car star
ST070 Beta 06 28.8 -07 02 3" 3.8 Mon triple star
ST071 UU 06 36.5 +38 27 * 7.8 Aur red variable star
ST072 Sirius 06 45.1 -16 43 4" -1.5 CMa double star
ST073 12 06 46.2 +59 27 2" 4.9 Lyn triple star challenge
ST074 ·958 06 48.2 +55 42 5" 5.5 Lyn double star equal magnitude
ST075 38 06 54.6 +13 11 7" 4.7 Gem colored double star
ST076 W 07 08.1 -11 55 * 6.4 CMa red variable star
ST077 h3945 07 16.6 -23 19 27" 4.5 CMa colored double star
ST078 Delta 07 20.1 +21 59 6" 3.5 Gem double star magnitude contrast
ST079 19 07 22.9 +55 17 15" 5.6 Lyn triple star
ST080 n 07 34.3 -23 28 10" 5.1 Pup double star equal magnitude
ST081 Castor 07 34.6 +31 53 2" 1.6 Gem double star challenge
ST082 K 07 38.8 -26 48 10" 3.8 Pup double star equal magnitude
ST083 Procyon 07 39.3 +05 14 * 0.4 CMi star
ST084 U 07 55.1 +22 00 * 8.2 Gem variable star
ST085 Zeta 08 12.2 +17 39 0.6" 4.7 Cnc triple star challenge
ST086 Æ70 08 29.5 -44 44 5" 5 Vel double star
ST087 ·1254 08 40.4 +19 40 21" 6.4 Cnc quadruple star
ST088 Iota 08 46.7 +28 46 30" 4 Cnc colored double star
ST089 Epsilon 08 46.8 +06 25 3" 3.4 Hyd double star magnitude contrast
ST090 Suhail 09 08.0 -43 26 * 2.2 Vel star
ST091 Sigma-2 09 10.4 +67 08 4" 4.8 Uma double star magnitude contrast
ST092 ·1338 09 21.0 +38 11 1" 6.6 Lyn double star challenge
ST093 Alphard 09 27.6 -08 40 * 2 Hya star
ST094 Zeta-1 09 30.8 -31 53 8" 5.8 Ant double star
ST095 R 09 47.6 +11 26 * 4.4 Leo red variable star
ST096 Y 09 51.1 -23 01 * 8.3 Hya red variable star
ST097 Regulus 10 08.4 +11 58 * 1.4 Leo star
ST098 Gamma 10 20.0 +19 51 4" 2.3 Leo double star
ST099 49 10 35.0 +08 39 2" 5.7 Leo double star challenge
ST100 U 10 37.6 -13 23 * 7 Hya red variable star
ST101 54 10 55.6 +24 45 7" 4.3 Leo double star
ST102 Xi 11 18.2 +31 32 1.5" 3.8 Uma double star challenge
ST103 N 11 32.3 -29 16 9" 5.8 Hyd double star equal magnitude
ST104 90 11 34.7 +16 48 3" 6 Leo triple star
ST105 Denebola 11 49.1 +14 34 * 2.1 Leo star
ST106 2 12 04.3 +21 28 4" 5.9 Com colored double star
ST107 ·1604 12 09.5 -11 51 10" 6.6 Crv triple star
ST108 2 12 16.1 +40 40 11" 5.7 CVn colored double star
ST109 ·1633 12 20.6 +27 03 9" 6.3 Com double star equal magnitude
ST110 M40 12 22.4 +58 05 50" 9 UMa double star
ST111 SS 12 25.3 +00 48 * 6 Vir red variable star
ST112 ACrux 12 26.6 -63 06 4" 1.4 Cru double star
ST113 Delta 12 29.9 -16 31 24" 3 Crv colored double star
ST114 24 12 35.1 +18 23 20" 5 CVn colored double star
ST115 ·1669 12 41.3 -13 01 5" 5.3 Crv double star equal magnitude
ST116 Gamma 12 41.7 -01 27 3" 2.8 Vir double star equal magnitude
ST117 Y 12 45.1 +45 26 * 7.4 CVn red variable star
ST118 32 12 49.2 +83 25 22" 5.3 Cam double star equal magnitude
ST119 Alpha 12 56.0 +38 19 19" 2.9 CVn double star
ST120 Theta 13 09.9 -05 32 7" 4.4 Vir triple star challenge
ST121 Mizar 13 23.9 +54 56 14" 2.3 Uma double star
ST122 Spica 13 25.2 -11 10 * 1 Vir star
ST123 R 13 29.7 -23 17 * 4 Hyd variable star
ST124 Kappa 14 13.5 +51 47 13" 4.4 Boo colored double star
ST125 Arcturus 14 15.7 +19 11 * 0 Boo star
ST126 R 14 16.6 -59 55 * 5.3 Cen variable star
ST127 Alpha cen 14 39.6 -60 50 20" 0 Cen double star
ST128 Pi 14 40.7 +16 25 6" 4.9 Boo double star
ST129 Zeta 14 41.1 +13 44 1" 3.8 Boo double star challenge
ST130 Izar 14 45.0 +27 04 3" 2.4 Boo colored double star
ST131 Mu 14 49.3 -14 09 2" 5.4 Lib double star challenge
ST132 39 14 49.7 +48 43 3" 5.7 Boo double star
ST133 Xi 14 51.4 +19 06 7" 4.6 Boo colored double star
ST134 44 15 03.8 +47 39 1.5" 4.8 Boo double star challenge
ST135 ·1932 15 18.3 +26 50 1.5" 6.6 CrB double star challenge
ST136 Mu 15 24.5 +37 23 2" 4.3 Boo triple star
ST137 Delta 15 34.8 +10 32 4" 3.8 Ser double star
ST138 ·1962 15 38.7 -08 47 12" 5.8 Lib double star equal magnitude
ST139 Zeta 15 39.4 +36 38 6" 5 CrB double star
ST140 R 15 48.6 +28 09 * 5.7 CrB variable star
ST141 Xi 15 56.9 -33 58 10" 5.2 Lup double star
ST142 T 15 59.5 +25 55 * 2 CrB variable star
ST143 Xi 16 04.4 -11 22 1" 4.2 Sco triple star challenge
ST144 Kappa 16 08.1 +17 03 28" 5 Her colored double star
ST145 Nu 16 12.0 -19 28 1" 4 Sco quadruple star
ST146 Sigma 16 14.7 +33 52 7" 5.2 CrB double star
ST147 Rho 16 25.6 -23 27 3" 4.6 Oph double star
ST148 Antares 16 29.4 -26 26 3" 1 Sco double star challenge
ST149 16/17 16 36.2 +52 55 3" 5.1 Dra triple star
12

13
ST150 Mu 17 05.3 +54 28 2" 4.9 Dra double star equal magnitude
ST151 Alpha 17 14.6 +14 23 5" 3.2 Her double star equal magnitude
ST152 36 17 15.3 -26 36 5" 4.3 Oph double star equal magnitude
ST153 39 17 18.0 -24 17 10" 5.2 Oph colored double star
ST154 Rho 17 23.7 +37 09 4" 4.2 Her double star
ST155 Nu 17 32.2 +55 11 62" 4.9 Dra double star equal magnitude
ST156 Rasalhague 17 34.9 +12 34 * 2.1 Oph star
ST157 Barnard’s Star 17 57.8 +04 34 * 9.5 Oph star
ST158 h5003 17 59.1 -30 15 6" 5 Sgr colored double star
ST159 ·2308 18 00. +80 00 19" 5.7 Dra double star equal magnitude
ST160 95 18 01.5 +21 36 6" 4.3 Her double star equal magnitude
ST161 Tau 18 03.1 -08 11 2" 4.8 Oph double star challenge
ST162 70 18 05.5 +02 30 1.5" 4 Oph double star challenge
ST163 100 18 07.8 +26 06 14" 5.9 Her double star equal magnitude
ST164 59 18 27.2 +00 12 4" 5.2 Ser colored double star
ST165 Kappa 18 33.4 -38 44 21" 5.9 CrA double star equal magnitude
ST166 Vega 18 36.9 +38 47 * 0 Lur star
ST167 Epsilon 18 44.3 +39 40 2" 4.7 Lyr quadruple star
ST168 Zeta 18 44.8 +37 36 44" 4.4 Lyr double star
ST169 5 18 46.5 -00 58 13" 5.8 Aql triple star
ST170 R 18 47.5 -05 42 * 4.5 Sct variable star
ST171 ·2404 18 50.8 +10 59 4" 6.9 Aql double star
ST172 O·525 18 54.9 +33 58 45" 6 Lyr colored double star
ST173 Theta 18 56.3 +04 11 22" 4.1 Ser double star
ST174 ·2426 19 00.0 +12 53 17" 7.1 Aql colored double star
ST175 V 19 04.4 -05 41 * 6.6 Aql red variable star
ST176 15 19 05.0 -04 02 38" 5.4 Aql colored double star
ST177 R 19 06.4 +08 14 * 5.5 Aql red variable star
ST178 ·2486 19 12.1 +49 51 8" 6.6 Cyg double star equal magnitude
ST179 U 19 18.8 +19 37 * 6.6 Sge variable star
ST180 UX 19 21.6 +76 34 * 5.9 Dra red variable star
ST181 RR 19 25.5 +42 47 * 7.1 Lyr variable star
ST182 Albireo 19 30.7 +27 58 34" 3.1 Cyg colored double star
ST183 HN 84 19 39.4 +16 34 28" 6.4 Sge colored double star
ST184 16 19 41.8 +50 32 39" 6 Cyg double star equal magnitude
ST185 Delta 19 45.0 +45 08 2" 2.9 Cyg double star magnitude contrast
ST186 O··191 19 45.9 +35 01 39" 6 Cyg colored double star
ST187 Epsilon 19 48.2 +70 16 3" 3.8 Dra double star magnitude contrast
ST188 Pi 19 48.7 +11 49 1.4" 5.7 Aql double star challenge
ST189 Zeta 19 49.0 +19 09 9" 5 Sge double star
ST190 Chi 19 50.6 +32 55 * 3.3 Cyg variable star
ST191 Altair 19 50.8 +08 52 * 0.8 Aql star
ST192 57 19 54.6 -08 14 36" 5.7 Aql double star
ST193 Psi 19 55.6 +52 26 3" 4.9 Cyg double star magnitude contrast
ST194 P 20 17.8 +38 02 * 3 Cyg variable star
ST195 Pi 20 27.3 -18 13 3" 5.3 Cap double star magnitude contrast
ST196 49 20 41.0 +32 18 3" 5.5 Cyg double star magnitude contrast
ST197 Deneb 20 41.4 +45 17 * 1.3 Cyg star
ST198 Gamma 20 46.7 +16 07 10" 4.3 Del double star
ST199 1 20 59.1 +04 18 1" 5.2 Equ triple star challenge
ST200 2 21 02.2 +07 11 3" 7.4 Equ double star equal magnitude
ST201 12 21 04.1 -05 49 3" 5.9 Aqr double star challenge
ST202 61 21 06.9 +38 39 29" 5.2 Cyg double star
ST203 S 21 35.2 +78 37 * 7.4 Cep red variable star
ST204 ·2816 21 39.0 +57 29 12" 5.6 Cep triple star
ST205 SS 21 42.7 +43 35 * 8.2 Cyg variable star
ST206 Herschels Garnet Star 21 43.5 +58 47 * 3.4 Cep red variable star
ST207 Mu 21 44.1 +28 45 1.5" 4.8 Cyg double star challenge
ST208 Xi 22 03.8 +64 38 8" 4.3 Cep double star
ST209 Al Nair 22 08.2 -46 58 * 1.7 Gru star
ST210 41 22 14.3 -21 04 5" 5.3 Aqr colored double star
ST211 ·2894 22 18.9 +37 46 16" 6.1 Lac colored double star
ST212 53 22 26.6 -16 45 3" 6.4 Aqr double star equal magnitude
ST213 Zeta 22 28.8 -00 01 2" 4.3 Aqr double star challenge
ST214 Delta 22 29.2 +58 25 20" 3.8 Cep colored double star
ST215 8 22 35.9 +39 38 22" 6.5 Lac triple star
ST216 h1823 22 51.8 +41 19 82" 7.1 Lac quadruple star
ST217 Fomalhaut 22 57.6 -29 37 * 1.2 PsA star
ST218 94 23 19.1 -13 28 13" 5.1 Aqr colored double star
ST219 Z 23 33.7 +48 49 * 8 And variable star
ST220 R 23 43.8 -15 17 * 5.8 Aqr variable star
ST221 107 23 46.0 -18 41 7" 5.3 Aqr double star equal magnitude
ST222 TX 23 46.4 +03 29 * 6.9 Psc red variable star
ST223 R 23 58.4 +51 24 * 4.7 Cas variable star
ST224 Sigma 23 59.0 +55 45 3" 4.9 Cas colored double star
ST225 ·3050 23 59.5 +33 43 1.5" 6.6 And double star challenge
6. The SETUP Star List
The SETUP mode contains a short list of 30 bright navigational
stars which make the initial star alignment operation go very
quickly. Objects from the database in CATALOG may also be
used. The short star list is arranged in alphabetical order by com-
mon name. If you choose a star from the SETUP list, you can then
change to CATALOG mode for more information on the star; Sky
Wizard will remember which star you have selected.
Name RA DEC size mag con type
Achernar 01 37.7 -57 14 * 0.5 Eri star
Acrux 12 27.0 -63 05 4.2" 1.0 Cru double star
Al Nair 22 08.1 -46 90 * 1.7 Gru star
Albireo 19 30.7 +27 58 34" 3.1 Cyg double star
Aldebaran 04 35.9 +16 31 * 0.9 Tau star
Alphard 09 27.6 -08 40 * 2 Hya star
Alpha Cen 14 39.6 -60 50 20" 0 Cen double star
Alpheratz 00 08.4 +29 05 * 2.1 And star
Altair 19 50.8 +08 52 * 0.8 Aql star
Antares 16 29.4 -26 26 3" 1 Sco double star
Arcturus 14 15.7 +19 11 * 0 Boo star
Betelgeuse 05 55.2 +07 24 * 0.5 Ori star
Canopus 06 24.0 -52 42 * -0.7 Car star
Capella 05 16.7 +46 00 * 0.1 Aur star
Castor 07 34.6 +31 53 2" 1.6 Gem double star
Deneb 20 41.4 +45 17 * 1.3 Cyg star
Denebola 11 49.1 +14 34 * 2.1 Leo star
Fomalhaut 22 57.6 -29 37 * 1.2 PsA star
Mirfak 03 24.3 +49 52 * 1.8 Per star
Mizar 13 23.9 +54 56 14" 2.3 Uma double star
Navi 00 56.7 +60 43 * 2.5 Cas star
Polaris 02 31.8 +89 16 18" 2 UMi double star
Procyon 07 39.3 +05 14 * 0.4 CMi star
Rasalhague 17 34.9 +12 34 * 2.1 Oph star
Regulus 10 08.4 +11 58 * 1.4 Leo star
Rigel 05 14.5 -08 12 9" 0.1 Ori double star

14
Sirius 06 45.1 -16 43 4" -1.5 CMa double star
Spica 13 25.2 -11 10 * 1 Vir star
Suhail 09 08.0 -43 26 * 2.2 Vel star
Vega 18 36.9 +38 47 * 0 Lur star
7. Troubleshooting your
Sky Wizard
Readouts do not change when you move the
scope.
1. Check to see if the encoder’s setscrews are tight. On Alt.-
AZ telescope, especially Dobsonians, make sure the
bottom Azimuth bolt does NOT rotate.
2. The cables are probably plugged in upside down. Unplug
the cable from the encoder, turn it 180° and plug it back in.
The correct orientation will have the wires coming out of
the plug going away from (opposite of) the encoder shaft.
“Encoder Error” readout on the Sky Wizard dis-
play.
1. Check the battery; is it a new ALKALINE battery? If not,
this can be a big problem during colder winter weather. If
you are observing in sub-zero weather, you might have to
use two batteries, keeping one warm inside a coat pocket.
Never use regular “Heavy Duty” or rechargeable batteries.
2. Check to see if the cables are properly attached. Loose or
broken wires will cause this error message.
3. Are you moving to fast? The Sky Wizard can only move
100° per second. Turning the encoders with your fingers
when they are not on the telescope can easily exceed this
maximum rate.
4. Switch the cables from RA and DEC and from DEC to RA;
does the “Encoder Error” change sides? If the error changes
from RA to Dec. (or Alt. to Az.) then it is possible that one of the
encoders is bad. If it does not change sides, then it is possible
that the cable itself is bad. Contact Orion Technical Support for
help.
The Sky Wizard cannot find anything!
(There are two possible scenarios)
A. The Sky Wizard is way off; the telescope points at the
ground or is more than 20° off of known targets. Warp
values are 20.0 or greater.
1. Do the ENCODER DIRECTION TEST. The encoder direc-
tion test is the only way to sort out this problem. The problem
is almost always encoder polarity or encoder ratios.
2. Look at the encoder ratios on the installation instructions.
Go into INSTALL mode and check to see that the encoder
ratios are input correctly.
3. The encoder direction test also tells you if the encoders are
hooked up backwards. It is very common for the encoder
polarity (+ -) to be backwards. If the encoder test goes the
wrong way, simply go to INSTALL mode and change the
polarity of the axis in question. Be sure to turn the unit off,
then back on before doing the encoder test again.
4. If you have a German Equatorial mount, is the first star
you chose in SETUP mode in the Eastern half of the sky?
(It must be.)
5. Are you sure you entered the correct names of sighting
stars in Setup? Consult a star chart if there is ANY doubt!
B. The Sky Wizard is close, but the objects are not quite in the
field of view. Warp values are less than 5.0.
1. This is almost always the startup index mark. If your tele-
scope is not precisely polar-aligned, or you have an
Alt.-Az telescope, you must take care to get this index
mark exact. If you are one degree off, this could mean
pointing errors of up to two degrees. Go over the section
on Startup Index Mark (page 5) and double check your
work. If the Sky Wizard is still off, it is possible that your
mount is not square or is imprecise.
2. Double check the encoder setscrew for slight slippage. On
Alt.-Az. telescopes, especially Dobsonians, make sure the
bottom Azimuth bolt does NOT rotate.
8. Quick Reference
Basic Setup & Use
Important: Before using your ORION Sky Wizard for the first
time you need to run the INSTALL program and enter the
characteristics of your telescope and encoder installation.The
Encoder Ratios are on the Installation Instructions that came
with the Install Kit for your specific telescope. See Chapter
1–Installation for detailed instructions.
Setup
1. Turn on Sky Wizard. After displaying the startup message,
it will show one of the following messages depending on
the type of mount:
Equatorial mounts: DEC=0—set telescope declination to
exactly 0° (Aim scope at celestial equator, 90° from the pole.
Press ENTER. (German Equatorial mountings have two 0°
indexes. Use the one that results in the telescope looking into
the Eastern sky.)
Altazimuth mounts: (Display depends on INSTALL choice
made.)
LEVEL ME: Aim telescope tube horizontally to your index
mark (telescope aimed at the horizon if scope base is level).
Press ENTER.
VERTICAL: Aim telescope tube vertical to your index mark
(telescope aimed directly up if scope base is level). Press
ENTER.
2. SETUP—Point telescope at a known bright star (not
Polaris).
3. Scroll UP or DOWN to display the correct star name.
4. Press ENTER to confirm the star sighting.
5. Point the telescope to a second bright star over 60° away.

15
6. Scroll UP or DOWN to display the correct star name.
7. Press ENTER to confirm the star sighting.
8. The “warp” error is displayed. Example: WARP=0.6. The
factor should be 0.8 or less. Verify star identification and
start over if the factor is higher.
Displaying Celestial Coordinates
1. Press MODE.
2. Scroll UP or DOWN until RA DEC is displayed. Press
ENTER.
Selecting A Celestial Object In The Catalog
1. Press MODE. Press UP or DOWN until CATALOG is dis-
played. Press ENTER.
2. Scroll UP or DOWN to choose which catalog: ST, M, NGC,
PLANETS, or NEW. When the desired catalog is dis-
played press ENTER.
3. Scroll UP or DOWN to set the blinking digit to the desired
catalog number. Press ENTER to advance to the next
digit. Repeat until the complete catalog number is entered.
4. Press ENTER to finish the setting, Press ENTER again to
display object coordinates. Press ENTER again to display
scrolling object description.
Finding A Celestial Object With The Telescope
1. Select an object from a catalog as defined above.
2. Press MODE.
3. Scroll UP or DOWN until FIND is displayed. Press ENTER.
The display shows the direction and distance to the object.
Move the telescope so the numbers count down until the
displayed angles are zero.
Your Orion Sky Wizard will provide years of viewing pleasure
for you and your family.
Orion Telescopes & Binoculars
Post Office Box 1815, Santa Cruz, CA 95061
Customer Support Help Line (800) 676-1343 • Day or Evening
One-Year Limited Warranty
This Orion Sky Wizard 2 is warranted against defects in materials or workmanship for a period of
one year from the date of purchase. This warranty is for the benefit of the original retail purchaser
only. During this warranty period Orion Telescopes & Binoculars will repair or replace, at Orion’s
option, any warranted instrument that proves to be defective, provided it is returned postage paid to:
Orion Warranty Repair, 89 Hangar Way, Watsonville, CA 95076. If the product is not registered, proof
of purchase (such as a copy of the original invoice) is required.
This warranty does not apply if, in Orion’s judgment, the instrument has been abused, mishandled,
or modified, nor does it apply to normal wear and tear. This warranty gives you specific legal rights,
and you may also have other rights, which vary from state to state. For further warranty service
information, contact: Customer Service Department, Orion Telescopes & Binoculars, P. O. Box 1815,
Santa Cruz, CA 95061; (800) 676-1343.
Table of contents
Other Orion Camera Accessories manuals

Orion
Orion 5560 1.25 User manual

Orion
Orion #5545 User manual

Orion
Orion 7152 User manual

Orion
Orion Starshoot AllSky User manual

Orion
Orion Sky Wizard Model 3 User manual

Orion
Orion 7330 User manual

Orion
Orion 5377 Paragon-Plus XHD User manual

Orion
Orion Tritech 40811 User manual

Orion
Orion Starshoot User manual

Orion
Orion Tritech LT-1 User manual

Orion
Orion 5745 User manual

Orion
Orion SteadyPix Deluxe User manual

Orion
Orion 52061 User manual

Orion
Orion 5598 User manual

Orion
Orion Sky WizardModel 1 User manual

Orion
Orion #5562 2" Version User manual

Orion
Orion STEADYPIX 5228 User manual

Orion
Orion 5599 User manual

Orion
Orion TRITECH 5373 User manual

Orion
Orion SteadyStar 53077 User manual