manuals.online logo
Brands
  1. Home
  2. •
  3. Brands
  4. •
  5. Orion
  6. •
  7. Camera Accessories
  8. •
  9. Orion SteadyPix Deluxe User manual

Orion SteadyPix Deluxe User manual

Corporate Offices: 89 Hangar Way, Watsonville CA 95076 - USA
Toll Free USA & Canada: (800) 447-1001
International: +1(831) 763-7000
Customer Support: [email protected]
Copyright © 2021 Orion Telescopes & Binoculars.All Rights Reserved. No part of this product instruction or any of its contents
may be reproduced, copied, modied or adapted, without the prior written consent of Orion Telescopes & Binoculars.
AN EMPLOYEE-OWNED COMPANY
Español
Francais
Deutsche
➊Pour obtenir le manuel d'utilisation
complet, veuillez vous rendre sur le site Web
OrionTelescopes.eu/fret saisir la référence du
produit dans la barre de recherche.
➋Cliquez ensuite sur le lien du manuel
d’utilisation du produit sur la page de descrip-
tion du produit.
➊Wenn Sie das vollständige Handbuch
einsehen möchten, wechseln Sie zu
OrionTelescopes.de, und geben Sie in der
Suchleiste die Artikelnummer der
Orion-Kamera ein.
➋Klicken Sie anschließend auf der Seite mit
den Produktdetails auf den Link des entspre-
chenden Produkthandbuches.
➊Para ver el manual completo, visite
OrionTelescopes.eu y escriba el número de
artículo del producto en la barra de búsqueda.
➋A continuación, haga clic en el enlace al
manual del producto de la página de detalle
del producto.
Orion®SteadyPix™
Deluxe Camera Mount
#5338
INSTRUCTION MANUAL
IN 358 Rev. A 03/09
2
Welcome to the exciting world of astro-imaging. With
the Orion SteadyPix Deluxe, you can shoot your own
pictures of celestial objects with just a telescope and
camera. The Orion SteadyPix Deluxe is designed for
use with point-and-shoot cameras, as well as tradi-
tional SLR (single-lens reex) and DSLR cameras with
interchangeable lenses. By using the Orion SteadyPix
Deluxe, you won’t need all the difficult set-up and extra
equipment normally associated with astro-imaging.
1. Parts List
Figure 1 shows the SteadyPix Deluxe assembled and ready
to use. Figure 2 shows the parts of your SteadyPix Deluxe
as they arrive. Please refer to these photographs to identify
the various parts when assembling and using the SteadyPix
Deluxe.
• 1 Depth Adjustment Plate with eyepiece clamp and
knobs.
• 1 Lateral Support Plate with ¼"-20 camera attachment
post.
• 1 Depth Adjustment Lock Knob.
2. Assembling the
SteadyPix Deluxe
1. Loosen the Height adjustment lock knob and rotate the
eyepiece clamp assembly so that it is perpendicular to
the Depth adjustment plate. Position the lock knob so
that it is aligned with the slot in the height adjustment
shaft and retighten the lock knob (Figure 1).
2. Attach the Lateral support plate to the Depth adjustment
plate (Figure 2). Align the block located on the underside
of the Lateral support plate in the slot that runs along
the length of the depth adjustment plate (Figure 3) and
secure it in place by tightening the depth adjustment
lock knob.
3. About Afocal
Photography
The SteadyPix Deluxe lets you couple almost any camera
to almost any telescope to do afocal photography. In the
afocal method, the camera lens is aimed into the telescope
eyepiece. SteadyPix Deluxe is not designed for prime-focus
photography, in which the telescope takes the place of the
camera’s own lens (which is removed).
While it is possible to take pictures by holding the camera
up to the eyepiece by hand, small movements of the cam-
era make it difficult to maintain perfect focus and to keep the
image centered on the camera’s lm frame. SteadyPix Deluxe
Figure 1. The SteadyPix Deluxe assembled and ready to use. Figure 2. The SteadyPix Deluxe individual component parts.
Height
adjustment
slot
Swivel
adjustment
lock knob
Swivel adjustment lock knob
Height adjustment lock
knob
Height adjustment
lock knob
Eyepiece clamp
Eyepiece clamp
Eyepiece clamp
adjustment knob
Eyepiece clamp
adjustment knob
Depth
adjustment
plate
Depth
adjustment
plate
Depth
adjustment lock
knob
Depth adjustment
lock knob
Camera
attachment post
Camera
attachment
post
Lateral
support
plate
Lateral
support
plate
Figure 3. Mount the Lateral support plate into the Depth
adjustment plate by placing the mounting block in the slot.
Lateral support plate
Lateral support
plate mounting
block
Depth
adjustment
plate
3
eliminates those problems by locking the camera lens in posi-
tion relative to the eyepiece. Such coupling also allows the
camera to move in synchrony with the eyepiece if the tele-
scope is motor driven.
To get the best pictures with the SteadyPix Deluxe, we recom-
mend using an eyepiece with a long (around 20mm) eye relief.
The Orion Epic ED series, for example, has very long eye
relief. Long eye relief will allow the camera to see the whole
field of view in the eyepiece. Some eyepieces, especially
high-power designs, may not have enough eye relief to project
the entire eld of view into the camera lens, that is, even when
the camera lens is right up against the eyepiece, the views
will still be constricted.
4. Using the SteadyPix
Deluxe
To set up and use the SteadyPix Deluxe:
1. On the underside of most cameras you will nd a
threaded hole that will accept the SteadyPix Deluxe’s
Camera attachment post. Attach the camera by inserting
the post into the threaded hole of your camera. Certain
inexpensive cameras may not have this threaded socket
and therefore will not be compatible with the SteadyPix
Deluxe.
2. Begin by setting up the camera as far away from the
eyepiece clamp as possible.
Note: some cameras have lenses that expand outward
beyond the camera body when powered on. Take caution
that you have allowed sufficient clearance before aligning the
camera with the eyepiece.
3. Locate the object you wish to photograph in your
telescope. Before attaching the SteadyPix Deluxe,
focus the image in the telescope’s eyepiece using the
telescope’s focuser. Make sure the telescope mount is
locked down once you have centered your target. Also
conrm that the eyepiece is securely locked down in the
telescope focuser.
4. Loosen the eyepiece clamp adjustment knob until the
clamp is wide enough to t around the body of the
eyepiece. Then place the clamp over the eyepiece and
tighten the eyepiece clamp adjustment knob until the
SteadyPix Deluxe is secure on the telescope.
5. Loosen the 1/4"-20 camera adjustment post, then slide
the camera along the depth adjustment plate towards the
eyepiece. Loosen the shaft knob just a bit and adjust the
depth adjustment plate so that the eyepiece will line up
with the camera lens. Do this by sliding the camera along
the lateral adjustment plate to match the orientation of
the camera lens with the eye lens of the eyepiece. The
camera lens and eyepiece will likely need to get quite
close to each other to work properly, but make sure they
do not touch or else damage to the eyepiece or camera
lens may occur.
6. Look at the camera’s viewscreen or viewnder to see if
the object is there. If not, some ner adjustments may
need to be made. Try bringing the camera lens closer
to the eyepiece, or adjust the camera support plate by
loosening the shaft knob and moving it left or right and
up or down. Keep making minor adjustments until the
image from the eyepiece takes up as much space in the
viewscreen or viewnder as it possibly can. Be sure to
tighten the 1/4"-20 camera attachment post when you
are ready.
7. Focus the camera, and shoot the picture.
Some telescopes mounts, such as Dobsonian mounts, may
move very easily if any pressure is put against the eyepiece.
The act of placing the SteadyPix Deluxe over the eyepiece
and readying it for shooting may cause the telescope to move
off of its target. You may nd it easier to attach the eyepiece
and camera to the SteadyPix Deluxe in advance, and then
nd the object you wish to photograph with a separate eye-
piece with similar characteristics. Then replace that eyepiece
Figure 4. The SteadyPix Deluxe mounted to an eyepiece in a
reector telescope.
Eyepiece
Reex
sight
SteadyPix
Deluxe
Figure 5. A camera attached to the SteadyPix Deluxe mounted
on a reector telescope and ready to use.
4
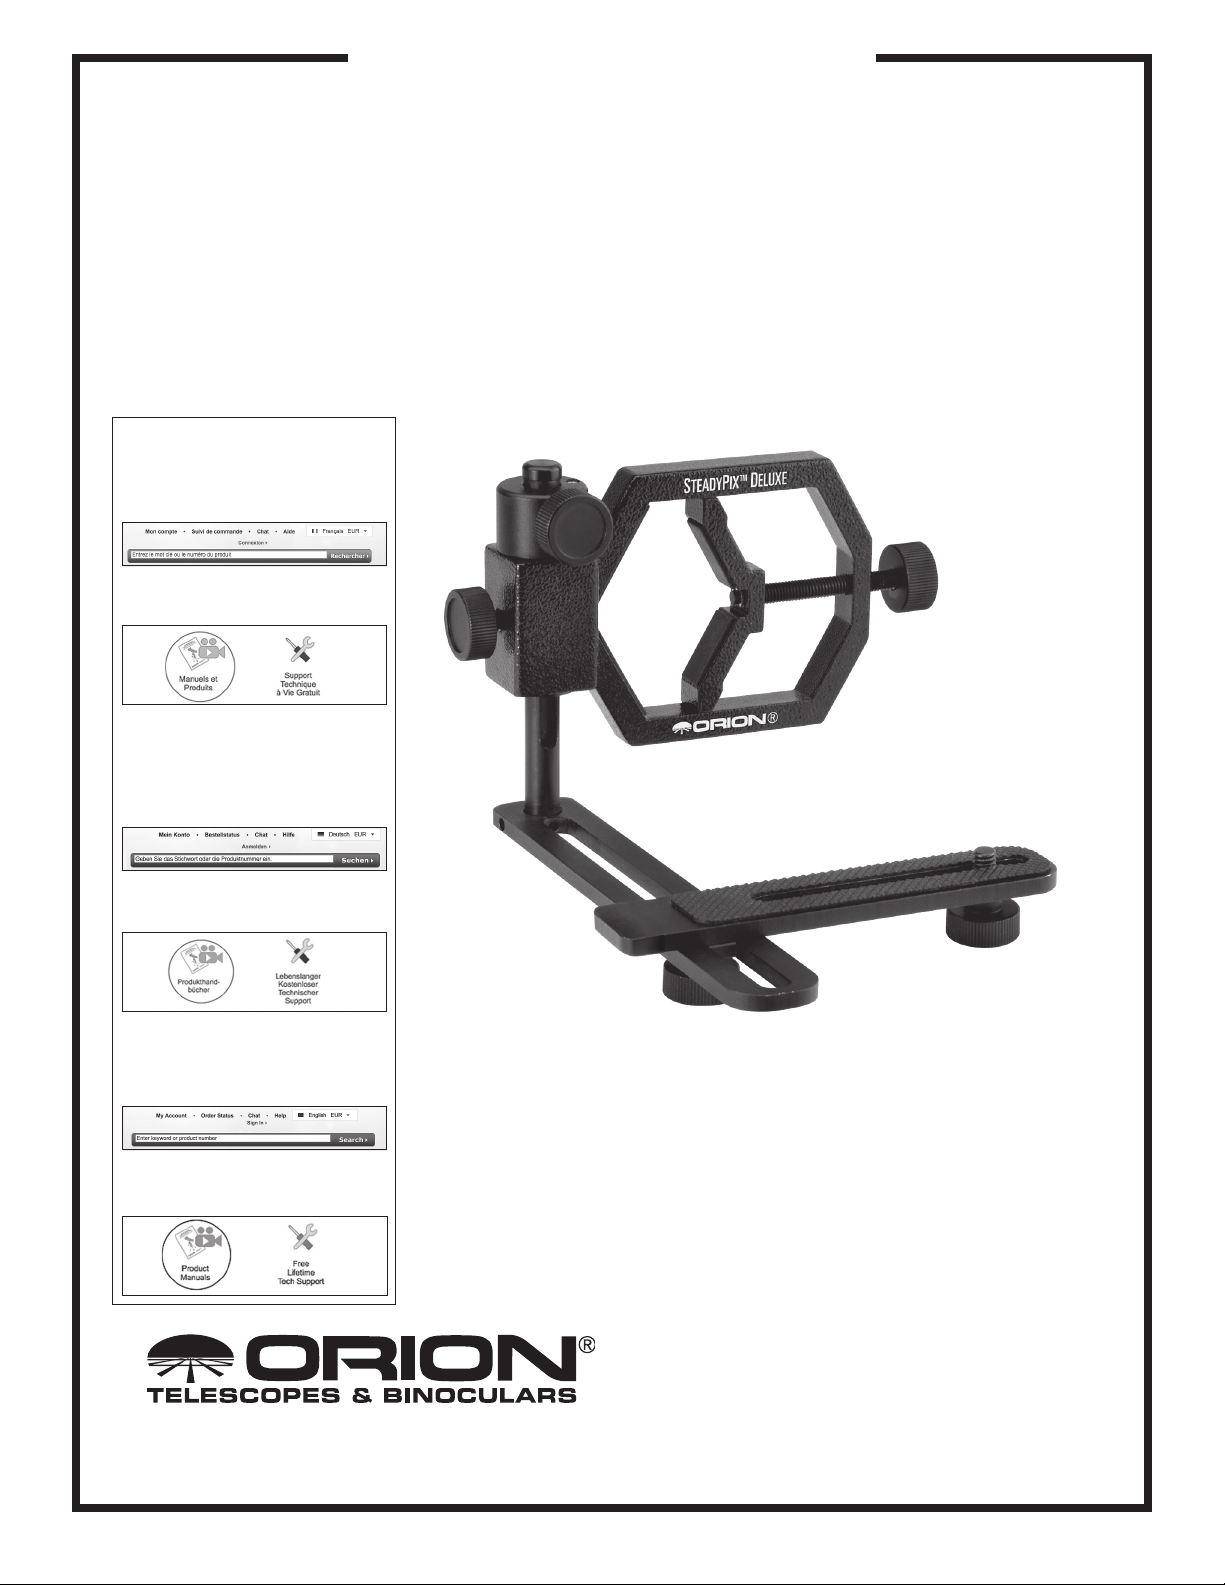
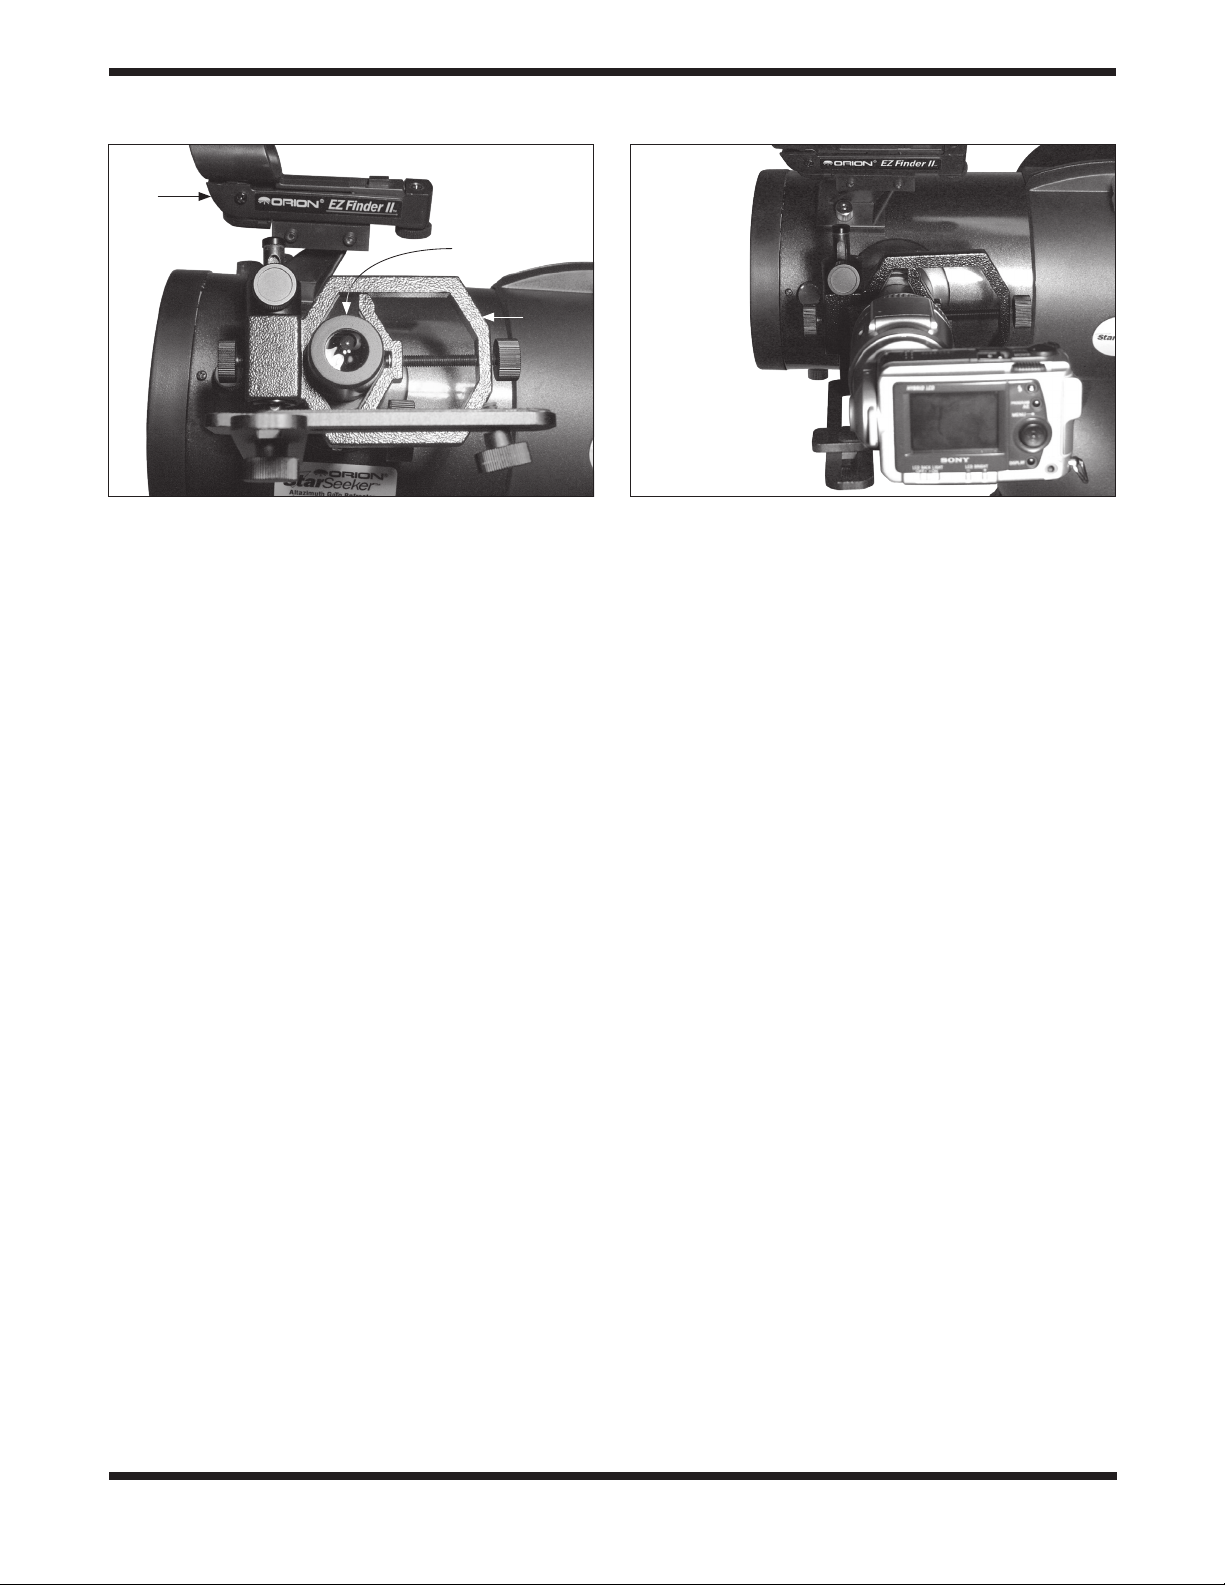
with the SteadyPix Deluxe, camera, and eyepiece assembly
you have prepared in advance.
You may nd it handy to use the camera’s timer to take your
picture, as this will result in minimal disturbances to the cam-
era or telescope when snapping the photo. The movement of
pressing the shutter button may be enough motion to affect
image quality, or even lose the picture.
5. What to Photograph with
the SteadyPix Deluxe
Now that you have assembled the SteadyPix Deluxe, the only
question remaining is “What do I want to photograph?” We
have a few suggestions for you:
Terrestrial Photography
With literally millions of objects to photograph on earth, there
are only a few hints we can give for using the SteadyPix
Deluxe for terrestrial photography. One is to consider using
a telescope with an Alt/Az (short for altitude/azimuth) mount
on a sturdy tripod. An Alt/Az mount will allow simple up/down,
left/right motions of the telescope so that you can easily adjust
and aim the camera. Equatorial mounts (mounts designed to
track the movement of stars in the sky) are not recommended,
as they will be needlessly heavy due to the counterweight,
and their ability to track celestial objects is of no use when
photographing an object like a bird’s nest. In fact it will likely
get in the way. Dobsonian mounts will also have trouble with
terrestrial photography since aiming a Dobsonian mounted
telescope at something close to the horizon (where most ter-
restrial photography takes place) will mean it has to be very
low to the ground and hard to use.
Remember that objects viewed through certain types of tele-
scopes can be oriented backwards, upside-down, or both.
The Moon
The Moon is one of the easiest and most interesting targets to
photograph. With its rocky, cratered surface there is a wealth
of detail to be photographed with your camera and SteadyPix
Deluxe. The Moon is a very large target, so at higher magni-
cations you will only get a part of the surface in each pic-
ture. Use eyepieces that provide low powers (50x and below
should work with most telescopes) if you wish to have the
entire surface of the Moon in your eld of view.
Photographing the full moon can be difficult since sunlight is
falling directly on lunar surface and will mean there are very
few shadows, so details will be harder to see. Photographing
the Moon when it is in one of its partial phases is preferable,
when the angle of the sun provides many detailed shadows
on its surface. You might also want to use an optional Moon
lter that threads onto the bottom of the eyepiece to bring out
more subtle features on the lunar surface, even during a full
moon.
The Bright Planets
Next to the Sun and the Moon, the planets Mars, Venus,
Jupiter and Saturn are the brightest objects in the sky and
make excellent targets for photography. Keep in mind that the
planets don’t stay still like the stars, so to nd them you should
refer to Sky Calendar at our website (OrionTelescopes.com),
or to charts published monthly in Astronomy, Sky & Telescope,
or other astronomy magazines.
To get the right amount of detail on the planets, eyepieces
that give high powers (at least 75x or more) should be used
when using the SteadyPix Deluxe. Low powers will make it
easier to nd the planets, but they will not bring out any signi-
cant details on the planets to make them worth photograph-
ing. High powers must be used to get images of the famous
details of the planets, such as the rings of Saturn or bands on
Jupiter’s surface.
You might also consider using colored planetary lters that
thread onto the bottom of the eyepiece (just like the Moon
lter). These colored lters bring out subtle details of the plan-
ets by ltering out various colors that reduce detail. Orion has
several sets of colored lters available. Visit our website, tele-
scope.com, for more information on colored planetary lters
Deep-Sky Objects
Since deep-sky objects are very faint, use only digital camer-
as to photograph them when using the SteadyPix Deluxe. Film
cameras require too much exposure time to get good results.
A few bright objects can be photographed effectively using
your SteadyPix Deluxe (such as the Orion Nebula). Other
deep-sky objects may also be photographed for interesting
pictures. Try experimenting with different deep-sky objects to
see what kind of results you can obtain.
Corporate Offices: 89 Hangar Way, Watsonville CA 95076 - USA
Toll Free USA & Canada: (800) 447-1001
International: +1(831) 763-7000
Customer Support: [email protected]
Copyright © 2021 Orion Telescopes & Binoculars.All Rights Reserved. No part of this product instruction or any of its contents
may be reproduced, copied, modied or adapted, without the prior written consent of Orion Telescopes & Binoculars.
AN EMPLOYEE-OWNED COMPANY
One-Year Limited Warranty
This Orion product is warranted against defects in materials or work-
manship for a period of one year from the date of purchase. This
warranty is for the benet of the original retail purchaser only. During
this warranty period Orion Telescopes & Binoculars will repair or
replace, at Orion’s option, any warranted instrument that proves to
be defective, provided it is returned postage paid. Proof of purchase
(such as a copy of the original receipt) is required. This warranty is
only valid in the country of purchase.
This warranty does not apply if, in Orion’s judgment, the instrument
has been abused, mishandled, or modied, nor does it apply to nor-
mal wear and tear. This warranty gives you specic legal rights. It is
not intended to remove or restrict your other legal rights under appli-
cable local consumer law; your state or national statutory consumer
rights governing the sale of consumer goods remain fully applicable.
For further warranty information, please visit www.OrionTelescopes.
com/warranty.

This manual suits for next models

1

Other Orion Camera Accessories manuals

Orion 5598 User manual

Orion

Orion 5598 User manual

Orion 7152 User manual

Orion

Orion 7152 User manual

Orion 52061 User manual

Orion

Orion 52061 User manual

Orion 5745 User manual

Orion

Orion 5745 User manual

Orion Sky WizardModel 1 User manual

Orion

Orion Sky WizardModel 1 User manual

Orion Tritech 40811 User manual

Orion

Orion Tritech 40811 User manual

Orion Tritech II User manual

Orion

Orion Tritech II User manual

Orion #5562 2" Version User manual

Orion

Orion #5562 2" Version User manual

Orion 5377 Paragon-Plus XHD User manual

Orion

Orion 5377 Paragon-Plus XHD User manual

Orion 5599 User manual

Orion

Orion 5599 User manual

Orion Starshoot AllSky User manual

Orion

Orion Starshoot AllSky User manual

Orion Sky Wizard Model 2 User manual

Orion

Orion Sky Wizard Model 2 User manual

Orion TRITECH 5373 User manual

Orion

Orion TRITECH 5373 User manual

Orion Thin Off-Axis Guider User manual

Orion

Orion Thin Off-Axis Guider User manual

Orion 5564 User manual

Orion

Orion 5564 User manual

Orion Starshoot User manual

Orion

Orion Starshoot User manual

Orion 5302 User manual

Orion

Orion 5302 User manual

Orion #5545 User manual

Orion

Orion #5545 User manual

Orion STEADYPIX 5228 User manual

Orion

Orion STEADYPIX 5228 User manual

Orion Tritech II User manual

Orion

Orion Tritech II User manual

Orion VersaGo E-Series User manual

Orion

Orion VersaGo E-Series User manual

Orion Tritech LT-1 User manual

Orion

Orion Tritech LT-1 User manual

Orion 7330 User manual

Orion

Orion 7330 User manual

Orion 5560 1.25 User manual

Orion

Orion 5560 1.25 User manual

Popular Camera Accessories manuals by other brands

Pentax 67 Rear Converters 1.4X operating manual

Pentax

Pentax 67 Rear Converters 1.4X operating manual

Nikon EN-EL1 instruction manual

Nikon

Nikon EN-EL1 instruction manual

inogeni CAM Series user guide

inogeni

inogeni CAM Series user guide

Soliton STC Zao user guide

Soliton

Soliton STC Zao user guide

Vello BG-N23 user manual

Vello

Vello BG-N23 user manual

oConnor 2575B Operator's guide

oConnor

oConnor 2575B Operator's guide

D-Link DCS-60 user manual

D-Link

D-Link DCS-60 user manual

PROAIM FLN-CTDB Assembly manual

PROAIM

PROAIM FLN-CTDB Assembly manual

PAJ PROFESSIONAL Finder user manual

PAJ

PAJ PROFESSIONAL Finder user manual

Spectrum BB24V1U user manual

Spectrum

Spectrum BB24V1U user manual

Samsara ACC-CM-ANLG install guide

Samsara

Samsara ACC-CM-ANLG install guide

Nauticam 25101 instruction manual

Nauticam

Nauticam 25101 instruction manual

imacon Ixpress user guide

imacon

imacon Ixpress user guide

Mastervolt MVSV series user manual

Mastervolt

Mastervolt MVSV series user manual

Nauticam NA - GH6 user manual

Nauticam

Nauticam NA - GH6 user manual

FujiFilm VPB-XT2 owner's manual

FujiFilm

FujiFilm VPB-XT2 owner's manual

Magnus VPH-20 owner's manual

Magnus

Magnus VPH-20 owner's manual

Saft SRX 720 Installation and operating instructions

Saft

Saft SRX 720 Installation and operating instructions

manuals.online logo
manuals.online logoBrands
  • About & Mission
  • Contact us
  • Privacy Policy
  • Terms and Conditions

Copyright 2025 Manuals.Online. All Rights Reserved.