manuals.online logo
Brands
  1. Home
  2. •
  3. Brands
  4. •
  5. Orion
  6. •
  7. Camera Accessories
  8. •
  9. Orion SteadyStar 53077 User manual

Orion SteadyStar 53077 User manual

INSTRUCTION MANUAL
Orion®SteadyStar™Adaptive Optics
Guider with Field Rotator
#53077
Addendum to IN 368 Rev. A
Providing Exceptional Consumer Optical Products Since 1975
OrionTelescopes.com
Customer Support (800)676-1343
E-mail: [email protected]
Corporate Offices (831) 763-7000
89 Hangar Way, Watsonville, CA 95076
© 2008-2010 Orion Telescopes & Binoculars
IN 401 Rev A 08/10
2
3
Click7. Connect and the autoguider
and SteadyStar will connect at the
same time.
Click8. Connect Rotator in the
Rotator section. You will be
prompted with the ASCOM
Rotator Chooser window
(Figure 2).
Note: You must be connected to
the autoguider camera in order to
connect to the SteadyStar and the
Rotator.
Select the9. SteadyStar Rotator
and click OK. The SteadyStar will
initiate the instrument rotator and
you will hear the stepper motor
move. The sound of the rotator will
vary depending on the weight of
your camera setup and the motor
speed.
You can manually jog the rotator to any
position between 0° and 359.9° simply
by entering the value in the Rotator
section and clicking Rotate to (Figure
3). This function is useful when try-
ing to acquire guide stars through the
SteadyStar’s off-axis prism.
Adjusting the Rotator Speed
and Settings
You can adjust the rotator speed to pro-
vide more torque (slower) or to operate
quieter (faster).
With the rotator connected, click1.
Setup in the Rotator section of
the SteadyStar’s Setup tab.
In the2. SteadyStar Rotator Setup window (Figure 4), choose the speed you
wish to set the rotator to. For most applications, the default speed is best,
unless you want to reduce the sound by increasing the speed. Click Set
Now.
This addendum discusses the features
of the instrument rotator built into your
SteadyStar. For software installation
and use with the SteadyStar and the
functions of the AO, please refer to the
SteadyStar manual included with this
addendum.
The SteadyStar AO Guider with Field
Rotator enables you to more easily
acquire a guide star by mechanical-
ly rotating the off-axis pickoff prism.
Additionally, if you are using a fork
mounted altitude-azimuth mount such
as a Celestron NextStar®telescope,
you can compensate for field rotation
and take long exposure astro-images
without an equatorial platform.
Cabling and Setup
Use caution as you set up your imaging equipment and keep the cables in mind
when rotating your camera and imaging accessories. Securely thread the 2"
nosepiece of the SteadyStar onto the SteadyStar body and make sure it can sup-
port the torsion caused by the potential offset weight of your imaging camera and
accessories. As a convenience, you can route cables through the loop provided
for extra security (Figure 1).
There should be a small amount of mechanical backlash in the rotator. This
ensures free movement of the rotator under different loads and conditions. The
SteadyStar utilizes anti-backlash when rotating to a given angle.
Connecting to the Rotator
Please follow the installation steps provided by the SteadyStar manual. Once you
have installed the SteadyStar software, you will automatically have the instrument
rotator installed in your ASCOM devices.
Connect the SteadyStar to your computer’s USB port.1.
Plug the SteadyStar into your power source using the provided 12VDC cable.2.
Connect the provided RJ-12 autoguide cable from the SteadyStar to your3.
mount’s compatible autoguide port.
Connect the autoguider camera to your computer’s USB port. Make sure the4.
autoguider camera is properly installed recognized by your computer.
Open the SteadyStar software.5.
Select your autoguider camera in the6. Camera selection pulldown menu.
If you are using a video or web camera, select Video camera then click
Choose to select your camera.
Figure 1. The provided loop will fit some
cables to avoid problems from rotating your
imaging setup.
Figure 2. The ASCOM Rotator Chooser
window
Figure 3. The Rotator status section
allows you to jog the rotator to a custom
angle to find a guide star.
Figure 4. The SteadyStar Rotator Setup
window
4
5
Choose your mount and click4. OK
to establish the connection to
your mount. The field derotation
function will automatically have the
coordinates needed to provide the
correct rotation rate.
Backfocus Requirements
As outlined in the SteadyStar manual,
the whole image train backfocus is larg-
er than the mechanical profile because
it depends on the combination of guide
camera backfocus, prism position, main
camera backfocus, adapters, etc.
The SteadyStar with Field Rotator has a mechanical profile of 55mm. When factor-
ing in the guide camera and necessary focus travel to reach the imaging camera,
the total minimum backfocus requirement is approximately 100mm.
Additional Specifications
Maximum Rotator Load Capacity 7 lbs.
Maximum Rotator Speed 7.7°/sec
Rotator Resolution 30 steps/degree
In the same window, you can3.
set the Zero Position. The zero
position determines the starting
point for the rotator and the angle
0°. You can set this point wherever
you would like for your particular
camera orientation. The position
defaults with the angle mark to
align with the top index mark on
the SteadyStar (Figure 5).
Enabling the Field Derotator
Function
To track on altitude-azimuth mounts,
you need to enable the field derotator
to take long exposure astro-images.
The best way to use the field derota-
tor function is to establish an ASCOM
connection with your mount. This way,
the R.A. and Dec. coordinates are auto-
matically provided to calculate an accu-
rate rate of rotation speed. However, if
you don’t have an ASCOM compatible
mount or otherwise wish to enter the
coordinates manually, you can enter
your R.A. and Dec. and location coordi-
nates (Figure 6). Note that the longitude
and latitude only need to be rounded off
to the nearest degree.
Select Start and the field derotation will begin. You can proceed to using the
SteadyStar AO Guider as outlined in the manual. The adaptive optics function is
operated independently from the rotator.
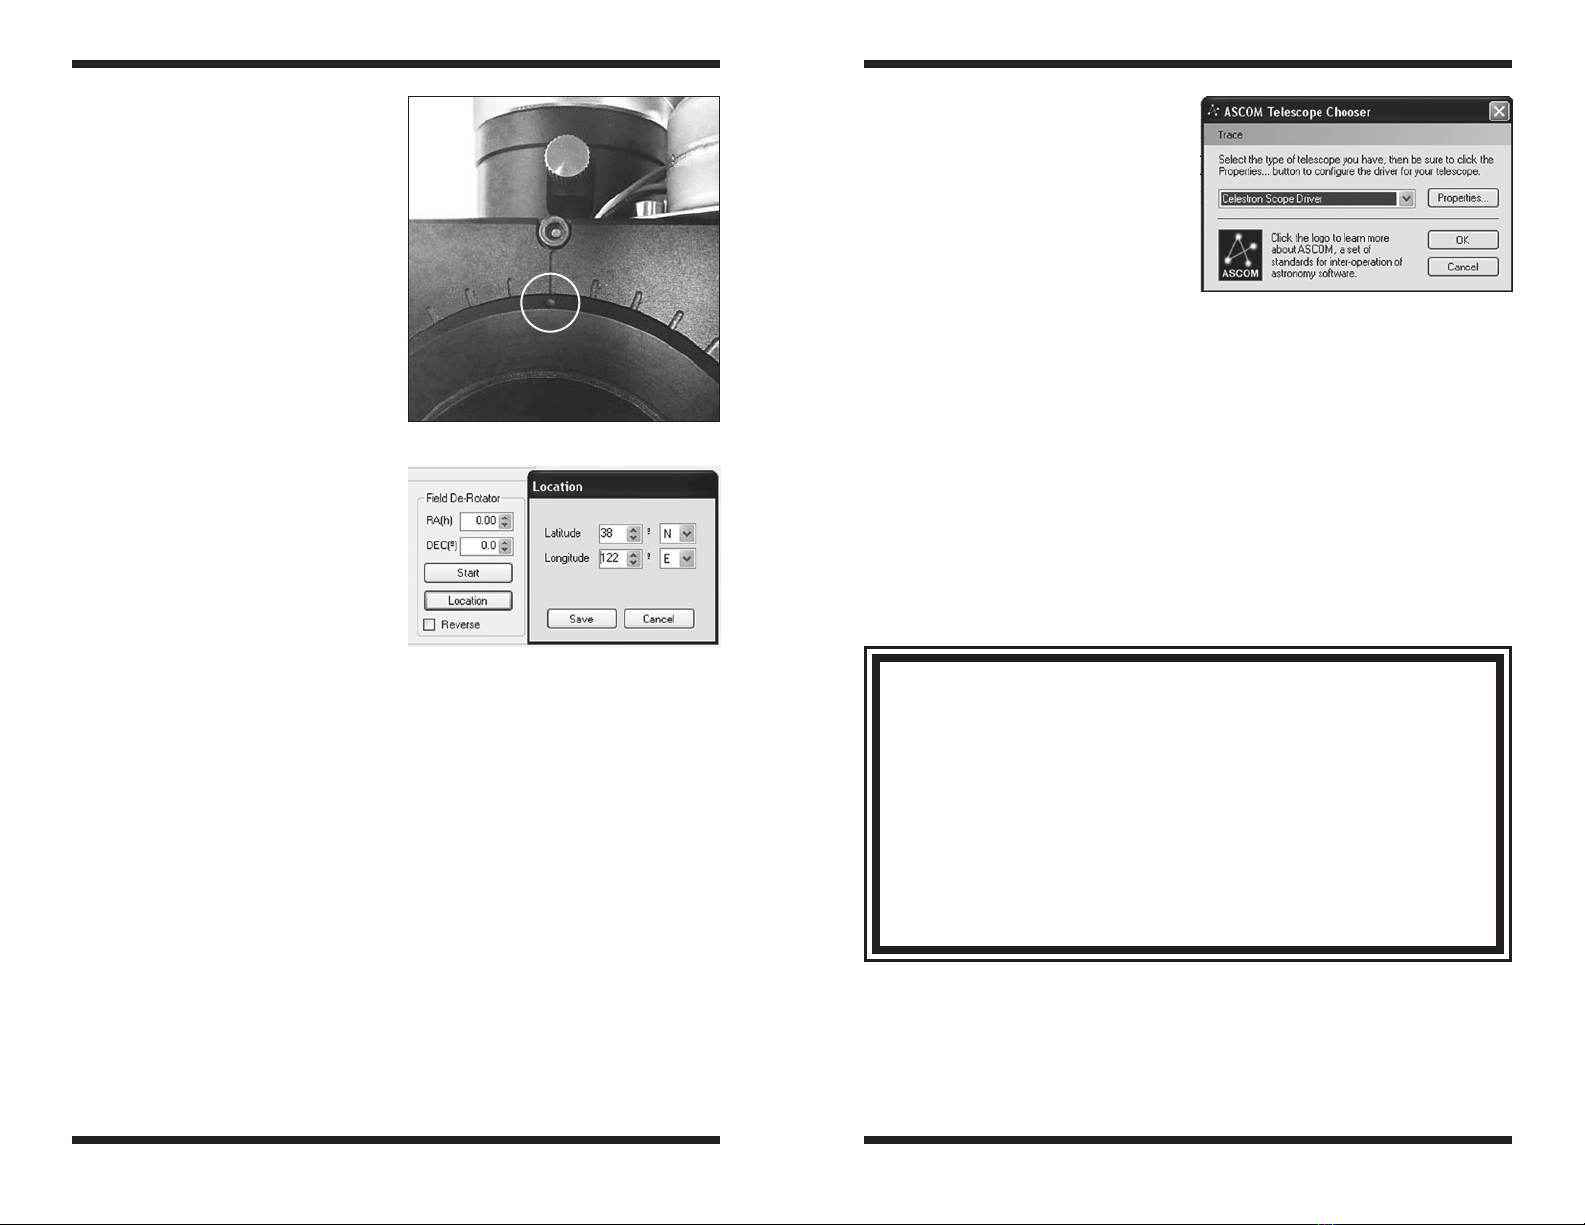
To connect to your mount using ASCOM:
Align your telescope mount as your normally would, making sure the date,1.
time and location information is accurate.
Click2. Connect in the Mount section of the SteadyStar’s Setup tab. You will
be prompted with the ASCOM Telescope Chooser window (Figure 7).
The SteadyStar includes the Celestron drivers which includes the NexStar3.
series telescopes. If you are using a Meade fork mount or other mount type,
please download the drivers from the ASCOM Standards website:
http://ascom-standards.org/.
Figure 6. Manually enter your latitude,
longitude, and mount coordinates to
manually set the derotation rate.
Figure 7. The ASCOM Telescope
Chooser window
Figure 5. The default zero position.
Orion Telescopes & Binoculars
OrionTelescopes.com
89 Hangar Way, Watsonville, CA 95076
Customer Support Help Line (800) 676-1343
© 2008-2010 Orion Telescopes & Binoculars
One-Year Limited Warranty
This Orion SteadyStar Adaptive Optics Guider with Rotator is warranted against defects
in materials or workmanship for a period of one year from the date of purchase. This war-
ranty is for the benefit of the original retail purchaser only. During this warranty period Orion
Telescopes & Binoculars will repair or replace, at Orion’s option, any warranted instrument
that proves to be defective, provided it is returned postage paid to: Orion Warranty Repair,
89 Hangar Way, Watsonville, CA 95076. If the product is not registered, proof of purchase
(such as a copy of the original invoice) is required. This warranty does not apply if, in Orion’s
judgment, the instrument has been abused, mishandled, or modified, nor does it apply to
normal wear and tear. This warranty gives you specific legal rights, and you may also have
other rights, which vary from state to state. For further warranty service information, contact:
Customer Service Department, Orion Telescopes & Binoculars, 89 Hangar Way, Watsonville,
CA 95076; (800) 676-1343.

Other Orion Camera Accessories manuals

Orion SteadyPix Deluxe User manual

Orion

Orion SteadyPix Deluxe User manual

Orion 7152 User manual

Orion

Orion 7152 User manual

Orion Starshoot AllSky User manual

Orion

Orion Starshoot AllSky User manual

Orion Sky Wizard Model 3 User manual

Orion

Orion Sky Wizard Model 3 User manual

Orion 5745 User manual

Orion

Orion 5745 User manual

Orion 5377 Paragon-Plus XHD User manual

Orion

Orion 5377 Paragon-Plus XHD User manual

Orion 5598 User manual

Orion

Orion 5598 User manual

Orion 52061 User manual

Orion

Orion 52061 User manual

Orion VersaGo E-Series User manual

Orion

Orion VersaGo E-Series User manual

Orion 5560 1.25 User manual

Orion

Orion 5560 1.25 User manual

Orion #5562 2" Version User manual

Orion

Orion #5562 2" Version User manual

Orion 7330 User manual

Orion

Orion 7330 User manual

Orion Tritech LT-1 User manual

Orion

Orion Tritech LT-1 User manual

Orion Tritech II User manual

Orion

Orion Tritech II User manual

Orion Tritech 40811 User manual

Orion

Orion Tritech 40811 User manual

Orion STEADYPIX 5228 User manual

Orion

Orion STEADYPIX 5228 User manual

Orion Tritech II User manual

Orion

Orion Tritech II User manual

Orion #5545 User manual

Orion

Orion #5545 User manual

Orion 5564 User manual

Orion

Orion 5564 User manual

Orion 5599 User manual

Orion

Orion 5599 User manual

Orion TRITECH 5373 User manual

Orion

Orion TRITECH 5373 User manual

Orion 5302 User manual

Orion

Orion 5302 User manual

Orion Sky Wizard Model 2 User manual

Orion

Orion Sky Wizard Model 2 User manual

Orion Thin Off-Axis Guider User manual

Orion

Orion Thin Off-Axis Guider User manual

Popular Camera Accessories manuals by other brands

Arashi Vision Insta360 AcePro Instructions for use

Arashi Vision

Arashi Vision Insta360 AcePro Instructions for use

Powermat Power! Dual 1850 owner's manual

Powermat

Powermat Power! Dual 1850 owner's manual

Tiffen V Specification sheet

Tiffen

Tiffen V Specification sheet

Olympus M.ZUIKO DIGITAL MC-20 instructions

Olympus

Olympus M.ZUIKO DIGITAL MC-20 instructions

Iron Edison REVOLT4 IE51100RV4 user guide

Iron Edison

Iron Edison REVOLT4 IE51100RV4 user guide

Spinpod Spinpod user manual

Spinpod

Spinpod Spinpod user manual

Kodak ROCPGTRI9 user guide

Kodak

Kodak ROCPGTRI9 user guide

DitoGear Trinity quick start guide

DitoGear

DitoGear Trinity quick start guide

Fluke Pan Tilt System user manual

Fluke

Fluke Pan Tilt System user manual

SLIK SH-806E operating instructions

SLIK

SLIK SH-806E operating instructions

Visceral Psyche Films Leeming LUT PRO Setup guide

Visceral Psyche Films

Visceral Psyche Films Leeming LUT PRO Setup guide

Vinten V4045-4980 Operator's guide

Vinten

Vinten V4045-4980 Operator's guide

Godox R1200 instruction manual

Godox

Godox R1200 instruction manual

TecnoVideo SSH254 manual

TecnoVideo

TecnoVideo SSH254 manual

dji Force Pro user guide

dji

dji Force Pro user guide

Philips SJB4191 Specifications

Philips

Philips SJB4191 Specifications

Vocas FCR-15 user manual

Vocas

Vocas FCR-15 user manual

Ryobi BPL3620D Original instructions

Ryobi

Ryobi BPL3620D Original instructions

manuals.online logo
manuals.online logoBrands
  • About & Mission
  • Contact us
  • Privacy Policy
  • Terms and Conditions

Copyright 2025 Manuals.Online. All Rights Reserved.